For the most part, turning a raw basement into finished living space calls for the same procedures that apply to any area of the house. You build walls, in stall finish flooring, hang ceilings, paint or paper, put up shelving, build closets, hang doors—topics that are covered in detail in subsequent sections. But be fore you can begin any of these other jobs, you first have to provide an interior shell—floor, walls, and ceiling—that is dry, warm, level, and plumb.
Above, we explained how to dry out a damp basement. Now let’s look at how to prepare the walls and floor for interior finishing (covered in sections 11 through 20).
PRELIMINARY CONSIDERATIONS
First consider headroom. Codes require a minimum of 7½ feet from finished floor to finished ceiling, and 8 feet is better. If you have less than 7½ feet of headroom, your basement is not a candidate for refinishing.
Next, check the floor. Lay a long, straight 2 x 4 across it from wall to wall and corner to corner at several different points. Place a carpenter’s level on top of the 2 x 4 and take readings. If the floor is level, in sound condition, and warm to the touch, you can install finish flooring or carpet directly on top of it. If not, you will need to build up a new subfloor, and probably insulate it as well, as shown below.
Check the walls, too. Again, use a straight 2 x 4 to determine how flat they are and a level to learn if they are plumb. If the walls are flat and plumb, or have only minor irregularities, you can put up 1 x 2 or 1 x 3 furring strips. If they are very uneven, use the double furring system shown below. Unless yours is a newer home with exterior foundation insulation, you will probably also need to install insulation between the furring strips.
(NOTE: As an alternative to furring you can construct 2 x 3 or 2 x 4 stud walls and install insulation between the studs. This pro vides more room for wiring and plumbing lines, but it costs more than furring and somewhat reduces floor space.)
INSTALLING FURRING STRIPS
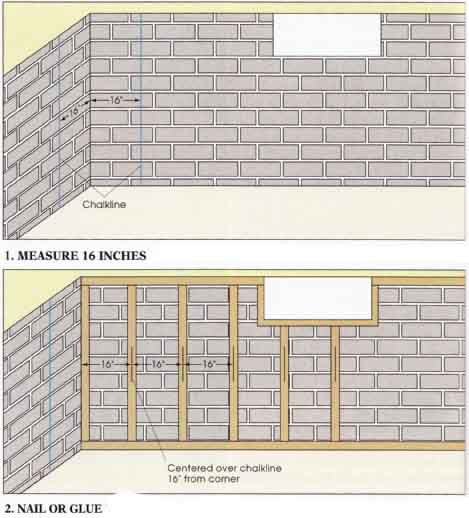
1. MEASURE 16 INCHES from a corner and mark a vertical line. Make all subsequent measurements from this line; many corners are not perfectly plumb. You will start by installing a fur ring strip in the corner, and one centered over this vertical line.
2. ATTACH 1 x 2 OR 1 x 3 LUMBER with the wide face against the wall by driving masonry nails into poured concrete or into the mortar joints between blocks. Wear safety goggles. You can glue furring up with construction adhesive instead of nailing. Install horizontal strips at the top and bottom first. Then space verticals 16 inches apart on center. Use a level to ensure that the verticals are plumb. Each time you reach a corner, measure 16 inches out from it and install a plumb strip there. Fit short furring strips around windows and doors. For uneven walls, use double furring, described below.
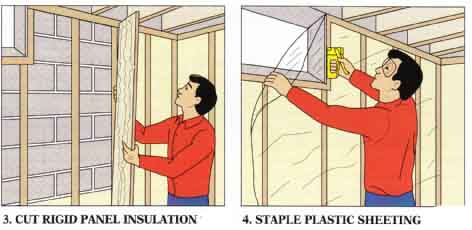
3. USING A UTILITY KNIFE AND STRAIGHTEDGE, cut rigid panel insulation to fit between furring strips. You can glue this kind of insulation to an even wall surface. Apply beads of construction adhesive along the vertical edges and down the middle of one side and press the insulation panel into place. If the insulation has a foil or kraft paper facing, it should face into the room. This type of insulation can be stapled through the flanges of the facing into the furring strips.
4. IF THE INSULATION DOES NOT HAVE A FACING, staple 4-mil plastic sheeting to the furring after the insulation is in place. Space the staples several inches apart and pull the plastic taut as you go. Overlap sheet edges 1 inch or more at the furring and staple through the overlap. Drywall panels go directly over the plastic sheeting. Even if you plan to install wood paneling, building codes require that you put up drywall first.
SINGLE-LAYER FURRING

1. MEASURE 16 INCHES from a corner and use a chalk line and plumb bob or level to make a vertical line. Use this line for reference,
not the corner, which might not be plumb.
2. NAIL OR GLUE furring strips to the walls. Install top and bottom horizontals first; space verticals 16 inches from center to center.

3. CUT RIGID PANEL INSULATION to fit between furring
strips. Glue it in place with construction adhesive or, if it has a foil
or paper facing, staple that to the furring.
4. STAPLE PLASTIC SHEETING over everything if the insulation does not have a facing. This ensures that moisture from in doors won’t penetrate the wall.
DOUBLE FURRING
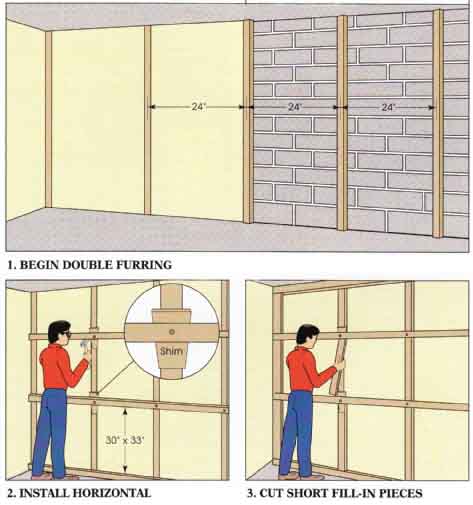
1. EVEN UP VERY IRREGULAR WALLS by first furring the 2 x 3 or 2 x 4 lumber, instead of the 1x material needed for single-course furring. Space the centers of these boards 2 inches apart. You don’t need horizontals for this first course, just verticals. Install insulation and a plastic vapor barrier if needed.
2. INSTALL 1 x 2s OR 1 x 3s HORI ZONTALLY across the verticals at top and bottom of the wall. Nail the intermediate furring between these strips 30 to 33 inches apart. Even up the furring by slipping shingle shims into gaps between the two layers.
3. NAIL VERTICAL FILL-IN PIECES of 1 x 2s or 1 x 3s on top of the first layer of furring, between the horizontals the second layer. This brings the second layer to a uniform plane both horizontally and vertically. To finish the wall nail, screw, or glue drywall to the furring, then tape and paint it, or apply paneling or an appropriate wallcovering.
DOUBLE FURRING (illustration)

1. BEGIN DOUBLE FURRING with vertical 2 x 3s or 2 x 4s.
Then glue up insulation and install a plastic vapor barrier if one is needed.
2. INSTALL HORIZONTAL 1 x 2s or 1 x 3s across the verticals. Fit shims between layers as needed to even up the wall surface.
3. CUT SHORT FILL-IN PIECES of 1 x 2s or 1 x 3s to fit between the horizontals, again shimming to achieve an even surface.