Seepage at the bottom of a basement wall usually means that the drainpipe alongside the footing isn’t doing its job. To keep water out, you or a contractor would have to dig down to the footing and replace the entire drainage system—a back-breaking or very expensive proposition. An alternative is to collect water as it enters the basement and direct it to a floor drain or sump pump.
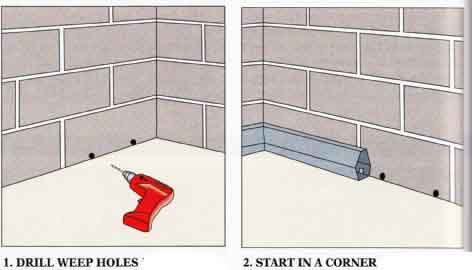
One way to do this is to install a plastic channeling system, sold in kit form at many home centers. The channeling system resembles a baseboard, except that it's hollow and has a recess and a series of holes in back. You drill weep holes at the base of the wall and glue channeling over them with two-part epoxy adhesive. Water coming into the wall flows through the weep holes into the baseboard, which leads the water wherever you want it to go.
1. DRILL WEEP HOLES. Drill weep holes into block cavities using a 1/2-inch masonry bit. Locate them at floor level, 4 to 6 inches from the ends of the blocks. If the walls are poured concrete, the bottoms of vertical cracks can serve as weep holes. Fill all but the bottom 3 inches of these cracks with hydraulic cement.
2. INSTALL CHANNELS. Clean the floor thoroughly within 3 inches of the walls. If the surface has been painted or treated with a sealer, use a circular wire brush mounted in an electric drill to expose bare concrete. Set inside and outside corner sections into place, then trial-fit 5-foot lengths of channel, leaving a 1/8- to ¼-inch gap between them. Make cuts with a hacksaw. At corners, cut the ends of the straight sections to make miter joints.
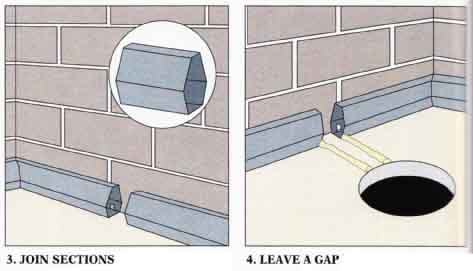
3. SPLICE CHANNELS. Join straight sections with butt-joint connectors that fit inside the ends of adjoining sections. Seal the joints with adhesive, and seal the seams with adhesive. Epoxy the connectors and joints together. After you have joined the entire system this way, go back and glue all the channels to the floor with waterproof epoxy adhesive. It will adhere even if the floor is still wet. Check to be sure the entire baseboard has made contact with the floor, and trim any excess adhesive.
4. ROUTE CHANNELED WATER. When you reach the point where you want water to exit from the channeling, leave a 3-inch gap between sections. At this point, mound up two beads of adhesive about 1 inch high to form a channel from the baseboard to a floor drain or sump pump.
INSTALLING CHANNELING

1. DRILL WEEP HOLES into the cavities of concrete blocks.
If the walls are poured concrete, let the bottom parts of vertical cracks
serve as weep holes. 2. START IN A CORNER and set channels in place. After
laying out straight sections cut the ends at corners for miter joints to fit
with inside and outside corner connectors.

3. JOIN SECTIONS with connectors that come with the channels.
Cement everything with epoxy adhesive. Now water will run within the channels,
not across the floor. 4. LEAVE A GAP between two sections water can flow
to a floor drain or sump pump. Beads of adhesive here serve as levees to direct
the water.
PROFESSIONAL SOLUTIONS TO BASEMENT PROBLEMS
Frequent flooding, severe cracks that seem to be getting worse, bulging walls, and heaving floors are not do-it-yourself projects—they call for the services of a waterproofing professional. Select a basement waterproofer as you would any other contractor: Get written estimates, check references, ask about the method used. Many contractors offer long-term warranties for the work they do—that is important protection for you, even if it's initially more expensive.
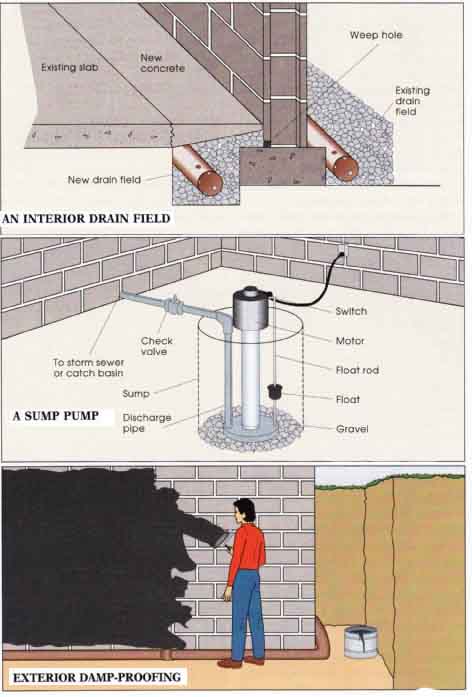
Professional waterproofing systems differ, but most include one or a combination of the three approaches illustrated here.
INTERIOR DRAIN HELDS
An interior drain field works in much the same way as the channeling system shown in the figure, except that it runs under the floor. The installer excavates around the basement slab’s perimeter, drills weep holes at the base of the walls, then lays perforated drain pipe in a bed of gravel. The result is a drain field like the one outside the footing. The pipe channels water to either a storm sewer or a sump pump.
Although more costly than a channeling system, an interior drain field can handle far more water, an important consideration if your basement suffers m a high water table, a clogged exterior drain field, or heavy seepage.
SUMP PUMPS
If a spring or high water table is forcing water up from below the slab, a contractor may recommend installing a sump pump. A sump is a pit that collects underground or runoff water. As the pit fills, a float activates the motor of a pump in the pit. A one-way check valve ensures that water from outside won’t back up into the sump.
EXTERIOR DAMP-PROOFING
Excavating to the footing, coating the foundation or adding a vapor-retarding membrane, and installing a new footing min is the most costly alternative, but it may be necessary if damage is extensive and the wall also needs to be rebuilt.
PROFESSIONAL WORK

AN INTERIOR DRAIN FIELD requires breaking through the
basement floor, digging down to the footings, and installing a second drain
field.
A SUMP PUMP turns on automatically as its pit begins to fill with water. It should be equipped with a warning device that signals when the pump isn’t working.
EXTERIOR DAMP-PROOFING is a last resort. Treatment may be roll-on or sprayed com pounds, sheet membrane, or other measures. For more exterior solutions, see next section.