Plugging cracks and sealing concrete or masonry walls can eliminate condensation, most leaks, and minor seepage. For more severe problems, first divert incoming water with the channeling system shown below or get professional help, then apply sealant as shown here.
Hardware stores and home centers sell a variety of products designed especially for basement walls. To patch cracks and holes purchase hydraulic cement. This material quickly expands and hardens, even if water is coming in under pressure.
Moisture penetration can leach soluble salts from concrete and masonry, leaving wall sections with a white, powdery substance on the surface—a process known as efflorescence. Remove this deposit with a 10 percent solution of muriatic acid (see Step 2, below).
For the sealant, select a waterproofing compound or cement-base paint formulated specifically for basement walls. You’ll also need a wire brush for cleaning the walls, a stiff bristle brush for scrubbing away efflorescence, a masonry pointing trowel, and a heavy-duty paintbrush or long-nap roller for applying the sealant.
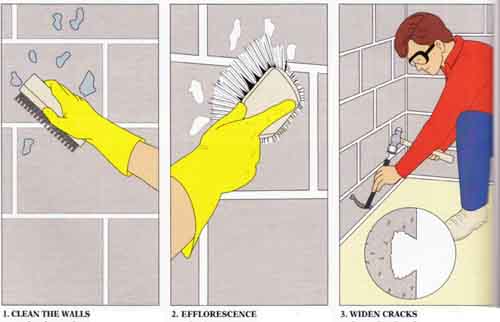
1. SCRUB THE WALLS. Thoroughly scour the walls with a detergent solution or the cleaner recommended by the waterproofing compound manufacturer. Remove grease with a degreaser or solvent. Rinse thoroughly. Concrete and masonry surfaces must be absolute free of grease, dirt, and old paint or the waterproofing compound won’t adhere properly.
2. ELIMINATE EFFLORESCENCE. If salts have come to the surface, remove them, too. Mix a 10 percent solution of muriatic acid by dissolving 1 oz of crystals (or 1 oz of concentrated liquid cid) for each 10 oz of water. Scrub the solution with a stiff bristle brush, and rinse thoroughly. Wear rubber gloves, goggles, and a long-sleeved shirt—even diluted, muriatic acid is strong stuff.
3. PREPARE CRACKS. Widen any cracks between blocks and at floor level with a cold chisel, cutting back to und material. Then try to undercut each crack’s edges, so they are wider inside than at the surface, as shown in the illustration’s detail. This provides space for the patching material to spread into and form a key that will lock it in place. Use a ball peen hammer or engineer’s hammer to hit the chisel. They will not chip the way the head of an ordinary carpenter’s hammer might. Protect your eyes with goggles. Clear debris with a wire brush.
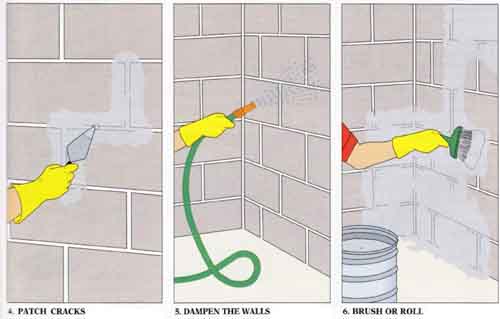
4. FILL THE CRACKS. Mix a small quantity of powdered hydraulic cement with cold water to the consistency of heavy putty. Pack it into the cracks and trim away the excess with the edge of the trowel. The cement expands as it hardens, even if water is coming in as you work. Hydraulic cement sets up in three to five minutes, so mix only a small batch at a time. Methodically continue filling cracks and holes until all the walls have been patched. Let the patching cement cure for a week or so before applying waterproofing com pound to the walls.
5. PREPARE THE WALLS. For liquid waterproofing compounds, the walls must be completely dry. Cement-base paint, on the other hand, comes as a powder, which must be mixed with water and applied to a pre-dampened surface. Use a hose or garden sprayer to mist the walls before you begin, and keep the walls damp as you work.
6. APPLY WATERPROOFING. Brush or roll compound onto the wall, packing it into mortar joints, pinholes, and hairline cracks. Waterproofing compounds have a thick, creamy consistency, which makes them difficult to stir and spread. After you’ve applied a base coat, let it dry for several days. Cement-base paint must cure slowly, which means you need to moisten the walls periodically—follow the directions supplied with the product. Let the base coat dry thoroughly and apply a second coat. If you don’t like the color, you can apply latex paint over the waterproofing after it has dried.
DAMP-PROOFING BASEMENT WALLS

1. CLEAN THE WALLS with detergent and a wire brush. Use
degreaser or solvent on grease stains. Chip off daubs of mortar. The surface
must be both clean and sound.
2. EFFLORESCENCE produces a chalky powder deposit. Remove it with a 10 percent solution of muriatic acid and rinse well. Wear goggles and protective clothing.
3. WIDEN CRACKS to about an inch and undercut the edges if at all possible (detail). Undercutting lets the patching cement spread to form a key that locks it in.

4. PATCH CRACKS and holes with by hydraulic cement. Pack
it in with the tip of a pointing trowel and scrape away excess. The cement
expands to form a tight bond.
5. DAMPEN THE WALLS if you will be using cement-base waterproofing paint. But for liquid waterproofing compound, the walls must be dry.
6. BRUSH OR ROLL on two coats of waterproofing compound, letting the walls dry between coats. Scrub the compound into mortar joints, pores, and hairline cracks.