Just as you acquainted yourself with the instructions before you laid out the pattern pieces, so too should you acquaint yourself with your sewing machine before you start to use it.
Finding your way around
The manual that accompanies each machine contains diagrams and instructions for threading the upper part of the machine and the bobbin. A simplistic explanation of a stitch is that a thread from the top of the machine comes together with a thread from the bottom onto the surface of the fabric. Therefore, you need thread in the bobbin casing and thread in the top of the machine in order for your machine to work.
Familiarize yourself with the parts of the machine: Find the presser foot lifting/lowering lever. Find the fly wheel. Find the buttons and knobs for lengthening and shortening the stitches, for backing up, for making a zigzag stitch and adjusting the width of the zigzag, and for moving the needle to the left and right of center. Most modern machines include these features, which will be described in the manual. If you are unsure about your machine or if you have an old machine without a manual, visit the dealer where you bought the machine for instructions or find a good repairperson who can acquaint you with your machine.
Pinning for Machine Sewing:
If you will be sewing by machine, pin your fabric pieces so that you can take the pins out as you sew. You must never sew over pins regardless of what anyone says. It’s not good for the pins, the needle, or the machine. I pin parallel to the edge, with pins pointing toward the direction in which I’m sewing.
When you are sewing pieces together on the sewing machine, there are a few basics to remember:
• Pin the ends, notches, and at 4-inch, to 5-inch, intervals.
• Pin so that you can take the pins out as you sew.
• Pin so that the 5 seam allowance you are sewing is on the right and will pass through the small opening in the sewing machine.
• Pin so that the biggest part of the pieces you are sewing will be on the left of the machine and can lie on the table as the seam is being sewn.
Practicing sewing
Practice sewing straight lines on scraps of fabric. Although some machines have line markings that indicate the standard 5/8-in. seam allowance and other common distances from the needle, it helps to have a more obvious visual aid for a seam guide. My favorite visual aid is a Post-It note, which can be placed along the 5/8-inch line. A rubber band slipped over the free-arm of the sewing machine and placed along the 5/8-in. line is another alternative. There are also devices that attach to the machine that work well.
To practice, take two pieces of fabric that are the same length. Pin them right sides together along the 5/8-in. seamline, matching the edges you are pinning. You will almost always sew right sides together and will almost always sew a 5 seam, so it’s best to practice this way, too. I recommend pinning each end and every 4 in. to 5 in. in between (although your scrap may not be this long). (See “Pinning for Machine Sewing” above.)
Check the stitch length on the machine, and adjust it to be in the range of 10 to 12 stitches per inch, or 2.5 on metric machines. Most sewing will be done in this range.
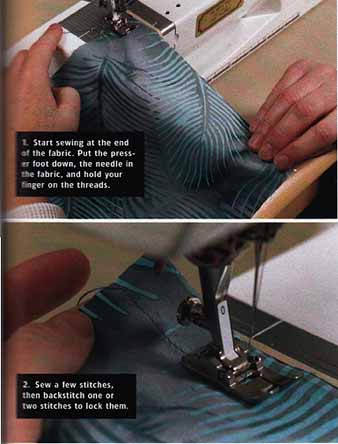
(1) Place the fabric pieces under the presser foot with both edges along the seam guide. With your hand, turn the fly wheel and lower the needle into the fabric, then lower the presser foot. Make sure both the bobbin thread and the needle thread are placed to the back of the machine (see image). It is a good idea to keep your fingers on the thread tails until you have sewn a couple of stitches. With my older machine especially, I find that this prevents getting wads of thread under the fabric at the beginning of the seam. (2) Starting at the edge of the fabric, sew a few stitches, then lock the stitches by taking a couple of stitches backward (backstitch) before continuing forward (see image). A stitch or two is all you need to lock the stitching. More than that adds thickness to the seamline, and if you had to redo the seam, you would have a lot of stitches to take out. Sew to the end of the fabric, and again lock the stitches with a backstitch or two. Lift the needle out of the work by turning the fly wheel with your hand, lift the presser foot, and pull the work away from the machine leaving a thread tail. Cut the tail in half so that the machine has a tail and the fabric piece does, too.


== Wiki Sewing ==
Pre-shrink Fabric and Notions
Preshrinking washable fabric and notions that will be used in a sewing project is essential to having a finished item that can be laundered with confidence.
1. Before you preshrink fabric, secure the raw cut edges of the fabric with a zigzag stitch to prevent fraying.
2. Launder the fabric according to the end of the bolt care instructions or how you intend to launder the finished item.
3. Launder and dry the notions such as zippers, bias tape, trims, and lace the same way you will be laundering the finished item. A lingerie bag or stocking is a great way to prevent these items from being tangled while they are laundered.
4. Press, straighten, and smooth the fabric and notions after they have dried.
FAQ: Why did my fabric fade when I preshrunk it?
Fading can happen to any fabric, particularly dark fabrics with excessive dye. Preshrinking the fabric allows it to happen before you have invested the time and energy into sewing the fabric.
Pressing
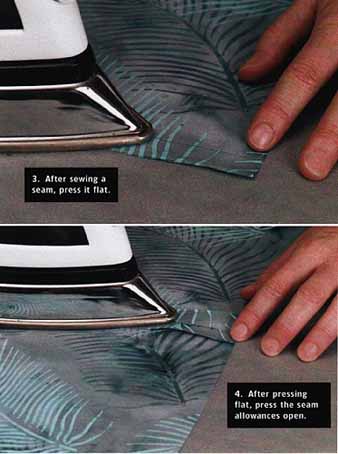
(3) After you have sewn a seam, it's a requirement that you press it. Press the seam flat, then press the seam open from the wrong side, and finally (4) press the seam flat from the right side (see bottom images above). You are now ready to work on a garment! The information contained in this section is the foundation for the sewing that's ahead.
Sewing Basics -- A Quick-start Guide
Before you begin sewing, know about ...
- Fabric
- Basic sewing tools
- Beyond the basic tools
- Choosing a pattern
- Choosing fabric
- Layout and cutting
- Marking the pieces
- Introduction to the sewing machine
