|
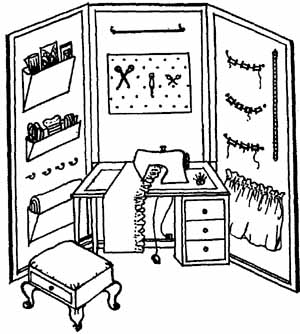
No-one would expect a man to dig over a large garden with a small coal shovel, or a secretary to type a report with two or three keys missing from her typewriter. If you had never before sat at the driving wheel of a car, you wouldn't expect to climb in and drive unaided through busy traffic. Yet many women, young and not-so-young, expect to take to dressmaking without the necessary equipment or training, and become very discouraged when they find it difficult, laborious and unrewarding. Who can wonder that they find dressmaking an effort when one looks at the way they tackle the task? They hack out a dress using an old, blunt pair of scissors, used by the rest of the family for cutting paper, opening coffee-tin lids, snipping fuse-wire and carving up carpet under felt. The small huddle of rusty pins they find in the bottom of the sewing box are obviously inadequate, so they supplement them with a few stray office pins. They expect the sewing machine to stitch every type of fabric perfectly, although they never think of adjusting tension or pressure, or using a drop of oil, or fitting a different needle. They don't have the exact color of thread they need, so they make do with a very bad match rather than go back to the shops. The thickness of the sewing thread doesn't even enter into their calculations. They don't bother to try the pattern to see if it fits, but assume optimistically that as long as they buy one in the right bust size, it will all come out right. ‘Well,’ they think hopefully, ‘if it doesn't fit when I have machined it together, I can always take a few tucks in here and there.’ Yet sewing experts estimate that there are over three hundred different figure types for every bust size which comes in a paper pattern, so that the person who needs to make no adjustment at all to the pattern is very rare indeed. No wonder that many women never succeed in making clothes they are pleased with. They work hard at everything they make, but use the wrong methods entirely. As a result sleeves never set quite right and retain telltale puckers, collars look slightly off—centre, hems are uneven and over-stitched, darts never quite match. Discouragement sets in, followed by the vow never to make clothes at home again. If only these women could realize that by investing in some good (and not necessarily very expensive) equipment, and by unlearning their old habits and relearning correct modern methods, they could produce clothes of which they could be proud, with far less effort than before. In later sections we will be dealing with correct methods. But it's best to start with the basic needs—the right place to sew, the right place to store the equipment and the right tools for the job. Without the right tools it's probable that you will be a rather bad workman, whether or not you actually blame your tools. THE RIGHT PLACE TO SEW, THE RIGHT PLACE TO STORE Dressmaking must be one of the untidiest of occupations. We are not all lucky enough to a special room which we can set aside for sewing and other hobbies, and often the living room it would seem to be the only place we can use. But is it the only place? Much thought has gone into the subject of sewing areas, and many people have found their own ideal arrangement. Could you, perhaps, find some space in your bedroom or the spare-room for a cupboard, carefully sectioned off to take all your sewing equipment, and with space to store the garment you are making without undue crushing? If you amid put the sewing machine beside the cup board you would have a very convenient sewing area. Then, when you have to stop sewing, it would be a simple matter to stow everything away in the cupboard. A full-length mirror, too, is a tremendous help when you are trying on a garment, so try to site one nearby. This sort of arrangement, with a ceiling-mounted curtain, is showing (1). 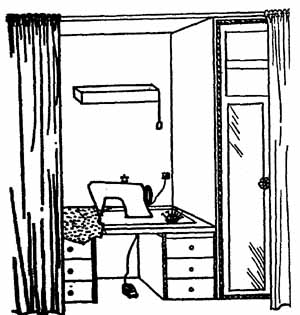
Two other ingenious sewing corners are shown. One of the cleverest I have seen consisted simply of a large, three-leaved screen, placed in a corner of a bedroom to conceal a sewing machine, with sewing aids arranged on the inside ‘walls’ (2). In another house I saw a large, built-in cupboard in the children’s play room, fitted out as a miniature sewing room complete with ready-to-use sewing machine, strip lighting and , of course, a good lock on the cupboard door to keep out the smaller children. When the children are safely tucked in bed, their mother is able to take over the ‘den’ for her sewing (3).
Whatever sewing corner you manage to devise for yourself, you will need to invest in a sewing box in which you can store all the small items you need. There are excellent sewing boxes available: for example there is a good one in the form of a sectioned container with a transparent plastic lid, or you may prefer one of the attractive wicker baskets which are fitted to hold the various sewing items. If your budget is tight, however, you could adapt an old wooden knife-tray for the small sundries, and keep it in a special drawer re served for sewing equipment. THE RIGHT TOOLS FOR THE JOB Unless you are a wizard with a needle you are not going to get very far without a sewing machine. I will be dealing with this subject in Section 2, and the question of sewing machine attachments will be dealt with at the same time. There are certain tools which are absolutely essential for the home dressmaker—a good pair of cutting-out shears is the first item which springs to mind. Other aids are extremely helpful, but can be dispensed with if you can't afford the outlay at this stage. Some items are certainly not essential, but would make your task so very much easier, often at a very low cost, that you would be well advised to invest in at least a few of them sooner or later. So great are the savings when you make your own clothes at home that if you set yourself up properly with good tools, you will probably redeem their cost with the first few garments you make. Since no two people would agree on which items are essential and which are merely helpful aids, I will simply give you a fairly complete list from which you can make your own choice. Here it's : GENERAL EQUIPMENT
CUTTING TOOLS
EQUIPMENT FOR HAND EMBROIDERY
PRESSING EQUIPMENT
That is a summary of ‘the tools for the job’. I will explain each item in turn so that you can become familiar with them. == Wiki Sewing ==
Lining, Interfacing, and Stabilizers Lining, interlining, stabilizers, and interfacing are all inside elements of a project and are rarely seen. So why do they make a difference? The choices you make for the inside of a sewing project will affect the way the outside will stand up or drape; it impacts the overall appearance. This section will help you make the appropriate choice for any sewing project.
Definitions of Inside Elements When you know the definitions of what is needed inside a sewing project, you can ask for those products in a fabric store or search for them online. This will increase the likelihood that you'll purchase exactly what you need. Lining is sewn separately and joined inside an identically sewn item. A man's suit jacket, a handbag, or a lined skirt can all contain a lining. Interlining is an unseen layer of a garment that may be sandwiched between the outer layer and the lining layer of a garment. It adds warmth but isn't used to add shaping to a garment. Interlining is commonly found in a winter coat when the outer layer and the lining don't add warmth to the garment. Underlining is a layer of fabric that's basted to the outer layer so that the outer fabric and underlining are worked together as one layer during construction. Solid-colored underlining is commonly used under printed sheer fabric for dresses. Interfacing is an unseen part of sewing that gives body and adds form and shaping to fabric. Interfacing is commonly used in collars, cuffs, facings (see Section 8), handbags and home-décor items to add shaping that the fabric alone will not provide. Stabilizers are not seen but add stability to the fabric while you're sewing. They're commonly removed after the sewing is done. The most common uses for a stabilizer are sheer fabric and machine embroidery. TIP--Look at Ready-Made Garments: When in doubt on how to achieve a finished result, look at clothing in your closet or in retail stores. Although those items may not be exactly what you want to make, you can use those same construction techniques to sew whatever you have in mind. Lining Lining not only hides seams and construction details but protects the inside details from damage and wear. Lining is sewn as a separate item before it's sewn into the garment or project. Garments or projects may be fully or partially lined. The fabric care instructions for the lining must match the outer fabric's care instructions. Lining a garment can cause static cling. Watch for "anti-static" finishes on the bolt end information to prevent static buildup as you move in a garment. TIP--: Be Daring! Lining doesn't always have to be a boring solid. Have fun and use prints that you love, but would never use for a garment, to line handbags and totes. You might even smile when you reach for your wallet to pay a bill. Interlining Adding interlining is the solution to using lightweight fabric and lining that offer no warmth. It provides insulation from the cold in a winter coat. You've probably worn something with interlining and never even knew it was there. Common choices for interlining are blanket fabric, wool, felt, and fleece. Interlining is protected during laundering because it's hidden inside, although it still needs to have the same care instructions as the outer fabric and the lining. TIP--Interlining on Hand! You may not need to buy interlining. If you have a stash of blankets that you never use, they may make perfect interlining for your project. Save the scraps for using inside potholders. Underlining Underlining is perfect to use with sheer fabric to make a garment and yet still maintain some modesty. Underlining is basted to the sheer outer layer of fabric and worked as one piece of fabric. It helps keep seams and construction detail from showing through sheer fabric. Stabilizers Although stabilizers have become widely used with embroidery, they can be used to solve common sewing problems. Types of stabilizers include lightweight, heavyweight, water-soluble, heat-soluble, and permanent. Decorative stitches, machine embroidery, and puckered seams are the most common need for using stabilizers to hold the fabric taunt while the stitching is sewn. For more information on using stabilizers with embroidery stitches. TIP--Economical Stabilizer: Save the gift wrapping tissue from gift bags and boxes. You can use it between layers of slippery fabric to minimize the slipping and stabilize the seam to prevent puckers. Interfacing Interfacing is the key to adding shape and controlling how fabric lays. Even a fine, silky, draping fabric can have a smooth neckline when the facing is interfaced. Interfacing is available in a variety of weights. The weight you choose will depend on the reason you're using inter facing. Garment interfacing is commonly lightweight to add body and shape with out overpowering the fabric. Interfacing is also used to stiffen the body of a tote bag. FUSIBLE INTERFACING Fusible interfacing will add a slight amount of rigidity just from the fusing process as opposed to sew-in interfacing of the same weight. TIP--Preshrinking Interfacing: You can preshrink your interfacing by soaking it in warm water, but never put fusible interfacing in the dryer before it's fused. The fusible properties will melt in the heat of the dryer and leave a mess you'll never forget! SEW-IN INTERFACING: Lightweight to medium-weight sew-in interfacing is basted to the seam line of the wrong side of the piece that will be interfaced and trimmed back to eliminate bulk in seams. Heavyweight sew-in interfacing is sewn by removing the seam allowances, butting the seam lines to each other, and joining the pieces using a long, wide zigzag stitch to reduce bulk. FAQ: What weight interfacing should I buy? When in doubt, drape the interfacing with the fabric over it on your extended hand. Watch for how the combination drapes and bends. Experiment with different combinations until you have results that appeal to you. GENERAL EQUIPMENT Bodkin (4) 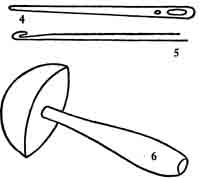 A bodkin is a large, blunt needle, either flat or round with a big eye. There are various sizes and types. It is used for threading tape, ribbon, elastic or fine cord through slots or a casing. Some bodkins have a small additional round eye to take round elastic. Carbon See Dressmaker’s Carbon Paper. Crochet hook (5) It is very useful to have a fine crochet hook in the sewing box. This is handy (quite apart from its conventional use for crocheting) when you are mending—for example a woolen jumper may have a hole where stitches have run, and may need ‘knitting’ up again before it can be mended. Darning mushroom (6) This is a mending aid rather than a dress making one, but it's invaluable for hand- darning socks and jumpers. If your eyesight isn't as good as it might be, make your task easier by choosing a light-colored darning mushroom (or painting a dark one white) which will make it easier to see the thin parts round the hole you are darning. Dress forms (7,8,9,10) 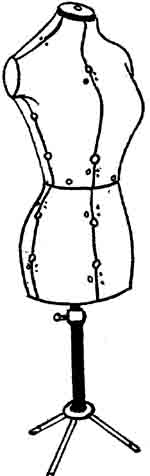 If you mean to take dressmaking seriously it will be well worth your while to invest sooner or later in a dress form—or what used to be called a dressmaker’s dummy. The best kinds are those which can be adjusted to duplicate not only your bust/waist/hip measurements but also to indicate how long- or short-waisted you are, the width of your shoulders and , in fact, every measurement which might affect the final fit of your garment. For preference choose one which includes the tops of the arms—a very important part of the body when you are fitting a garment. 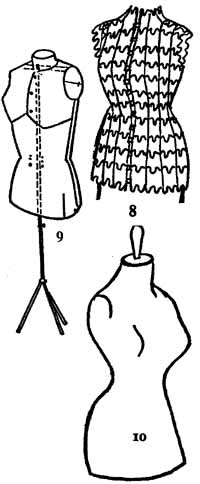
It is advisable to buy one which you will be able to adjust over the years to the changes in your figure. A dress form isn't a cheap purchase, and you wouldn't want to have to discard it after a few years because you have lost or gained a considerable amount of weight. There is a wide range of dress forms made in a variety of materials. A browse round the sewing department of a large store will probably help you to decide which kind you find most suitable. Three useful types are illustrated (7, 8 and 9). The one in 7 is of padded, reinforced plastic, well made and fully adjustable. The wire form (8) is perhaps less durable, but it's inexpensive and good value for money. It is covered by a stockinette ‘sleeve’ once the correct size has been achieved. The dress form in 9 is, in fact, made from a cardboard-type material, and fits together neatly with special studs. Not as sturdy as, say, the form in 7, but reasonably priced and adjustable. Old-fashioned dressmaker’s dummies in wood or plaster (10) can still be picked up in second hand or antique shops. But as they are mostly small-waisted and usually not adjustable, they are seldom a practical purchase (although they may have a certain decorative appeal). Dressmaker’s carbon paper (11) 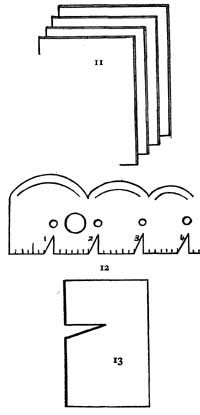
Some dressmakers like to use special dress maker’s carbon paper, usually in conjunction with a tracing wheel, as an alternative to making tailor’s tacks. It is available in a variety of colors from most good department stores. Hem gauge (12, 13) This is used for measuring the width of the hem allowance after you have marked the correct hem length. You can buy a plastic hem gauge (12) from a shop or department which stocks sewing aids, or you can make your own in strong cardboard (13). Hem marker (14) 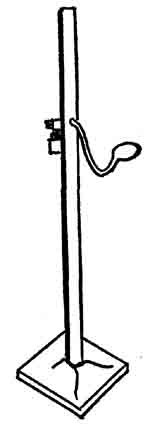
Turning up a hem is a surprisingly tricky job. Even if you have someone to help you pin the hem to the correct length, the results are not always satisfactory unless your helper has a very good eye and a steady hand. It is therefore worth saving up for a hem marker which you can use to mark out a clear and completely level hemline in chalk. It can be adjusted to any hem length. Magnet (15) 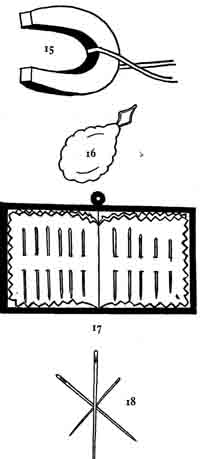
Buy a child’s magnet, horseshoe-shaped, tie to it a piece of tape or ribbon, and attach it to your sewing machine or the handle of your sewing box. When you have finished sewing, the floor is quickly cleared of errant pins and needles. Keep the magnet away from scissors, to avoid magnetizing them, which you might find irritating. Needle threader (16) Even if your eyesight isn't as good as it might be, needle-threading need present no problems. A needle-threader like the one illustrated costs only a few pennies, and many home sewers find it indispensable, both for hand sewing and for use with the sewing machine. There is another type, also inexpensive, made of plastic. Needle-case (17) If possible, buy a really commodious, professional-looking needlecase, with banks of needles of all sizes neatly ranged. This encourages one to keep it replenished, and means one never has to go through the hunt-the-needle routine which can be so nerve-shattering at moments of crisis. Needles (18) ‘Sharps’ of medium length are generally used for sewing, but there are at least ten sizes and it pays to stock a wide range so that you can find your favorite needle for each fabric. You will probably find that the needle you like to use most is decided not only by the fabric you are sewing, but also by your own personal preference. Some people like to use a very fine needle, with a fairly large eye, for most light and medium fabrics; some like a short, rather thick needle. It is worth mentioning here that tapestry needles, which are thick and have a large eye and a very blunt end, can be most helpful in the sewing box, particularly for sewing up garments knitted in double knitting wool. They are also the safest possible needles to give to a small child who is experimenting with her first sewing stitches, perhaps using pieces of punched card board. Orange stick (19) 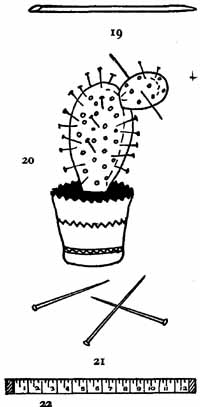
Why an orange stick? This is valuable for poking out the corners of inside-outed belts, or sharp-pointed collars—a gentle and effective tool for such purposes. Pincushion (20) Many types of pincushion are available in good department stores, some in novelty shapes, such as pumpkins, small mice or pots of cacti, some strictly utilitarian. Most useful are those which fit on your wrist so that they are ready to hand. You can also buy pincushions with a miniature emery bag attached. Emery bags or emery cushions are an old-fashioned idea, but a good one: if a pin or needle becomes sticky, or if it's very slightly rusted, you can plunge it into the emery bag for gentle scouring. Pins (21) Choose fine, sharp, steel dressmaker’s pins, from a sewing shop or department. The ones which come in a tin with a dip in the lid are perhaps easiest to handle. You tip out a few pins into the upturned lid, and then instead of sticking your fingers into a prickly mass of pins as you work, you take pins from the lid, where the small ‘hump’ has prevented them from huddling together. Manufacturers of good quality pins line their containers with a special paper which helps to prevent rusting. Sizes 15, 16 or 17 pins are used for most fabrics. For sheer fabrics there are very fine pins, sometimes called lillikins, and for upholstery work one can buy very coarse pins. Never use office pins for dressmaking. They are blunt, clumsy to handle, and make unsightly holes in most fabrics. Ruler (22) There are sewing experts who consider it essential to have a whole armory of rulers, including wooden and plastic rulers of various lengths and even T-squares, while others manage without rulers at all, confining their needs to a good tape measure and yardstick. However, you would probably find a 12-in. ruler with flat, unbevelled edges very useful (22), and perhaps also a 6—in, ruler in clear plastic, marked to eighths and sixteenths of an inch. If you become a dedicated needlewoman, you can buy rules and measures (and of course other equipment) made for the professional garment industry, which will cost more but last a lifetime. Seam unpicker (23) 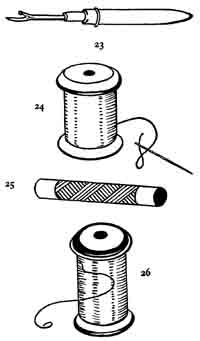
A seam unpicker is very inexpensive and well worth buying, as unpicking is a job one has to be prepared to tackle from time to time. Some dressmakers use the same gadget for cutting open machine-made buttonholes in light fabrics. Sewing threads (24, 25) Most women, when they buy sewing thread, ask for ‘a reel of cotton’. The correct term, however, is sewing thread, and this includes cotton thread, mercerized cotton thread, machine— embroidery thread, nylon thread, silk thread, Terylene thread and the strong thread used for sewing on shoe buckles and shoe-buttons. There are also buttonhole twists (25) and embroidery silks. A good general rule is to use mercerized cotton or silk for natural fibers, and reserve nylon and Terylene thread for synthetic fabrics. Sometimes a garment made of nylon fabric and sewn with cotton thread may develop puckered seams. Tacking thread (26) It is surprising how many people never think of buying special tacking thread, which has great advantages over ordinary sewing threads for making tacking stitches and tailor’s tacks. It clings well and is easily broken or snipped when you want to draw it out. Choose brilliant colors which will show up well against the fabric you are sewing. Tailor’s chalk (27, 28) 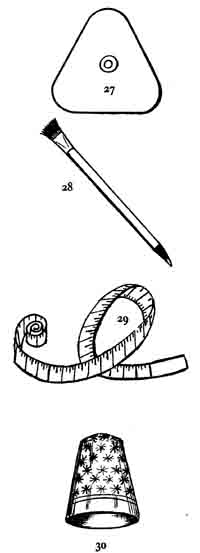
Tailor’s chalk, preferably of the non-wax variety, is used for transferring markings from pattern to material or making alteration marks during fitting. A chalk pencil (28) with a small brush for removing chalk traces after the job is finished is also useful. Tape measure (29) A good-quality measuring tape with a brass end is essential. It simply isn't worth the small saving to purchase a cheap tape measure, for it may stretch in use and become very unreliable. Thimble (30) Anyone who has done a good deal of hand sewing normally finds a thimble indispensable. It is worn on the middle finger of the hand used for sewing, and even if you can't accustom yourself to wearing a thimble all the time, it's useful to keep one by you, for sewing especially strong materials. Choose a metal rather than a plastic thimble, and be sure to buy the correct size for your finger. Tracing wheel (31) 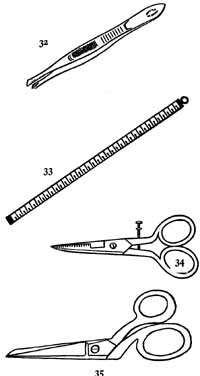
Some find it an advantage to use a tracing wheel in conjunction with dressmaker’s carbon paper for reproducing pattern markings on the material. Others prefer to make tailor’s tacks or to use tailor’s chalk. Tweezers (32) A strange tool in a sewing box? No—if you have tacking stitches or tailor’s tacks to take out, a pair of tweezers can be a great asset. Yardstick ( A yardstick may be flat like a ruler, or rounded, and may be wooden or metal. It is useful for checking grain lines when pinning pattern pieces on to fabric, and for marking out hem lengths if you have no hem marker. Look for a good-quality yardstick—a cheap one which will warp or buckle is useless. CUTTING TOOLS Buttonhole scissors (34) These are not essential, but are useful if you may be making many buttonholes, because they can be adjusted to cut exactly the buttonhole length you require. Dressmaker’s shears (35) Good dressmaker’s shears are absolutely essential to the efficient home dressmaker, and anyone who tries to economize on them, or to make do with the household scissors, is inviting failure. If you choose wisely and give your shears loving care, they will repay you with long service and always be a joy to use. Choose bent-handled shears about 7 to 8 in. long, with a small ring handle for the thumb and a large ring handle for the second, third and fourth fingers. It is important that they should have bent handles so that one edge of the lower blade will rest flat on the surface of the table when you are cutting out. Do not buy straight- handled scissors for cutting out fabric. Shears made from steel by the hot-drop forge method, and with blades joined with a bolt or screw, rather than a rivet, are best. However, it's always advisable to try out scissors and shears in the shop before buying them—if you go to a shop which specializes in good-quality sewing aids, the assistant should not mind at all. Never, never let the shears be used for any purpose other than cutting out fabric: paper will blunt them very quickly, and so will any thing tougher. Always store them in a dry place, and put a touch of oil on the screw occasionally. If you have chosen wisely, your shears will keep their sharp cutting edge for a long time, but when they lose their first keenness, have them re-sharpened by taking them to a shop which specializes in sewing equipment, or to the sewing department of a large store. It is unwise to entrust them to the ‘scissor man’ who comes round the streets sharpening anything from ordinary scissors to lawnmowers. Electric scissors (36) 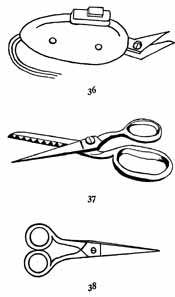
Certainly not an essential item for the home dressmaker, but many enthusiasts are finding electric scissors a useful supplement to their dressmaker’s shears. They are surprisingly light and easy to use. Pinking shears (37) Some heavy fabrics can be pinked to advantage— the v-shaped cuts along the edges of the seam allowances help to avoid excessive bulkiness. However, the pinking of seams isn't a practice normally recommended for good home dress making. If you do wish to pink seam allowances, it's a good idea to machine-stitch and pink. Pointed scissors (38) Important in every sewing box is a pair of good- quality sharp—pointed scissors between three and six inches long, handy for snipping threads and trimming or clipping seam allowances. The same rules apply as when choosing dress maker’s shears—always look for a high-quality pair as a long—term investment. Ripping scissors (39) 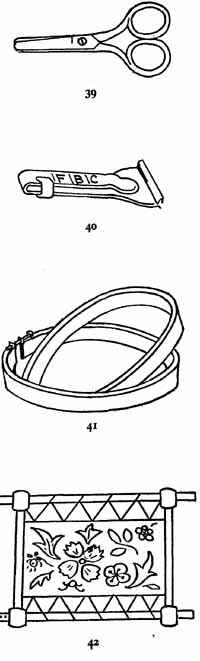
These have rounded ends so that you don't cut the fabric when you unpick a seam. They are not to everybody’s liking, however, and many dressmakers prefer a simple, inexpensive seam unpicker. Scissor cutting gauge (40) If you do a good deal of needlework or handicraft you may find this gauge a great help. You fit it on the top blade of the scissors, adjust it to the required width, and you can then cut long strips of fabric (for example bias strips) to an even width. EQUIPMENT FOR HAND EMBROIDERY Embroidery frame (41, 42) The range of embroidery frames is wide, and it's advisable to go to a shop which specializes in artwork and handicraft materials in order to see a good selection. There are circular em broidery frames (41), rectangular ones where the material is stretched as it's fixed on the frames, and more elaborate ones where the fabric is tightened by the turning of a screw or screws. Embroidery scissors (43) 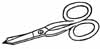
Small, sharp—pointed scissors are essential, especially if you will be doing any cut-out embroidery. Examine them carefully before you buy them, to see that the points meet closely, and make sure that it will be possible to have the scissors re-sharpened when necessary. Embroidery silks (44) 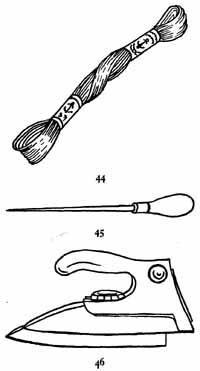
Normally, embroidery silks are purchased in six-strand skeins and one uses three strands at a time, dividing the silk as each length is cut for sewing. Finer work may, however, require only two strands of silk, or even one. Stiletto (45) Not by any means an essential embroidery tool, although some needlewomen like to keep a stiletto for making holes in fabric, in order to embroider tiny eyelet holes. PRESSING EQUIPMENT Pressing equipment is necessary to any home dressmaker, and a sure sign of an experienced needlewoman is an ironing board set up near the sewing machine during sewing sessions, with the iron switched on and additional ironing aids placed nearby. The iron will be in use again and again, at each stage of the dress making process, for with only a few exceptions every seam should be pressed after it's sewn and before you move on to the next stage. It is wise to have a thermostatically controlled iron, so that you can keep the iron switched on all the time you are sewing will not overheat and will not consume an undue amount of electricity. There are three types of iron available: dry irons, steam irons, and steam-or-spray irons. Dry iron (46) Modern irons are better designed than ever before, and the majority have thermostatically — controlled heat settings. If you are buying a new dry iron, look for the very lightweight types (weight 2 to 3 lb.) which are extremely easy to use both for thin fabrics and , in conjunction with a damp pressing cloth, for thick ones. The new irons with a cut-away handle in the Scandinavian style (46) m for very quick pressing and ironing, and are very maneuverable. The majority of thermostatically-controlled irons now on the market have numbered heat settings for different types of fabric. These settings have been agreed upon by the British ‘Home Laundering Consultative Council’, who felt there was a need for greater standardization of iron temperatures and , after considerable re search and testing, developed a method of classifying fabrics for ironing purposes. The classification is as follows: Setting 1. COOL Suitable for acrylics (e.g. Acrilan, Courtelle, Orion). Setting 2. WARM Suitable for acetates, nylon, Tricel, Terylene and wool. Setting 3. MEDIUM HOT Suitable for rayon. Setting 4. HOT Suitable for cottons and linens. Iron manufacturers may also include a VERY HOT setting (setting 5) for use in special circumstances at the discretion of the user. But this setting is unlikely to be used by the home dressmaker. If you are using an iron which is more than a year or two old, it may possibly not have these settings, in which case it's best to follow the instruction book which came with the iron. The particular value of this standardized range of heat settings is that in the next few years more and more ready-made garments will bear labels telling you how they should be washed and which iron setting to use. This should eventually develop into a sort of label-shorthand—for example, an Acrilan dress may bear washing instructions and underneath them the advice: ‘Iron setting I’ or: ‘Iron: I’. The Council also hope that in time, similar labels will be available for every length of fabric sold by the yard. See Section 6 for more on H.L.C.C. and the home laundering of fabrics. Steam iron (47) 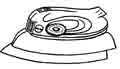
A good modern steam iron (47) is of particular value to the home dressmaker. With some fabrics—though not all—it does away with the need for a pressing cloth. A dressmaker needs to press her work as she goes along, and a steam iron does the job perfectly, so that the fabric retains its body and doesn't develop a ridgy, shiny or over-pressed look. The fact that the pressing cloth can sometimes be dispensed with means that time and trouble can be saved. Most important of all, a steam iron gives better and more consistent results. With most types of modern steam iron you can change from steam ironing to dry ironing and back again as the need arises, and you will sometimes find these irons described as steam- or-dry irons. They work on a drip-feed principle: a measured amount of water is allowed to drop on to a part of the soleplate, where it's instantly turned into steam. The steam then travels along the steam passages, out of the soleplate and on to the fabric. Steam irons have one temperature setting for all fabrics, but once you switch over to dry ironing you select the setting according to the fabric, in exactly the same way as described before. I have talked to a number of people who have tried using a steam iron—in a friend’s or relative’s house perhaps—but who haven't been very impressed by its performance. The reason may have been that the iron was an old one—some of the very first steam irons were extremely heavy and cumbersome; or that it was of the tank type which is rarely made these days, having been almost entirely superseded by the drip-feed type. It may be that the iron was so choked up inside with hard-water deposit that little or no steam came out; or that it had been filled from a jug that was not quite clean, so that clothes were stained with pale brown marks. However a good modern steam iron, properly used, is an asset to anyone who has ironing or pressing to do. There are some important points to bear in mind on the filling of the iron. Unless you live in an area where the water is very soft, it's far better in the long run to take the trouble to use only distilled water, which you buy from your chemist or drugstore at a very reasonable price. It is certainly not wise to use tap water, or distilled water from a garage (which could contain traces of harmful acids). One iron manufacturer markets as an alternative to distilled water a special bottle which converts tap water to de-mineralized water. Manufacturers of irons usually suggest that water which has been boiled and cooled may be used as a substitute for distilled or de-mineralized water, but even this is likely to leave a coating inside the iron where water is very hard. Many people bottle the melted ice left after defrosting their refrigerator, for use in their iron. But some manufacturers frown on this practice, because the water may not be pure: frozen food or ice cream may have thawed slightly before being placed in the freezer compartment and may possibly leak and mingle with the ice. A steam iron should always be emptied after use, as this, too, helps to prevent the iron from ‘furring up’. Steam-or-spray iron (48) 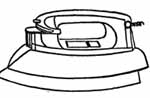
This can be used for steam ironing but there is in addition a button on the handle which when pressed releases a fine jet of water just ahead of the iron, thus reproducing automatically the old system of hand sprinkling the ironing. It is particularly useful for thick cottons and linens which have become far too dry after washing for normal steam ironing. There are some possible disadvantages to these spray mechanisms—for example rayon may react unfavorably to being sprayed with water and then ironed, and become permanently spotted. If one is choosing a new iron with home dressmaking chiefly in mind, there seems little advantage in a steam—or-spray iron. A steam iron probably gives all one needs for good pressing. If, however, you are buying for the family laundry as well as for dressmaking, you may decide that the extra cost of a steam-or—spray iron is amply justified. Ironing board (49) 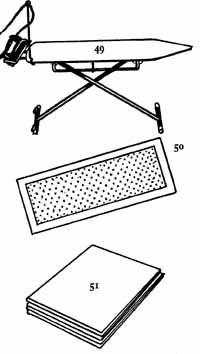
Ironing boards vary from the sublime to the worse—than-useless. A really well—designed metal board with fully-adjustable height is hard to beat. One such board is shown in 49. It has two small wheels, so that once you have folded the board you can wheel it to its storing place, with no lifting. If your house has a convenient wall space, an ironing board which folds up against the wall could be very useful. It is usually possible to buy them, but a member of the family may perhaps feel enthusiastic enough about your dressmaking activities to construct a fold-away board for your sewing corner. An ordinary ironing board, whether newly purchased or the ancient family friend, may be adequate for dressmaking if it's wide enough, if the surface is well-padded and has a good cover, and (preferably) if the height can be adjusted. But boards which are warped like a switchback, and so thinly covered that one irons a series of fine ridges into every article, are quite useless. If the board you are using is old, try improving it with a new cover. Inexpensive covers are available in most department stores. Choose one which has a thickness of foam plastic in addition to the cover fabric, to give extra smoothness to all ironing and pressing. Various types of fabrics are used for these covers—cotton, Milium, asbestos fabric or a special type of heat-resisting plastic. Cotton covers are inclined to scorch fairly rapidly, but are inexpensive enough to be replaced when necessary. Milium gives good heat deflection and doesn't scorch, nor does the asbestos-type cover. The special plastic covers are guaranteed against scorching, and will remain unharmed even if you should unthinkingly leave the hot iron face down. Whatever type of cover you choose, make sure that it's the right size and that it ties snugly to the ironing board with tapes. Needle board (50) This is something you will probably defer buying until you have special need of it. A needle board is used for pressing velvet, velveteen, corduroy and other pile fabrics while making them up. The fabric is placed face down on the needles so that it may be pressed without the pile being crushed or marked. Modern needle boards are made with a thick, flexible base, and may be rolled up for storage. Pressing cloths (51) Specially—treated pressing cloths, which look and feel like coarse paper tissues, can be bought. Not everybody, however, finds they have any advantage over fabric pressing cloths. A cotton pressing cloth, either of fine soft cotton or closely-woven cheesecloth, is generally used for silks and rayons; a thin woolen cloth is used for woolen fabrics. A dry wool pressing cloth used under a damp cotton cloth is helpful for materials which are inclined to go shiny; it retains a matt surface and helps to avoid that flattened, over-pressed look which can give a garment such a home-made appearance. Pressing aids—a set to make yourself There will be stages in your pressing when you will find it very useful to have a curved, padded surface over which to smooth and shape curved seams, deal with intricate gathers or small sleeves, or mould darts. There are three pressing aids, all easy to make at home, which would answer the purpose admirably; if you make all three you will be able to select the one most suitable for each article you deal with. The cost is minimal because the three pressing aids—press mitt, tailor’s ham and seam roll— can all be cut from half a yard of strong bleached calico, and additional materials are not expensive. The press mitt and the tailor’s ham are best stitched on a sewing machine for maximum strength, although you can sew them by hand if you prefer. The seam roll is very simple to make, and is stitched by hand. The materials for the three items together are listed below: You will need…
Cutting out There are three pieces for the press mitt, two pieces for the tailor’s ham and one piece for the seam roll. Press mitt (52) 
Trace the mitt shape on to tracing or greaseproof paper, copying all markings. Cut three identical pieces from the calico, using this pattern. To make: Hem one of the pieces along the straight edge, making a fold for the hem at the dotted line indicated. Place the hemmed piece between the two other pieces, and stitch the three layers together along the seamline marked, taking ½” seam allowances. Leave the straight end open for filling. Turn the mitt right side out so that the seam allowances are concealed, and fill the two un— hemmed pieces tightly with kapok, ensuring that the tip of the mitt is well-padded. Turn in the raw edges, press and stitch neatly to close. Sew a loop of tape to one side so that the mitt may be hung up if desired. Tailor’s ham (53-56) 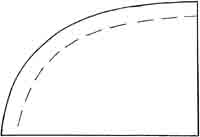
To make: Take a piece of tracing or greaseproof paper measuring at least 13” by 9” and fold it in half lengthways, then in half again to divide the paper into four quarters. Place the folded paper with the folds to the straight edges of the pattern (53), and trace the curved edge and seam line firmly. Cut round the line so that you have an oval-shaped pattern. Cut two of these oval shapes from the calico. Stitch the two pieces together along the seam line, leaving a 6-in, opening for inserting the stuffing (54). Snip the seam allowance at intervals all the way round the stitched seam line. Turn the fabric right side out and stuff the ham firmly with kapok. The secret of success is to pack it tightly—for best results soak the scraps in clean water, then squeeze them and stuff the ham with the damp filling, packing until it's solid (s). Finally, turn in the raw edges and over-sew the opening by hand (Put the ham in a warm place (such as the airing cupboard) for several days to dry out. Sew a loop of tape to one end. Sometimes sawdust is used as a filling instead of the kapok, to give even more firmness. Seam roll (57-59) 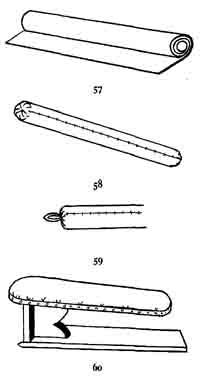
To make: Roll the woolen material tightly on to the broom handle (57) and stitch the raw edge down firmly. Draw together the ends of the roll to form a neat closure at each end (58). Next roll the calico tightly round the woolen material, turning in one edge neatly and sewing it down firmly. Again, neaten the ends of the seam roll. Sew a loop of tape on to one end ( so that you can hang up the seam roll if you wish. Sleeve board (6o) A sleeve board isn't essential, especially if you make the three pressing aids already described. But if there is a sleeve board provided with the ironing board you use, it's a good idea to learn to use it on the more intricate parts of garments, such as the sleeves themselves. Sleeve boards can also be bought separately from ironing boards, to stand either on the board or on a pressing table. Sponge (61) 
A clean sponge, kept specially for the purpose, is useful for damping down fabrics as you press them. |
| PREV: The Sewing Machine | NEXT: MODERN SEWING MACHINES: Their selection, use and care | Home |
Friday, 2012-06-01 11:31