|
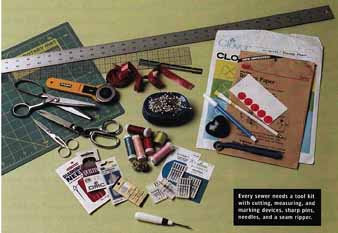
Before you begin to sew, you need to assemble a few good sewing tools. Let’s review the basic tool kit. Scissors Everyone who sews needs to have a good pair of sharp scissors for cutting fabric. Choose a pair that's right-handed or left-handed (whichever you are) that you will keep with your sewing supplies, not used for cutting coupons and wrapping paper. Scissors range from the small embroidery type to large dressmaker shears. For starters, find a pair of scissors 8 in. to 10 in. long; your second pair can be small scissors for trimming and clipping. Pinking shears Pinking shears are a handy tool for simple seam finishing. These large scissors cut a wavy or V-shaped edge. They should not be used for cutting out pattern pieces though, because the cut edge isn't exact and cutting should be as exact as possible.
Pins Buy sharp pins and throw away any pin that's bent, dull, or burred. Sharp pins work in both fine and heavy fabrics. Good pins are available with small and large glass heads and with no heads at all. I find pins with glass heads are a good choice because they can be seen in the fabric (and on the floor, too). Beware of pins with plastic heads because the heads melt if pressed with a hot iron. It is a good idea to have a place to keep your pins. I know sewers who like to keep their pins in boxes and sewers who prefer to stick their pins into pincushions. I like a magnetic pin- cushion and only buy pins that will stick. Then when I knock the pincushion over and spill all the pins, I just sweep the floor with the pin cushion to easily collect them. Needles You will need to have an assortment of needles for hand sewing and needles for your sewing machine in your sewing “tool kit”. HAND-SEWING NEEDLES--Needles for hand sewing come in various lengths, numbered sizes, eye sizes, and fineness, and with names such as betweens, sharps, embroidery/crewels (not to be confused with needles for tapestry-type crewel embroidery), darners, and beadings. Needle sizes range from 1 to 24; the smaller the number is, the longer and thicker it's . Keep a variety of hand-sewing needles in your sewing kit for marking, basting, hemming, and sewing on snaps and buttons. TIP: A needle should be sharp enough to easily pierce the fabric, but it shouldn’t be too thick or else it will mar the fabric. The thread you are using should fit through the eye of the needle; f not, choose a needle with a larger eye. If you have trouble threading a needle, look for a Calyx-eye needle that has a fine but large eye at the top. SEWING-MACHINE NEEDLES--Sewing-machine needles also should be chosen for the type and weight of fabric you are using. Machine needles are numbered by size and lettered to indicate the shape of the tip—both are important. The sizes are a pair of numbers: the European number and the American number. 60/8 is a fine needle, suitable for use with very light weight or fine fabrics like chiffon. 70/10 and 80/12 are the frequently used sizes for light- to-medium and medium-weight fabrics. 90/14 is used for fabrics like corduroy, and 100/16 is for even heavier fabrics like upholstery fabric. Needle type is as important as size. Choose an H needle for most general sewing, whether the fabric is woven or knit. Choose an SUK needle for use with power knits or fabrics that are blended with spandex and an H-S needle for knit fabrics where the H needle leaves skipped stitches. H-J needles are for jeans, and NTW needles are for real leather, because they punch holes in the fabric. TIP: Use the appropriate needle for your project, then throw it away before you start another. If you are working with a microfiber, you may have to change the needle several times during the course of the project. N needles are designed for topstitching because they have large eyes to accommodate the width of heavier topstitching thread. Microtex Sharp Needles are now available for use with microfibers. Some sewers find that small jeans (70/10 H-J) needles also work with this fabric. Another kind of needle is the double needle, which can be used with woven fabrics as well as knits. These needles create very ready-to-wear finishes, especially on knits. A popular and knowledgeable sewing teacher in the Oakland, California, area, is, among other things, the teaching guru regarding sewing machines and needles. She gives the best advice: Change the sewing-machine needle often. Don’t let the needle be the source of any sewing problem. == Wiki Sewing ==
Bolt End Information Unless it's a remnant or a precut flat, fabric is usually folded and wrapped on cardboard as a bolt of fabric. The end of the bolt has a label that gives you the information you need to make an educated purchase. Unfolded fabric that's wrapped around a tube will have a hangtag or sticker on one end with the same information you would find on the bolt label. Be sure to write down this information, and keep it with your fabric just in case you need to buy more. The bolt label will contain care information on the proper way to clean and dry the fabric. Dry cleaning, cool or warm water washing, and machine drying are just a few of the options you might find for fabric care. The fabric manufacturer and the style number and /or name will also be on the bolt end. This information is extremely helpful when shopping for the best prices, either online or in fabric stores. The bolt label will also contain information on fiber content, which may be important if you have allergies or sensitive skin. If your fabric is a remnant or you don't have the bolt end information Google to learn how to determine your fabric's fiber content. Tape measures No sewing kit would be complete without a tape measure. Tape measures are available in several widths, from ½-in. to 1-in. If you have to choose one, 5/8 in. is a good width.
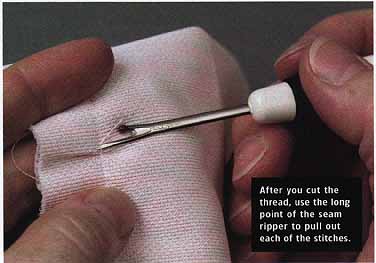
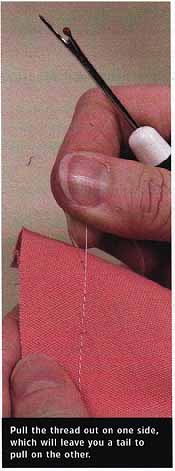
Seam rippers One of the best things about sewing is that you can remove and redo your mistakes. This tool can help. Seam rippers have an uneven, forked end with a cutting edge between the fork tips. Look for a seam ripper whose fork tips are sharp and not too thick so that you can work with fine fabrics as well as medium- to-heavy ones. (See “How to Use a Seam Ripper” above) Tracing paper, chalk, and other marking devices I am a classicist who makes tailor tacks to transfer certain markings from the pattern to the fabric. However, I keep tracing paper and a tracing wheel in my sewing kit, as well as chalk of various types and marking pens, and I use all of them at different times. Tracing paper is paper that's waxed on one side. Tracing-paper packages contain sheets of various colors, usually white, red, blue, and yellow. When a tracing wheel is rolled over the wrong side of the paper, the colored wax is transferred to the fabric underneath. The chalk marker I use most frequently is the Chalkoner. I can draw fine lines for such tasks as buttonholes with this device. I also like chalk pencils for quick marking. In addition, there are marking pens and pencils available, some that brush off and some that disappear with moisture. Collect these as you go. You may be working on a project when one device or the other seems the most appropriate. THREAD USAGE FOR VARIOUS FABRICS:
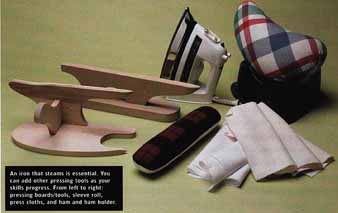
Thread There is one important thing to say about thread: Buy the good stuff. Whether you buy silk thread, cotton thread, polyester thread, or rayon thread, make sure it's of good quality; don’t buy junky stuff. It may look like a bar gain, but the hassle to use it's not worth the savings. Cheap thread breaks and separates during sewing, so avoid it. There are many good brands of thread avail able: Coats and Clark Dual Duty Swiss Metro sene, Guterman, Molyneke, and Tire. Charts exist that list what thread to use with what fabric, and books on fabric feature this information. For those just starting out, see the chart to determine which thread works best for easy fabrics. TIP: As a general rule, use polyester thread when you are working on fabric that stretches. Use silk thread whenever possible for basting. Rulers There are at least three rulers every sewer needs to have. The first is a metal yardstick. The second is a transparent ruler like the C-Thru ruler, and the last is a 6-in.-long seam guide. Pressing tools The essential list of pressing tools includes an iron, an ironing board with a good cover, and a press cloth or two. Let’s start with the iron. If you don’t have an iron that steams (not drips sort—of-hot water but really steams), you don’t have an iron good enough for sewing. Look for a heavy iron with metal parts—you’re more likely to get steam than drips.
I have a new cotton duck cover on my ironing board (it has been 12 years since my last new one). I washed the old cover, put it back on the ironing board, then put the new one on top; I like a thick surface that I can stick pins in. Press cloths can be packaged ones from the sewing notions department or 100% cotton diapers. I use a press cloth to prevent fusible interfacing from sticking to the bottom of my iron as well as to prevent fabric from being marred by steam and heat. Sewing Basics -- A Quick-start GuideBefore you begin sewing, know about ...
|
| PREV: Fabric | NEXT: Beyond the basic tools | Home |
Saturday, 2016-09-17 23:09