|
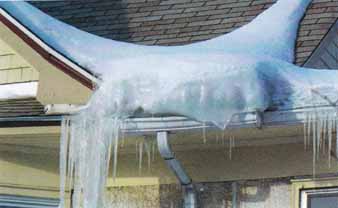
A picturesque array of icicles might make a nice image for a holiday card, but there’s nothing charming about the damage that built-up roof ice can do to your home, especially the continuous chunks called ice dams. Several conditions are required for their formation (see “How ice dams form,” below), but the factors you can control are heat loss through your roof and proper ventilation to maintain a cold roof.
Spot problem roofs by observing them during the few days following a snowfall. If significant heat loss occurs, the blanket of snow will rapidly develop thin areas or holes from melting. Icicles will soon appear at the eaves, then thicker layers of ice will form above them.

The only effective strategy against ice dams is this: Keep the attic cold by preventing upward heat loss from the living areas of the house, and keep the roof cold by providing a clear path for cold air to move from eave to ridge. Attic insulation between and above the ceiling joists is essential; most modern codes specify as much as 1 ft. of insulation with a heat retention value above R-32. Equally critical is sealing off ceiling penetrations—from a small electrical box to a large access hatch—that allow warm air to leak past the insulation.
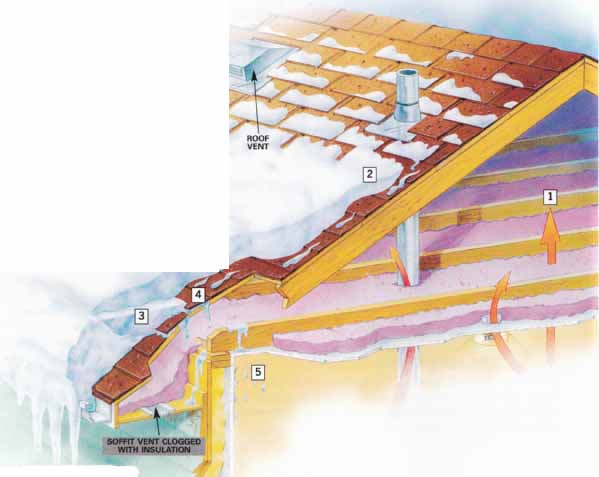
Ice dams can’t form from snow and cold weather alone; they need a warm roof too. This is how they’re created:
1. Heat rises through ceiling penetrations and into an attic.
2. The snow on the shingles melts, and the water runoff travels down the roof slope until it gets to the edges.
3. Because the heat loss stops at the eaves, they are typically cold enough to refreeze the melted water, forming icicles and ice dams. Gutters magnify the problem by providing a platform for the ice to accumulate on and are often damaged by the added weight.
4. As the dams accumulate ice, they form an obstacle to the melted water that’s still making its way down the roof.
5. With nowhere else to go, the water backs up under the shingles and eventually finds its way through the sheathing and into the house.
Tip: Free heat from the Sun: During the winter and other cold months, keep the curtains on the south side of your house open during the day to let in free solar heat. Close those curtains at night to help prevent heat loss.
Ice dam solutions
When ice dams occur on a roof, it’s usually not long before the symptoms move inside. Rust spots from drywall fasteners might show up on the ceilings, paint will peel and water stains will appear around windows and exterior doors. Even under the best conditions, some ice dam formation is often unavoidable; the daytime sun can melt snow on sections of a roof, but as night falls, temperatures drop and the water refreezes. You can’t prevent this melting-refreezing cycle completely, but you can reduce the attic heat loss that aggravates it, and you can also protect your roof sheathing and house from the inevitable ice dams that will form from normal climatic changes.
Above all, stop or at least minimize the heat loss through your attic. Air leaks can occur wherever a ceiling or wall penetration isn’t sealed properly. Light fixture boxes, access hatches and open pipe or duct chases can all be routes for warm air to migrate up into your attic, so use caulk, expanding foam insulation or other sealants to close them. This requires a trip to the attic to pull away the insulation and apply a sealant from the top side of the drywall or plaster, so this is a good project to tackle in the fall, when the attic will be reasonably cool. Aside from reducing the ice dams’ severity, these measures should lower your energy bills. Upgrading insulation also helps; it’s likely the attic already has some—probably fiberglass batting nested between the joists—but additional blown- in cellulose or fiberglass helps seal gaps and improve the R-rating.
Also important is maintaining a cold roof by installing or improving ventilation with soffit vents and roof or ridge vents that keep cold air circulating freely. Even with some attic heat loss, this will reduce the melting rate. Also, the next time you reroof, install a self-sealing membrane along the roof edges.
Keeping a cold roof
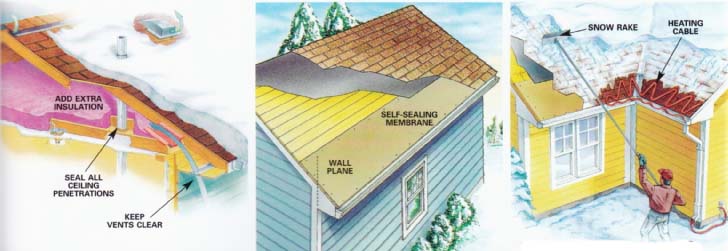
Insulate and seal every ceiling penetration so heat intended for living areas can’t migrate into the attic and warm the roof. Add an extra layer of insulation across the entire attic, if necessary. Make sure there’s adequate vent area along the soffits and eaves so cold air from outside can flow freely under the roof sheathing and out through vents on or near the ridge.
Installing ice-and-water barrier
Even if ice dams do form, you can prevent damage to the roof sheathing and interior by installing an ice-and-water membrane along the roof edges before shingling or re-shingling. These 3-ft-wide adhesive membranes are waterproof and self- seal around nail and staple holes. The membrane should run at least 2 to 3ff. up the roof beyond the exterior wall plane.
Using secondary measures
If there’s no snow on the roof, it can’t melt to form ice dams at the edge. You can remove snow manually using a snow rake on an extension handle, although you’ll have some cleanup to do on the ground afterward. Beware of overhead power lines. For a surefire preventive measure, place heating cable intended for this purpose along the roof edges and all the way out the downspout to melt the ice and snow. Always follow all manufacturer’s instructions.

Using Secondary Measures; Keeping a Cold Roof; Installing
Ice-and-Water Barrier
Next:
Prev: Warming up Fireplaces
