How you insulate your attic space will depend on whether you intend to have a “cold” or “warm” roof space. In the former you insulate at the joist level to stop heat from escaping through the unused roof space (see below and opposite). With a “warm roof,” you insulate between and under the rafters of the roof (see opposite bottom). In older properties it may be necessary to increase the depth of the joists or rafters to accommodate the recommended depth of insulation.
What Tools and Materials Will I Need? See TOOLS AND MATERIALS CHECKLIST
Recessed Light FixturesThere are two types of recessed light fixtures. Some are rated for insulated ceilings and others are rated for non-insulated ceilings. For the non-insulated rated fixtures, there needs to be at least a 3-in gap around the fixture for fire safety reasons. To create the gap, use the joist members as two sides of the rectangle. Simply fasten blocking perpendicular to the joists in the ceiling. Alternatively, you can construct a wood frame using blocking (see right). If you have fixtures rated for insulated ceilings, the fixture can be in direct contact with insulation. For more information contact the Insulation Contractors Association of America. Image at right: of WOOD FRAME |
Laying Blanket InsulationA. Sweep away debris from between the joists. If a vapor barrier is needed, roll it out and cut separate pieces of barrier the same length as the joists. Lay one piece between each pair of joists. Cut holes in the vapor barrier to accommodate any electrical fixtures. Staple the barrier to the side of the joists using a staple gun. B. Do not unpack the insulation blanket until you are in the attic. This will keep insulation fibers from getting into the rest of the building. C. Roll out the insulation blanket between the joists, taking care not to compress it. Tuck it in against the sides of the joists. D. Butt the lengths of insulation up against one another, as required, making sure that there are no gaps between each of the lengths. 

 |
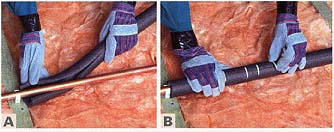
Insulating PipesA. Slide the pipe insulation onto the pipes, keeping the seam facing upwards, so that it can be clipped or taped. B. Cut lengths to fit with scissors or a utility knife and butt them together. Draw the insulation up around the pipe, and secure with clips or tape.
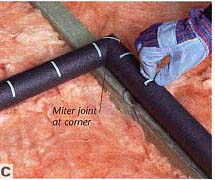
C. At corners, miter the insulation by making a 45-degree cut in the insulation tubing. Slip the insulation into place and butt the two edges together. Join with clips, adding an extra clip across the corner joint, as shown, so there are no gaps. For any valves wrap the pipe with insulation but leave the handle exposed.
|
Moving Around in an AtticWorking in an unfinished attic can be difficult, especially
if there isn’t a floor. Always walk on the joists, as the
surface below the joists may seem like a floor, but it is
actually the ceiling of another room. Lay plywood sheets
across joists to create a stable work area for safety and
efficiency. |

 Working Safely in an AtticProtect yourself from breathing airborne particles of insulation and other materials by wearing a disposable dust mask, closed toe shoes, and gloves when you are handling insulation. Adjust the mask carefully, because proper fit is essential for it to work. The insulation should list the personal protective equipment (PPE) that handling it requires on its packaging. |
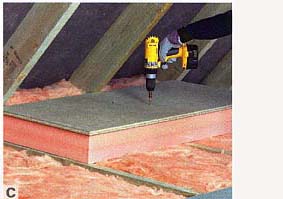
Laying Storage Decking A. Cut wedges of blanket to insulate the joint of the roof rafters and floor joists, but with non-breathable felt leave an air gap behind the wedge. B. Lay the first board across the joists. Butt
the edge of the board up against the rafters. Be sure not to displace
the gap behind the wedge of insulation. C. To hold the deck in position, use one screw
to attach each section to the joist below. Board ends should join
on joists. Glue the board edges with woodworking adhesive, then
fit the boards together using their tongue-and-groove system. |

Insulating Rafters A. Screw lengths of wood along the inside edge of each rafter right up against the roof felt. These furring strips maintain the ventilation gap when non-breathable felt is in place. B. You can increase the depth of the fill space by screwing on 2-x-2-in (50-x-50-mm) wooden furring strips along the roof rafters. C. Fill in the space by wedging the blanket between the furring strips, but do not compress the insulation against the underside of the roof. D. Cover the rafters and the lower knee wall with vapor barrier, then staple the sheets to the joists. E. Attach drywall to the knee wall, butting the boards up against one another. F. Stagger the seams between subsequent boards to ensure that you have complete coverage. Screw the boards to the rafters as you go. For finishing the wall surface.     |
Next: Attics (cont.)
Related: INSULATING WALLS