AMAZON multi-meters discounts AMAZON oscilloscope discounts
Goals:
- Recognize common bottom end engine failures in a two-stroke power equipment engine
- Understand the importance of inspecting the various parts of the two-stroke engine bottom end for damage or wear
- Understand the importance of bench testing an engine prior to completing reassembly
INTRODUCTION
The process of disassembling the bottom end engine assembly is a process in which all engine parts located below the cylinder are removed, inspected, and replaced if necessary. As a technician, it's important that you understand how to disassemble the engine right down to its heart: the crankshaft. It's also important that you know how to inspect engine components, do any necessary repair work, and reassemble the engine correctly.
Disassembly of most engines requires that the engine be removed from the implement it's installed in. Therefore, you should first be sure the malfunctioning component is located in the engine and not the implement it's mounted on. After all, you would not want to remove an engine and disassemble it completely, just to find out that the "failed" component didn't require any disassembly in the first place! This is actually quite common, so be sure the engine you're working on really requires disassembly before you start.
Common Bottom End Engine Failures
The following is a brief discussion of some areas in the bottom end assembly where malfunctions commonly occur.
Leaking Seals
Seals are used on transmission shafts and other rotating shafts within a power equipment engine to prevent oil loss, prevent contaminants from entering the engine and bearings, and prevent the crankcase from leaking. Remember a leaking crankcase causes poor transfer of fuel.
A leaking oil seal requires that the engine's bottom end be disassembled, although in many cases, replacement can be done without disassembly. Therefore, before disassembling the bottom end, always confirm by checking the appropriate service manual if replacement of the faulty oil seal requires complete disassembly.
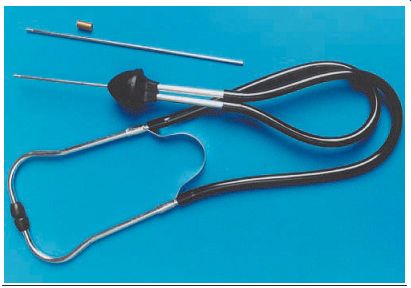
FIG. 1 A mechanic's stethoscope is often used to listen for internal
engine noises.
Worn Crankshaft Bearings
Crankshaft bearings are used to mount the crankshaft assembly into the crankcase. Bearing failure is indicated by a rough, growling sound.
You may wish to use a mechanic's stethoscope (FIG. 1) to help you pinpoint the location of the bad bearing. A mechanic's stethoscope is similar to a stethoscope that a doctor uses to listen to your heart and lungs during a physical examination. It picks up very faint sounds and can pinpoint the location of noises in an engine. Worn bearings may cause excessive up and-down movement of the crankshaft, which can cause seals to leak, which in turn can cause the engine not to start or even prevent the crank shaft from rotating.
Worn Connecting-Rod Bearings
Connecting-rod bearings allow the connecting rod to rotate as the crankshaft assembly turns. The following are some symptoms of worn connecting-rod bearings.
The engine knocks. The engine starts, but won't run freely. The crankshaft doesn't rotate (it's locked up).
Any of these symptoms will necessitate disassembly and repair of the bottom end of the engine.
Repair Procedures
Being alert to other problems by inspecting when you're performing repairs on an engine will help you become a fully competent power equipment engine technician. In this section, we'll list the necessary procedures to inspect and replace worn parts in single cylinder two-stroke air-cooled engines. These procedures apply to all two-stroke engines that you'll work on as a technician.
As mentioned before, be sure that the power equipment engine is clean before you begin any disassembly work. Use a water-soluble degreaser and use it according to the manufacturer's instructions. Remember that dirt or foreign particles can ruin your repairs if allowed to enter the working parts of the engine.
The disassembly of the bottom end of a two stroke engine requires that the top end be removed first. Therefore, we'll assume that the top end of the engine has been removed, using the procedures found in the appropriate service manual.
The procedures in this section are general in nature. Their purpose is to familiarize you with the types of activities you'll encounter when you inspect the components of a typical two-stroke engine bottom end. Always refer to the appropriate power equipment engine service manual for detailed information. The manufacturer's ser vice manual contains all the information to do the job correctly, including detailed instructions for the specific make and model of engine, special tools, and service tips. Above all, the service manual contains appropriate safety information to ensure that your job is completed safely.
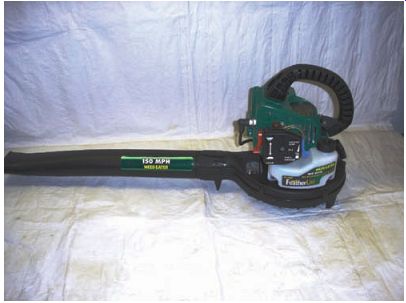
FIG. 2 An air-cooled two-stroke engine to power a leaf blower (used in
this section for illustrative purposes).
TWO-STROKE ENGINE REMOVAL AND DISASSEMBLY
Although two-stroke engines are built by different power equipment engine manufacturers, almost all are disassembled in a similar manner. It's strongly recommended that you use the appropriate manufacturer service manual and follow the procedures therein when disassembling any engine. Incidentally, as in Section 10, we would be using an engine from an air-cooled Weed Eater gas blower, which uses a Poulan engine, for illustrative purposes (FIG. 2). Generally speaking, the procedures for the inspection of the bottom end of all two-stroke engines are similar, from the least to the most expensive engines. Although some engines are considered to be non-serviceable because of high replacement costs (as compared with rebuilding costs), any two-stroke engine can be rebuilt if needed.
As we discussed in Section 10, in most cases, the two-stroke engine top end can be disassembled and inspected without removing it from the implement it's powering. However, to gain access to the two-stroke engine bottom end components, you must first remove the engine from the implement it's powering (FIG. 3). When a systematic approach is used, the procedure to remove a two-stroke power equipment engine is quite simple. However, specific instructions pro vided by the manufacturer for this purpose must be followed. Therefore, the appropriate service manual should always be used as a reference.
FIG. 3 To gain access to the two-stroke engine bottom end components, you must first remove the engine from the implement it's powering.
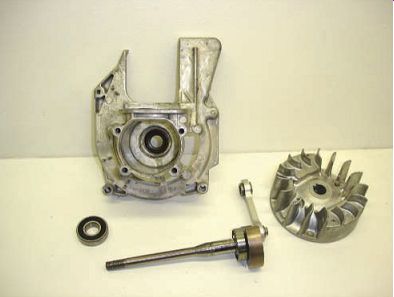
FIG. 4 In most cases in two-stroke power equipment engines, disassembly
is quite simple, as there are not many components, as seen here.
TWO-STROKE ENGINE BOTTOM END INSPECTION
In most cases in two-stroke power equipment engines, disassembly is quite simple as there are not many components involved ( FIG. 4). Once the bottom end of the engine has been disassembled, it's time to inspect each component for damage and wear. As heating the crankcase allows for easier disassembly, a heat gun can be used to assist with the disassembly of the two-stroke bottom end. This prevents damage to the crankcase.
Although you may be trying to locate a particular problem, you should carefully inspect all engine components when the engine has been disassembled. Because a complete engine disassembly is a lengthy procedure that isn't done frequently, it's important to make sure that the job is done right and that there are no existing or soon-to-occur problems. We'll learn how to inspect the bottom end of a two-stroke engine, beginning with the engine crankcase.
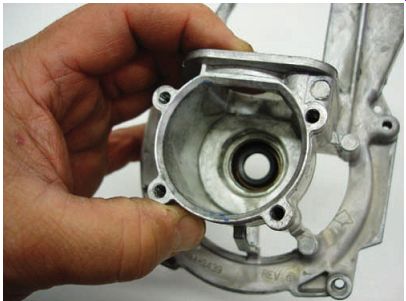
FIG. 5 When inspecting the crankcase, look closely for cracks, loose-fitting
bearings, and worn out fastener anchoring points.
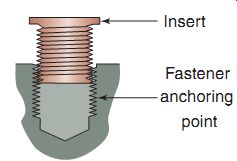
FIG. 6 An insert that would assist in the repair of a stripped fastener
anchoring point.
Inspecting the Engine Crankcase
The engine crankcase (FIG. 5) should be closely inspected for cracks, loose-fitting bearings, or worn-out fastener anchoring points.
If there are stripped bolt holes, they may be repaired using a special thread repair kit that reconditions the hole (FIG. 6). The HeliCoil and the Time-Sert are two popular thread repair systems, which should be available from an automotive tool supplier.
Inspecting and Replacing Engine Seals
Engine seals are designed to retain oil in the engine compartment and keep air out of the crankcase of a two-stroke engine bottom end. Their most important function is to prevent crankcase pressure from leaking around the crankshaft. Seals are located on all two-stroke engine shafts that rotate, and they're exposed to the outside atmosphere and internal engine oil that must be separated from the engine's crank shaft (FIG. 7).
Although today's engine seals are durable, it's important to inspect them to verify that they're in good condition. Inspect the oil-seal lip for wear and damage. Depending on its location, damage to the lip of the oil seal may result in leakages of air into the engine, transmission oil into the crankshaft compartment, or transmission oil from inside the engine to the ground. Inspect the seals carefully. If a seal isn't in perfect condition, replace it. The rubber of the seal must be "live," that is, the lip of the seal must be soft and springy.
Virtually all engine seals have a small coil spring that fits on the seal lip to apply pressure to the shaft (FIG. 8). Some seals have two lips, one on each side to seal both pressure and vacuum.
Be sure this spring is attached properly. If it's not in place, even a good seal will leak.
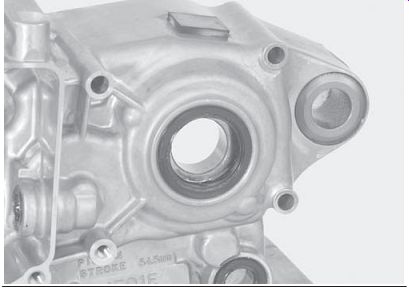
FIG. 7 Engine seals are located on rotating shafts and are designed to
keep oil in, keep oil out, or in certain cases on a two-stroke engine, keep
air out of the crankcase.
FIG. 8 The parts of a seal.
Always install a new seal if you have any doubt about the condition of the old one. Also, install new seals whenever you replace any bearings that have a seal next to them.
Before you remove any seal, be sure to note how it's installed, as seals will work correctly only if installed in the proper direction. Once removed, you should never reuse a seal, as it would have suffered damage while being removed.
If you remove a seal, replace it with a new one. Because you should never reuse a removed seal, the removal process becomes pretty simple. Seals can be carefully pried out of the cases by using a screwdriver or by using a special seal removal tool (FIG. 9). When removing seals be sure to be careful not to damage the crankcases.
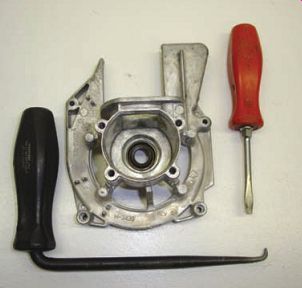
FIG. 9 You can purchase special tools to remove seals or, in many cases,
just pry it out with a screwdriver. Never reuse a seal once it has been removed.
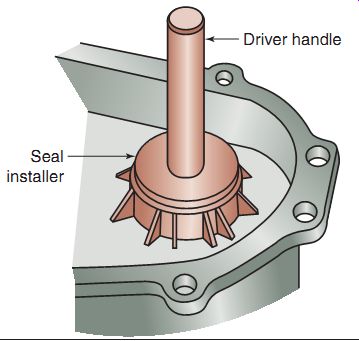
FIG. 10 Seals need to be installed correctly and evenly by using a special
seal installation driver that rests on the outside of the seal.
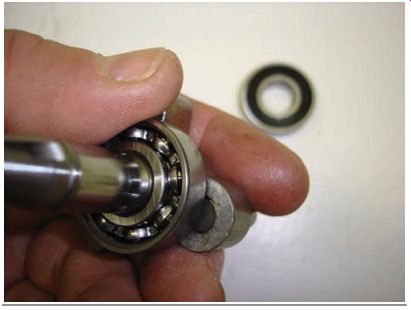
FIG. 11 Ball bearings are the most common bearing found in a two-stroke
engine and are easy to inspect for wear or damage.
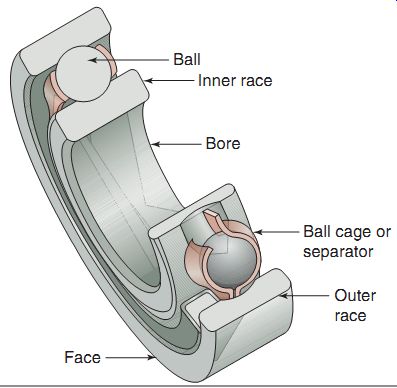
FIG. 12 A cutaway illustration of a ball bearing.
A new seal must be installed evenly in the hole. Use a seal installation tool to assist in placing a new seal correctly (FIG. 10). Be sure to install the seal into the case properly. Generally, the seal manufacturer's identification number is on the side away from the bearing or shaft to be sealed. Check the appropriate service manual to be certain that you do install the seal correctly. Lubricate the seal with the recommended lubricant before installing the seal. This can be either oil or grease depending on the manufacturer's recommendation.
Some engine seals are located on the inside of the crankcase cavity and can be replaced only when the crankcase halves are separated. It's always a good idea to replace this type of seal.
Inspecting and Replacing Engine Bearings
The most common bearing that you'll find in a power equipment two-stroke engine is the ball bearing. Remember that bearings usually make a low growling sound when they're failing. You can inspect a bearing by hand while it's still mounted in the crankcase or on its shaft (FIG. 11) by rotating the bearing inner race (or outer race if the bearing is outside of the crankcase) and feeling for smooth operation. If a bearing has a rough feel or makes a noise when you rotate it, the bearing should be replaced.
Also, visually inspect the inner and outer races, balls, and ball cage of the bearing (FIG. 12). If there is any sign of wear, chips, cracks, or damage, the bearing must be replaced.
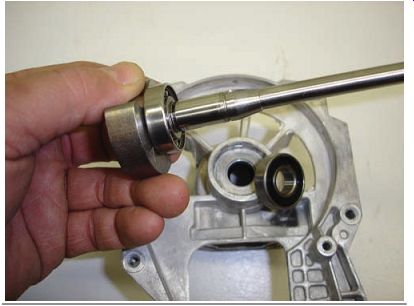
FIG. 13 Ball bearings must be driven out of the crankcase or pulled off
the shaft it's installed on.
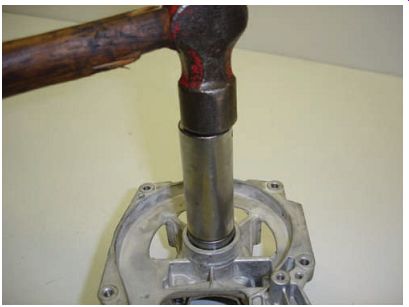
FIG. 14 A bearing being driven into the crankcase.
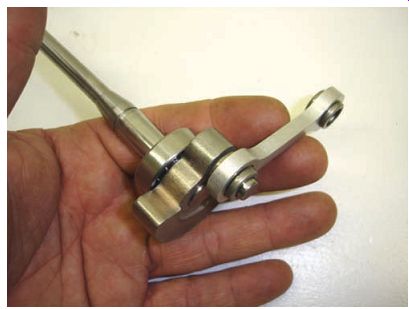
FIG. 15 Crankshafts in small two-stroke power equipment engines are often
single piece units that look like one half is missing.
To replace any two-stroke engine bearing, you must first remove the old bearing by driving it out of the crankcase or pulling it off the shaft (FIG. 13).
Ball bearings are held in the case by a tight fit, which is called an interference fit. Before installing new bearings, you may want to put them in a freezer. When bearings are placed in a cold environment, they will shrink slightly, which will make their installation easy. You can also heat the crankcases on a hot plate or by using a heat gun to expand the case metal before installing the bearings. However, doing so may allow any other bearing in the cases to fall out.
As just mentioned, placing cool bearings into a warm case makes for easy installation, while also ensuring a tight fit when both the bearing and case have returned to room temperature.
This is because the cooled bearings expand as they warm up, and the warmed case shrinks as it cools down. When installing bearings, be sure to strike the bearing only on its outer cage ( FIG. 14), or else you'll risk damaging the bearing inner cage. Pre-lubing the engine parts will provide assurance that there hasn't been a lack of lubrication when first starting the engine after assembly. Use a small amount of two-stroke oil on all bearing and surfaces when reassembling.
Inspecting the Crankshaft
Crankshafts in many home-owner quality, small two-stroke power equipment engines are often single-piece units that look like one half is missing (FIG. 15). This is due to the fact that many two-stroke engines are very small in size and a full size crankshaft isn't needed because of the relatively low power being developed. Inspecting this type of crankshaft consists of ensuring that there are no signs of wear on the bearing surfaces.
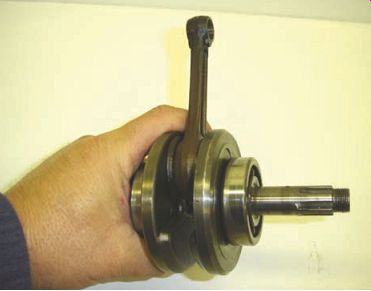
FIG. 16 A multi-piece crankshaft is often re-buildable.
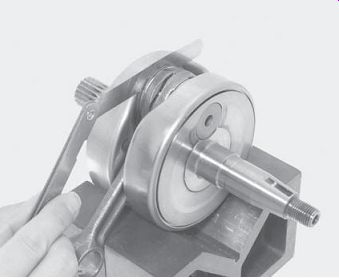
FIG. 17 Measuring crankshaft side clearance with a feeler gauge.

FIG. 18 (a) Measurement of radial clearance with a dial indicator.
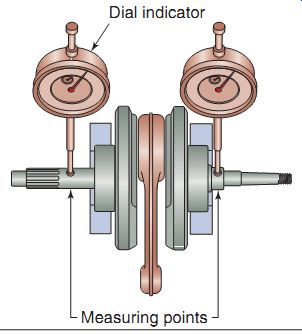
FIG. 19 Measuring a crankshaft for trueness requires V-blocks to set
the crankshaft on and two dial indicators.
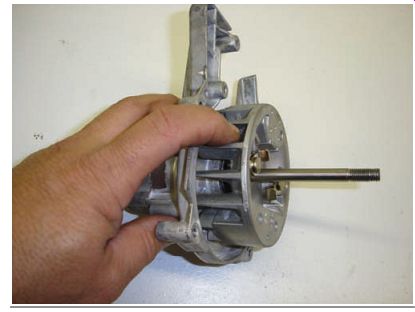
FIG. 20 Before completing reassembly, always check to ensure that the
bottom end components turn freely.
Inspecting the Multi-Piece Crankshaft
While many smaller home-owner quality, two-stroke power equipment engines use a single-piece crankshaft, most high-end units use a multi-piece crankshaft. You'll find that two-stroke engines that use multi-piece crank shafts can in most cases be rebuilt if worn or damaged. The most commonly replaced part of a two-stroke engine crankshaft is the connecting rod and its bearing (FIG. 16). The crank shaft connecting-rod lower bearings are usually of the roller type and are often replaced as a set with the lower crank pin and connecting rod.
Replacement of the connecting-rod lower bearing unit requires separation of the flywheels and is in most cases the type of job that is sent to a machine shop that specializes in such repair.
Typically, a technician visually inspects a crank shaft and makes three measurements.
Side clearance is required to ensure that there is enough space between the connecting rod and the crankshaft flywheels. This is a measurement that is done using a feeler gauge (FIG. 17). The specification for this measurement can be found in the appropriate service manual.
Radial clearance is a measurement of the up-and-down motion of the connecting rod at the lower bearing. To check this clearance, the crankshaft will need to be placed on a pair of V-blocks, which will hold it above the bench, and then checked with a dial indicator (FIG. 18).
Runout is checked with the use of two dial indicators (FIG. 19) and includes checks on the trueness of the crankshaft. This measurement is also done on V-blocks and assures the technician that the crankshaft is straight and not twisted, which makes the engine vibrate excessively.
Bench Testing
After you've completed the reassembly of the bottom end of the engine, it's good practice to verify if all components are moving freely and properly. You wouldn't want to discover that there is a problem after you've completely reassembled the engine and installed it into the chassis.
Bench testing refers to the process of verifying the correctness of reassembly. To ensure that the bottom end assembly is operating satisfactorily, turn the crankshaft to make sure it moves freely (FIG. 20). When you're satisfied that all components have been assembled correctly and turn freely, you're ready to reinstall the top end onto the crankcase and complete the installation of the engine into the implement it powers.
Remember always to use the appropriate service manual when reassembling the engine.
Summary
It's important to understand how to recognize common bottom end engine failures in a two-stroke power equipment engine.
It's important to inspect all of the components of the bottom end of a two stroke lower end while the crankcases are apart for any reason to ensure that there will be no cause to have to disassemble the engine again after the initial repairs have been made.
By bench testing an engine prior to completing reassembly, you'll know that all internal parts of the engine are working properly.
QUIZ
1. An engine should always be replaced with a new one if it's removed.
2. Ball bearings are held in the engine cases by an i t.
3. The bearing is the most popular bearing used to support the crankshaft of a two-stroke engine.
4. The two-stroke engine crankshaft connecting rod is generally of a single-piece design. (True/False)
5. After you've completed the reassembly of the bottom end of the engine, it's good practice to verify that all components move freely and properly. (True/False)