Computer-aided design
Over the last decade, most companies have finally completed the transition from manual drawings to computer-aided design (CAD). As a result, students and engineers are now familiar with these tools as a normal way of doing business.
The emphasis today in manufacturing is how in formation moves from one location to the next.
The most important development in CAD systems in the last few years has been the introduction of three-dimensional (3D), solid-modeling software. Solid modeling allows a design engineer to create a precise mathematical and graphical representation of the final design.
All downstream applications, including tool design, can leverage the solid model to carry forward the original design intent. The use of 3D CAD also can significantly reduce the time required to generate 2D drawings. In many systems, the drawings generated from the solid model are parametrically linked with one an other, so changes to the model are automatically reflected in the drawing.
Although a 3D solid model generated by design engineering may be mathematically complete, the geometric dimensioning and tolerancing (GD&T) information necessary for manufacture may not be included. Some CAD systems have addressed this by allowing a GD&T annotation to be incorporated into the 3D solid model.
Product manufacturing information (PMI) is a new information mode that places GD&T, finish requirements, and inspection data in/on a 3D solid model. The information is visible even when dynamically rotating the model. As CAD software has evolved, use of this tool has become commonplace. This has greatly automated the production of 2D drawings. Drawings may re main in shops, but more as a Reference tool than the official design definition.
While CAD is the most common computer application being used in tool design, rapid prototyping, simulation, tolerance analysis, design document management, and 3D parametric solid modeling are also important. 3d solid modeling
Without the ability to represent the third dimension, 2D CAD must depend on conventional practices, such as multi-views, to represent a 3D object indirectly. Because of this, the usefulness of the design process is limited. Digital 3D modelers create models with a closer one-to-one correspondence to the real object. Solid-based modeling can be created in the computer without the time and effort necessary to build real-world equivalents (FIG. 1). Although the ultimate goal is to manufacture or construct the real object, the goal in the design process is to experiment and test numerous solid models in the early stages of design, which can speed the process considerably.
Three-dimensional modeling plays an important role in many manufacturing techniques, including CAD, computer-aided manufacturing ( CAM), computer-integrated manufacturing (CIM), concurrent engineering (CE), and design for manufacturability (DFM). All are aimed at shortening the design cycle, minimizing material and labor expenditures, raising product quality, and lowering the cost of the final product. Central to these goals is better communication within a company. By sharing a 3D database of information for a proposed product, more people can work simultaneously on various aspects of the design problem. The graphic nature of the database has convinced many that 3D modeling is a superior method of communicating design intents.
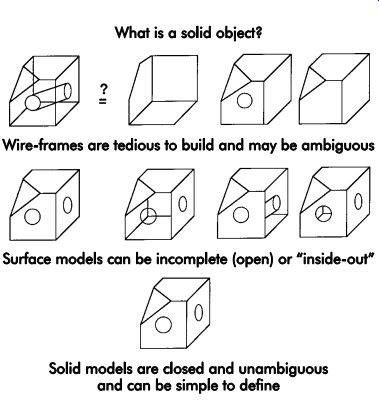
FIG. 1. CAD software systems have evolved from wire-frame geometries to
surface models, to the current generation of parametric solid models. Solid
models are closed (no holes in geometry) and unambiguous.
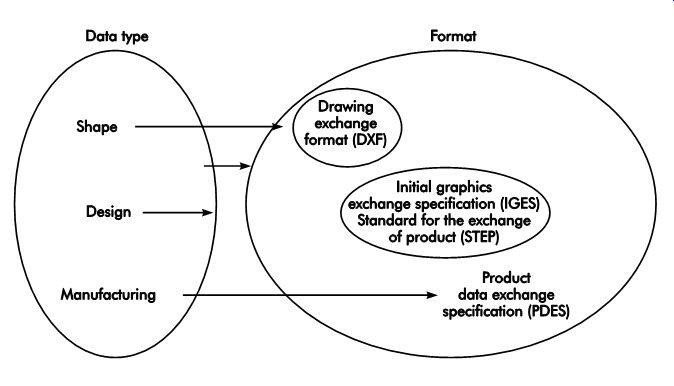
FIG. 2. The types of information contained in neutral data exchange formats.
Data exchange standards are designed to support differing amounts of information
relating to design and manufacturing.
Engineering design transfer
The evolution of 3D solid modeling has given the tool designer use of the same tools as the product design engineer. In addition to inter active viewing and collaboration, actual data transfer is facilitated by the Internet. Traditional issues caused by dissimilar CAD systems still exist because tool and product designers often do not use the same CAD system. CAD data must be translated using some neutral format or a direct translator. The most common neutral formats are the initial graphics exchange specification (IGES), standard for the exchange of product (STEP), and drawing exchange format (DXF) (FIG. 2). DXF is a standard from the developers of AutoCAD. Due to the longevity and dominance of AutoCAD in the CAD world, DXF has become one of most widely used data exchange formats. DXF is an American standard code for information interchange (ASCII) text file containing both 2D and 3D geometric and topological information.
In 1980, the ANSI Y14.26 standards commit tees voted to adopt IGES. Like DXF, IGES was designed to write to an ASCII text file. In 1984, the International Organization for Standardization (ISO) began trying to combine the European and U. S. standards into a single standard, STEP model data. This standard attempts to integrate European standards and IGES with standards that contain larger subsets of information. These data exchange formats have evolved. STEP now is primarily used for solids, and IGES and DXF for wire-frame and 2D. Because implementation of these formats vary among CAD systems, all translators should be thoroughly tested with bench mark files before being used for production.
Collaborative engineering
For any tool design to be a success, the designer has to be involved early with the product design engineering staff. The tool designer, however, cannot actually commit tooling for production until the product to be built is finalized. While the ideal environment would be for the product and tool design personnel to use a common database, tool designers are not typically aligned with design engineers. In modern multinational corporations, people can be located anywhere. Therefore, while a common database is desirable, it is not practical.
Tool designers and product design engineers can share information in ways that were not possible just a few years ago with the advent of the Internet and collaboration software. For example, people in multiple locations can review a product design simultaneously.
Various types of collaboration software products enable simultaneous viewing of CAD models or a representation of them. Collaboration soft ware provides simultaneous sharing of interactive CAD sessions. Most of these systems allow any of the users in the session to take control of it from their location. Communication methods that provide sharing and access capabilities include the World Wide Web, allowing outside companies access through a company's firewall, or a combination. Given current bandwidth capacities, a typical collaboration session can be a combination of audio and sharing screens over the Internet. Participants also can initiate data transfers during the session. Required security levels normally are dictated by the policies of the respective company. Editable designs are usually "checked-out" to a single designer. The "check-out" concept eliminates multiple users saving over the master file-thus preventing loss of data integrity.
PMI presents a 3D solid model of a desired product (or tooling component) with attached viewable data. The viewable data included with the model provides for better and clearer explanations of the part. The data communicated may consist of: critical dimensions, texture with callouts, weld specifications, detailed inspection criteria, etc., and it is all readily available while viewing the 3D model. The proper application of PMI reduces the number of drawings or may possibly totally eliminate the need for a physical 2D paper drawing. Including 3D product definition in a single viewable file improves productivity and typically eliminates errors as the data is easier to find in the PMI file as opposed to a (possibly) complicated set of 2D drawings. No hardcopy documents are needed if all users of the data have compatible "view and markup" software.
Collaborating among fellow workers and suppliers is fast and accurate. Proper application can shorten design cycles, streamlining the design and manufacturing processes. Tooling companies are applying PMI technology to critical tool design assemblies. Shop-floor requirements of various tooling component specifications can be communicated easily using PMI.
Rapid Prototyping and Manufacturing
Rapid prototyping and manufacturing (RP&M) encompasses a group of technologies capable of directly producing physical objects from computer-generated data. This data, whether from CAD files, computer-aided tomography (CAT) scans, or 3D digitizers, serves to guide a mechanical sys tem that builds a solid object in thin, horizontal cross-sections with each layer adhering to the previous one. RP&M technology enables designers, engineers, and tool developers to join together liquid, powdered, extruded, and sheet materials to form prototypes, scaled models, functional models, casting patterns, shell molds, actual production parts, and short-run tooling (see FIG. 3).
Rapid prototyping parts and assemblies typically used in design engineering during the initial design stages also can communicate product de signs to tool designers. Rapid prototyping models have been used to check tooling designs for fit and function. RP&M technology was initially developed to re duce the lead time required to produce prototypes used to evaluate studies by engineers and designers. Now, this technology is used to reduce part costs and increase the speed of production. The processes also have been applied in the biomedical and microelectronics fields.
Stereolithography, or 3D printing, was the name given to the initial process. As other technologies developed, other terms followed, such as desktop manufacturing, toolless model-making, and automatic fabrication. Today, the generally accepted name is RP&M, though the term "solid free-form fabrication" also is used.
Innovations
Increasingly, manufacturing industries need to reduce product development time to be competitive. RP&M is a fast approach to the design, prototype, and manufacture of new products.
This need to reduce product development time, together with the growth of computers in design offices, has motivated inventors to create new ways of producing physical objects from computer model data.
Rapid prototyping had its beginning in the late 1970s. The first system combined two emerging technologies-CAD and photo-curable polymers-into a machine that fabricated intricate geometries by building them one layer at a time.
The first commercial RP systems became avail able in the late 1980s. Early applications were limited to basic prototyping, but with the fabrication of functional parts, RP&M has developed into a technology capable of improving visualization, shortening product development time, optimizing product quality, and discovering design flaws.
While some industries are just starting to implement RP&M for the first time, others have already acquired several systems. A number of organizations have three or four entirely different systems from various vendors, since each fundamental technology produces pieces with different end properties at different costs and accuracies.
RP&M processes are dramatically altering the way companies design, model, prototype, tool up, and manufacture new products.
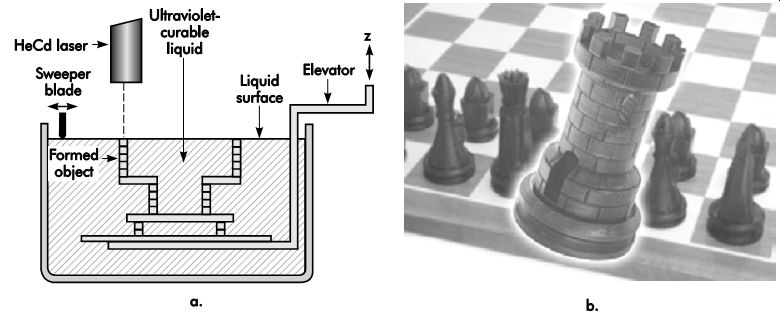
FIG. 3. (a) The stereolithography process, and (b) the finished product.
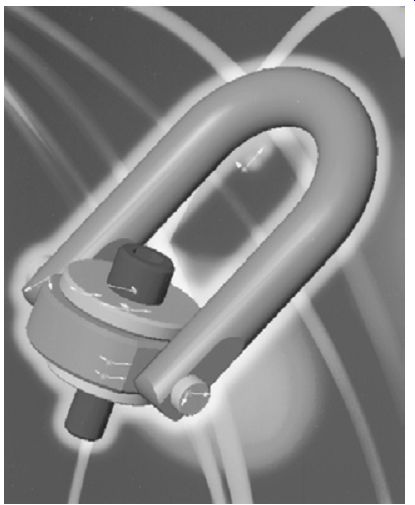
FIG. 4. Example of a 3D solid model.
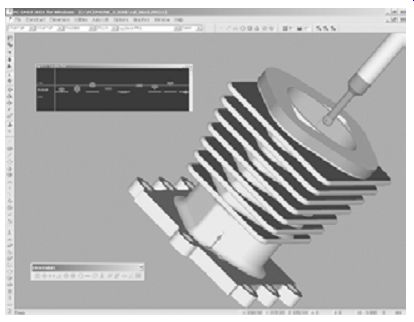
FIG. 5. A typical computer screen shot of an STL file.
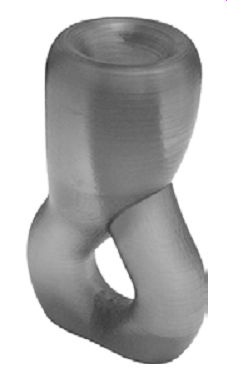
FIG. 6. Sample surface model of a cured liquid resin part.
Methodology
To create a 3D computer model of a part to be built, digital data from any of various modeling packages are converted into a standard stereo lithography (STL) file format and transferred to the RP&M computer.
CAD software creates models in various forms: two-dimensional, two-and-one-half dimensional, three-dimensional wire-frame, three-dimensional surface, and three-dimensional solid. Yet, RP&M processes require CAD data as either solid models or 3D-surface wire-frames (FIG. 4). Agreements are being developed that facilitate accepting other data formats in addition to STL files. The STL file approximates the shape of a solid model using a mesh of small triangles called facets. The smaller the facet size, the more accurate the surface approximation, at the expense of increased file size and processing speed. The vertices are ordered to indicate which side of the triangle contains the mass. If one were to view the contents of an STL file, there would be a list of X, Y, and Z coordinates that describe a surface mesh made of triangular facets (FIG. 5).
RP&M system software cuts the STL file data into thin horizontal cross-sections, generally .005-.020 in. (0.13-0.50 mm) thick. The system control software then uses the stack of digital cross-sections to produce each fused or joined layer of material, one on top of the next. A number of RP&M systems are commercially available in the United States, Europe, and Japan, with many others under development.
• Stereolithography (FIG. 6) uses an ultraviolet (UV) light source to cure liquid resin selectively, thus forming the desired model.
• Selective laser sintering (SLS) works with an infrared laser to sinter plastic powders and waxes.
• Fused deposition modeling (FDM) (FIG. 7) employs an extrusion head to melt and deliver plastic or wax wire to build a model.
• Direct-shell production casting (DSPC) uses an ink-jet nozzle to apply a liquid binder to ceramic powder. This process is unique in that it creates a shell mold from which a part can be cast, whereas the other processes produce the part directly.
Each RP&M system has unique features and applications, making it unlikely that any one system will totally dominate the market.
These systems can help manufacturers reduce time-to-market cycles and get their products out more quickly, an important factor in an increasingly competitive world market.
3d printing
A newer generation of RP&M technology is generally referred to as 3D printing or desktop RP (FIG. 8). These office-friendly machines can sit next to CAD workstations, office copiers, and fax machines. Some are used by the design engineer for concept modeling and early design review and approval. Rather than submit an RP&M job and wait for days, 3D printers bring the technology within reach, literally, of design groups running CAD solid-modeling software. While the term 3DP (three-dimensional printing) was trade marked for use with the technology developed at the Massachusetts Institute of Technology (MIT), it is now commonly applied and accepted across multiple technologies. Companies with commercial licenses from MIT use a wide variety of proprietary base powders and liquid binders to form products from starch, metals, plaster, ceramics, and even medicines and real or synthetic bones.
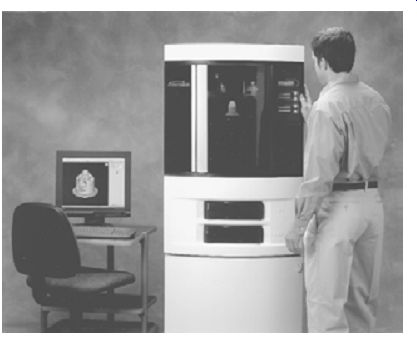
FIG. 8. A common 3D printing system.
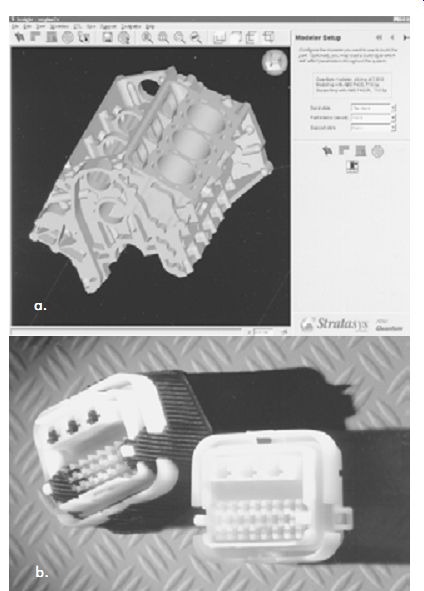
FIG. 7. (a) A typical computer screen shot of the fused deposition modeling
process, and (b) a finished product.
Applications
RP&M applications include the production of patterns for shell investment-cast functional metal parts, development of soft and hard tooling, human replicas, art, jewelry, perfume containers, all kinds of automotive and aerospace parts, and photoelastic part studies. The variety of parts and assemblies is unlimited.
RP&M was used to verify the form, fit, and function of various parts at an automotive manufacturer. The design team developed a new automatic transmission shift handle. To verify the form of a part, a solid model was created in a CAD system and the part was built using stereolithography.
The 3D model revealed several problems with the original design. The handle was too large for a person with small hands and uncomfortable for gear shifting. Following this discovery, three additional models were made at 8%, 10%, and 12% reductions in size with very little time delay. It was determined that the RP&M process saved $40,000 and 18 weeks of additional design time over the conventional prototyping method. The traditional method would have required a functional proto type shift lever to be manufactured before the sizing problem would have been discovered.
In another application of RP&M, the same company used it to prove the fit of a starter.
The starter was designed for a European export version of a U.S. car model with a turbo diesel engine. It was redesigned in France, but existed only as a CAD file. The CAD file was downloaded to an RP&M machine at the company and a starter housing was built. Not only did the starter fit, but the battery cable and wire harness were developed as well.
Service bureaus
In the late 1980s, service bureaus began pro viding RPM services to manufacturers. RP&M became available in Europe and Japan via this expanding base of service bureaus.
An increased need for RP&M gave rise to the establishment of service bureaus that would al low companies to benefit from the technology without actually purchasing and operating the equipment. Many companies, after utilizing ser vice bureaus for a time, decide to purchase their own RP&M machines. Service bureaus allow potential users the opportunity to experiment before buying the technology, or simply to use the latest technology without investing in equipment that might become dated shortly thereafter.
However, if parts are built in-house with on site equipment, they may be turned around more quickly than at a service bureau. Additionally, control is maintained and secrets are kept inside the company. If a system is purchased, a budget for the people needed to operate it and finish parts must be carefully researched. Consider the cost of training, system maintenance agreements, materials and other consumables, and any facility changes that the system might require.
Cost Justification
Most RP&M users employ CAD software with solid-modeling capabilities. This limitation often requires the change to different software and incurring the associated costs of hardware and employee training. Solid-modeling software produces closed volumes and ensures a good data file; it is the place to start if RP&M is in a company's future plans.
The decision to purchase RP&M systems depends on several factors, such as the number of parts to be built over a period of time. For example, if two parts a month are built at an average cost of $1,000/part, $24,000/year is spent on prototype parts. This may not be enough volume to justify the purchase of an RP&M system. However, if five parts a month are built at the same average cost per part, $60,000/year is spent. In this instance, it may make sense to consider the purchase of a system. RP&M systems range in price from about $100,000-500,000, while 3D printers are offered at $40,000-70,000.
Simulation
A tool designer involved in building a complex machine or mold often will use simulation and analysis to study mechanisms. Full-motion characteristics of the mechanical design can be viewed and analyzed before valuable manufacturing resources are committed.
Simulation software has saved significant amounts of time and materials in the casting process as well. Software analyzes the flow of materials being poured into a mold and deter mines hot and cold spots and voids. The mold designer working with the design engineer can adjust the mold or casting process before the first part is ever made.
Tolerance analysis
Tolerance analysis software is used to evaluate, optimize, and validate the capability of proposed designs. The primary purpose of tolerance analysis is to make sure that when all tolerances are summed, or stacked, in a worst-case situation, the final design is within the original product specifications.
Design document management
Tool designs, as well as the physical tools them selves, must be controlled and stored so they can be easily retrieved. Changes in product design often can require a change to tooling as well.
The information contained on tool design drawings is critical to the maintenance of tools and machinery. It is not unusual to request that all of the tooling associated with a product or project be identified. Document management systems used to manage engineering design drawings can be tailored for tool design as well. The future direction for corporations will be to establish corporate-wide databases from existing isolated pockets of product design, tool design, and other information. The challenge is to set up information so future employees have access to lessons learned from previous projects.
References
Bedworth, D., et al. 1991. Computer-Integrated Design and Manufacturing. New York: McGraw Hill, Inc.
Bertoline, G. R., et al. 1995. Fundamentals of Engineering Design Graphics. Burr Ridge, IL: Richard D. Irwin, Inc.
Conkol, G. K. (ed). 1994. The Role of CAD/CAM in CIM: The Perspective. Dearborn, MI: Computer and Automated Systems Association (CASA) of the Society of Manufacturing Engineers (SME).
Jacobs, P. F. 1992. Rapid Prototyping and Manufacturing: Fundamentals of Stereolithography.
Dearborn, MI: Society of Manufacturing Engineers (SME).
Jacobs, P. F. 1996. Stereolithography and Other RP&M Technologies. Dearborn, MI: Society of Manufacturing Engineers (SME).
Marks, P. (ed). 1994. Process Reengineering and the New Manufacturing Enterprise Wheel: 15 Processes for Competitive Advantage. Dearborn, MI: Society of Manufacturing Engineers (SME).
Mills, A. 1998. Collaborative Engineering and the Internet. Dearborn, MI: Society of Manufacturing Engineers (SME).
Orady, E. A. 1990. "Design and Development of an Expert System for Simultaneous Engineering." SME Technical Paper MS90-431. Dearborn, MI: Society of Manufacturing Engineers (SME).
--. 1989. "Design and Development of Manufacturing Evaluation System for Rotational Parts." pp. 51-56. Proceedings 15th Annual Conference of ASME. New York: American Society of Mechanical Engineers.
Rapid Prototyping Systems: Fast Track to Product Realization. 1994. Dearborn, MI: Society of Manufacturing Engineers (SME).
Schrader, G., and Elshennawy, A. 2000. Manufacturing Processes and Materials, 4th Edition. Dearborn, MI: Society of Manufacturing Engineers (SME).
Shetty, D. 2002. Design for Product Success. Dearborn, MI: Society of Manufacturing Engineers (SME).
The New Manufacturing Enterprise Wheel. 1993. Dearborn, MI: Society of Manufacturing Engineers (SME).
Tool Designer's Assistant. 1993. St. Louis, MO: Carr Lane Manufacturing Co.
Wohlers, T. 1996. Rapid Guide to Rapid Proto typing. Minneapolis, MN: Wohlers Associates, Inc./Stratasys, Inc.
Zied, A. 1991. CAD/CAM Theory and Practice. New York: McGraw-Hill, Inc.
Other Refs.
The Society of Manufacturing Engineers (SME) has developed the Fundamentals of Tool Design video series, which comprises nine DVDs, of which two relate directly to this section's con tent: Computer Aided Design (28 minutes) and Rapid Tooling Design (26 minutes).
The first, Computer Aided Design, explores the use of computers and software to digitally create engineering drawings and models to aid in tooling and product design. This program re views the tools and techniques used within four fundamental computer-aided design categories: two-dimensional CAD; three-dimensional modeling; 3D assembly design; and CAD analysis.
The second, Rapid Tooling Design, explores the development and application of various direct and indirect rapid tooling technologies used to create injection molds. Written by renowned rap id prototyping industry specialist, Todd Grimm, this video examines the tool design practices that leverage the advantages and address the limitations of the various technologies.
QUIZ
1. Identify the most significant trends concerning CAD in tool design.
2. What does the concept of "collaborative engineering" provide during the tool design process?
3. Illustrate the relationships between data types and associated formats.
4. What is the most widely used data exchange format?
5. What are the most common neutral formats used for data transfer?
6. Define the acronyms CAD, CAM, CIM, DFM, CE, RP&M, DXF, GD&T, CAT, and ASCII.
7. What constitutes the basic concepts of RP&M?
8. What does an STL file approximate?