Consider the door back: First, it’s a good mounting surface; second, it’s easy to get to; and third, it’s already attached to your closets and cabinetry. Add these merits up and you discover a hidden storage potential. Door-back pockets transform this potential into efficient storage space and put frequently used things conveniently at your fingertips; just open the door for instant access. You will also notice that drawers, cabinets, and closets work much more efficiently when you’ve lightened their storage load by putting some of their contents into door-back pockets.
Use pockets to turn your closet into a one-stop dressing room. Stockings, socks, underwear, lingerie, accessories, combs, and brushes all slip into pockets with ease, freeing drawer space and putting your whole wardrobe in one place. If you’ve got bi-folding or sliding doors, replace them with hinged doors to take advantage of pockets. Pockets also solve bathroom storage problems easily and well. Design them to hold grooming or shaving things— hair equipment such as dryers, curlers, and combs; makeup, lotions, sundries, and soaps; facecloths, sponges, and the children’s bath toys.
In the kitchen, mount pockets on cabinet door backs. Small containers such as yeast packets, condiments and spices, or heavy cans, bottles, and jars store equally well here. Slip lids into pockets that are fitted with lengthwise dividers; you’ll free cabinet space, and the lids will be easy to take out and replace. See below for information on dividers.
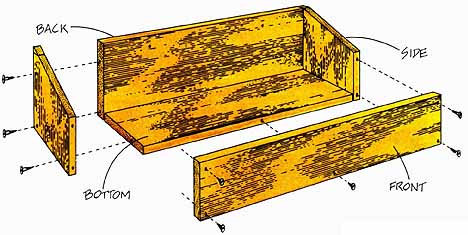
Designing Pockets: Each pocket consists of sides, bottom, a front or lip, and a back, plus any interior partitions you might add. As you plan your pockets, keep in mind:
— the number and size of the items you plan to store there. This will guide you in figuring the height and depth of the pocket and the shape of the lip.
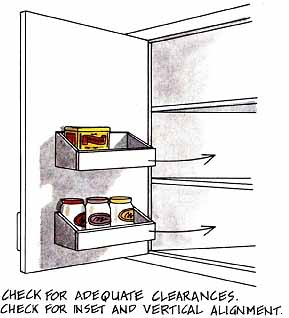
— clearance for closing the door. The door swings in an arc; the pocket must be inset enough to allow the door to close.
— the pocket’s vertical alignment. You don’t want it bumping into either the existing shelves or their contents.
— the door material and construction. Solid doors can receive the pockets directly. Older cabinet doors are almost always made of solid material, which is a good mounting surface. New cabinet doors may be hollow-core, panel-frame, or metal, and will need a 1/2-inch backing sheet. To determine your door’s material and construction, tap gently across the face of it; if it sounds tinny or hollow, it probably is.
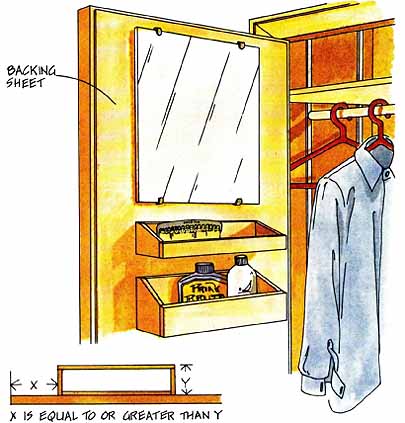
Measure the space, noting existing shelves and other factors (door knobs, backing plates, hinge positions) that may affect your plan. Record the dimensions on a freehand sketch. Plan the number of pockets you want, their sizes and shapes, and their positions on the door. Use the sketch to figure the length-to-depth ratio so that your door can still close. The formula is this: The pocket must be inset from the door’s opening edge by an amount equal to or greater than the length of the side.
Construction: Cut the material to size; if you want curved front lips, make these cuts now, using a curve- cutting saw.
Assemble the parts with glue and nails or with screws. First fasten the sides to the bottom, then apply the front and back, and insert and fasten any interior dividers. If you are applying the pockets directly to a solid door, sand and finish them as desired.
Hold the pocket in place on the door back and check to be sure the door will close. If there’s a problem, reposition the pocket closer to the hinge side so that the door will still open and close. Pre-drill for the screws and fasten the pocket onto the door back. For panel-frame, hollow-core, or sheet-metal doors, use the backing sheet method.
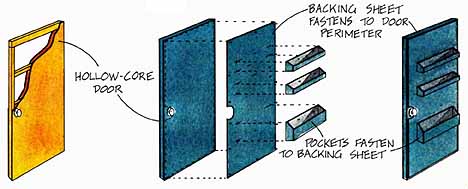
Backing Sheet Method: Measure the surface to which you will mount pockets; note factors such as door stops, door knobs, and backing plates that will prevent a snug fit between the door back and the backing sheet. Record the dimensions on your sketch, and plan a backing sheet of 1/2-inch plywood large enough to overlap the solid perimeter, yet small enough to miss the obstructions; cut a notch in the backing sheet to fit around the door knob and plate if you need to. (To determine the dimensions of the solid perimeter, tap across the door face, listening for the spot at which the hollow sound stops.) Check your measurements again and cut the backing sheet to size. Mark the positions of the pockets directly on the backing sheet. Measure again to be sure the door will close, and then screw the pockets down.
Hold the backing sheet and pocket assembly in place on the door back and check again to be sure the door will close. Mark the position of the assembly, and pre-drill the screw-holes. Then mount the assembly, using wood screws for wood doors or sheet-metal screws for sheet-metal doors. Paint, or finish with stain and a sealer coat.