Storage options must be tailored to individual needs and style. A formal living room can demand an elegant wall-storage system. It serves mainly as a display case yet holds an entire media (aka entertainment, hi-fi or home-theater) system which may be concealed when not in use.
Whether you own or rent the space you call home, you probably wish it
were bigger. That’s a common lament: There just isn’t enough room for
everything.
And who has the strength of character—or a strong enough
back—to solve the problem by hauling armloads of stuff to the nearest
dumpster?
Well, relax. You have more alternatives than living in clutter or throwing out treasures. And you have help: With this guide, you can learn to make efficient use of the space you already have and create new storage areas.
The goal of a good storage plan is to keep items safe, secure, and readily available when you need them. Achieving this goal requires more than a few storage bins and some shelves. Implementing a storage plan involves organizing your space and your belongings.
This section will get you started with some planning tips, plus instructions to build the basics units of storage systems.
Later sections take you through specific areas around your home: the kitchen, bath, arid laundry and utility rooms; bedrooms and closets; living and working spaces; then attics, basements, garages, and your yard. Each section begins with ideas you can use to develop storage solutions then guides you through do-it-yourself projects designed to get “stuff’ under control.
Analyzing the Problem
Most older homes lack adequate storage space, partly because it rarely was a design priority. Architects today think more about storage. But even when a house has plenty of space, using it to your best advantage requires good planning.
DEALING WITH MORE AND MORE
Over the years, all of us tend to accumulate possessions. One moving company estimates that the average household grows by 1,000 pounds of property per year. Households expand even if the size of the living space does not. Babies need diapers, high chairs, strollers. Then children grow out of clothing and toys. Your own interests bring new items into your life: an expanding library, collectibles, computer accessories, and equipment for cooking, hobbies, and sports.
Storage is needed for appliances you don’t want to live without: A food processor, computer, audio and video equipment all demand space to store them as well as room to enjoy them. Time adds not only to the list of cherished mementoes we keep but also to the mass of household records.
GETTING STARTED ON SOLUTIONS
Your approach to storage will be unique to your home and needs. No rules apply to every situation. If you’re a renter, for example, you probably will need to use freestanding storage devices rather than built-ins. But certain techniques can help you solve even the toughest storage problems.
Effective storage solutions arise when living patterns are compatible with a home rather than at cross-purposes. For example, if furniture blocks easy access to a storage area, putting away or retrieving items can be awkward, making the storage area little used. Such conflicting uses of space undermine attempts to improve storage.
BE SYSTEMATIC: Solving storage problems requires being logical and organized. But you can approach the situation in your own way. You may want all items of one category kept together: all dress coats, hats, and boots in the entry closet and all work coats, hats, and boots in the back hail. Or you may prefer to group items by users: all adult outerwear in the entry closet and children’s things in the back hall or in their rooms.
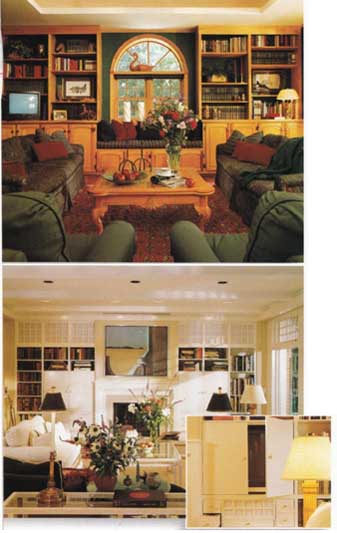
In attacking your storage problems assess what belongs
where and how your family uses each room. You can find good storage
space around a room’s fixed points of interest—the window (above) and
the fireplace (bottom).
Some people find it sensible to store spices in alphabetical order; some do the same with books and music. Determine a way to organize items that will make you comfortable. No one method is best; what’s important is that your method work for you.
Devising a way to improve your storage situation gives you a framework to fall back on when you look at an object and wonder where to put it. If at some point your method seems less effective than it used to be, it’s time to take a different approach.
KNOW WHAT YOU NEED: Although interest and activities change over time, people often forget to change their living spaces to match their lives. Often a storage problem develops because you’ve outgrown an interest but haven’t gotten rid of its related equipment. Most families’ basements, attics, and garages are repositories of outgrown skis, old tennis rackets, and out-of-date clothing.
A built-in sewing area is no longer useful if other interests have replaced sewing A formal living room is wasted space if entertaining takes place in the family room.
The first step toward solving your storage problems is reviewing the pattern of your daily life to see what changes have occurred. Ultimately, improved storage frees you from dealing with too much stuff so you have time for more enjoyable activities.
QUESTIONS TO ASK YOURSELF
What’s the most frustrating area of your house? Where does the clutter accumulate? Your answers to these and the following questions will help you set priorities as you begin to get storage under control,
Do you have storage space for ongoing projects or hobbies, such as sewing, homework, quilting, painting, or woodworking? Do you have a safe place for mail, bills, recipes, and other household office items? Do such places have to be private or public?
Where do you put seasonal items—clothes, sports and hobby equipment, and lawn and garden items? Do you have a place for items in transit—recyclables, hand-me-downs, items for charity?
As you consider the things you store, run through this list:
• Does it have to be accessible readily? Occasionally? Rarely?
• Which family member uses the item most often?
• Has anyone used it in the last 12 months? Will it be used again?
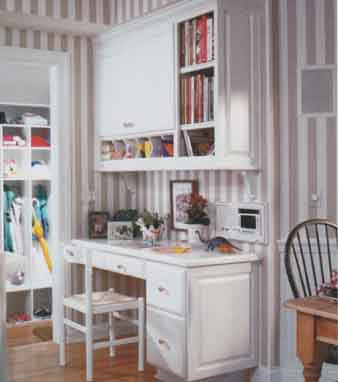
One cardinal rule of developing storage is to put
items near areas where you will use them. This small kitchen corner
frames a writing desk, with drawers below for storing family records;
open spaces above for mail, memos, and cookbooks; and cabinet space
for rarely used dishes.
Planning Effective Solutions
Start your planning process by searching for unused or underused spaces to add storage, as shown in the illustration below, Start with the obvious bare walls and corners, then search out unused nooks, insets, gaps, “next-to” areas (next to the door, next to the stove, etc.), and places above or below fixtures or appliances. Find areas that you can fill in and fit out without sacrificing floor space. No space is out of bounds; for example, you may be able to build storage in the space between studs of interior walls.
Examine all surfaces. The back of a door can be outfitted with a pocket organizer. The inside of a basement, attic, or laundry-room door can hold hooks and racks or be covered with perforated hardboard and hanging hooks.
Space under a staircase is ideal for storing bulky items. A coffee table (or any table at which no one sits) can hide games or magazines if the storage space can be masked from view.
Analyze your list of “must haves.” Not everyone needs a dresser, for example. Maybe some shelves, baskets, and pocket organizers in a closet would clear out that dresser space. Do you need a permanent bed in the guest room, or could you use a sofa bed that takes up less space? This could create additional seating and free the room for other purposes.

A careful inventory of the available space in your home can help
you plan how to use it effectively. Compromises will be required.
Making an area serve more than one purpose increases your functional space. Can the recipe center in the kitchen become an all-purpose desk for homework? Can your sewing center, home office, or hobby area be a mobile cart on wheels?
Think also about the structure of your house and your household’s needs. Would you prefer an open floor plan or specialized, private areas that are set apart?
CREATING ACCESS
Once you’ve decided on a potential storage space, determine its accessibility. Is it suitable for everyday items that require immediate access, or is it more appropriate for long-term storage? For example, if retrieving something from the attic involves setting up a stepladder and climbing through a trap door, the attic should be limited to storing rarely used items.
Easy access to items begins with storing them close to their point of use. Drinking glasses are difficult to carry, so why not store them directly above the dishwasher? Pots and pans should be kept close to the stove. Brooms, mops, and vacuum cleaners should be near the areas where they are used the most. Linens are best stored near the bedrooms and bathrooms, And magazines belong wherever your family enjoys reading.
A second level of access to items is how they are stowed within a storage area. Board games stacked 16 high at the back of a coat closet are not reached easily. Storage shelves should be convenient heights. For example, children should be able to reach their toys. Safe, secure locations should be found for dangerous items such as medicines, firearms, and chemicals.
TRAFFIC PATTERNS
The more you know about how you use your rooms, the better you can make them work for you. Take note of fixed elements in each room—the door openings, windows, closets, built-in cabinets, and other fixtures. They define the room’s natural traffic patterns.
If you are considering a major reconfiguration of a room, start by making a floor plan of the space drawn to scale. Place tracing paper over the sketch and trace the walls and all the fixed elements mentioned above. Draw in the major traffic pathways between entry and exit doors, for example. Sketch the traffic patterns as if there were no furniture in the room. With a lighter pencil, draw secondary traffic routes, such as those that approach built-in features. These paths shape the room’s activity areas. You may discover that these pathways cause just as many storage problems as crowding does.
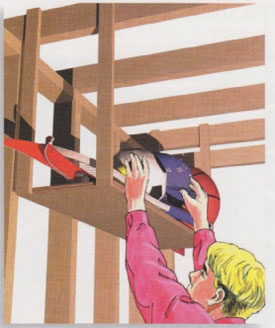
Be sure you have easy access to items. In this case, it’s not a
good idea to store skis or ice skates hidden behind those summer sports
items you just brought in for the winter. Make sure items are stored
at a convenient height, too.

Analyze the traffic flow and furniture placement in a room before
locating storage areas. If a storage space is hard to reach, it won’t
be used. The end result: more clutter.
CONSIDER DIMENSIONS
Once you have clear access to a storage area, the next challenge is to make it easy to retrieve things and put them back. This is where the height and depth of shelves, counters, and closet rods come in.
Although occupants of a home come in different sizes and shapes, most homes are built for the average-size person. Standard kitchen counters are 36 inches high. Yet the people who use them might be much more comfortable if the counters were lower, say 32 inches, or higher, about 40 inches, By the same token, if a closet rod is too high for a child to reach, clothes probably won’t get hung up. Objects crammed into spaces that are too small will not only be difficult to reach but may suffer damage. The ideal dimensions for any storage unit are those that suit the people who use it and the objects it will hold.
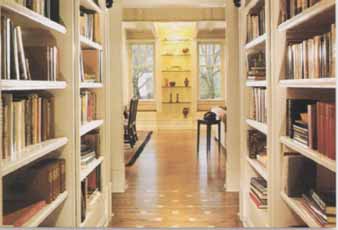
On these floor-to-ceiling bookcases, above, you’d want to store
children’s books on the lower shelves and rarely-used books on the higher
ones.
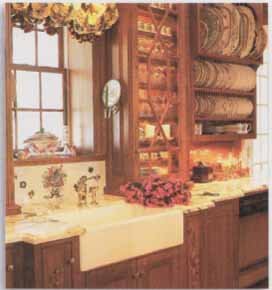
The informal country style of this kitchen has the added benefit
of keeping dishes and other tableware right at hand.
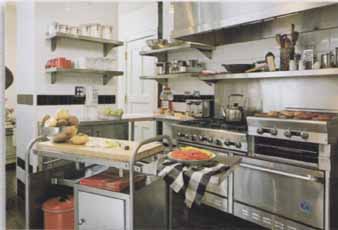
Your personal style plays a large role in planning storage solutions.
This industrial-style kitchen has the same “bones-out” functional focus
as the country-style above, but its character is much different.
FORM AND FUNCTION
Another consideration in planning your storage space is style. What do you want to display or hide? Do you prefer formal or informal arrangements? Your goal should be to harmonize your storage spaces with the architectural and furnishing style of your home. Fortunately, you have a lot of flexibility in this area. For example, the warm, informal American country style incorporates open storage for dinnerware, pans, crockery, and foodstuffs. A purely utilitarian, industrial style also emphasizes display. Both are “bones-out” styles. On the other hand, traditional wood kitchen cabinets may provide completely covered storage—even the refrigerator door might be covered with a matching wood veneer. A contemporary all-laminate kitchen may accomplish the same thing. Both strongly emphasize a finished look.
Every style provides options for displaying or concealing stored items. Formal styles may set the stage for elegant display, and informal styles may emphasize the lived-in look, Both allow you to choose what to reveal and what to conceal.
Storage Solutions You Can Purchase: Because DIY is Not Always Ideal
Throughout this guide, there are many projects you can build to enhance your storage. But before you build, you may want to investigate sources of prebuilt or ready-to- build storage solutions.
Most home centers, lumberyards, and discount stores stock shelving material and hardware; ready-to-assemble shelves, bookcases, computer desks, and entertainment centers; and many other storage systems. Among the most popular of these kit storage solutions are modular closet organization systems, made of either plastic- coated metal grids or wood.
Another source of items—and ideas—are catalogue businesses and stores that specialize in storage products. These businesses stock many ready-made and kit storage solutions. They also have consultants who will help you plan solutions based on the products they stock or can order from various distributors. Browsing through these shops and catalogues can provide you with many ideas.
Antique dealers and used furniture stores are another source of storage solutions. Even if you’re not an antique collector, you may find a solution to one of your problems.

Before you build, explore the storage units now available at
home centers, discount stores, and specialty storage stores. Bicycle
rack; Wire-grid door can rack; Suspended vinyl wardrobe bag; Hanging
hook; Adjustable plastic shelving; Door-hinge- mounted towel rack;
Rolling, slide-out vegetable bins; Wire-grid clothes basket; Coat hooks;
Steel, door can rack; Cardboard boxes for record storage; Shop tool
rack; Tie/belt rack; Hanging lumber rack; Shoe hanger
Basic Techniques
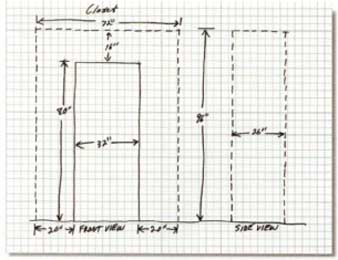
SIZING UP YOUR SPACES: Once you’ve decided where to add storage,
your next step is to size up the space. Using graph paper, draw the room
or a portion of it and sketch in the major features, such as walls, doorways,
windows, and other fixed items. Measure and record the height, width,
and depth of these features.
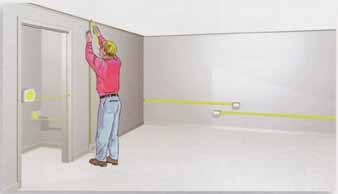
Add detailed items, such as trim, if necessary. The best tool for
this job is a 1-inch wide, 16- or 25-foot steel tape measure. The more
you know about the space, the better off you’ll be when you draw your
detailed plans. You can then use the sketch of the space as the base
for a detailed drawing of your project.
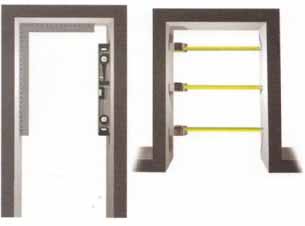
PLUMB. FLAT, AND LEVEL: Before you draw detailed plans of your
project, you need to determine if walls, floors, and openings are plumb
(truly vertical), level (truly horizontal), square (perpendicular to
one another), and parallel to one another. If not, you’ll need to compensate
for these differences in your plan or correct the problems before you
begin building the project. A 2- or 4-foot carpenter’s level and a framing
square are essential tools for this job.
Materials for Storage Projects
For most of the projects you may tackle, you’ll be using one of two types of basic wood materials: lumber or sheet goods.

LUMBER: Lumber is classified as either boards—less than 2 inches
thick and wider than 3 inches—or dimension lumber—more than 2 inches
thick and wide, You can choose a softwood, such as pine or fir, which
is easy to work with. Hardwoods, such as birch, oak, or cherry, have
more character but are harder to work with.
Lumber has both nominal and actual dimensions. For example, a 2x4 is actually 1 3/8 inches and a 1x6 is ¾ x 5½ inches.
Order by nominal size, but design your project with actual size in mind.
SHEET GOODS: Sheet goods include plywood, particleboard or waferboard, hardboard, or laminate-covered panels.
• PLYWOOD is made of layers (plies) of wood glued together with their grains running in alternate directions, which makes the finished product strong. Plywood is sold in 4x8-foot sheets in thicknesses ranging from 1/8 inch up to 1 1/8 inches. For shelves and other projects in this guide, the most common thicknesses required will be ¼-, ½-, and 3 material.
Plywood is graded on both its surfaces:
“A” being the smoothest and free of defects and “B,” “C,” and “D” are progressively rougher. Both sides need not be graded the same (for example, A-C). You’ll want an “A” surface for the finished side of most projects.
• PARTICLEBOARD AND HARDBOARD are made of wood chips, fibers, and glue bonded together under heat and pressure. They are sold in 4x8-foot sheets in thicknesses from 1/8 inch up to 3/4 inch. They are less expensive than plywood but often harder to work with because screws and nails do not hold well in their edges, which have no continuous grain. Particle board can be used for shelving, cabinets, and as core material for countertops. You can also buy particle board or plywood that is covered with plastic laminate, eliminating the need to finish the surface.
• DRYWALL, often called wallboard, is used to finish walls. You’ll need it to make repairs if you cut into a wall for a project.
• GLASS: An alternative material for shelves is decorative glass. Do not use regular window pane glass; buy plate glass designed to be used for tabletops and shelves.
FASTENERS, HARDWARE, AND STORAGE COMPONENTS
Fastening materials, hardware, and other components for building storage solutions vary considerably with the type and extent of your project.
Basic fasteners include, of course, nails and screws. For general construction, use box or common nails. For finish work, use finish nails or brads, sinking their heads below the surface with a nail set.
Wood screws are made with flat, oval, or round heads. Use oval-head or roundhead screws with trim washers when the head will be exposed to view. Use flathead screws when they will be countersunk. Screwhead types include slotted, Phillips, or square-drive styles. Phillips are perhaps the easiest to drive and can be driven with an electric drill. You may need lag screws, hanger screws, machine bolts, toggle bolts, hollow-wall anchors, or masonry anchors to fasten projects to walls.
You can strengthen joints with angle brackets, flat corner irons, T-plates, or mending plates. Corrugated fasteners, wooden dowels, or biscuits also can be used to strengthen miter, butt, or dado joints.
The variety of shelf-bracket systems ranges from basic closet-rod brackets to several styles of slotted, adjustable standards and accompanying interlocking shelf brackets. You also can support shelves by simply drilling parallel sets of holes and inserting one of many types of pin supports.
If you’re building a cabinet, you may need to select hinges and catches for the doors, slides the for drawers, and pulls and knobs for both.
Basic Tools for Building Your Storage Solutions
To build the projects in this guide or to tackle your own storage solutions, you should assemble a basic tool kit. Complement this kit with other tools as you need them.
For measuring and marking, you should include a 16- or 25- foot, 1-inch-wide tape measure; a plumb bob; a chalk line; and a pencil.
To make sure things stay plumb, level, and square, you’ll need a 2- or 4-foot carpenter’s level, a framing square, and a combination or speed square to help mark cuts.
For cutting materials, a crosscut handsaw will do, but you’ll probably want to invest in a 12- or 13-amp, 7 1/4-inch circular saw. A backsaw and miter box are essential if you’ll be cutting a lot of miter joints. A keyhole saw is the best hand tool for cutting holes in drywall, and a coping saw or variable-speed jigsaw is a useful power tool for cutting curves and designs.
For fastening, invest in 16-ounce claw hammer for nailing. Have a nail set on hand for driving nailheads below the surface of finished work. Have a good assortment of screwdrivers, including No. 1 and No. 2 Phillips heads and at least two sizes of slot-tipped ones. Make pilot holes for screws with an awl.
You’ll need a power drill to bore holes. Buy a variable-speed drill with a 3 chuck. Drill bits to have on hand include twist bits for pilot holes, spade bits for general purpose drilling, and a combination wood drill countersink. You may also want brad-point bits for doweling and shelf holes and a plug cutter to cut plugs to cover countersunk screw heads. Buy Phillips-, slot-, and square-head screwdriver bits for your drill and you can drive screws faster and more easily than by hand.
A router is a very versatile power tool. Use it to cut dadoes, mortises, and dovetails for strong shelf joints. It’s also the best tool to trim laminate edges on shelves and countertops.
You’ll need an assortment of clamps—C-clamps, squeeze clamps, and adjustable clamps—to hold glued items together while they set.
For shaping and finishing, your tool kit should include a wood file and rasp, chisels, block plane, and hand-sanding block. A power orbital or belt sander also is a good investment if you’re finishing large surfaces.

SHELF-HANGING HARDWARE: Shelf bracket with closet rod holder;
Adjustable shelf standards and brackets; Adjustable shelf standard
with shelf clip; Shelf clips for predrilled holes

FASTENERS: Box nail; Carriage bolt; Masonry lag shield; Drywall
screw; Finish nail; Brad; Lag screw; Machine bolt; Roundhead screw; Slot
head screw; Phillips head screw

CABINETRY HARDWARE: Side-mount offset hinge; Bullet door catch;
Pull; Knob; Butt hinge; Decorative corner reinforcement; Decorative butt
hinge; Decorative pull; European-style hidden hinge; Friction door catch;
Magnetic door catch; Invisible hinge; Decorative ceramic knob; Decorative
ceramic pull; Front-mount offset hinge; Pivot hinge; Roller door catch;
Drawer slide