INSTALLING SHELVES
Once you’ve made your general plan, it’s time to create specific storage units. Shelving, the most common storage solution, uses vertical space to store items so they are out of the way yet accessible.
Before you buy lumber and build your own shelving, take some time to investigate the wide selection of ready-made shelving available at home centers. You’ll find precut shelves in various lengths made from softwood, hardwood, particle board, and laminated particle board. All these choices are quick and simple to install and are prefinished so you don’t have to worry about sanding and painting or staining the final product. Most shelves are manufactured to fit common-size shelf brackets and wall standards.
In planning shelving, consult the table below to calculate the spans, which are based on the load you expect the shelf to bear. If you’re selecting ready-made shelves, be sure they’ll handle the load or make sure to use additional supports to reduce the spans.
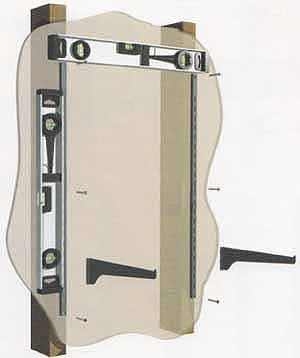
Use a magnetic or electronic stud sensor to locate the wall’s
framing lumber, which will support your shelf system. At one stud,
mark the top of one standard. Drive the top screw of the standard into
the stud. Using a level to determine plumb, secure the bottom of the
standard. Place the level on top of the standard and mark the locations
of the tops of the other standards. Install the remaining standards,
then insert the brackets. If a standard must be mounted where there
is no stud, your hardware dealer can provide an appropriate wall anchor.
SHELF LOADS AND SPANS
A shelf s potential for sagging depends on how much load it will bear. A shelf full of books requires more supports (shorter spans) or thicker shelving material than a shelf holding linens. The span length also depends on whether the load is concentrated in the center of the shelf or distributed along the length of the span.
Material |
|
Maximum Span With Heavy Load |
Maximum Span With Light Load |
|
|
|
|
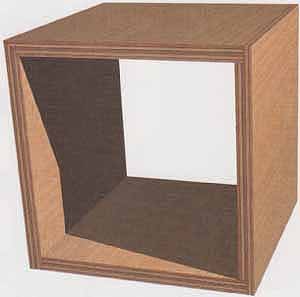
THE BOX
The next step beyond a basic shelf is a box. Whether it’s a storage cube, the outside frame of a bookcase, a toy or hope chest, or a drawer in a cabinet, its basic form is a box.
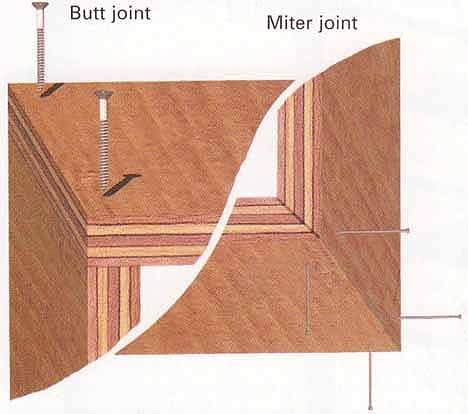
The keys to building a good box are strong corner joints and making sure the box is square. A butt joint is the simplest way to form a corner: The face of one board is joined to the edge of another. For the more attractive rabbet joint, one board is recessed into a groove cut into another board. In a miter joint, the most attractive but also the weakest joint, the edge of each corner board is cut at a 45-degree angle.
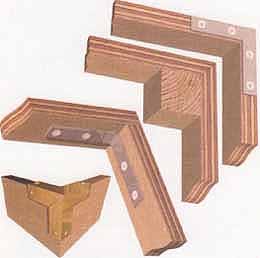
To make joints stronger, you can reinforce them with
angle brackets, flat corner irons, wooden cleats, corrugated fasteners,
or wooden dowels or biscuits. Miter joints are especially weak and should
be reinforced with one of these methods.
Select the style of joint you will use and cut your materials
to size. Place one side in position against the top piece and pre-drill
holes for screws or nails. You may want to countersink the holes if you
are using screws. Screw the pieces together and repeat the process on
the other side and top piece. You can use carpenter’s glue to increase
the strength of the joint.
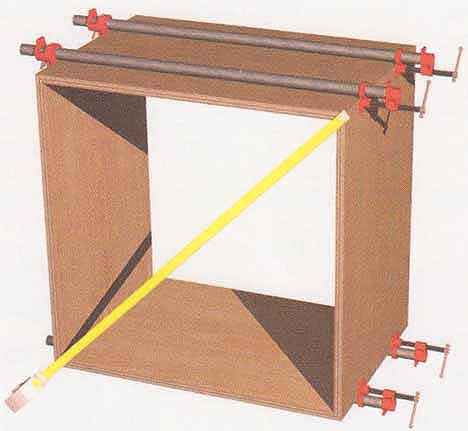
Before the glue dries on the joints, test the box corners with
a framing square. Double check by measuring from one corner to the opposite
corner. Then measure the distance for the other diagonal. If the measurements
are not equal, the box is not square.
Once the corners are square, place adjustable clamps across the
sides and from top to bottom and let the glue dry. After the joints have
dried, you can add reinforcing brackets as shown, above left.
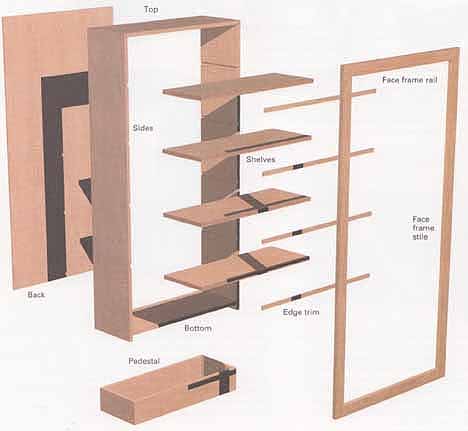
BUILDING A FREESTANDING BOOKCASE
When determining the size of a bookcase, consider the lines and proportions of the room in which it will be located. A bookcase that is the same height as a door or that aligns with the tops of windows, for example, will harmonize with the room. The freestanding bookcase described here is 30 inches wide and 60 inches high, but you can alter the size to fit your needs.
Shelves longer than 30 inches may sag unless they are reinforced. For a bookcase wider than 30 inches, add shelf supports along the back of each shelf. An option is to build two bookcases and stand them side by side to create an illusion of a single, large unit.
This bookcase is made of ¾-inch cabinet-grade (A-A) oak plywood. You may prefer to construct the case from lx or ¾ solid lumber. The case has a face frame to make it more rigid and to cover the exposed edges of the plywood. The face frame, however, is not a structural element.
This freestanding bookcase is remarkably simple. However, the
construction is complex enough to offer a challenge — an opportunity
to master a number of woodworking techniques.
PREPARING THE PIECES: Rip three boards, 11 inches wide, from a sheet of the oak plywood. From these, cut two side pieces, each 60 inches long, and the top and bottom shelves, each 29¼ inches long. Rip plywood shelves 10½ inches wide, The shelves are narrower than the other pieces to allow for the ¼-inch-thick back and the ¼-inch shelf trim that hides the front edges of the plywood.
Lay the two side pieces, back edges together, with the inside surfaces facing up. Measure and mark the positions of the top piece, allowing for a 3 rabbet and the bottom shelf, 1 1/2 inches from the bottom edge. Carefully join the marks across the full width of both boards.
These lines must be square and true and the side pieces must match exactly.
Mark the positions of all four shelves in the same way. In this case, the shelves are 15, 27, 39, and 50 inches from the bottom, but you can change the shelf heights as you prefer.
In each side piece, cut 3/4-inch-wide by 3/8-inch-deep grooves or tracks, called dadoes, in which to insert the shelves, Then cut inch rabbets for the top piece. Cut a 3/8-inch wide and ¼-inch-deep notch, or rabbet, along the back edge of the top, side, and bottom pieces to accommodate the back panel. If you prefer adjustable shelves (see “Making Your Shelves Adjustable” below), rabbet and dado only the top of the case and the bottom shelf. Cut the intermediate shelves to 28¼ inches to allow for maneuvering them in and out of the case. Sand and prepare all the surfaces before continuing the assembly.
TRIM THE SHELVES: To trim the shelves, cut four ¼x¾-inch strips from 1x2 solid oak. Cut each strip the length of each shelf. Apply glue to the front edges of the shelves and the back edges of the strips. Attach the strips to the shelves with 3d finish nails. Set the nail heads, then fill the holes with wood putty. Remove excess glue. When dry, sand the trim flush with the shelf surface.
An alternative trim is oak veneer tape, which you iron onto the edges of the shelves. In this case, you would have to cut the shelf a bit wider.
ASSEMBLE THE CASE: Spread glue on one end of the top piece and in the top rabbet of one side piece. Set the top piece in the rabbet, making sure the rabbets in the back edge face forward. Nail together with 6d finish nails: three nails into the sides and two through the top.
Spread glue on the dado for the bottom shelf. Set the shelf in place, making sure the rabbet on the back is facing up, and nail from the outside with 6d nails. Attach the interior shelves as you did the bottom shelf. To attach the other side piece, spread glue in the dadoes and rabbets and fit the top piece and shelves into place, nailing as you did on the first side.
For the back panel, cut a sheet of ¼-inch plywood to 29¼x59¼ inches. Sand the front side of the panel. With the bookcase resting on its front edges, glue and nail the back panel into place.
Clamp the case, remove all excess glue, and let it dry.

Edge trim nailed on shelves; Veneer edging glued on with clothes
iron
A combination of glue, dadoes, and nails ensures that these
shelves will stay straight and square.
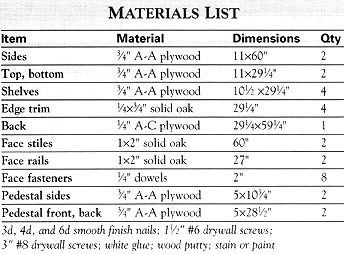
Table: Materials List
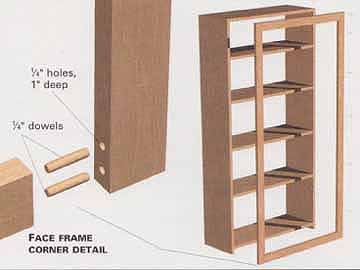
MAKE THE FACE FRAME: Cut the face frame pieces to length from 1x2
oak. The rails should fit exactly inside the stiles when the stiles are
flush with the outside edges of the case. Measure carefully. On a flat
surface, align the rails squarely inside the stiles.
Using a square, mark two lines across each joint. Using a doweling jig, drill ¼-inch holes 1-inch deep at the marks, Apply glue to the rails along the end grain and in the dowel holes, tap in the dowels, and tap the assembly together. Check for square, clamp, remove excess glue, and let dry.
Apply glue to the front edges of the bookcase. Fit the face frame to the case so the outside edges are flush and the bottom rail aligns with the top of the lowest shelf. Nail the frame on the case with 6d finish nails. Set the nails and fill the holes. Remove excess glue and let dry.
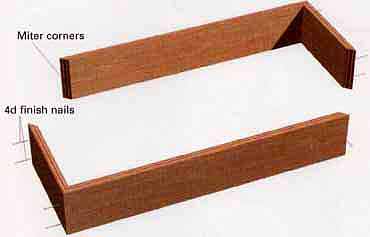
MAKE THE PEDESTAL: From the leftover oak plywood, cut four 5-inch-wide
pieces, two 281½ inches long, and two 10 inches long. Miter each of the
ends at 45 degrees. Spread glue on the miters on one short and one long
piece. Fit them together and cross-nail them with 4d finish nails. Fasten
the other two pieces in the same manner. Then fasten the two L-shaped
pieces together. Remove excess glue, check for square, clamp, and let
dry.
Position the pedestal under the bookcase so the face frame and sides overlap it equally. For added stability, screw 1½-inch drywall screws through the bottom shelf into the pedestal.
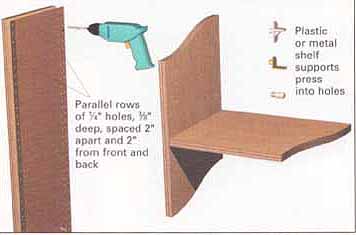
MAKING YOUR SHELVES ADJUSTABLE: If you’d prefer to have adjustable
shelves in a bookcase or shelf unit, do not cut dadoes for the shelves.
Drill a series of 1/4-inch holes in the sides of the case. The holes
should be 3 deep, 2 inches apart vertically, and 2 inches from the front
and back. You must be sure that the holes line up exactly in both rows
and on both boards, or the shelves will not be level. An easy way to
ensure this is to use a template made out of perforated hardboard. Lay
the hardboard on the side pieces, using the holes as a drilling guide.
Then simply purchase one of the many styles of plastic or metal pin-type shelf supports on which to rest the shelves.
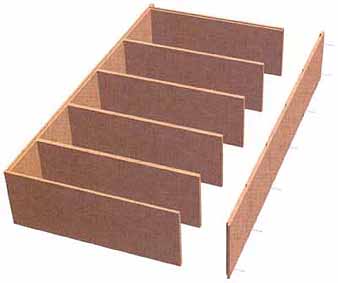
BUILDING A HANGING BOOKSHELF
A hanging bookshelf is an excellent way to display and store items in virtually any area of your home. You can store cookbooks and spices in the kitchen, books and collectibles in the family room, dishes in the dining room, and soaps, perfumes, and small bouquets in the bathroom.
The 36-inch-high, 28-inch-wide bookshelf shown here is designed to hang from two studs, either 16 inches or 24 inches apart. You can adapt the dimensions to your needs. Select No. 2 pine boards, without large knots or warping, so you can stain, oil, or paint the bookshelf to match other furniture.
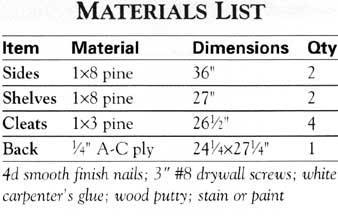
Cut the uprights and shelves to length. Rip ¼-inch from the center shelf to allow for the recessed plywood back, Cut the back out of 1/4-inch A-C plywood to 27¼ inches wide by 24¼ inches high— ¾-inch less than the total width of the cabinet and 3/4 inch shorter than the distance between the top of the top shelf and the bottom of the bottom shelf. Use lx3s for cleats.
Use a jigsaw to cut the ornamental curves at the ends of the side pieces. File and sand the curves to remove any saw marks.
Position the uprights so their back edges meet and the inside surfaces are facing up. Mark the top and bottom of each shelf dado. Set a 3 dado blade or a 3 router bit to a depth of ¼ inch and cut the dadoes. Saw or rout a 3 x ¼-inch-deep rabbet on the back edges of the uprights for the plywood back to sit in.
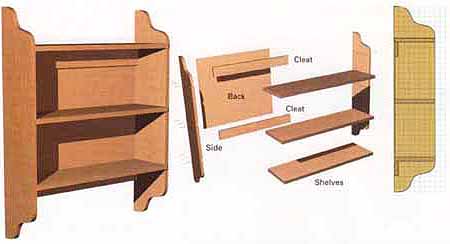
Shelves
Assemble the shelves by applying glue to the ends of the shelves and the dadoes. Insert the shelves, then drive in 6d finish nails through the uprights into each shelf. Set the nails below the surface, then cover the holes with wood putty.
Cut the cleats to match the inside width of the case. Apply glue to the upper edges and ends, then secure the cleats to the case with 4d finish nails through the sides and through the shelves. Rout a ¼-inch rabbet into the back of the top and bottom shelves. Spread glue along the rabbets and on the back face of each cleat. Then screw or nail the back to the case. Now you can sand and paint.
To hang the bookshelf, drill countersunk holes through the cleats where you intend to drive screws into the wall studs. Drive in 3-inch drywall screws through each of the cleats into the studs. Fill the holes with putty or insert a wood plug to cover the screwheads.
FINAL DETAILS
The key to achieving an ideal finish is careful preparation of the surface. Stains, clear finishes, and even paint won’t cover up imperfections in the wood. So don’t skip quickly over these details.
On bookcases, cabinets, or other storage projects that have fixed shelves or tight corners, you may want to undertake these surface-finishing steps before assembly.
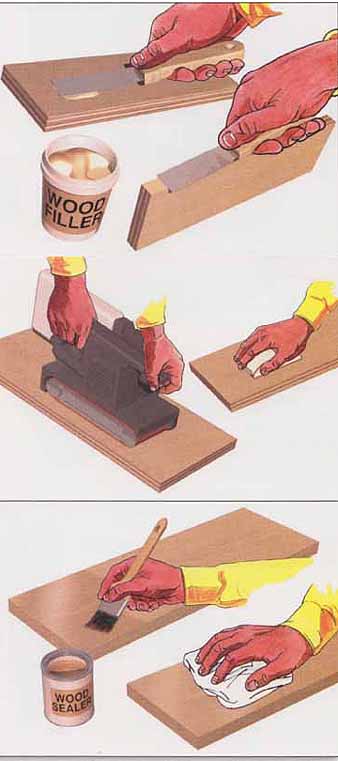
FILLING AND SMOOTHING: The first step is to fill small scratches
and gaps and nail holes. If you are going to paint the piece, use acetone-based
wood putty or latex paste wood filler. Apply these with a flat putty
knife, pushing the filler into the gap or hole, then scraping away the
excess. The goal is a smooth surface—no lumps should show under the primer
and paint. An oil-based crayon makes quick work of filling small holes.
If you use a clear finish or stain rather than paint, select the filler carefully. Patched areas will take a stain or finish differently than the surrounding solid wood. It’s best to test fillers, stains, and the finish coat on a scrap of your project’s wood to find the best match.
SANDING: Repairing, sanding, and cleaning wood surfaces are tedious tasks, but they are important to any project, so take your time. Begin sanding with a rough (80-grit) abrasive paper and move to 120- or 180-grit. Seal the wood again, then sand again with extra-fine paper (220- or 400-grit) for the smoothest surface. Electric sanders save time but tend to leave marks or grooves, so plan to do the final sanding by hand, Remember to sand with, not against, the wood’s natural grain
SEALING AND STAINING: A sealer helps close the wood’s pores, which results in an even stain or paint finish. It also serves as an intermediate coat between the stain and the final finish. This is especially important for stains that react with and ooze into the finish. A sealer is sufficient protection on articles made of particleboard for use in a basement or garage. Apply sealer with a brush, working it into the grain in all directions.
Stains add color and enhance the natural grain of the wood. Except for penetrating oil stains, a stain doesn’t protect the wood so you’ll want to use a top coat of shellac, varnish, or oil for that purpose. Stains can be applied with a brush or cloth. After your piece stands for a while, wipe off the excess.
THE RIGHT FINISH
The final finish on your project gives smoothness, sheen (high, medium, or low), and sometimes color, as well as protection for the piece. Natural-resin or polyurethane varnishes, shellac, lacquer, wax, oils, stains, and gloss or enamel paints are among the options. When selecting a finishing product, consider all the factors, including the type of project; its style, use, and location; and the look you desire.
FINISHES FOR THE PROJECT
Material |
Description |
Use |
Application |
Comments |
Paint gloss or enamel finish |
Opaque usually oil or synthetic based liquid that dries to a hard finish |
Colors and protects wood |
Brush spray |
Wood must be sealed or primed apply two or more coats sand with abrasive paper or steel wool between coats |
Varnish, natural resin or polyurethane |
Clear Finish new synthetic (polyurethane) varnishes superior to traditional formulations |
Enhances appearance of and protects wood |
Varnish brush for natural resin types brush spray polyurethanes |
Durable finish shows off depth and grain pattern of wood resists moisture including alcoholic beverages; fairly slow drying |
Shellac |
Clear to slightly cloudy finish |
Protects raw or stained wood; used as a sanding sealer or sealer under stain or paint |
Brush, spray |
Similar to varnish in protective and visual qualities, but dries faster; clean up with ammonia and warm water or alcohol |
Lacquer |
Clear protective finish |
Workable finish for fine furniture |
Spray apply three coats rubbing with steel wool between coats; leave final coat glossy or rub to a satin finish |
Use wood filler to create smooth base first extremely fast drying time simplifies application of multiple coats. |
Water based stain |
Powder or premixed liquid well suited to enhancing grain of premium hardwoods |
Tints wood |
Brush spread with cloth spray dampen wood first |
Designed to be used under protective clear finish |
Pigmented oil stain |
Premixed liquid |
Tints wood |
Brush or wipe on wipe off excess |
Well suited for darker tints on softwoods when dry apply clear finish for protection |
Alcohol or spirit stain |
Powder or premixed liquid |
Mostly commercial use fine spray for shading |
Spray |
Use in spray applicator for shading and refinishing |
Penetrating oil stain |
Linseed or tung oil based premixed liquid |
Tints and protects wood |
Brush cloth |
Apply paste was for added luster and protection |
Wax |
Paste compound that dries to hard lustrous finish |
Protects oiled finishes |
Cloth buff with clean cloth |
Wax finish over a penetrating oil stain gives warm lustrous appearance |
Oil |
Linseed tung or plastic based produces translucent to dark tints |
Colors wood and gives it harder surface |
Brush on wipe off with cloth |
Soaks into wood and gives warm lustrous appearance |