Dividing your existing storage space can multiply its capacity. Dividers tailor the shape of the volume to the shape of what you store there. Both vertical and horizontal dividers are simple to build. They visually organize and sort the things you store—and what you can see, you’ll be more likely to use.
Vertical Dividers
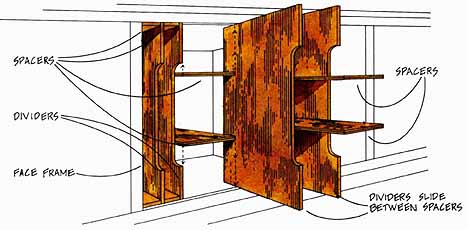
Vertical dividers support thin, rigid things on edge—baking tins, platters and trays, sewing patterns, records, art supplies. Slip articles such as these between 1/4-inch hardboard, plywood, or plexiglass dividers to make a convenient, concentrated storage space. But you need not stop with small items: card tables, folding chairs, trays, table leaves, and even supplies of plywood are safely and accessibly stored between sturdy 1/2-inch or 3/4-inch vertical dividers.
Construction: Measure the enclosed space and record the dimensions on a freehand sketch. If the space doesn’t have a continuous upper surface to which you can fasten spacers, install one: cleat the perimeter of the enclosure so that the bottoms of the cleats are 1 inch above the cabinet opening and nail a piece of 3/4-inch plywood to the bottom of the cleats. Adjust the height recorded on your sketch accordingly.
Based on what you plan to store in each compartment, determine the number of dividers you’ll install. Then cut them to size, subtracting 1/16 inch from the height for clearance. For easy access, you might want a curved cut on the front edges; if so, use a coping, saber, or band saw. Sand smooth and finish.
Cut a pair of 1/4-inch plywood spacers for each compartment; spacer width will determine compartment width, so size them to what you plan to store. To install, start at one side of the enclosure. Nail the first pair of spacers to the top and bottom of the enclosure, butting the edges flush against the side wall. Set a vertical divider in place, and nail down the next pair of spacers so that they are flush against it. Continue to the other side and end with a pair of spacers.

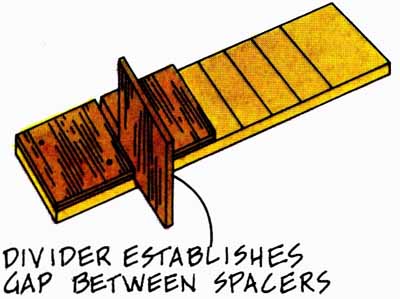
Variations: Vertical dividers are most often installed in base and wall- hung cabinets and in closet space between fixed horizontal surfaces. But adjustable shelves can house dividers just as well. To install them, measure the height between two shelves—this, less 1/16 inch allowance for clearance, will be the height to which you will cut the dividers. Then remove the shelves, place them edge to edge, and mark the divider placements across the face of both with a pencil and a square. Cut the dividers and spacers to size. Working from one side of each shelf to the other, attach the spacers to the top of one shelf and the bottom of the other, using a divider to establish the gap between spacers. Remount the shelves and slide the dividers into place.

Horizontal Dividers
Horizontal dividers are simply sliding trays, and you can store more on them than meets the eye. Why? Because pulling out the tray gives access to things at the back. You can get full use of your existing storage volume by mounting horizontal dividers close together; since they slide out, you get good access even with minimal headspace.
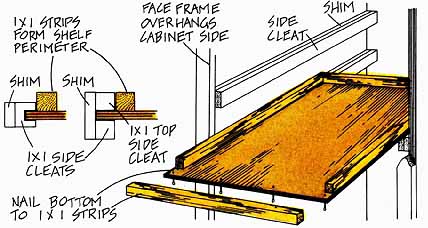
Construction: Measure the space and record the dimensions on a freehand sketch. Measure any face frame overhangs; you will shim out the sides of the enclosure so that the trays can slide out between the overhangs. Determine the distance between trays according to the height of what you plan to store there; you need to allow only minimal headspace. Mark the positions on the enclosure’s sides. This is where you will position the shims and side cleats, so use a carpenter’s level to make sure that the marks are level front to back and that each horizontal pair is positioned on the same level plane.
The diagrams below show three ways to make your slide cleats. You’ll need two full-depth cleats for each tray. Make up your cleat stock in a convenient length—perhaps 8 feet—then cut the cleats to size.
At the tray position marks, shim out the sides of the enclosure enough that when the cleats are installed, the slide grooves will clear the face frame. Pre-drill and nail on the slide cleats, rechecking to be sure that the two cleats of each pair are level and parallel to one another.
To determine the tray dimensions, measure the interior depth of the enclosure behind the face frame. Then measure the operating width of the slide cleats, and subtract 1/16 inch for clearance. Cut the trays to size, and sand the exposed surfaces. Then glue and nail 1 by 1 strips on top along all four edges as shown. Sand, and finish with plastic sealer or a semigloss paint. Insert trays in the slide cleats. For smooth sliding, wax the tray tongues with paraffin.

Drawer Dividers
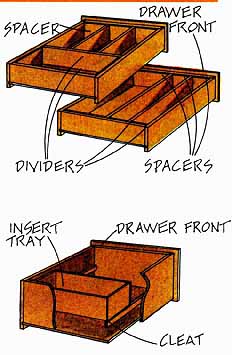
Any drawer can house vertical dividers of full or partial depth. Deep drawers can be split into two levels as well: cleat the long side above the dividers and rest a tray on lop.
Construction: Rip 1/4-inch or 1/2-inch lumber or plywood to the divider depth you choose. Cut pieces to length according to your design. You can use a mix of both 1/4-inch and 1/2-inch stock in the same drawer according to where you need the extra strength and where you want the extra space. The diagrams show some configurations.
— Partial: nail or dado the back to dividers and insert in drawer. Tack 1/4-inch spacers to the drawer front, and side-nail the cross partition in place.
— Cross: side-nail dividers in place, or tack 1/4-inch spacers to the drawer sides.
— Lengthwise: tack spacers to drawer front and back, inserting dividers as you proceed from one side to the other.
— Combinations: tack spacers to drawer sides after side-nailing the cross dividers.

An Insert Tray: Plan the tray’s height, then nail 1 by 1 cleats onto the drawer sides at a level that will allow the drawer to close. To build the tray, cut a ½-inch plywood bottom piece; glue and nail on edging made of 1/2-inch lumber (drawer stock); let the lumber sides cover the plywood edge. Set the tray into place on the side cleats.