Whether you need more capacity in an existing shelf system or you want to create shelves in a new place, the components described below can help. Each of these three basic types—self-supporting shelves, cleated shelves, and the six-track system—meets storage needs in a different way. Full- or partial-depth self-supporting shelves are the easiest and least expensive to build; cleated shelves are handsome and particularly strong; and the six-track system affords great versatility and flexibility.
Any of these three shelf types is a good project for a beginner, since they require only basic woodworking tools and techniques. Building any of these units will get you warmed up for other component projects and, for a modest investment of time and money, will produce good, quick solutions to some of your most pressing storage problems.
How do you choose which type of shelf to use? Think about where you plan to put the shelving, what you want it to look like, how you want it to work, and what tools and skills you have. Consult the illustrations and descriptions below to decide which type of component will add the shelf capacity you need.
Self-Supporting Shelves: On
any exposed surface, or where existing shelves are too far apart so that
the space between them is wasted, adding self-supporting shelves will increase
your storage capacity. Build them in the height, width, and depth that reflect
the items you plan to store on them. To install one of these shelves, you
simply set it in place. Because they aren’t fastened down, no surface repair
is needed when you relocate them, which makes them particularly useful if
you rent your dwelling. As your storage patterns change, you can rearrange
these components according to your new needs. Cleated Shelves:
You can mount cleated shelves in any space with two parallel or adjacent
vertical surfaces, such as an opening between a wall and the side of a cabinet,
in a closet, under stairs, or in a nook. Cleated shelves are sturdy, stable,
and capable of bridging fairly long spans, especially when they are supported
on three sides.
Since cleated shelves are not adjustable, it’s best to use them where you want shelves to become part of the architecture. The cleats are fastened directly to wall surfaces, so measure carefully when you position them; mistakes will require surface repairs.
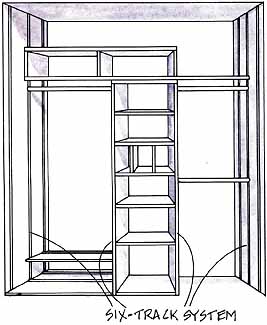
Six-Track System: People’s clothing
storage patterns change: young people grow, fashions shift, wardrobes expand
and contract. Some people, such as the very tall, the very short, and the
handicapped, need specially designed closets. With the six-track system
you can arrange your closet to give you easy access to every cubic foot
of storage space. Let your wardrobe and your imagination guide you as you
plan pole heights and design components that meet your present storage needs.
If your living and storage patterns change, the six-track system allows
you to rearrange your closet interior.
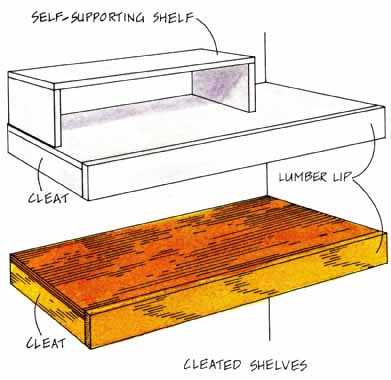
Self-Supporting Shelves
You can build self-supporting shelves quickly and easily using simple butt joints and common materials; or you can make a handsome version with a finer hardwood and miter joints.
Place self-supporting shelves on exposed surfaces to create mini shelf units, or set them at the back of enclosed spaces to store small items that otherwise get lost among larger things. You can improve the effectiveness of storage space in kitchen cabinets, bathroom vanities, linen, utility and front hall closets (such as the one shown on the cover) by adding self-supporting shelves.
Construction. Measure the space and record the dimensions on a freehand sketch. Take particular care with inside measurements, and be sure to account for the barrel of the tape.
When you plan the component’s dimensions, remember that face frames and closet side-wall overhangs can restrict your ability to move a full-length shelf into place. Unless there is plenty of space between existing shelves, build the component shorter than the full interior width.
Cut your materials to size; apply 1/4-inch by 3/4-inch lumber strips or veneer tape to unfinished plywood edges if you wish. If you’re using softwood lumber or plywood, assembly will be easier if you start the nails in the top. If you’re using particle board or hardwood lumber, pre-drill for screws, using a countersink bit.
Apply a thin layer of white glue to the end-grain of one side piece. Lay the top over the glued side piece, hold it flush and square, and fasten it down. (Rest the unglued side piece under the top to support it during this process.) Then glue and fasten the other side piece to the top. Set and putty the nail heads, or glue and plug the screw heads.
Let the assembly dry, then sand and finish it. You’re ready to set the shelf in place and use it.


Some Options for Materials
Choose your materials according to your time and money budgets, your skills, your tools, and the finished look you want to achieve.
— Particle board is inexpensive and comes in stock widths; all you have to do is cut the pieces to length. Plan to pre-drill and screw the parts together.
— Softwood lumber can be purchased in small quantities and stock widths, needs no edging, and can be nailed without pre-drilling.
— Hardwood lumber has the same merits as softwood, except that it needs to be pre-drilled and screwed. Like softwood, hardwood lends itself to fine joinery; plugged screw heads at a butt joint can add a very nice touch.
— Plywood needs to be ripped to width and cut to length, and if you want to cover the exposed plies, it needs to be edged. These processes aren’t difficult, but they do require extra work.
Cleated Shelves
Two parallel upright surfaces are the key to these easily installed, good- looking shelves. Cleat-mounting has been used for centuries. Cleated shelves can bear a lot of weight, and you can take advantage of this fact by storing heavy things—TV, stereo components, DVDs, CDs, LPs, or mags and books—on them. You can also use cleats to build a sturdy, ample working shelf: in the kitchen, cleat- mount a slab of chopping block; in the bedroom or the study, mount a hollow-core door.
Some Options on Design
Different construction materials give you a number of options for cleated-shelf design.
— For shelves, use edged 3/4-inch plywood or hardwood or softwood lumber of any thickness, or consider mounting 1/4-inch plate glass on large quarter-round cleats.
— For concealed cleating, you might use ripped plywood or particle-board strips. Conceal the cleating by attaching a lumber 1 by 3 lip to the front of each shelf.
— If you wish the cleating to show, use an attractive stock molding, 1-inch quarter-round, 1 by 2 lumber, or any other material with at least one flat side. For a three-sided support, miter the joints of the back and side cleats. To expose the cleating, don’t put a lip on the shelf.
— Paint the shelves the wall color to blend them into their environment, or apply a natural wood finish for contrast.

Construction. Measure the space and record your dimensions on a freehand sketch.
Cut your cleating material to length. If you’re using two cleats, they can be the full depth of the shelf, or 1/4 inch to 1/2 inch less. For butt-joined cleating on three sides, make the back cleat flush to each side wall, then butt the side cleats to it. For mitered cleating, each cleat’s wall face will be lull length.
When you cleat the inside of a cabinet, you should use only side cleats. Cabinet backs are often surface-nailed 1/4-inch material. Nailing a back cleat to such a back may well knock it off.
If you can locate the studs, mount the cleating to them with nails or screws. If you can’t find the studs, mount the cleats with hollow-wall fasteners. If the wall is brick, concrete, or tile, drill it with a masonry bit. Then drill corresponding holes in the cleats and fasten them to the wall using expansion shields and screws. Cut the shelf material to size, allowing about 1/8 inch clearance to slip the shelf into place. Edge the shelf, and putty and sand it as needed. Apply natural wood finishes now; if you’re painting, wait until shelves are in place.
Place the shelves on the cleats. If you’d like to attach them permanently, pre-drill, and then nail through the shelf surface into the top edge of the cleat. Set the nails and putty the holes.
Six-Track System
The amount of capacity the six-track system generates in an average closet borders on the miraculous. Most closets are under-equipped; the usual fixed shelf over an adult- height closet pole provides only limited wardrobe storage. Tremendous wasted space glares out from under shirts and skirts hung on full-width poles.
With this kind of arrangement, it’s not easy to create the versatile and flexible closet you’d like. With a six- track system, though, you can tailor a closet for any member of the household at a small investment of both time and money. You need not confine this system to closets; mount it between any two parallel walls for excellent storage space.
Design and Construction:
Measure your closet space and record the dimensions on a freehand sketch. Make a note of anything that will bear on your design: the door opening, the way the door is mounted (hinges, bi-folding pivots, sliding-door track), closet side-wall overhangs, interior baseboard, and existing closet fittings.
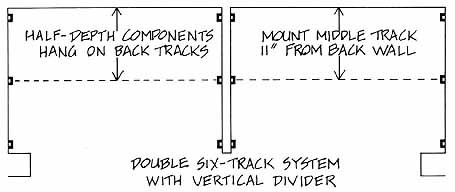
Plan your closet layout. If your closet has a door opening between 30 inches and 48 inches wide and an interior up to 60 inches wide, plan to mount three shelf tracks on each side wall. For wider closets, add a divider (see below) or a vertical module; then double the six-track system, so that each pair of vertical surfaces has a set of six tracks. The doubled six- track system will allow more versatility in the use of space, and will give better weight-bearing capacity by allowing you to use shorter-span shelves and poles.
If your design doesn’t include using existing closet fittings in their present positions, remove them now. On one side wall only, mark the positions of the tracks; place the middle track about 11 inches from the back wall. Clothes rods will hang from this track; half-depth shelves and modules will hang from the middle track and the back one; full- depth components will hang from all three tracks.
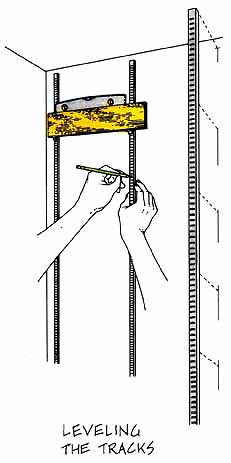
Position the first track, and check to see that it’s plumb. Through one screw-hole, drill a pilot hole, and then loosely drive the screw in. Recheck the track to be sure it is plumb, and drill the other screw-holes; then screw the track down securely. To assure that the clip slots are level with one another, insert a clip in a numbered slot on the fastened track; insert another clip in the next track’s corresponding slot. Hold the second track in its approximate position and rest a piece of flat scrap across both clips. Place a level on the scrap, and adjust the second track until the bubble is centered, and pencil-mark several screw locations. (You may find this process easier with a helper.) Drill and screw this track down like the first; repeat this process for the remaining tracks.
When all the tracks are installed, measure the width of the space between the track’s faces. Then cut the shelves and poles to size, allowing clearance as needed.
Closet Divider: First, before installing any track, cut the divider to size, or construct a module. Then, on each outside face of the divider or module, mount three tracks as described above. Cleat or toenail the divider into place; screw or nail the module to the floor and back wall.
Now install three tracks on each remaining closet side wall according to the instructions given above. Take care to match the slots so that your shelves and poles will be level.