In some cases, the best solution to a wet- basement problem is not sealing the foundation but installing a sump pump that will expel water as fast as it enters. A sump pump may be preferable to expensive foundation repairs if, for example, basement flooding only occurs during severe storms. And it's the only practical remedy if water is being forced up through the basement floor by a rising water table. In addition to solving immediate problems, a pump is good insurance against water damage from burst pipes or backed-up basement drains.
Sump pumps come in many versions. Most are permanently installed units that run on electricity, but they may also be powered by small gasoline engines or by pressure from the water main, and they are sometimes intended for occasional emergency duty rather than regular use. Sump pumps empty water that runs into a hole, or sump, dug in the lowest part of the basement. The pump starts automatically as the water level in the sump rises, then switches itself off when the water has been evacuated.
Installing a sump pump is an interdisciplinary task, typically calling for the skills of a plumber, electrician and carpenter, as illustrated overleaf. The first part of the job is to dig the sump. To chop through the concrete floor of most basements, you can rent an electric jack hammer from a tool rental agency. The sump will have to accommodate a liner
—a bottomless cylinder, available from plumbing suppliers in a variety of materials, that prevents the sides of the hole from caving in. A liner should have a diameter of at least 15 inches; a smaller liner with less water capacity will short en the life of a pump by causing it to operate more frequently. Before purchasing the liner check the pump manufacturer’s instructions for any recommendations on sump diameter and depth.
In making plans for a discharge line, first consult your local plumbing code. Most communities will not allow you to pump basement water into sewer lines, but many will not object if you pipe the water to the storm drain system. Or you can simply pump the water away from the house and let it disperse through the soil. Sump pumps usually require 1¼- or 1½-inch discharge piping. Use a plastic pipe if possible; it's easier to work with.
Manufacturers of electric sump pumps usually recommend that power be drawn from a separate, unswitched outlet. Such a source can safely supply the large amounts of current required to start most pumps, and it will also ensure that the pump can't be unintentionally disconnected by flipping off a basement light switch. Before installing a new receptacle, check your local electrical code to be sure that you use the correct materials. Call in an electrician to make the connection at the service panel.
Every sump should have a cover in order to keep out pump-clogging debris and eliminate the possibility of injuries caused by unexpectedly stepping into an open hole. Some sump liners can be purchased with a cover, but in most cases you must make your own.
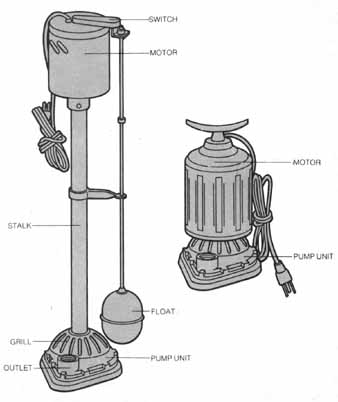
Two common pumps. Electric
sump pumps are available in two basic forms—pedestal (above, left) and submersible (above, right). Both have a rotary pump unit that rests on
the floor of the sump. Water enters through a grill, which traps objects
that could damage the pump, and leaves from an outlet to which a discharge
pipe is attached. The submersible pump, completely sealed against water and installed below the floor of the basement, is quieter than a pedestal
model, which has a less expensive, unsealed motor atop a long stalk to
keep from getting wet. A float near the base of the stalk is connected
to a switch that turns on the motor when the water rises above a predetermined
level; a submersible pump is controlled by a switch inside the motor.
Preparing the Sump
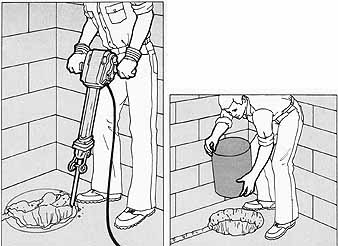
1. Digging the sump. With
chalk and a piece of string, mark a circle on the basement floor where
water collects. The circle should measure 3 inches larger in diameter than
the sump liner you are using and , if possible, should lie close to a wall and out of the way. With an electric jackhammer from a tool-rental agency,
chop through the basement floor around the sump outline, then deepen the
sump with a shovel until the hole is about 2 inches deeper than the liner.
If water collects in more than one depression in the floor, use a chalk
line to lay out drainage trenches, about 2 inches wide, to the sump; use
the jackhammer to dig them 1 to 2 inches deep. 2. Lining the hole.
To keep the pump from sinking into the mud and becoming clogged, lay a
4-inch bed of gravel at the bottom of the sump. Next, slide the liner into
the sump and pack dirt between the liner and the side of the hole. Fill
the last few inches with mortar and trowel smooth, being careful not to
dam any drainage trenches leading to the sump. Mix enough mortar to smooth
the inner surfaces of the trenches.
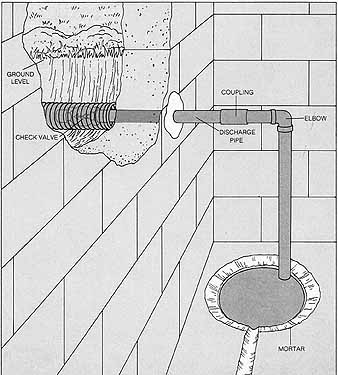
3. Installing a discharge pipe.
For the outlet through the foundation, choose a side of the house where
soil provides good drainage. Inside the basement, about 10 inches below
ground level, make a hole through the wall large enough for the discharge
pipe. Use the rented jackhammer if the foundation is concrete, or a 4-pound
maul and cold chisel if it's cinder block.
Outside, locate the outlet hole by digging at the foundation. Push a 2-foot length of discharge pipe through the hole in the wall so it protrudes equally on either side. On the outer end of this pipe, install a check valve—with the arrow pointed away from the basement—to prevent backup of water and to intercept any small animals. Excavate a trench 1 or 2 feet wide to hold perforated drain tubing or, if the soil offers poor drainage, to lead unperforated tubing to a dry well or storm sewer. The trench floor should be inclined away from the house so water will not collect and freeze in the tubing in winter.
Inside the basement, extend the discharge pipe horizontally toward the sump. For a short run to a nearby sump, the discharge pi can jut directly from the wall, as shown at right. Discharge pipes more than 3 or 4 feet long should be strapped to the wall or the overhead joists for support, ac cording to the manufacturer’s recommendation. About 3 inches from the center of the sump, use an elbow to turn the pipe toward the pump. Pack mortar around the discharge pipe where it passes through the foundation, sealing the wall.
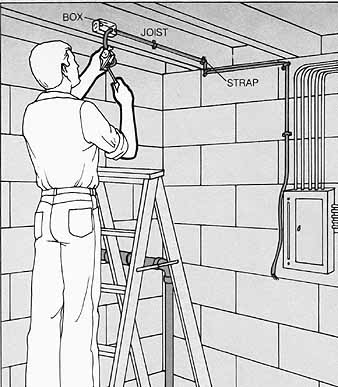
4. Supplying electricity for the pump.
String three-wire plastic-sheathed cable from the service panel, along
the joists, to a point above the sump. strap the cable to walls and joists
every 4 feet and whenever it turns corners. On the joist above ne pump,
fasten a surface-mounted electrical box that has a cable connector fitted
through a knockout. Thread the cable through the connector, trim the cable
so 8 inches stick out.
Strip the sheathing from the tail, and remove ¾ inch of insulation from the black and white wires n the cable. Attach the black wire to the brass terminal of a single grounded receptacle and the white wire to the silver terminal. With a wire nut, attach two 4-inch green or bare jumper wires to the bare wire in the cable; then, with a sheet metal screw, connect one of the jumpers to the green terminal of the receptacle and the other to the box. Attach the receptacle to the box and close it with a cover plate. Have an electrician connect the other end of the cable to the service panel through a ground-fault interrupter, a cir cult breaker that prevents serious shocks.
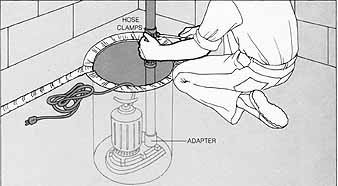
5. Installing the pump. Screw
a length of discharge pipe, fitted with a threaded adapter, into the pump
outlet. The pipe should be long enough to extend a few inches above the
lip of the sump when the pump is in position. Lower the pump into the sump and connect the pieces of discharge pipe to each other with rubber hose and hose clamps if the pipes are plastic; use a coupling called a union
if the pipes are metal.
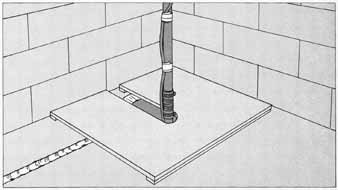
6. Making a cover. From a
piece of ¾-inch plywood, cut a square with sides extending about 6 inches
beyond the edges of the sump. Draw a line across the middle of the square.
Along this line, cut a slot wide enough to fit the discharge pipe and deep
enough so that the cover overlaps the edge of the sump evenly all around.
If the cause of basement flooding is seepage through the walls, screw strips
of the plywood along two opposite edges of the cover to raise it off the
basement floor and allow water to reach the sump. Before installing the
cover, paint it and tape the pump’s electrical cord to the discharge pipe.