If simple remedies, such as grading surface soil or patching interior walls, fail to cure a wet basement, you must block moisture outside the basement wall. No amount of interior patching will stop penetration caused by the power of substantial subsurface water pressure, nor will it plug leaks through cracks opened when the roots of a tree penetrate.
To waterproof a basement wall from the outside, you must excavate at least part of the foundation of the house, a heavy job you may want to have done. You also may prefer hiring a professional if basement walls must be resurfaced with concrete. But the rest of the job is fairly simple to do yourself.
Some cracks are shallow enough to block by simply excavating the upper part of the basement wall to a depth of about 2 feet and waterproofing with asphalt foundation coating and polyethylene plastic sheeting. If the leak is lower down, there is no alternative to excavating the entire basement wall down to the footing. Once the digging is done, you should waterproof the wall with concrete and also lay drain tiles, which collect subsurface water and carry it away from the house. The tiles—made like storm-sewer piping, but generally perforated—are available in several materials in various lengths with connectors and el bow fittings. Tiles that are asphalt impregnated and rigid plastic types are the easiest to use.
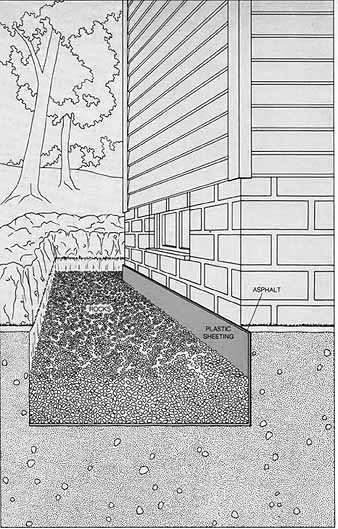
Waterproofing near the surface.
Dig a trench 4 feet wide and 2 feet deep around the house, sloping it downward
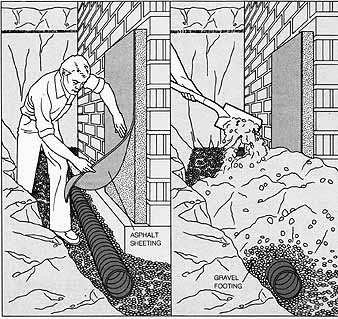
away from the house. With a trowel, apply a coating of asphalt to the wall
from the bottom of the ditch to grade level. Smooth the coating with a
stiff brush. Then press a sheet of polyethylene plastic against the asphalt and extend the sheeting to line the bottom of the entire ditch. Fill the
trench with a 1½-foot layer of rocks and cover with topsoil.
Drains for Deeper Cracks
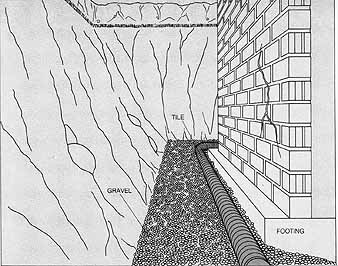
1. Installing drain tiles.
Once the foundation has been excavated to expose the crack, place a 4-inch
layer of gravel in the trench next to the foundation footing, then set
tile along it. If the house is on level ground, surround the house with
tiles, sloping them slightly with the gravel, and connect them to a dry
well.
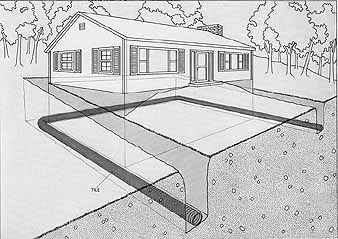
If the house is on sloping land,
you can lay out the drain tiles so that connections to a dry well may not
be necessary. Place tiles around the three uphill sides of the foundation and extend the ends 10 to 12 feet beyond the foundation on the downhill
side to ensure that water drains away from the house. A dry well would
be necessary only in crowded neighborhoods or where the soil offers exceptionally
poor drainage.
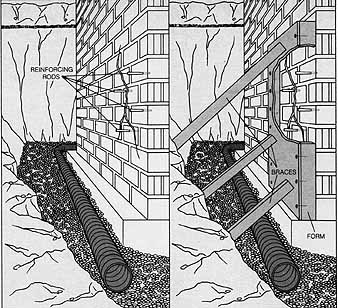
2. Reinforcing the wall.
Begin by driving 6-inch lengths of ¼-inch metal reinforcing rods halfway
into the old wall, putting one rod in each square foot of a 6-foot-square
area around the crack. Put some rods into the crack and others in holes
drilled with a masonry bit. 3. Making the form. Make a
three-sided form to hold the concrete by nailing sheets of ½-inch plywood
to a frame of 2-by-4s that's 6 feet wide and tall, and 4 inches deep.
Set the form on the footing—open side to the wall as shown at far right—brace
it firmly and pour the concrete. Remove the form after the concrete sets,
reusing it as needed on other exterior cracks.
4. Adding asphalt. With a
trowel, apply a layer of asphalt to the new concrete and smooth it with
a stiff brush. Press polyethylene plastic sheeting on the asphalt. The
sheeting can extend above ground and be trimmed after the ditch is filled. 5.
Finishing and filling. Bury the tile in gravel in a pile inclined
against the footing as shown at far right. Fill the ditch and replace the
sod.