When a house’s framing is too close to the ground, surface water will splash up and /or wick up through the foundation, often rotting the mudsill. To correct this condition, you’ll have to raise the top of the foundation at least 8 in. above grade: by shoring (or jacking up) the house, removing the sill and shortening the pony wall, then capping the foundation—or replacing it altogether.
(The procedures that follow assume that your house has pony walls, short walls running from the foundation to the first-floor platform. If it lacks pony walls, and if joists rest directly on the foundation, you have two options: cut ting back the grade on the outside of the house to gain the necessary height, which may not be possible if the foundation is shallow; or jacking up the house at least 8 in., which is complicated and extremely expensive.)
Capping the foundation means pouring a new foundation atop or around the old foundation, after first adding rebar dowels to tie old concrete to new. It also assumes that the old concrete foundation is sound enough to tie into; if it’s cockeyed or cracking, it makes more sense to tear it out and replace it with a new foundation. In most cases, this is a job for a specialist.
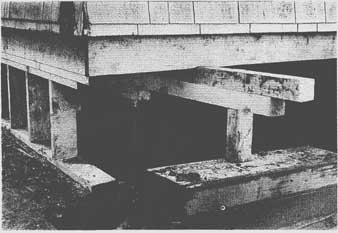
Figure 10.8: A needle beam supporting a wall while its pony wall is
being replaced.
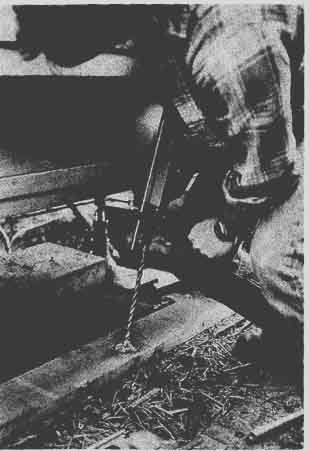
Figure 10.9: Drilling the foundation with an impact drill. Because
it’s helpful to lean into this task, drill before framing out the pony
wall.
 Figure 10.10: Capping a foundation. (A) Pony wall studs in midair.
Drill and clean out holes in the foundation before adding the mudsill—it’s
much easier. (B) A corner section almost ready for the concrete pour.
The form-boards, lying in the foreground, are ready to be tilted up and tied off.
Supporting the Wall
Please read the sections on shoring and jacking thoroughly before proceeding. Then survey the underside of the house and the area around the foundation for sewer lines, water pipes, wiring, and the like—move jacks or support beams to avoid crushing them. A few points to keep in mind: Jack up no more than you must: 1/8-in. should be enough to get the weight off pony walls. All jacks must be firmly footed, and all posts, plumbed. Repair no more than you must. If the entire foundation needs capping or replacing, raise only one wall at a time.
Place jacks and support beams close enough to the foundation to pick up loads, but back enough to give you room to work: 2 ft is optimal in most cases. The direction of floor joists dictates the placement of support beams. Re member to double up rim joists and add blocking if joists are parallel to the foundation wall you’re replacing.
It’s possible to support the house with temporary wooden posts, but it makes more sense to rent a few extra jacks and leave them in place beneath support beams until you’re done with your repairs. Should the house settle, as houses frequently do, you’ll have jacks in place to set things right.
Replacing the Sill
Once support beams are in place and you’ve jacked up low spots, as necessary, lay out the height of the new sill by snapping chalk lines across pony wall studs. If the top of the old foundation is level, measure up the requisite amount you must raise the sill; otherwise, measure down from the top plate of the pony wall to mark your cuts.
At this point, it’s convenient to rip off siding up to the top of the pony wall, but prudent to rip off no more than you must to allow the saw to pass unobstructed. Siding can serve as one side of your cap forms and , in any event, will need to be replaced when the job is done. (Of course, if you needed needle braces to support joists, you will have already punched through the siding.)
The siding off, use a square to extend cutoff marks across the face of the studs. It’s important that these cuts be square so that studs sit fully on the new sill. For this reason, use a circular saw rather than a reciprocal saw. If the first stud “chatters” as you cut through it, you may want to tie together successive studs with strapping tacked just above the cut line.
The replacement sill should be redwood, or pressure- treated with a preservative such as Copper Green, to resist bugs or moisture; and end-nailed to each stud with two or three 16d galvanized nails. But before nailing up the new mudsill, drill dowel holes in your foundation and rough out rebar—much easier without the sill in the way.
Tying Old Concrete to New
Dowels are steel pins grouted or epoxied in the original foundation. They are particularly important because they provide positive mechanical attachments between sections and transfer loads to the larger footprint of the new foundation. In short, they tie old to new.
Dowel types. Several materials are appropriate. One is threaded rod (all-thread bar), which can be cut long enough to run continuously from old foundation through new sill, thus acting as both dowel and anchor bolt. If you can drill straight down into the foundation, it’s easy to align threaded rods to holes predrilled in the sill.
More likely, you’ll have to drill at an angle because the house is in the way. For this reason, it’s often easier to install rebar dowels at a slight angle in the foundation, as a separate operation from setting anchor bolts. Dowels set at an angle are also less likely to pull out should shifting occur
Placing steel. Because tie-ins are only as strong as the material around them, you should center dowel holes in the top of the old foundation and drill them 6 to 8 in. deep. If you’re drilling into concrete, use an impact drill; into brick, use a heavy-duty power drill with a carbide bit. Holes should be in. larger than the diameter of the dowel so that there is room for epoxy: for ¾-in. all-thread, drill 1-in, holes; for ½-in. rebar, ¾-in, holes will suffice.
Anchor bolts are routinely placed every 6 ft, and not more than 1 ft from corners or board joints, so if you alternate all-thread with anchor bolts, drill holes for the all-thread accordingly. In earthquake country, space the bolts every 4 ft. When using rebar dowels, some contractors prefer to space them every 3 ft. with anchor bolts in intervening spaces so there is steel of some sort every 18 in. or so.
The steel reinforcement running with the length of the foundation is thus tied to the rebar and the anchor bolts at each point they cross. If you are capping a brick foundation, the cap must straddle the old foundation with a minimum of 3 in. concrete on each side, and should be further reinforced with rebar running along each leg, and with saddle ties spaced every 4 ft to tie together the three lengths of steel.
If you pour your cap (or new foundation) a wall at a time, always extend rebar through the ends of the forms so that it continues at least 2 ft into the next section you pour. Concrete “cold joints” are inherently weak, but steel run-fling continuous across those joints will keep them from separating. When drilling into the ends of such sections, angle the drill bit slightly downward, so the adhesive added later will not run out.
Setting dowels. When you’re done with drilling and have cut the rebar to length, clean out holes and set dowels. Because clean-out is critical to sound attachment, one builder duct-tapes a length of ½-in. flexible tubing to the hose of his shop vacuum and inserts that tubing in holes. That rig has enough suction to raise the dead and is as effective with the vac on a blow mode.
There are a number of masonry adhesives suitable for attaching dowels; epoxy compounds are among the strongest. To avoid air pockets, fill holes from the bottom, using a funnel and a tube, or a special epoxy injector. The epoxy should flow in easily. As you insert the rebar (or all-thread) dowels, twist them to distribute the adhesive evenly. If epoxy runs out of holes drilled in the ends of foundations, insert dowels and pack the holes with clay until the epoxy has cured.
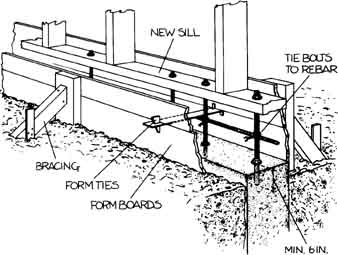
Figure 10.11 Capping an old foundation. Ready for the pour: formwork,
bolts, and mudsill.
Securing the Sill
Before hanging rebar off the dowels, pre-drill for anchor bolts in the new sill. (You have not yet attached the sill plate to cutoff studs.) Space the bolts as noted above, making sure that no bolt occurs under a stud. When the new cap is installed, your foundation will rise well above grade, but if local codes still require termite shields, add them now.
You need only tack each shield to the underside of the sill, but pre-drill anchor bolt holes through it, too. All that at tended to, nail up the sill to the studs. A nail gun can be helpful here.
The sill finally in place, insert anchor bolts, screw on washers and nuts, and tie the free ends of the bolts to the rebar. At this point, nuts should be just snug; you can really tighten them down after the concrete has cured.
The Forms
Because a cap contains a modest amount of concrete, forms can be simple. If you stripped the siding earlier to facilitate cuts or to position beams, nail boards to the outside of the pony wall to create the outer wall of the form. Two-inch-thick boards are customarily used for forms, but in this in stance you can use 1-in, boards if you take care that all joints are centered over stud edges and are braced with stakes running diagonally to the ground. For ease in removing forms, use duplex nails throughout.
On the inside, you’ll need at least 3 in. of clearance between the inside of the form board and the inside edge of the new sill, to fit the nozzle of the grout pump. If the old foundation is too narrow or the sill too wide, notch the forms to accommodate that nozzle. The inner form board should also be staked for strength and backed by 2 x 4 walers every 4 ft, and at board joints. The top of the form should be slightly higher than the bottom of the sill, These forms should be sturdy enough without spreaders, especially if your forms are 2-in, planks, but for a really first-class job, use foundation stakes and spreaders. These stakes, which are perforated, can be driven solidly into the ground and then tacked to the form boards. After leveling the bottom form board, you can use spreaders and wedges to hold subsequent form boards perfectly in place.
Stakes, spreaders, and wedges are imperative, in fact, if your cap overlaps the old foundation, as it must when capping brick. To hold forms out from the foundation the minimal amount, just place a few standard bricks (3 in. wide) in the bottom of each form. And because the exterior face of this cap will extend beyond the present foundation (and siding), taper its edge 45 degrees to shed water. You can shape this edge with a trowel after the concrete has started to set up a bit.
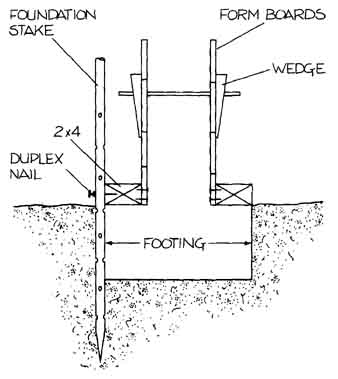 Figure 10.12 Formwork for a spread footing. By nailing a 2 x 4 on-edge
to the foundation stakes, you easily create the 4-in, footing on both
sides of the form walls (i.e., you can pour footing and walls in, one
operation). Take pains to make sure that concrete fills the footings.
Pouring the Concrete
As concrete sets up, it shrinks a small amount. To compensate for this shrinkage, crank your jacks about in. high. Thus when you fill up concrete to the edge of the forms—slightly above the bottom of the new sill—and the concrete shrinks, there will be a slight pocket beneath the sill. When the concrete has cured and you lower the house, it will be true level; and the sill, now resting in that pocket, will be quite unlikely to migrate thereafter.
But the key to a strong cap is the care with which you place the new concrete and drive out air from the forms. If your job is more than 1 cu yd, have it delivered premixed, in tandem with a grout pumper. As pumping requires smaller aggregate (3/8 in.), specify a six-sack mix from the concrete supplier.
Vibrate the forms to drive out air: hammering the side of the forms works well, a reciprocating saw with no blade vibrates superbly. As the concrete approaches the tops of forms, signal the pump to shut off so that it doesn’t slop over the side. When the forms are full and you’ve poked and vibrated to exorcise air pockets, float the top and sponge off any globs on stakes or forms.
As noted earlier in the section, allow concrete to cure 3 days minimum, 7 days optimum before removing the forms, setting down the house, replacing the siding, and tightening down the washered anchor bolts. For further protection against moisture, seal the outside of the foundation with asphalt emulsion.
Figure 10.12 Formwork for a spread footing. By nailing a 2 x 4 on-edge to the foundation stakes, you easily create the 4-in, footing on both sides of the form walls (i.e., you can pour footing and walls in, one operation). Take pains to make sure that concrete fills the footings.
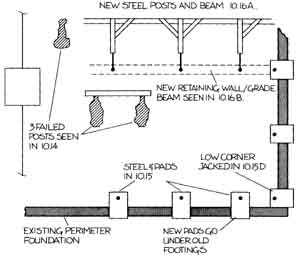
Figure 10.13: A floor plan of our case history. To the left center
of the drawing, the three failed concrete columns seen in Figure 10.14.
Down the middle, the new steel posts and beam seen in Figure 10.16A and embedded in concrete in Figure 10.16B. The driven steel and pads shown
lower right appear in Figure 10.15A-D.
Replacing a Foundation
Supporting, removing and replacing a failed foundation section can be substantially the same as capping a foundation It depends on the size of the old foundation in most cases it’s advisable to have a professional replace it. The major difference is the amount of excavation necessary to expose the foundation and provide room to install a new footing. Supporting the house correctly becomes correspondingly more difficult as excavations get bigger—have an engineer recommend jacking platforms and support-beam s when designing the replacement foundation. That person can also pinpoint the cause of the failure, but it will probably be an absence of reinforcing steel or an insufficient footprint (i.e., no footing).
To tear out the old foundation, you ye got two choices. Both require safety glasses, sound protection, heavy gloves, a mask, patience, and a strong back. Rent a gas-powered saw with a 10-in, blade, which cuts 4 to 5 in. deep, to cut the concrete into manageable chunks. An alternative is Roto-hammering a line of Fin, holes across the foundation and then smacking them with a hand sledge and a large mason’s chisel. Should you encounter rebar after all, have someone with a torch cut through it. This is monstrously hard work.
Once that’s out of the way, locate the new foundation by plumbing down from the outside edge of the sill. (If the sill needs replacing or the pony wall shortening to get it above grade, do that now.) Foundations are typically 8 in. wide and their footings 16 in. wide, so lay out forms accordingly.
Foundation stakes are a great boon here. Keeping them as plumb as possible, drive stakes solidly into the ground and tack through them into 2 x 4 spacers, as shown in Figure 10.12. These 2 x 4s, themselves tacked to the first course of form boards, establish the width of the footing beyond the foundation wall proper. To level the form boards, and all boards atop them, tap down the foundation stakes. Place metal spreaders across the tops of these first boards. Spreaders vary, but in our example, wedges on the outside of the form draw boards tight. These wedges, in turn, restrain the bottoms of the boards above.
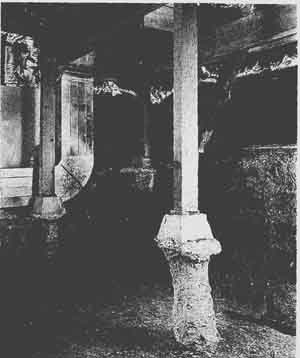 Figure 10.14: Because the soil is excavated in the foreground, one
can see how small earlier footings were.
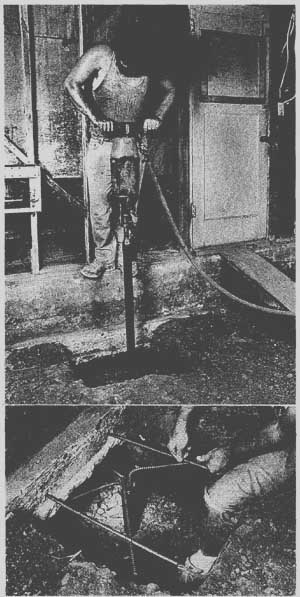
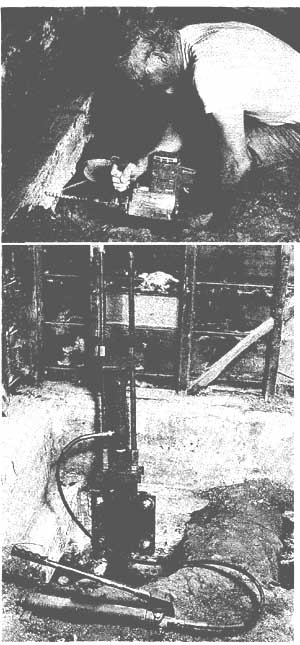 Figure 10.15 Adding driven steel. (A) Drive in the steel until it
hits bedrock. (B) Once the steel pipe hits bedrock, cut it off below
grade. Then drill the old foundation with an impact hammer. After cleaning
out the holes, pour in epoxy and insert rebar. (C) Tie the rebar in the
foundation to that sticking out of the steel pipe. (D) Here, the lowest
corner of the foundation is raised by a hydraulic jack capable of lifting
15 tons.
The deeper the footings, the taller the forms and hence the more important that bolstering devices such as walers and diagonal braces become. Over-jack the house as de scribed above to compensate for concrete shrinkage, set anchor bolts in sills, and tie them to the rebar grid within the forms.