After identifying the cause of foundation failure, do what you can to prevent its recurrence. If there was an insect infestation, for example, treat it as described in section 8; if excessive surface water, put in downspouts, drainage, and so on. Then, working from the design your engineer provides, repair failed sections. But first you’ll have to sup port the structure above, which requires shoring or jacking.
Although they employ many of the same principles and materials—notably, big timber—shoring and jacking have different purposes. Shoring timbers temporarily sup port the structure as it's , or prevent sagging when the structure is altered. Jacking, on the other hand, lifts the structure to its original position or temporarily raises a section to make some task easier—say, raising a girder just a bit so that you can fit a full-sized post beneath without having to beat it into place.
Thus you might need only shoring to add a girder beneath a floor that's merely springy; but you should jack that floor to level if it has sagged appreciably, say ½-in. Use shoring to support joists while you create a rough opening in a floor or add a doorway to a bearing wall. But you’ll have to jack when a pad or post has failed, when the perimeter foundation has sunk, when earlier plumbers or electricians cut so much of a joist that it split, and so on.
Materials and Tools
When used as a temporary partition, shoring can be fabricated from 2 x 4s; in foundation work, 4 x 4s are more commonly used for shoring studs and plates, with 4 x 8s or 4 x 10s on-edge used as carrying beams. To fully support loads above, studs are cut nearly to length, plumbed, and fit tightly to plates by driving cedar shims in with a hand sledge. Jacking also uses 4 x 4s or 6 x 6s as posts, and as cribbing beneath the jack, which provides a level platform from which to jack and distributes loads over a broader area.
There are a variety of jack types to choose from. Screw jacks, perhaps the oldest type, vary from 12 to 20 in. high in repose and extend another 9 to 15 in. Never raise the threaded shaft more than three-fourths its total length; it will be unstable beyond that. Hydraulic jacks are the work horses of foundation work and are rated according to the loads they bear: 16 to 20 tons is typical. In general, hydraulics are easier to operate and fit in tighter spaces than screw jacks; but because they lower by releasing hydraulic pres sure, you can’t lower them as slowly as screw types. Adjust able columns feature a screw mechanism atop a sleeved column, and a plate or bracket atop which attaches to the wooden member being raised. These lightweight columns, which bolster girders or joists, are intended to be permanent posts and are not rated as jacking devices. Lumber can also be used as a jack of sorts if your jacking is minimal, say, in.; cut posts oversized by that amount and beat them into place.
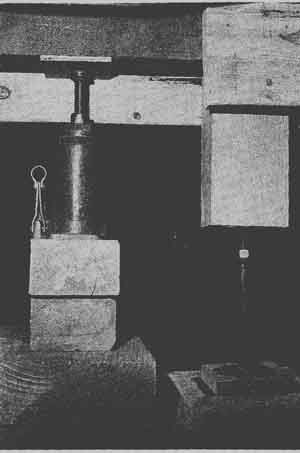
Figure 10.4 Left, a hydraulic jack atop cribbing; right, a screw jack
atop a concrete pier block.
Jacking Safely
Jacking houses is scary and should be: there are tremendous loads involved. But it can be done safely if you proceed slowly and observe the following precautions:
1. Wear a hard hat. Get a tetanus shot. Set up adequate light. Always have help within shouting distance.
2. Have a professional engineer assess the foundation’s failing, design an appropriate remedy, and recommend jack sizes and placement.
3. Supplement that advice with a thorough inspection of your own. Know what’s above: where bearing walls are, what heavy items put additional stress on joists, what pipes or ductwork might interfere with shoring or jacks, and so on.
4. Think things through. How much digging is there, who’s going to do it, where are you going to put the dirt? What machines can you rent? If you need more than 1 cu yd of concrete and will have it delivered, do you need a pumper truck? Where will you store materials? What hap pens if it rains?
5. Important: Never jack more than you must, and raise all jacks in equal increments—say, in. at a time.
6. If repairs are extensive, raise an entire wall at a time; repairing shorter sections wastes too much time setting and moving jacks.
7. Jacks and posts must be footed adequately:
a. Pads or cribbing must be wide enough to bear the load. Putting posts or jacks directly on earth is a waste of time, and precast concrete pier blocks right on the ground aren’t much better. Instead, put 8-in, pier blocks atop 2 ft x 2 ft concrete pads at least 6 in. thick. Or avoid the hassle of concrete altogether and use cribbing.
Cribbing must also be substantial.—ideally, 4 x 4s or 6 x 6s stacked so that they taper up from a base of 3 or 4 ft square to a top about 1 ft square, as in Figure 10.5A. Some builders also place a piece of 1k-in. plywood atop the cribbing, for an even more stable platform from which to jack. (Aside: When using screw or hydraulic jacks, whose heads are relatively small, place a-in, steel plate atop those heads so that they don’t sink into the wood being jacked.)
b. Never jack a post that's not plumb, and never jack from a base that's not level. The logic of this should be self-evident: When loads are transmitted straight down, there is less danger of jacks or posts kicking out and injuring someone.
Accordingly, cut the ends of all posts perfectly square, plumb posts when you set them, and check them for plumb periodically as the job progresses. If jacking posts are longer than 5 or 6 ft, brace their tops with 1-in, boards run diagonally.
Where it’s necessary to build a platform of cribbing on sloping ground, add an extra crib on the low side, as shown in Figure 10.5C. To hold cribbing on a slope, nail the crib to foundation stakes, using duplex nails for easy removal.
c. Don’t put jacking platforms too close to the edge of an excavation, for the soil could cave in when the jack is loaded. The rule of thumb is to go back 1 ft for each 1 ft you dig down. Also, don’t put jacks where they’ll be undermined later: if, for example, you need a needle beam to support joists parallel to the foundation, excavate on either side of the foundation and place the jacking platforms in those holes. In that manner, you can remove the foundation without undercutting the jacking platform.
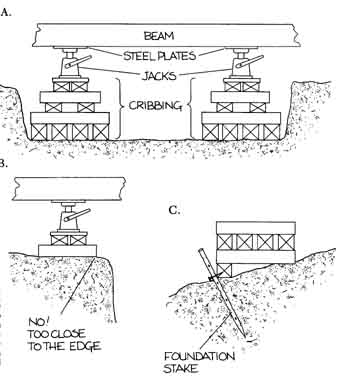
Figure 10.5 Jacks and posts must be footed adequately. (A) A safe
setup for the cribbing can't be undermined and will not have to be moved
later. (B) Unsafe! Here the jack is too close to the edge of a hole.
When the jack is loaded, it could easily collapse the dirt shoulder.
(C) Where you must jack on a slight in cline, hold cribbing in place
with foundation stakes—or dig into the ground to create a level shelf
from which to jack.
Placing the Jacks
Ideally, place jacks directly under the area to be jacked. This is usually possible when raising a sagged girder or when adding a new one. If you’re putting in new posts, jack up in the intervening spaces between old posts. Jacks every 8 ft should be sufficient under joints of a laminated girder and under girder ends not supported by the foundation wall.
Frequently, though, it’s not possible to place jacks directly underneath (e.g., when replacing a foundation). In that event you’ll need to pick up the load above with a beam. Where joists run perpendicular to the foundation, place a 4 x 8 or 4 x 10 beam on-edge under the house, within 2 ft of the foundation. This distance should be close enough to the end of the joists so that they won’t deflect, yet far enough back to give you room to work. A jack every 6 ft under the beam should suffice.
When replacing a foundation whose joists run parallel to the foundation, rip off siding up to the underside of the joist platform—and insert needle beams every 6 ft, running perpendicular to the wall, as in Figure 10.6B. Thus you’ll need two stands of jacks to support the needle beams: one stand under the house, as above, and a second stand, roughly 2 ft from the foundation, outside. To keep the rim (outer) joist from deflecting under the load, nail a second rim joist to it, and add blocking from those doubled joists to the first adjacent joist. Use 16d nails to end-nail blocking, and 10d nails to face-nail rim joists.
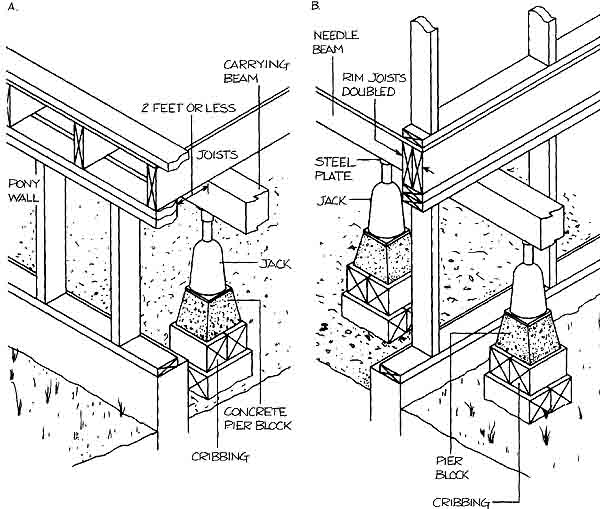
Figure 10.6: Supporting the structure. (A) When joists run perpendicular
to the wall you want to work on, support their load with a beam parallel
to the wall. Allowing yourself room to work, put this beam as close to
the wall as possible; it should be no further than 2 ft. Place jacks
at least every 6 ft beneath the beam. (B) Where joists run parallel to
the wall, run your beam (here called a “needle beam”) perpendicular to
the wall as shown. To prevent its deflection under pressure, double the
outer joist and run blocking to the next joist in. Again, place jacks
as close to the wall as possible, and no further than 2 ft.