Planning
The best time to plan the basement layout is when the house is being built. Many houses today were obviously built with future basement use in mind: utility rooms such as laundry and storage are set up in remote corners; bathroom plumbing is roughed in; heating and air conditioning appliances are located so one can plan and utilize remaining space for maximum use and advantage.
But, it doesn’t require extensive detective work to learn that most basements were built with no thought given to future expansion. Stairways are poorly located, so they not only cut up space and make it unworkable, but also make moving materials and appliances into the basement almost impossible. Furnaces may be set smack dab in the middle of the basement, making it impossible to lay out any large, uninterrupted spaces for game or recreation rooms. Floor drains are badly located so one must break up large portions of the concrete floor in order to install shower or bathroom waste drains. The first order of planning must be to over come or correct bad layout by the original builder.
Someone has observed that good housing design is timeless, because it makes the space “work.” How many times have you said to yourself that a door in your house is in the wrong place? Or the stairs are too steep, or too narrow, for comfortable use? Have you ever tried to cook in a really badly planned kitchen? Then you know the importance of good design. If you’re not sure of your own design, have a builder or architect take a look at the plan before you proceed. Keep in mind that good design will repay its cost not only by enhancing the value of the property, but also by enhancing the livability of the space on a daily basis. The reverse is also true: there is a price that's extracted by bad design, and you will pay that price in daily installments as you occupy the space.
Access
As mentioned elsewhere, poor stairway location can be a very negative factor in remodeling or using basement space. If you intend to use the basement, or a portion of it, for play space for your children and their friends, poor stairway location can turn your main floor living space into a race way, as children move between their upstairs bed rooms and the basement play area. If the basement will be used as a recreation room for adult or family parties, do you really want all guests to move through the kitchen, en route to the basement, while you are trying to prepare food? Think about the extra traffic you will create, and how the pre sent stairway location will work for that new traffic flow, before you decide that the stairway is workable in its present location.
Moving a stairway to a new location admittedly will increase the scope and cost of your basement project. Before you decide, have a contractor ad vise you on how feasible moving the stairway would be, and what it would cost. Moving a stair way involves cutting through the floor for a new stairway opening, installing and modifying joist headers to support the altered floor, and closing up the old stairway location. Although it's not a terribly hard job to do, it does involve making changes that affect the structural integrity of the house, so the job is one that requires expert knowledge.
Access Alternatives
You should consider access requirements both for convenience and for safety. Your local building code may require a secondary exit from finished basement space. Whether codes require it or not, you should be sure your basement has at least one optional exit, in case of fire or other emergency. Even an oversized window, one that's large enough for adults to climb through, is sufficient in most cases. Because most house fires occur at night, when sleeping occupants of the house may not notice early warning signs of fire such as odors or smoke, a secondary exit is mandatory if the new basement remodel contains bedrooms or sleeping accommodations such as convertible sofas for use of occasional guests.
If the existing stairway location does not complicate the basement floor space for room layout, consider installing a circular stair instead of moving the existing one. A circular stair can be an architectural attraction, one that adds a focal point of interest, just as a fireplace does. The installation of a circular stair in addition to the existing stair can permit you to redirect traffic, so that people don't have to pass through occupied space to get to the basement. Installing a circular stair near the entrance of the home can permit guests to go directly to the party.
Circular stairs can be installed in as little as 3’ or 4’ square areas, so they don’t take up much floor space. Keep in mind, however, that circular stairs with limited diameters are designed for live traffic only, and are not wide enough to permit passage of furniture or building materials.
Another option would be to install a basement access door from the outside. Units such as the Bilco Basement Door (see photos) can provide easy access for moving in appliances, workshop tools or materials, and for storing seasonal items such as yard and lawn tools and furniture. Stop ping traffic through the house, and the tracking of dirty, wet footprints across floors, should be a prime motivator in deciding to install an outside entrance.
Installing the outside door is a job for a masonry contractor, as the photos may suggest. The job includes excavating the lawn at the door location, cutting through the concrete wall, installing base drain tile and footings, laying up a concrete block wall, then installing the risers, the steps and the entry door at the basement wall. Then the steel door/cover must be installed atop the stairs and finished to suit.
Other options to open up the basement include bumping out the concrete wall and installing a greenhouse roof atop the bumpout. This can be an incredible addition because it takes away that claustrophobic feeling of being underground, and the natural lighting that's admitted by the enlarged window area can eliminate the need for artificial lighting in daylight hours. Installing operable roof windows in your bump out can eliminate moisture problems as well. Circulating outside air into the finished basement can eliminate fear of mold and mildew and the musty odors that attend these problems, so you should consider the value of added ventilation when deciding whether the project is worth the price.
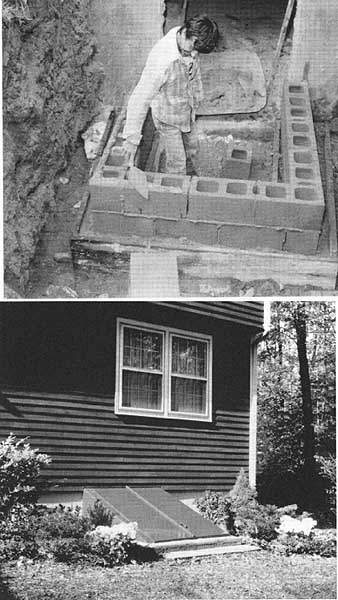
Contractor lays concrete block in outside door excavation. Contractor
also has stringers that can be attached to concrete walls to hold steps.
The finished job shows steel doors that swing up to provide convenient
access to the basement from outdoors. Properly installed, the doors offer
weatherproof cover, plus complete security with handy access.
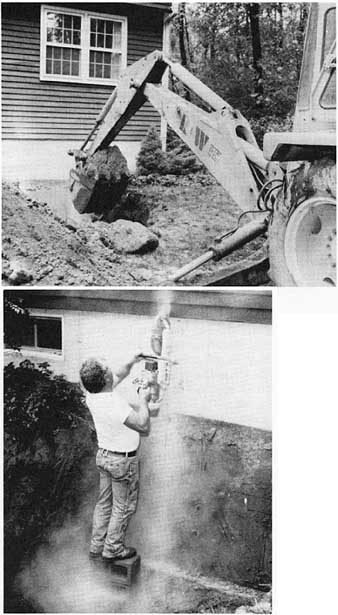
To install basement door, contractor excavates stair path to the
foundation with a tractor-mounted backhoe. Contractor uses a masonry
saw to cut through the concrete foundation wall to make an entry door.
Bathroom
Few amenities you can add are as useful and valuable as an extra bathroom, and if you are planning to use the basement space as full-time living space a bathroom is mandatory. The basement bath can be a half-bath, or a stool and lavatory that will require only a 4’ x 4’ space. The half-bath alone should save a lot of traffic between floors, plus saving the attendant wear and tear. If you have an active family that's involved in many sports, a basement level shower can help reduce the cleaning chores on your main bathroom. If hot-tubbing is your game, an expanded bath that can hold an oversized whirlpool makes sense. Options include deep Japanese soak tubs that resemble a barrel — tubs with sidewall seating built in so you can actually be in hot water right up to your neck. Other options are exercise room, dressing room(s), and built-in sauna. You must allow extra room for all options, and you may have to install either an extra water heater to handle all that volume, or a large-capacity (commercial rating) water heater. You can use masking tape or duct tape to lay out appliance locations on the floor, so you can get a visual idea of the scope of each project and how it will impact on your overall basement plan.
As you start your plan, do a preliminary layout on graph paper, so everything is planned to scale. As the plan progresses you can add or subtract space between rooms, as needed. For minimum distances between bathroom fixtures, see the Plumbing section in Section 7. Note that these are minimum distances and comfort and convenience will be increased if space available permits a more roomy layout.
As you proceed with your scale layout, consider exactly what you will use the space for. If you find yourself short of space, try to make a room do double-duty by better planning. Suppose you use exercise equipment three days per week, for thirty- minute workouts. This would mean you need exercise space for 1 1/2 hours weekly, hardly enough time to dictate devoting an entire room to exercise. By contrast, let’s assume a family of six who are all “jocks”: the exercise then becomes a major activity that would demand committed space for the necessary equipment.
To avoid mistakes and confusion during the building stage, you must stick with the planning until you have scale working drawings hammered out. Your building department will demand working drawings before issuing building permits; but be yond this requirement is the need to have a plan with check-off points so you don’t overlook things. The working plans will also save you much time and many miles of “gofer” trips, preventing you from having to “gofer” this and “gofer” that be cause you have forgotten materials or tools needed. A solid plan will also help you arrive at a concrete dollar cost for your project, so you won’t have any budget surprises.
As you plan, look ahead to the next section, Job Sequence, and Section 3, SPACE SAVERS AND ORGANIZERS. These will help you plan the flow of the job, and will help you organize space to free ore area up for your project. Also, before you finalize the plan, consider the suggestions in Section 11, NO-MESS OPTIONS, which discusses using prefinished materials to reduce finishing time and also reduce the dust, odors, and mess that so often become a factor in remodeling jobs.
Job Sequence
A common error for homeowners who decide to do their own contracting is to schedule or perform jobs out of sequence. Taking a logical approach to remodeling will help you avoid extra work and extra expense as the job progresses.

Flexibility is the name of the game when planning family recreation
space. This basement retreat has wood paneling for warmth and easy maintenance.
An exercise nook in one corner, at left, holds an exercise bike, weights
or rowing machine, and keeps them out of the way for traffic while offering
a full view of the room. At right an electronic entertainment center
holds a TV/home-theater, DVD and stereo equipment.
An example might be that of the couple who found a carpet remnant on sale and brought it home for the basement. They installed the carpet, then found a similar bargain in paneling for the wall. They lugged the paneling home, nailed it in place, and felt they were progressing nicely with their recreation room. Some time later they called the contractor and asked him to install a wallboard ceiling and finish it with a spray texture. The problem was that the ceiling should have been the first step, then the wall paneling (so the paneling could cover the cracks around the perimeter of the wall board ceiling). It is impossible to finish a ceiling against the walls, because it will always crack. The contractor suggested using molding to cover the crack, but the couple objected, saying they wanted a clean corner line, without molding. The contractor then asked whether they had done the electrical wiring before nailing the paneling in place. Nope, they thought they would worry about the wiring at some later date. When the contractor pointed out they had reversed the order in which jobs are normally scheduled, the couple became hostile. They could not see that the ceiling, being the messiest job, should logically have been done first. Why place paneling on the wall, and carpeting on the floor, and then plaster and spray texture? It only requires extra effort to protect the finished products in place from being damaged or destroyed by being covered with dust, wallboard compound, and spray from the texture operation. You don't want carpet on the floor when you are moving building materials about, or spraying paint. In building as in other matters, there is to everything a season.
Because part of the project is in place when you are finishing off existing space, project sequence varies somewhat from building a new house or addition. For example, all framing is done in new construction, then the mechanical jobs such as wiring and plumbing are done. But in a basement remodel it would be better to break up the concrete floor and add needed floor drains, then patch the concrete floor, before framing any partitions that might be in the way when you install the drain. For example, plan where the bathroom will be, break up the floor, install sewer drain pipes, patch the trench in the floor where you laid the drain pipes, then build the walls of the bathroom.
Similarly, one would normally do all the framing before installing electrical wiring. But, if you are furring out a concrete wall and installing foam board insulation such as Styrofoam®, you should run Romex wire to the spot where you need an electrical outlet, fasten the wires to the outlet box, and leave the wiring hang until you reach that spot in your furring job. Then install the furring strip, nail or staple the outlet box to the wood furring strip, then cut the foam board insulation to fit around the box and install the insulation.
Likewise, plan carefully for the job sequence where you will install any large components such as fiber glass tub/shower units, hot tubs, etc. It is best to place them on the site where they will be installed, so you won’t have to remove wall studs to get them into the bathroom if they can’t be fitted through a door. This may sound elementary, but I once had to remove a wall because the owner had pushed an old-style upright piano into a corner, where it would be out of the way while he was framing. He remembered that he did not want the piano to be permanently located in the back bedroom only after he had already installed the wallboard, and found he could get the piano through the bedroom but could not turn it down the hall because the hall was only 3 feet wide.
The key is, don’t overlook anything during the planning stage. Do you plan to install a stereo system later, but don’t have the money to do it now? It will cost very little to go ahead and do the wiring for remote speakers now, and you can easily install the expensive components later as you can afford them. It costs very little to have the telephone wiring done, or to do it yourself, with extra phone jacks at any conceivable location where they might be needed. But do it before you install wallboard or paneling, and then have to “fish” the wiring through very difficult paths to do the job.
The normal job sequence then is to do all the framing, but use the foresight we mentioned regarding plumbing and running needed heating pipes or ducts. After all framing is installed do the electrical and plumbing rough-in work. At this point you should also make any alterations to the heating duct system, or run hot water pipes if you have radiant heating. Don’t overlook other mechanical projects such as telephone or stereo wiring. In addition to electrical service outlets, complete wiring for lighting. Check your plan for odd wiring requirements, such as wiring for lighting over pictures, or wiring for lighting in china, trophy, or gun cabinets.
When you have completed all mechanical projects, install batt insulation. A common problem is to be careless in fitting batt insulation. Any voids or careless fits around electrical outlets or pipes render the insulation ineffective. Insulation must pre sent an uninterrupted barrier to be efficient.
Don’t forget to insulate in special areas. Packing insulation in holes where pipes penetrate through framing can help reduce plumbing noises from pipes banging. Apply a layer of insulation board or Sound Stop board, available in 4’ x 8’ panels, over plumbing walls of bathrooms to stop bath room noises from penetrating into bedrooms or recreation rooms. Also use acoustic measures to prevent party noises from recreation rooms from penetrating into adjoining sleeping rooms, or into the living space above.
When the insulation is completed, apply the wall board. If you want paneling as a finish material on the walls, you should apply a layer of 3/8”-thick wallboard to serve as a base on which to attach paneling.
When wallboard is in place, apply three finish coats (see Section 8, with wallboard). Complete all wallboard finishing and allow it to dry. Inspect the wallboard job with a strong sidelight (a bare 100 watt bulb in a trouble light or in a shadeless lamp). Only after all messy or dusty parts of the wallboard project are finished should you move other materials into the workplace.
When the wallboard is finished and the ceilings are spray textured, the walls primed, you can begin the application of doors and trim. Doors are installed before baseboard, and the door and vanity must be in place before you install any ceramic tile in the bathroom. Then the tile can be fitted against the door trim, the sides of the vanity cabinet, and against the countertop.
Finish installing the clothes poles and shelving in the closets. Don’t overlook the closet organizers that double the use of closet space.
TELEPHONE LIST of SUPPLIERS and SUBCONTRACTORS:
Supplier / Subcontractor Name |
Contact |
Phone / email |
Bid Amount |
|
Lumber: Home Center: Decorating: Plumbing: Electrical: Heating: Contractor: Excavator: Plumber: Electrician: Drywall: Painter: Paperhanger: Bldg. Dept.: Inspectors: OTHER: |
Ridge Bldrs, Inc. |
“Mark” |
555-1213 |
$800 |
Install any wainscoting or paneling as desired. In stall other items such as desks, bars, or cabinet.
When the trim work is all done, do any staining and varnishing. Then apply the finish coat of paint to the walls. Do all painting before installing the final finish materials such as carpeting.
If you plan a suspended acoustic ceiling, the ceiling goes in last, after wallboard is finished and painted. This sequence avoids having finished material in place during the messy jobs.
Any ceramic floor tiling in the bathroom must be in place and grouted before you set the plumbing fixtures. Other floor finishes, such as vinyl sheet goods or carpeting, are done last. This is to avoid traffic from other building trades on new carpet or vinyl. Ceiling light outlets, for example, may have to be cleaned if they have wallboard compound in them. It is best to install lighting fixtures before you install floorcovering so that dust from the wallboard does not fall on the flooring.
At each step, try to plan the work flow so that work already done is not a hindrance to work yet to come. For example, all switches and electrical receptacles should be installed after wallboard is finished and painted, so you won’t mess the electrical equipment with wallboard compound or paint. Think each stage of the work through before you begin.
PROJECT GUIDE:
Planning DECIDE on use of space LAY OUT room dimensions on floor INSPECT concrete walls for cracks INSPECT joists and existing framing for alignment DRAW working plan to scale MAKE multiple copies of plan SUBMIT plans to Building Department SUBMIT plans for bids, estimates MAKE supplier, contractor choices PATCH and waterproof concrete walls, floors FRAME walls, install backing ROUGH-IN plumbing ROUGH-IN electrical, phones ROUGH-IN heating INSTALL fireplace CALL for first inspection INSULATE INSTALL vapor barrier INSTALL wallboard, tile board TAPE and finish wallboard PRIME wallboard TEXTURE ceilings INSTALL paneling FINISH closet interiors INSTALL vanity, cabinets TRIM, install doors SET ceramic tile PAINT, stain INSTALL electrical devices SET plumbing fixtures FINISH electrical, hang lighting HANG wallcovering CLEAN rooms, floors LAY carpet CALL for final inspection |
Notes ___________ ___________ ___________ ___________ ___________ ___________ ___________ ___________ ___________ ___________ ___________ ___________ ___________ ___________ ___________ ___________ ___________ ___________ ___________ ___________ ___________ ___________ ___________ ___________ ___________ ___________ ___________ ___________ ___________ ___________ ___________ ___________ ___________ ___________ ___________ ___________ ___________ ___________ ___________ ___________ ___________ ___________ ___________ ___________ |
Building Permits
Most cities require that you get a building permit for any remodeling work, additions, or alterations to your home. Check with the Inspections Division of your local building department to find what permits you must obtain. Most communities insist that you buy a permit for the overall project, in addition to getting special permits for any changes or additions to the home’s mechanical systems. These separate permits usually include permits for any changes in the electrical, plumbing, and heating systems. Often, the Inspections Division can provide information that will assist you in planning your project.
The reasons for getting building permits and necessary inspections are often obscure to the home owner. Many homeowners view the permit system as being just another way for the government to extract taxes from the individual. And, it's certainly true that the cost of building permits has risen in the past two decades. So why not just “bootleg” the remodeling job in, when it can’t be detected from outside the house?
The first reason for obeying inspection and permit rules is that it's illegal not to do so. Beyond the illegality and possible legal consequences are more threatening penalties. Note the requirement for separate permits for the mechanical systems: electrical, heating, and plumbing. Mistakes made in changing these systems can be life-threatening, not only to your own family, but to neighbors who live nearby. People who do their own remodeling often enlist the help of the relative who swears he is an expert in electrical work. Are you sure you want to accept this free labor uninspected? What if your uncle the expert proves not to know about things electrical, and you have a house fire from a short? My advice is to obey permit and inspection requirements.
There is yet another consideration for obeying permit laws. You may find that your insurance company can refuse payment for damages to your house, caused by illegal alterations. You may put your house and family in jeopardy, and void any claims to your insurance, if the house is damaged by fire and the cause is found to be illegal electrical work. In the same vein, consider the consequences if the fire in your house spreads to your neighbor’s house. You are liable at law for damages to others that are a direct cause of your negligence. Don’t take such a risk to avoid the fee, usually a couple of hundred dollars, that permits would cost.
Suppose you decided not to comply with permit requirements, and you find the threat of possible fire or explosion from electrical and plumbing mis takes to be too remote to consider. Suppose you get away with avoiding permit costs, and the day comes when you decide to sell your dream home. Suppose also that the prospective buyer decides he likes your house, and brings in a house inspector to determine the house’s condition. If that inspector notes code violations in your do-it-yourself electrical job, he may advise that you be forced to bring in a licensed electrician to bring the thing up to code. Now you are stuck with delays, possible tear-out to open up walls or ceilings for workmen or inspectors, and high repair costs. Your buyer may just decide to move on, rather than risk getting a lemon. If this scenario seems far-fetched, consider that home buyers are increasingly being advised to bring in professional inspection ser vices. And consider that these professional inspectors list bungled home projects as among the most common causes of problems with code compliance inspections at sale time.
JOB SCHEDULE:
Project |
Materials Bought |
Date Begun |
Date Finished |
Inspected |
|
Inspections
Ask your local building office for a copy of their inspection guidelines. The basic rule is that you will call for inspections at certain stages of the job. For example, the inspector will check your framing work to be sure that you have done nothing to alter the structure that could weaken it.
For mechanical work such as electrical wiring, plumbing, and heating, you must call for inspection as soon as the rough-in stage is completed. Rough-in for electrical work is when the wires (usually Romex are run, and secured into outlet boxes. The electrical work gets final inspection when the fixtures are installed. For plumbing, rough-in is when the water supply, drain, waste, and vent pipes are installed. As with the electrical work, plumbing final inspection is due when the fixtures are installed.
Any alterations or additions to your heating system must also be inspected. This is to ensure that you don't have dangerous conditions such as leaking gas lines, or improper electrical wiring, that could cause a fire or explosion. It is essential that you don't proceed with other projects until inspections are complete. This is especially true of electrical inspections, because the inspector must approve the job and sign off on an inspection tag. He or she will want to inspect the job with all your work visible and accessible. You can't install insulation, wallboard, or paneling that would prevent the inspector from viewing the complete job. He or she can — and often will —order you to remove any material that covers up electrical work that has not been inspected and approved. For more information and sample permits on the mechanical trades, see Section 7.
SAMPLE PERMIT BUILDING PERMIT APPLICATION Date _______ Owner ________ Address________ Phone________ City________ Zip________ Address________ City________ Zip________ Job Site Address ________ Nature of work ________ Remodel _____ Addition _____ Demo _____ Move _____ New Const. ____ Repair ______ Total Square Feet of Proposed Building: Overall Size: ______ Basement: Full _____ Partial _____ Crawl Space ___ Slab _____ Plans Submitted: YES _____ NO _____ Garage Size: _______ Detached _____ Attached _____ RE-ROOF: # of Sq. Ft. of Material ______ Tear Off: (yes/no) Weight of Shingles _______ RE-SIDE: # of Sq. Ft. of Material Type of Siding ________ If commercial or multi. Residential, submit specifications for re-roof or re-side) ** Special note: separate permits shall be obtained for plumbing, electrical, heating, ventilating, and air conditioning installations. [] BUILDING PERMIT FEE [] PLAN CHECK FEE [] STATE SURCHARGE [] S.A.C. CHARGES [] SPECIAL INVEST. FEE TOTAL ____________ Valuation of Job: To include plumbing, electric, ventilating, heating, and air conditioning costs. Estimate valuation of the job: $ Applicant’s Signature_________ Phone: Contractor Phone: Please make checks payable to: ____ |