Though they are still fairly novel, continuous foundation walls made of wood alone can be ideal for a lightweight cab in. The job of building such a foundation calls for no more than the basic carpentry skills. Because the foundation requires no concrete, it saves both money and the time required for concrete to harden, and it can be erected in nearly any weather.
Wooden foundations are not feasible in some locations. In hot, moist climates where dry rot and termites are serious problems, even the best methods of protecting or preserving wood have a limited usefulness. Furthermore, certain soils, such as clay or silt, are unsuitable, due to poor drainage and load-bearing capacities. And, perhaps because they are Unusual, wooden foundations are not yet approved by many building codes.
If practical or legal limitations don't prevent you from putting in a wooden foundation, you may well choose one for its simplicity and speed of construction. The typical crawl-space foundation illustrated here, for example, can be built in a weekend by two workers. It consists of framed and sheathed panels, made of pressure- treated lumber and plywood and joined together with hot-dipped zinc nails. The panels are laid on a footing plate over a bed of washed pea gravel, in a trench dug below the frost line or, in an area of shallow frost, at least 10” deep.
When the panels are in place, the trench is partly filled with more pea gravel, the floor joists are installed and the rest of the trench is filled with dirt. A structure larger than 16’ by 24’ requires additional support for the joists, generally provided by center panels that are trenched, framed and sheathed like the wall panels. Butt the inner ends of 2-by-b joists over this panel; for single joists, use 2-by-10s for spans up to 14’, 2-by-12s for spans to 16’.
Pea gravel can be obtained from sand- and -gravel suppliers or building-supply houses, and pressure-treated wood is available at any lumberyard. Although almost any type of lumber is suitable, check to be sure that the grade you buy will support the structure.
Anatomy of a wooden foundation. The wall panels at the heart of this crawl-space foundation rest on 2-by-8 footing plates laid over a 4” bed of washed gravel in a trench 12” wide; grade stakes embedded in the gravel are used to set the 4” level. The panels are framed with 2-by-6 studs, sole plates and doubled top plates, and sheathed on the outer side with ½- inch pressure-treated plywood; header and floor joists are fastened to the top plates.
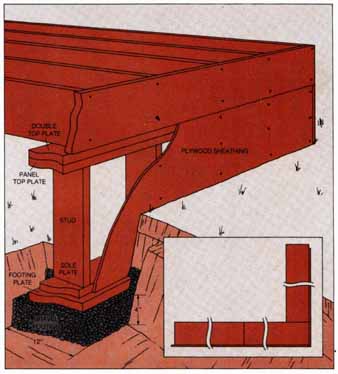
In cross section, the panel located at the right of a corner (as seen from the outside of the structure) butts against a left-corner panel, and the sheathing of the right-corner panel over laps that of the left-corner panel.
Readying the Trench
1 Setting the stakes. After digging the trench, use a long straightedge and a carpenter’s level to adjust the height of the grade stakes that will mark the depth of the gravel footing bed. To position the stakes, measure 3” in from the building lines as marked on the batter boards—this will be the center line of the footing plates. Set 1-foot-long pressure-treated 2-by-2 stakes at each corner of the center line and at 7-foot intervals between the corners. Drive one corner stake down until it projects exactly 4” from the soil at the bottom of the trench; then, checking with the straightedge and carpenter’s level, tap each succeeding stake to the same height.
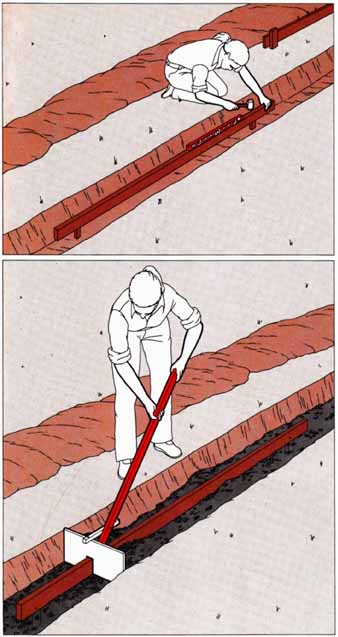
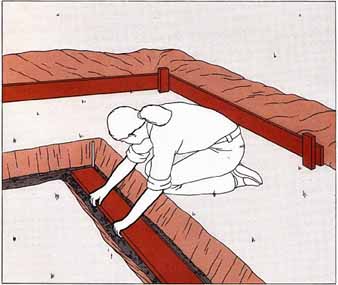
2 Leveling the gravel bed. After distributing pea gravel evenly in the trench, use a leveling hoe to smooth the gravel to the height of the grade stakes. To begin this step of the job, toenail 2-by- 4s on edge along the tops of the stakes to serve as a guide track for the leveling hoe (check the stakes to be sure you don't drive them below the 4” level; reset them if necessary). Make the hoe from a piece of ¾” plywood measuring 9 by 12” and notched to fit the guide track; attach a 2-by-2 handle braced with a length of scrap, Work the hoe with pushing and pulling movements, shaving the gravel down until the tops of the stakes are just visible, then remove the guide track.
Making and Laying Panels
1 Framing the panels. Drive 20-penny zinc nails through single 2-by-6 top and bottom plates and into 2-by-6 studs, each 19½” high. Make the eight corner panels 7½’ wide, the middle panels—as many as are needed to complete the building—8’ wide. Set the studs on 16” centers, with one short stud space at either end of a corner panel.
2 Sheathing the panels. Cover the panels with ½” pressure-treated plywood sheathing, fastened to the studs with eightpenny zinc nails at 6” intervals and cut to the following dimensions. On all panels, set the sheathing flush with the sole plate and have it overhang the top plate by 1½”. On an 8-foot panel, recess the sheathing by 3/4” at the right end, as seen from the outside of the panel, and have it over hang 3/4” at the left end. On a right-corner panel, recess the sheathing 3/4” at the right end and have it overhang 6” at the left end. On a left-corner panel, set the sheathing flush with the right end and have it overhang the left end ¾”.
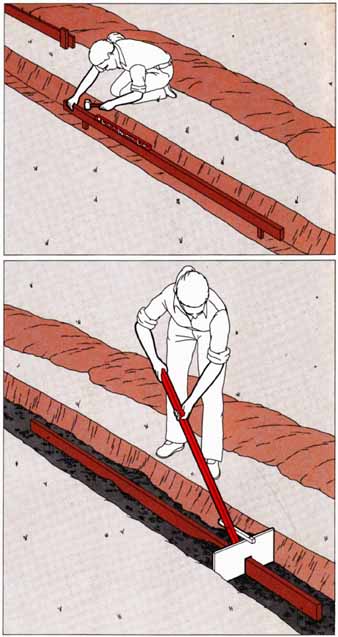
3 Installing the footing plates. Place the 2-by-8 footing plates in the trench with their outer edges flush with a line stretched 1” outside the building line. (If you must cut the plates to fit, coat the cut ends with a commercial preservative at three to five times the concentration recommended by the manufacturer.) Drive small stakes on both sides of the plates to keep them from shifting, square the corners with a steel square, and toenail the plates together. Snap a chalk line 1” in from the inside edges of the plates to mark the positions of the foundation panels.
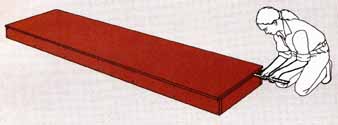
4 Installing the panels. Position a pair of corner panels along the chalk lines on the footing plate, fitting the end of the panel at the left of the corner (as seen from outside the structure) snugly against the 6” overhang of the right-corner panel. Nail the right-corner panel to the footing plate at each stud space. Move the left-corner panel slightly out of position and seal the end with butyl caulking, then set the panel along the chalk line and nail it to the footing plate. Nail the panels together at the studs.
Caulk the other end of the left-corner panel and install the next panel along the chalk line, fit ting the overlaps and recesses tightly together. Proceed around the building line until all of the foundation panels are in place.
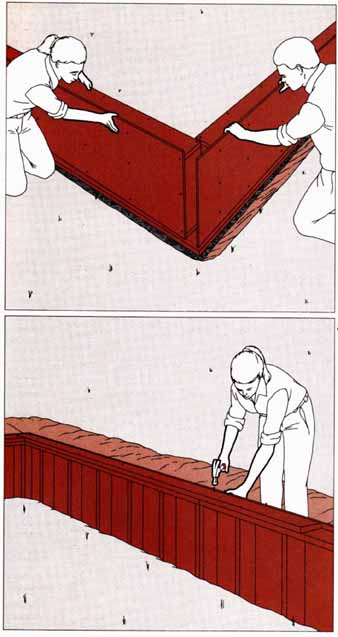
5 Finishing the foundation. Nail 2-by-6s to the top plate of the panels, offsetting the panel joints by 3’. Brace the corner panels with stakes and 2-by-4s, and fill the trench with pea gravel to within 2’ of the corners. Install floor joists on top of the plates. Use a single joist at the double studs of panel joints, and nail a 2-by-4 to the side of the joist, flush with the top, to serve as a nailing block for the subflooring. To support the ends of joists near two corners of the structure, cut extra studs and toenail them into the foundation wall. Fill the trench corners halfway to the top with pea gravel, then finish filling the trench with soil, graded down and away from the outside of the wall to a slope of ½” per foot for a minimum of 6’.