From a distance, a cottage resting upon wooden poles or masonry piers may look shaky and fragile. In reality, such a foundation can hold its own through storms and floods. It can't be used everywhere; in some localities building codes require the continuous-wall foundations shown, and foundation walls are preferred in earthquake-prone areas and in cold climates. But wherever they can be used, poles and piers make a practical and attractive alternative to a walled foundation; because they call for less material and labor, they save both money and time.
The building techniques on these pages are designed for level sites and stable soil. (Uneven terrain and insecure soils, such as soft clay or loose sand, call for somewhat different methods) These techniques are versatile—with slight modifications, they will serve for wooden or concrete poles and for concrete-block or precast-concrete piers. Of all these materials, the simplest and easiest to put up are the wooden poles shown below.
At your lumber dealer, order poles 6 to 8” thick and especially designed for use in house construction; such poles generally come treated with an oil- or water-based preservative that will protect the wood from insects and rot and will not harm vegetation. Before the poles are delivered, inspect them yourself to be sure that they are fairly straight and uniform in diameter.
After laying out the boundaries of the cottage (Steps 1 and 2), locate the corner and intermediate side poles, as well as the interior poles. Poles generally are spaced 8’ apart. Their height above the ground can range from 1 1/2 to 3’, but they must be sunk at least 4’ into the earth for stability. Digging such holes is easy if you use a gasoline-powered auger, available from tool-rental centers in models for one or two operators. When you have dug the holes and braced the poles in them, you must encase each pole in a jacket of either concrete or a wet mixture of 1 part cement to 5 parts clean soil, free of roots, leaves and other decomposable matter (the consistency of the mixture should be that of concrete, but the amount of water will vary, depending on the soil). The jacket, which fills the hole completely, increases the pole’s effective diameter in the earth.
After the poles are firmly embedded in the ground, floor beams are clamped into shallow notches, called daps, cut in the sides of each pole. From that point, for every type of pole or pier, the job consists of installing joists and a floor.
In this example sheets of plywood, which can serve as either a subfloor or a finish floor, have been laid to cover the entire platform.
Anatomy of a pole platform. The foundation above consists of three rows of poles sunk into the ground at 8-foot intervals. Below ground, each pole is firmly secured by a jacket of soil-cement mixture; above ground, the poles are sandwiched between 2-by-b beams, fastened in place with threaded rods, washers and nuts. Floor joists are fastened to the outside beams and to a middle beam by means of hardware called framing anchors, and to header joists with nails.
In this example sheets of plywood, which can serve as either a subfloor or a finish floor, have been laid to cover the entire platform.
Putting up a pole Platform
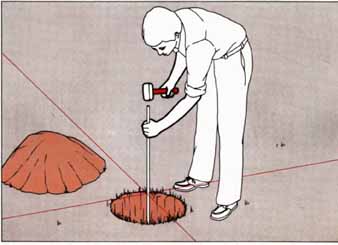
1 Digging the holes. With the locations of the poles marked and the boundary strings removed, use a power auger to dig pole holes to a depth of 4’, raising the bit slowly every few” to clear dirt from the hole; if your building code calls for a deeper hole, fit the auger with an extension bit. Use hand tools to widen the holes to a diameter 10 to 12” larger than that of the posts. Set all the poles in place, the straightest and largest at the corners.
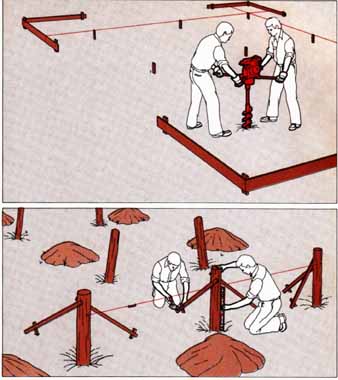
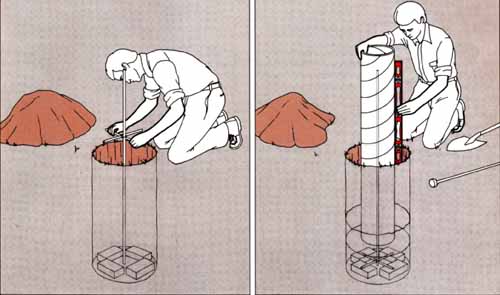
2 Lining up the poles. Plumb the corner poles and brace them with stakes and lengths of scrap wood; then stretch a horizontal string fitted with a line level along the outside faces of the corner poles and align the intermediate poles against the string. After plumbing and bracing these poles, measure up from the string along each outside row and mark the levels for the bottoms of the outside beams. Repeat the process for the middle poles; the end poles of this row need not align exactly with the corner poles, but the row itself should be perfectly straight. Make a jacket for each pole, overfilling the hole slightly and grading the top of the jacket down from the pole to the surface. Let the jacket cure for one day.
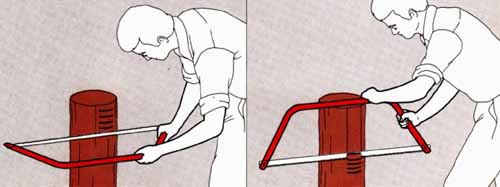
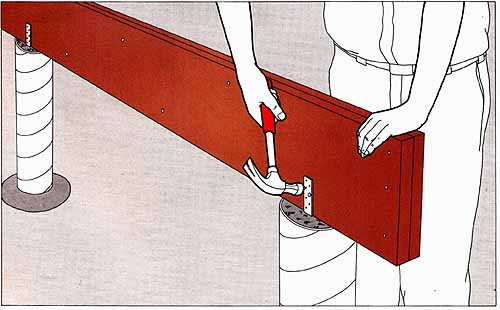
3 Cutting daps for the first beams. On the out side of the end rows and on either side of the middle row, make daps, or recesses, for a set of beams in the following way. Using a pruning saw or a bucksaw, make a series of horizontal cuts, each about 1½” wide and from ½ to ¼” deep, down from the top of a pole to the mark for the bottom of a beam. Complete the dap by making a vertical saw cut as deep as the horizontal ones.
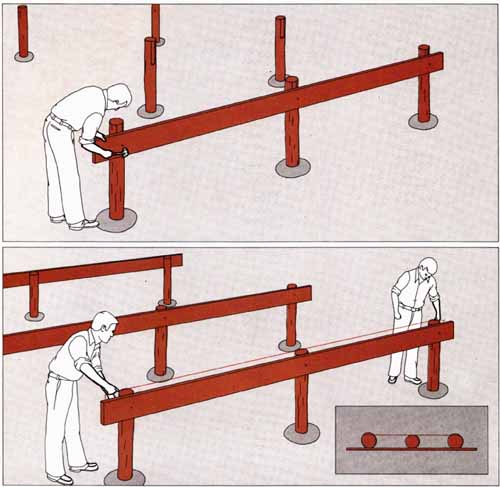
4 Attaching the beams. Set a beam against the daps in each row of poles, check to be sure it's level, then fasten it in place with a nail driven partway into each pole. If possible, use beams that are long enough to span a complete row of poles Otherwise lap shorter beams by a foot at the pole in the center of a row and install spacer blocks between the ends of the offset beams and the end poles. Cut off the tops of the poles to a level flush with the top edges of the beams.
5 Attaching the second set of beams. Stretch a string over each row of poles opposite the in stalled beam, with at least 1½” of string over each pole. Mark the string’s path over the poles, cut daps at the marks—you may have to cut especially deep daps in one or two poles—and loosely fasten the remaining beams.
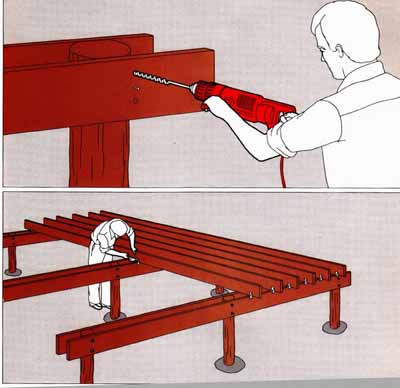
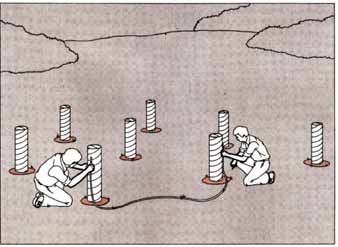
6 Bolting the beams. One third of the way from nuts on both sides and apply shellac to the ex the bottom and the top of each beam, drill ½” posed metal to prevent rust. holes completely through the beam-pole-beam sandwich; pour a commercial preservative into Check the nuts for tightness several weeks after each hole, then run threaded bolt rods through the foundation is completed: beams and poles the holes. Secure the assembly with washers and may shrink slightly with exposure on the site.
7 Attaching the joists. Set the joists across the beams at 16” intervals and fasten them to the beams with framing anchors, one anchor at each pair of beams; nail header joists to the open ends of the main joists to close the perimeter of the joist platform. A deck of plywood—preferably ¾” — completes the platform.
Masonry for Stronger Supports
Piers make a more durable masonry foundation than wooden poles, and are al most as easy to put up. You can make them in three different ways: by pouring concrete into cylindrical fiber forms; by stacking and mortaring masonry-block piers and filling the cores of the blocks with concrete; or by simply setting pre cast piers of solid concrete.
Each method has advantages and disadvantages. Cylindrical molds can be poured to any height, making it easy to set the tops of the piers to the same level. Blocks are the cheapest, but leveling must be done during excavation of the pier bases to make the height come out right. Precast concrete piers are the simplest to install, but they are heavy (90 to 150 pounds) and therefore awkward to transport and set into position. Like masonry blocks, they must be set on level bases, and because they generally come no more than 18” high, they are used mainly on level sites that have a shallow frost line.
All three types of piers rest on footings, solid concrete bases that sit at a depth specified by the local code and are wide and thick enough to carry the weight of the structures above them. In general, a footing should be as thick as the width of a pier, and twice as wide—a pier 8” wide, for example, would require a footing 8” thick and 16” wide.
To level the footings for block piers, use a water level to mark a fixed height on all the vertical reinforcing rods, then measure down from the marks to set the height of the concrete for the footings. Precast piers don't take vertical rods; to level their footings, drive stakes into the footing holes, mark the heights of the footings in the same way, pour concrete up to the marks and remove the stakes before the footing concrete begins to harden.
Materials for all three kinds of pier are available from masonry suppliers. Fiber tubes 8” in diameter and 10’ long make quick work of pouring cylindrical concrete piers; store them upright and keep them perfectly dry until they are filled. Masonry blocks come in a wide range of sizes; single-core, 12-by-12-by- 8” blocks make particularly sturdy piers. Both cylinders and masonry-block piers must be fitted with hardware to secure the girders or beams that will sup port the floor; precast piers are generally sold with nailing anchors or strips already embedded in them.
Pouring Your Own Piers
1 Setting a vertical rod. Dig each footing hole 16” wide (twice the width of the pier) and at least 8” deeper than the depth of the pier below ground. At the center of the hole, drive a length of reinforcing rod into the ground until the top of the rod is about 6” below the planned height of the pier aboveground. Set four bricks around the rod, halfway between the base of the rod and the bottom rim of the hole.
2 Pouring the footing. Fasten two 14” lengths of reinforcing rod together in the form of a cross, using a strip of tie wire that's long enough for you to make a loop over the vertical rod, and lower the crossed rods down onto the bricks. Pour a concrete footing 8” deep and allow it to dry for at least one day.
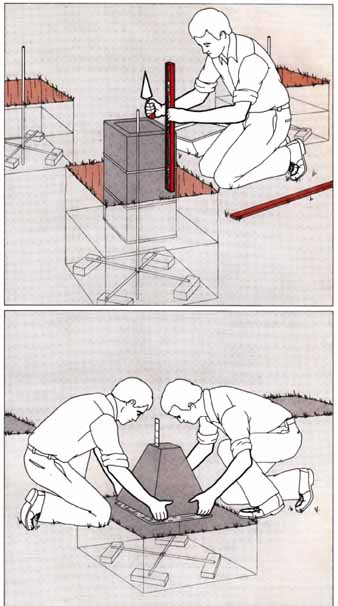
3 Positioning the form. Slide the form down over the vertical reinforcing rod until it rests upon the hardened footing. Fill the hole outside the form with earth, tamping every 6” and plumbing the form as you go.
4 Leveling the forms. Mark the planned height of the piers on a corner form; then, using a water level or a transparent plastic hose almost filled with water, hold one end of the hose against the form so that the water in the hose is exactly level with the mark. Have a helper hold the other end against another form and mark this form at the level of the water. Repeat the process for each form, in the foundation and cut the forms oft at the marked heights.
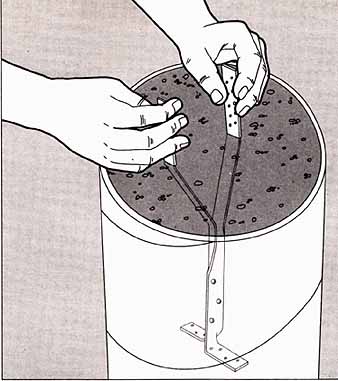
5 Setting the anchor. Pour and tamp concrete into each form a foot at a time. When the mix is even with the top of a form, bend a framing anchor like the one shown so that the distance between the anchor’s wings, or uprights, is equal to the width of a double beam—3” for a pair of 2-by-10s or 2-by-12s—and push the anchor into the concrete. To secure the anchor while the concrete hardens, run wire through the anchor wings and fasten the wire ends to the sides of the form. Check the alignment of each row of anchors with a string, let the concrete set for 24 hours, then remove the wire. Allow another three to seven days for the concrete to cure.
If you wish to remove the part of the form above- ground, make vertical cuts through the fiber and peel it off. The part below ground will rot away without weakening the pier.
6 Attaching a beam. Set the doubled beam into the anchors—if a beam is not level, shim the low end upward with galvanized washers between the beam and the pier—and fasten the beam in place with four nails driven through each anchor into the beam. Add joists and plywood to complete the platform (Step 7).
Masonry Blocks and Prefabs
A concrete-block pier. Using the strings that mark the edges of the building as a guide, mark the positions of the bottom blocks for the four corner piers on the footings; spread mortar beds on the footings and lay the blocks at the marks, with the vertical reinforcing rods passing through their cores. As you bring the corner piers to their full height, use a level to keep the blocks level and plumb, and a story pole to gauge the 3/8” mortar joints; then use a mason’s line strung from corner to corner to set the height and alignment of the remaining piers.
When all blocks are laid, fill the cores of the piers with concrete and embed a framing anchor in each pier (Step 5).
A precast-concrete pier. Mark the positions of the piers on the footings, spread full mortar beds on the footings and , with a helper, lay the piers in the mortar at the marks. Check the level of each pier in the mortar bed and , if necessary, adjust its seat in the bed. To fasten beams to the anchor shown here, drive nails through the anchor and into a pre-nailed double beam; other anchors are flexible enough to wrap around a beam.