[cont. from part a]
Trim Joints: Tests of Expert Craftsmanship
Trim carpentry--the craft of making neat, tightly jointed frames around doors, windows and walls-is one of the most demanding tests of woodworking skill. It requires not only mastery of the basic techniques of cutting and shaping wood, but also a repertoire of tricks for fitting and fastening the pieces. Even the most talented professional may fail to achieve a seamless fit at the first try, but must sand, plane, or saw edges-and then putty the gaps for a perfect joint.
The simplest, most common joint is the miter, which takes molding around a corner. On door and window casing, the face of the molding is cut at an angle for the miter On inside corner joints-be tween the stops of a doorway, perhaps, or between baseboards that meet at the corner of a room-the ends of boards can be beveled for a miter, but a better solution may be a coped joint, in which the end of one piece (generally the shorter one) is cut to follow the molded curve of the longer one. Most miters, whether face cuts or bevels, angle at 45°. However, other angles may be required-to case an octagonal window, for example, or to fit baseboard in a window bay.
For some moldings that meet or end in unusual places, you must work out special solutions to maintain an attractive symmetry. Stairway trim has to be joined at angles measured to match the slope of the stairs, window mullions must be mated into the shapes of casing, chair-rail ends may need to turn in toward a wall, and you may have to conceal the junction of incompatible moldings.
In all of these joints, precise marking is crucial With casing and interior corners, always nail one piece before you mark the next, so that you will have a bench mark to measure from. Wherever possible, hold short uncut pieces in place to mark length-a faster and more accurate method than using a tape measure; on a miter cut, mark the longest point of the miter where the top edge of the molding meets the back so that you can sight the mark against the miter-box saw.
Cut moldings a fraction of an inch longer than the measurement—1/16 inch for a short piece of casing, as much as inch for a long baseboard-because there is no good remedy for a piece that is too short. A bit of extra length, on the other hand, generally is absorbed when the piece is nailed and holds the joint tight; if your extra allowance proves too generous, some can be shaved off.
Because pieces of molding are relatively thin, they warp easily and often must be straightened as they are nailed. Most warps can be pulled straight by hand and held by nails; bad ones generally can be pulled straight by toenailing. Trim presents additional problems.
Nails tend to split it; coat them with paraffin, blunt the points with a hammer or, if needed, drill pilot holes. Furthermore, such costly wood is seldom painted but is usually given a clear finish to show its gram. This makes it difficult to hide at tempts to conceal gaps and nailheads with putty. Precisely fitted joints are essential, and nails should be set where tinted putty matches the gram color.
Door and Window Casings
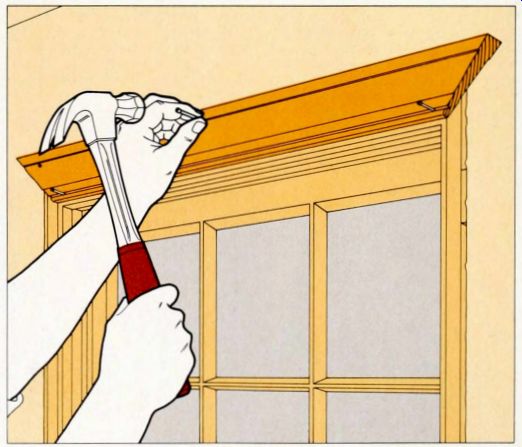
1. Nailing the top casing. Cut the ends of the top casing at 45° angles and hold the casing in place over the head jamb-set back Ve inch from the inner edge of the jamb on a door, flush with the edge on most windows. Drive a nail partway through the casing into the jamb at each corner, then nail the upper edge of the casing to the header over the jamb at 12-inch intervals. Nail the lower edge of the casing to the jamb, placing the nails opposite those in the upper edge, and drive them home at each end.
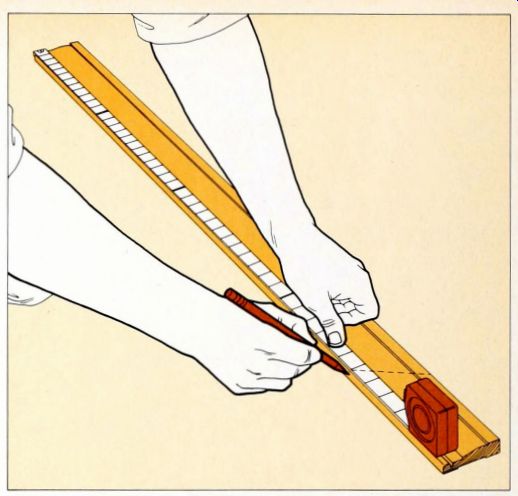
----2. Fitting the side casing. Mark the thin edge of the side-casing stock 1/16 inch longer than is necessary for an exact fit--it extends from the bottom of the top casing miter to the stool of a window or, for a door, to the floor. Square off one end of the stock and miter the other end outward, so the thick edge is longer than the thin.
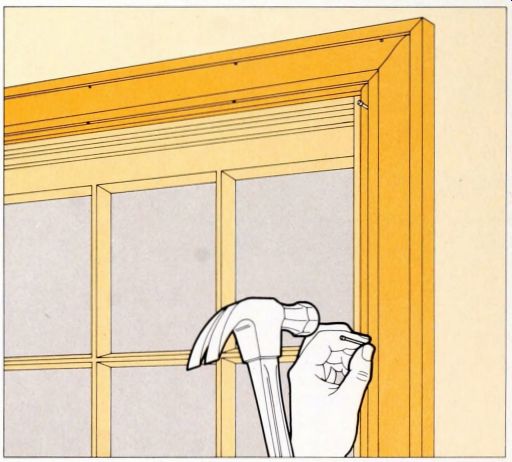
3. Nailing up the side casing. Fit the side casing as tightly as possible against the top casing and. at 12-inch intervals, drive nails halfway through the side casing into the studs and the jamb Leave about 0.025 inch of each of these nails protruding from the casing.
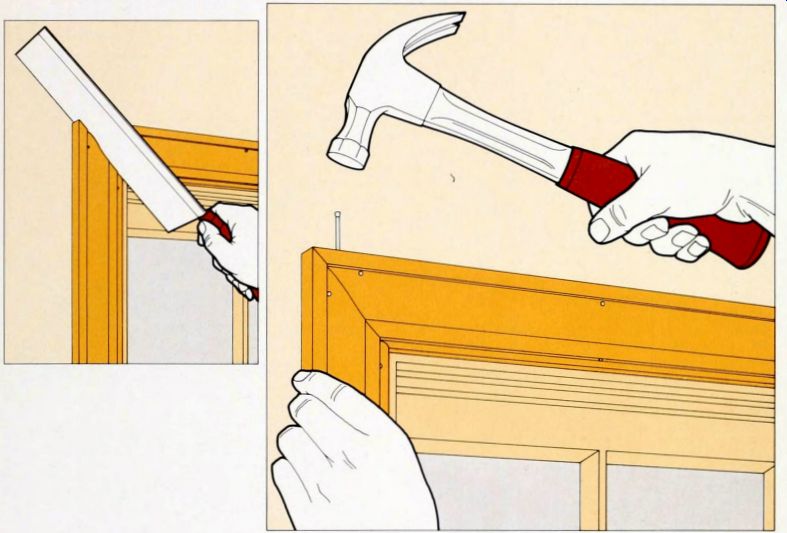
4. Adjusting the casing. If you find gaps, first try to close them by tapping against the sides with a hammer and wood block. If the joint remains ragged, with edges meeting at only a few points, cut along the joint line with a small hacksaw called a dovetail saw. then tap the casing again.
5. Lock-nailing the joint. To keep the joint firmly fastened and prevent its opening when the wood shrinks, hold the side casing firmly in place and drive a four-penny finishing nail straight down through the top casing into the side casing.
Then hold the top casing and drive a second nail horizontally through the side casing into the top casing.
Use a nail set to sink these nails and then drive and sink the nails in the face of the side casing. Cover all the nailheads with putty.
Coping a Joint
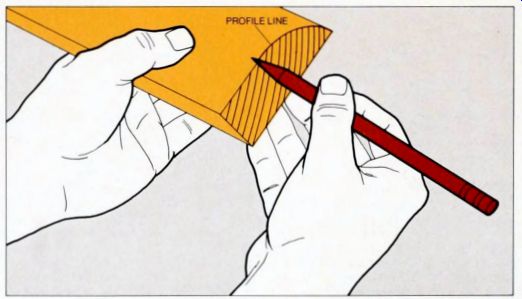
1. Marking for a coped joint. Butt a piece of molding into the corner and nail it to the wall. Miter the end of a second piece, angling the cut inward from the back of the piece to the front so that the cut creates a profile of the molding along the line of the cut; then mark along the curved profile line with the side of a pencil so as to make the profile more visible.
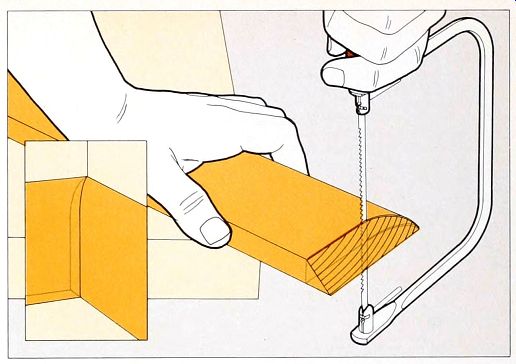
2. Making the cut. With a coping saw aligned at a right angle to the face of the molding, cut along the profile line. The coped molding (inset) should now fit against the face of the molding you have installed at the corner.
Fitting a Corner-and Fixing a Bad Fit
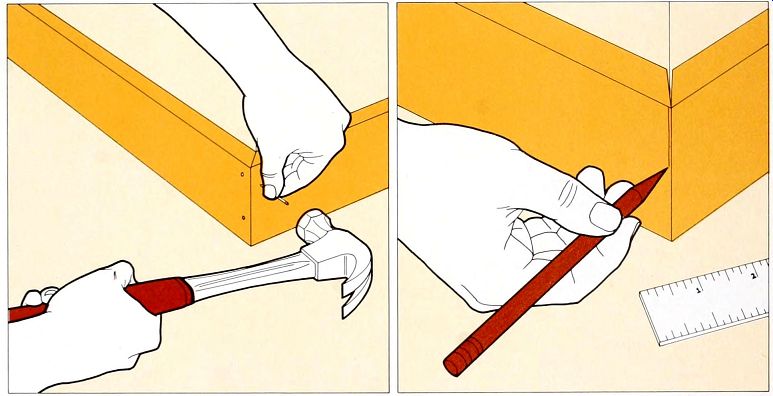
Fastening the wall molding. Miter two pieces of molding at 46° and hold them in place against the outside corner. If the joint is tight-this will occur only in the rare instance of walls meeting in a true right angle-nail the molding to studs along the wall and lock-nail the miters by driving two four-penny finishing nails horizon tally from each side. If the joint gaps, as is more likely, apply one of the remedies described at the right to improve the fit.
Closing a gap at the back of the joint. If the wall angle is greater than 90° and forces the joint open at the back, hold the moldings in place and measure the gap between the backs of the two pieces. If the gap is less than 0.25 inch mark a line on one piece of molding at the measured distance from the corner; if the gap is more than 0.25 inch, mark half the measurement on each piece of molding Use a block plane to shave the wood to the line or lines.
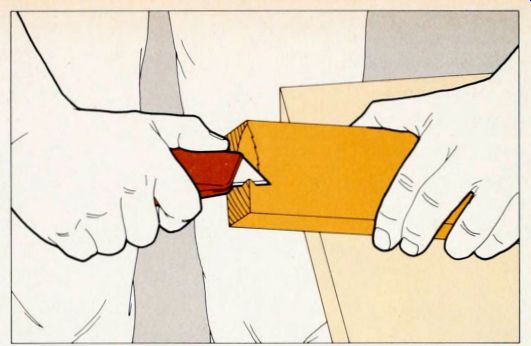
A gap at the front. If the wall angle is less than 90° and forces the joint open at the front, use a utility knife to shave wood-no more than 1/8 inch at a time--from the inner edge of moldings up to 4 inches wide, for larger moldings, use a coping saw but make the cuts in the same way Start just below the top of the molding--do not shave the top, which will squeeze to a tight fit-and work down to the bottom of the joint. To correct a large gap, shave wood from both sides of the joint.
Trimming the Angles of a Staircase
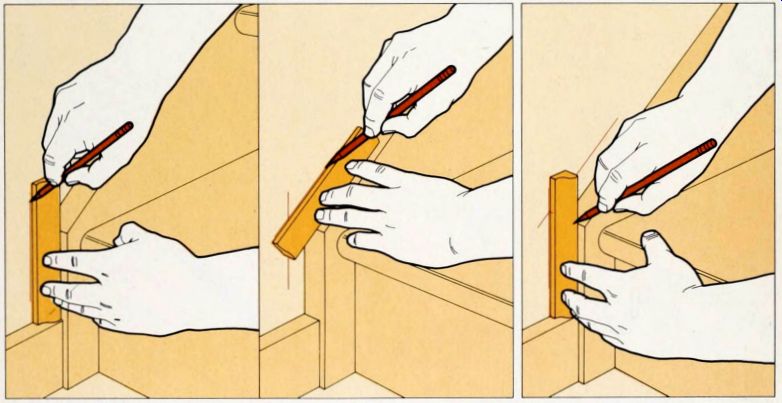
1. Marking the wall. Place the bottom of a piece of molding along one side of the angle and use the top as a straightedge to draw a line on the wall. Move the molding to the other side of the angle and use it to draw a second line on the wall, intersecting the first.
2. Marking the molding. Hold a piece of molding in position at the first side of the angle; mark the top edge of the molding at the intersection of the drawn lines on the wall, and the bottom edge at the point of the angle Repeat the procedure with a second piece of molding held at the other side of the angle Set a miter box to cut each piece along a line between the marks you have made; the miter cuts will fit the moldings to the angle.
Splices and End Pieces
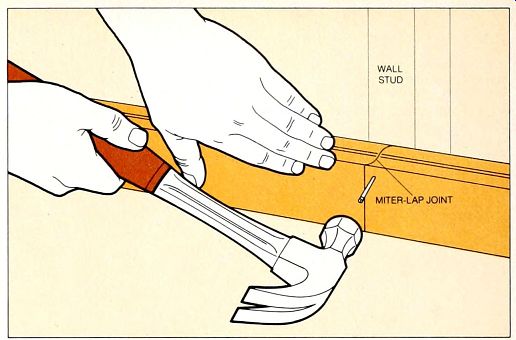
A miter-lap joint. Try to avoid splicing two pieces of identical molding along a single wall, but if you must make a joint on a very long wall, do so at a stud, mitering the ends of two pieces at 45° in the same direction. That is. set the miter-box saw in the same position for both the left and right pieces. Lap the cuts at a wall stud and drive two four-penny nails through the splice into the stud
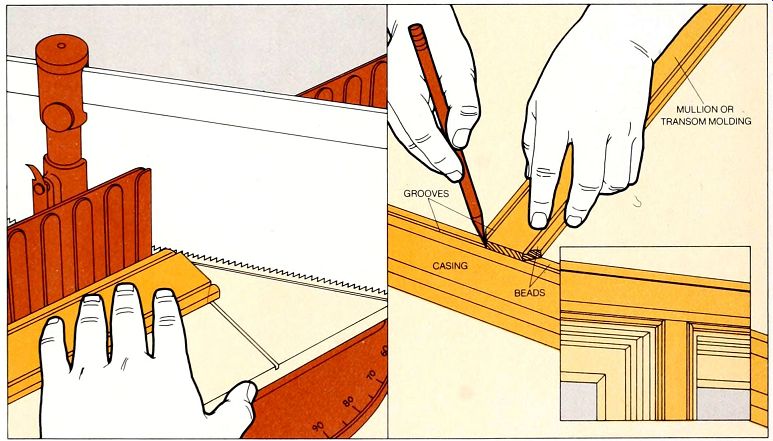
--------Splicing at right angles. To trim a transom over a door or a window unit containing two or more sections, you must fit special molding called mullion or transom molding at right angles into the casing. For most beaded casing, use mullion molding like that illustrated-a flat center section and edge beads the same thickness as the casing beads. Miter only the beads on each side, as indicated by the cutting line above, left. Place the mitered end of the molding over the bead of the casing and draw lines on the casing along each miter cut. Using a coping saw, cut out the section of casing be tween the lines so that the end of the molding will fit tightly into the body of the casing, with the beads of the molding and casing forming neat miter joints (inset). Miter the other end similarly for a transom; for a mullion, cut the bottom end square to butt the stool.
If you cannot match beaded moldings for the technique described above, use mullion molding thinner than the edge thickness of the casing. Do not miter it or cut into the casing; cut the mullion square to butt under the casing edge. If you use un-beaded casing and mullions--such as the smoothly curved "clamshell " style--cut a matching mullion end to a 45° point, like a fence picket, and trace and cut a mating notch into the casing If you are unable to locate any suitable mullion molding, use a plain thin board and use a rasp to round over the end so that it curves in under the casing edge.
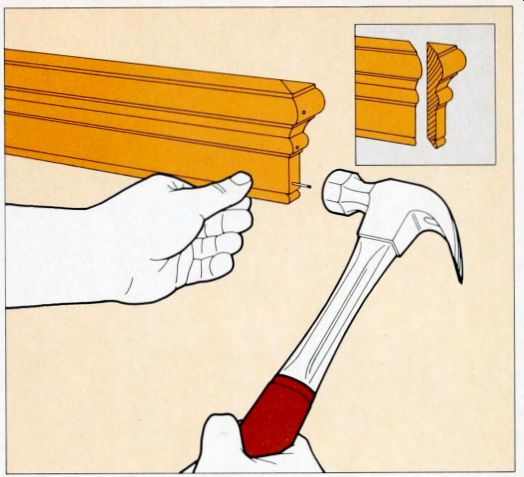
---A mitered return. To end a run of molding that does not join another-sometimes necessary for chair rails and ceiling moldings-mark the end point on the face and miter the piece in toward the back Miter the end of a second piece in the opposite direction, from the back in toward the face, and cut it at a 90° angle at the point where the miter cut meets the back, creating a 45-45-90 triangular wedge (inset). Glue the wedge to the mitered end of the first piece of molding, then drill pilot holes to fit No 19 brads and nail the wedge in place.
A Plinth for an Awkward Corner
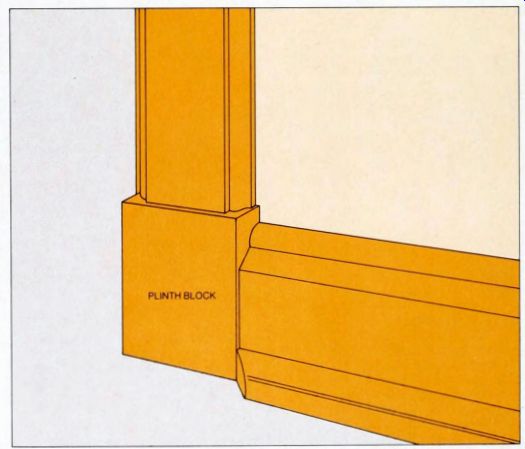
A plinth block. Where different moldings meet at floor level-in this typical example, a traditional door molding and a more severely styled base board-cut a rectangular "plinth" block of scrap wood Make it slightly wider, higher and thicker than the moldings and fit it to the moldings with butt joints. When you add a base shoe, miter its end to meet the outer edge of the block. A plinth block that is more than 3 inches wide can be nailed. In place like a short piece of baseboard; smaller ones should be glued to the wall and to the ends of the moldings.
A Tricky Miter Cut for a Cornice Molding
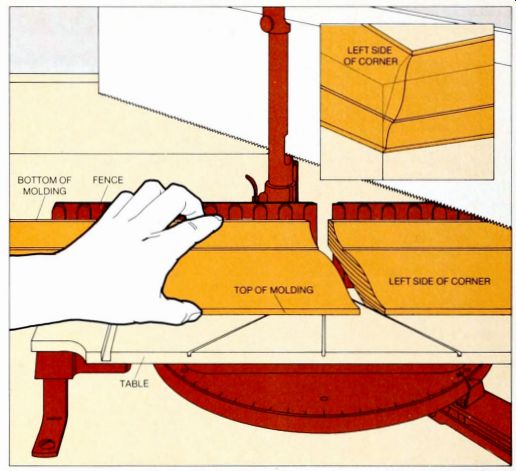
An interior corner. To make a miter joint (inset), measure from corner to corner, mark the distance on the bottom edge of a length of ceiling molding and place the molding upside down in a miter box, with the bottom of the molding tight against the fence. Place the piece you want to cut on the opposite side of the saw blade from its position on the ceiling-to the right side of the blade for the left-hand corner piece, and vice versa. Set the saw for a 45° cut to the right to cut the left-hand piece, as illustrated in this example: set the handle to the left for a right-hand piece. For a neater but somewhat more difficult alternative, cope a corner piece as you would a baseboard.
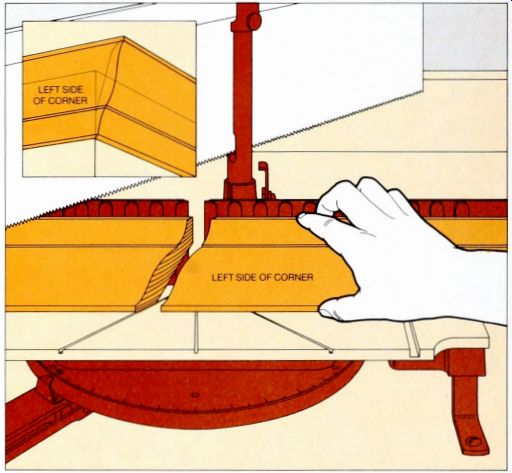
An exterior joint. For an exterior corner (inset). which cannot be coped and must be mitered, place the ceiling molding upside down and re versed in the miter box as you would for an interior joint, but do not reverse the saw' s direction Thus, cut the piece for the left side of the corner with the saw handle at the left, and the piece for the right side with the handle at the right.
Intricacies of the Old-time Woodworker's Joints
Although houses no longer are held together by strong, interlocking wooden joints, traditional woodworking joints still are needed for many special parts of a modern home. In joining those parts, simple nailing does not suffice; much stronger connections can be formed of mortises and tenons, dadoes or rabbets.
These joints are used in floors, stairways and doorframes and window frames, where strength is critical; in roof soffits and exterior siding, where a weathertight seal is needed; and in interior paneling, where appearance is important.
The way two boards meet determines the type of joint preferred. Where boards meet at right angles-either end to end, as with the side and head iambs of a door, or edge to edge, as with a stairway tread and riser-either of two joints is used. The stronger is the dado joint, in which the square end of one board fits into the dado groove near the end of the other. In the slightly weaker rabbet joint, the square end fits into a matching rabbet step at the end of the other board.
Where the boards meet edge to edge, the dado and rabbet can be combined, in a joint commonly found in stairway construction. The dadoes or rabbets for these joints ordinarily must be cut on the job with a router or radial arm saw, using the techniques shown in Section 3, but if a number of identical joints are used, the boards can be cut by a mill.
For boards that meet edge to edge on a flat surface-hardwood floorboards, ply wood subflooring, interior wall paneling, exterior siding and roof decks-the joints must combine a neat appearance with flexibility, so that the wood can contract and expand slightly as moisture and temperature change. On interior paneling and exterior siding, a variation on the rabbet joint often is used: boards are milled with a rabbet along the face of one edge and a matching rabbet along the back of the other, so that the two overlap when the paneling is installed.
Paneling, siding and flooring also can be fitted together with tongue-and groove joints: each board has a groove milled along the center of one edge and a matching tongue (made by cutting rabbets on each side) on the other. The tongue is generally a fraction of an inch shallower than the groove, to ensure that the board faces fit tightly together.
Because flat joints on walls and floors involve a series of boards, they require careful planning and alignment. When the boards are applied vertically on a wall, rows of 2-by-4 blocks must be nailed horizontally between the studs, one quarter, one half and three quarters of the way up the wall. To make sure a thin, unsightly board is not left at the end of the job, the width of the boards being used (plus any gap) should be di vided into the length of the wall or floor.
If the amount left over is less than 2 inches, both the first and last boards should be trimmed equally so that both are more than 2 inches wide. Where the joint between a board and a wall will be exposed, the board may need to be scribed and sawed or planed to the irregular contour of the wall; and in hard wood paneling, pilot holes must be drilled to keep the entering nails from splitting the wood.
The third type of joint, the mortise and tenon, is used when two boards meet, face up, at right angles, as in a window sash or paneled door.
The projecting tenon at the end of one board fits into the mortise hole in the other board and is secured by glue or dowels.
Mortise-and-tenon joints are less common in new window sashes and doors because modern glues and machine woodworking have supplanted them to some extent, but they may be needed in making repairs on old woodwork.
Three Basic Right-Angle Joints
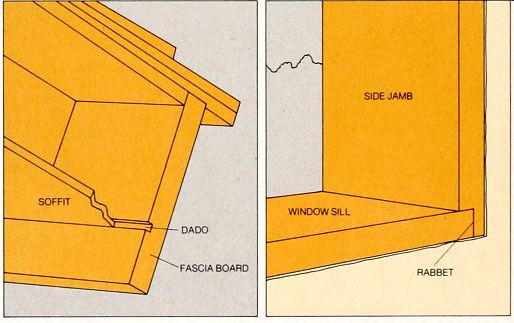
---------- A dado joint. Under the eave of this house roof, the edge of the plywood soffit fits into a groove, or dado, in the back of the fascia board, forming a strong, weathertight joint The dado-its depth ordinarily one third to one half the thickness of the fascia board-prevents the soffit from moving up or down, the joint could work loose only if the soffit and fascia board pulled apart. Dado joints also fit the top edge of stair risers to the undersides of treads. The same joint can be used between the ends of boards: the top and bottom jambs of a window and the top jamb of a doorframe often fit into dadoes in the side jambs,
------- A rabbet joint. At the bottom of this window frame, the sill fits into a step, or rabbet, in the side jamb Rabbet joints like this one also are used at the tops of doorframes and window frames, where the ends of the top jamb meet the side jambs. The same joint can be used between the edges of boards the back edge of a stairway tread may fit into a rabbet at the bottom of the riser above it, for example.
Rabbet joints are somewhat weaker than dado joints, because nails alone are not as strong as the combination of a dado groove and nails, however, because a rabbet joint forms a square corner, it can fit into a stair carriage or a door frame, and a dado joint cannot
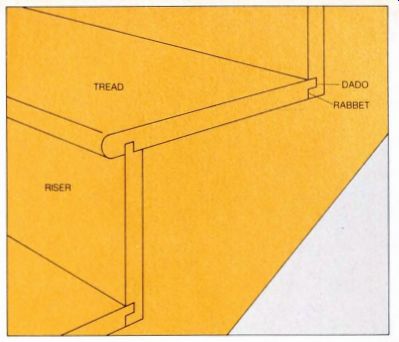
------------ A rabbet-and-dado joint. On this staircase, the back of
each tread is rabbeted to fit into a dado near the bottom of each riser.
The resulting rabbet-and-dado joint combines the best of both types it
is nearly as strong as a dado, but can be made at the edge of a board like
a rabbet. In such a stairway, the tops of the risers and the fronts of
the treads often are joined in the same way, but as a matter of convenience
only; a dado would work just as well there.
Flexible Joints for Walls and Floors
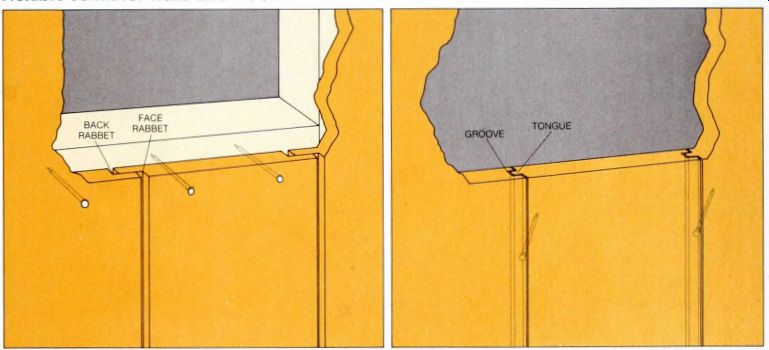
------Rabbet joints. In this interior-wall paneling, each board has a rabbet along one edge of the exposed face and another along the opposite edge at the back. The projection at the face over laps the back rabbet to conceal cracks; there is a gap--called a reveal--between each projection and the body of the next board, to allow boards to expand and contract without buckling or splitting. The same joint can be used for horizontal paneling or. without the gaps be tween boards, for weathertight exterior siding.
-------- Tongue and-groove joints. In this paneling, each board has a groove milled along the center of one edge and a matching tongue along the other The tongues and grooves interlock in nearly in visible joints and the boards are fastened with " blind nails." which are driven at an angle through the tongue of each board so that they are hidden by the groove of the next board Tongue-and-groove joints are stronger and more flexible than rabbet joints They are used for wood flooring, because they resist squeaking and warping, for plywood sub-flooring, because they eliminate the need for rows of blocking to support the edges of the sheets, and for exterior siding, because they resist air infiltration.
Assembling a Right-Angle Joint
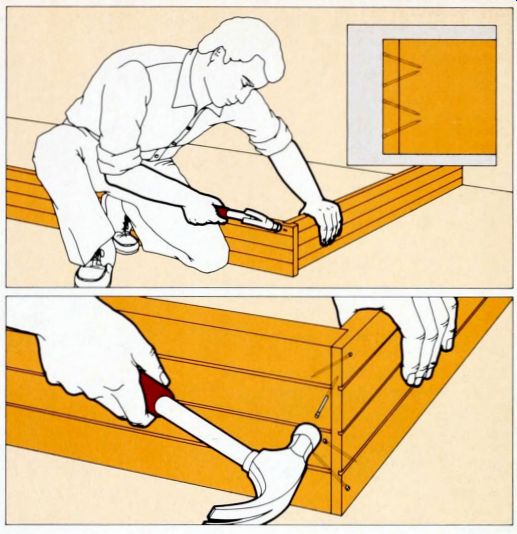
A dado joint. Slip the end of one board into a dado on a second board (m this example the first board is the top jamb of a doorframe, the second is a side iamb), then drive pairs of nails in V patterns through the dado, from the second board into the first (inset) The opposing angles o the nails help keep the joint tight If the first board is more than 0.5 inch thick and so warped that it will not slip easily into the dado, plane the end of the board down; forcing such a board into place can cause it to split.
A rabbet joint. For a joint commonly used to fasten doorjambs and window jambs together, fit and nail the end of one board into a rabbet in a second board Near the edges of the rabbeted board, drive a pair of nails in a V pattern through the rabbet into the end of the unrabbeted board, angling the nails toward the middle of the board, brace the other end against a wall to keep the joint tight while you nail. Then drive a second pair of nails through the unrabbeted boar into the end of the rabbeted one, starting the nails near the middle of the board and angling them out toward the edges.
Installing a Set of Rabbeted Panels
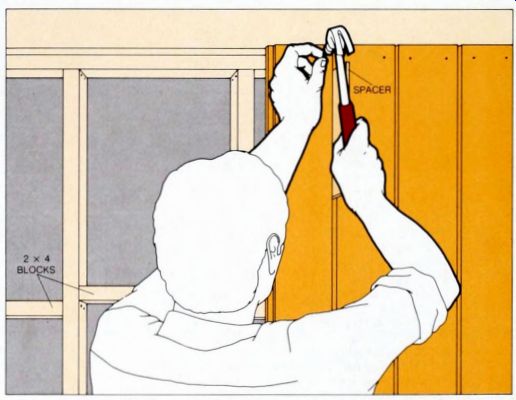
1. Aligning the first boards. To prepare the wall, nail a plumb starter board to 2-by-4 blocks, fastened between the studs in three horizontal rows, and also to the top plate and sole plate. If you are also paneling the adjacent wall, rabbet both edges of the starter-a normal 1-inch rabbet on the left edge, and on the right edge a rabbet equal to the thickness of a board and the width of the planned gap between boards If you are paneling only one side of a room, do not rabbet the right edge; instead, fit the edge to the adjacent wall.
Set a 0.25-inch plywood spacer into the left-hand rabbet of the starter board near the top of the wall, slide the edge of the next board against the spacer and drive two finishing nails through the face of the new board--not through the rabbets--into the top plate. Place the spacer into the rabbet near the bottom of the board and nail the board to the bottom plate; then nail the board to each of the blocks Repeat this procedure for each of the succeeding four boards.
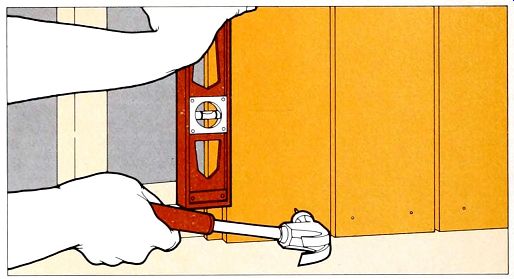
2. Keeping the boards vertical. Every six boards, fasten the top of a board with only one nail, then hold a level in the rabbet near the bottom of the board. Swing the board from side to side until it is plumb, then nail the board to the sole plate, the top plate and the horizontal blocks in the normal way.
At the left end of the wall, install the starter board of the adjacent wall (Step 1) if you plan to put paneling on the other side of the corner. Scribe and cut the last board so that it will fit snugly into the rabbet of the starter board (or against the wall, if you are not paneling the adjacent wall), then nail it in place.
Fitting and Nailing Tongue-and-Groove Joints
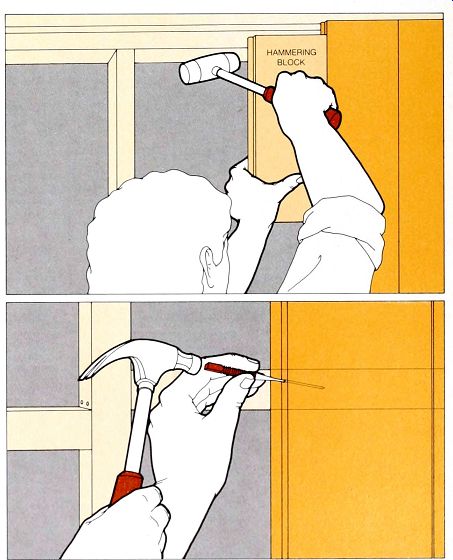
1. Driving the boards together. On a wall, align the I first board against an adjacent wall, with the tongue facing out; plumb it with a level and nail through its face into the top and sole plates and into horizontal blocks like those used for rabbeted paneling (opposite, bottom) On a floor or roof, align the board by measuring from a reference point, such as the bottom of a wall Slide the groove of the next board onto the tongue of the first one and fit the groove of a hammering block-a short scrap of tongue-and-groove board-over the tongue of the new board near one end Strike the block firmly with a mallet, driving the new board onto the tongue of the previous one; slide the block along the board as you work so that the board seats evenly
2. Nailing the tongue. Drive nails at a 45 angle partway through the base of the tongue, where it meets the body of the board, into the blocks or structural members behind the board, sink the nails with a nail set. taking care not to splinter the tongue. If a board is more than 8 inches wide, face-nail it through the middle; narrower tongue and-groove boards need not be face-nailed.
On a vertical surface, plumb every sixth board as you would a rabbeted one (Step 2, above) and adjust it by driving one end tight with the hammering block; on a horizontal surface, measure from the edge of the board to the reference point.
At the end of the wall or floor, cut off the tongue edge of the next-to-last board and install it by nailing through its face. Scribe the last board on the tongue edge to match it to the wall, cut it along the scribed line and face-nail it, with the groove against the cut edge of the next-to-last board.
Setting a Tenon into a Mortise
In a mortise-and-tenon joint, the projecting tenon of one piece fits so snugly into the rectangular mortise hole of the other that the two pieces are joined together almost as strongly as if they were a single piece of wood. Such strength is particularly important in window sashes and paneled doors, which are subjected to repeated stresses that would quickly pull apart a simple butt joint. Factory-made mortise-and-tenon joints like the one shown earlier rarely need to be replaced or even repaired.
The tenon is always made on the shorter of the two pieces-generally the horizontal rail of a door or window. This is done so that the short piece can be clamped vertically in a vise when it is sawed and chiseled, as a long piece could not be.
To make a strong, precise joint, you will need a special tool called a mortising gauge, which has two sharp points that can be set to mark both sides of a mortise at once and to transfer the marks to the tenon without changing the adjustment.
Modern mortise-and-tenon joints generally are fastened by glue alone, but the old-fashioned technique of using a cross wise dowel to pin such a joint together still has its uses. To mend a joint that has popped loose, you sometimes can drive the pieces back together, drill a hole through the joint and glue in a dowel; the alternative-disassembling the joint, then cleaning and re-gluing it-is difficult and time-consuming.
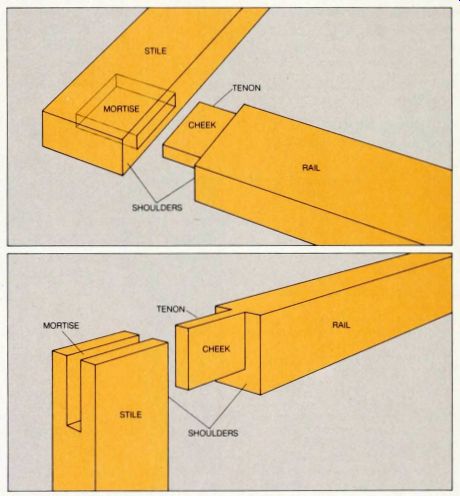
A blind mortise-and-tenon joint. At the corner of this window sash, the mortise in the vertical stile at left has a width equal to one third the thickness of the stile and a depth equal to three quarters the stile width, a design that gives maximum strength. At the end of the horizontal stile at right, the rectangular, projecting tenon is inch shorter than the depth of the mortise to allow space for glue.
The sides of the tenon, called cheeks, fit snugly between the wide inner faces of the mortise, to take advantage of the strength of a joint glued between the long gram of rail and stile. The shoulders of the mortise and of the tenon, on the bodies of the boards, fit together flush on all sides, they brace the stile against the rail and allow the end of the rail to hide the mortise.
The same joint is used between the rails and stiles at the edges of paneled doors, as well as be tween the intermediate rails and the outer stiles: it also is used between muntins, which di vide the panes of a window.
An open mortise-and-tenon joint. Often used at the corners of window sashes, this joint is a simpler alternative to the blind joint. An open mortise-a U-shaped cavity cut at the end of the stile with a mortise chisel or drill-press attachment-receives the tenon of the rail. Shoulders on the sides of the tenon strengthen the joint, as they do in a blind mortise-and-tenon joint, but the end of the tenon and one side of it are flush with the end and the outside edge of the stile The joint shown here is secured with glue alone, but dowels or metal pins running through both mortise and tenon sometimes are used instead of glue or in addition to it.
Assembling the Joint
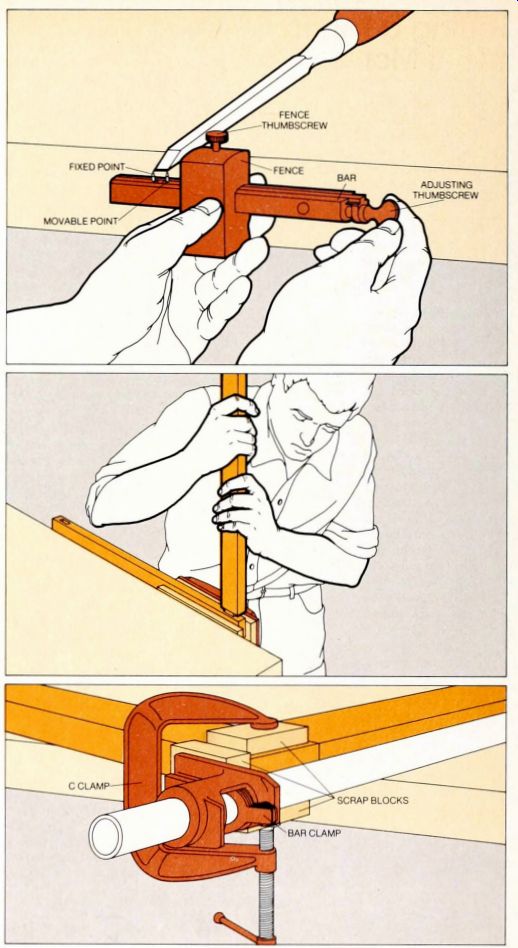
1. Setting the mortising gauge. Choose a mortise chisel whose width is one third to one half the thickness of the wood to be joined; rest the chisel on a workbench, the tip overhanging the edge of the bench Loosen the thumbscrew atop the gauge fence, hold the gauge to the chisel tip and set the gauge points to the chisel-tip width by turning the adjusting thumbscrew at the end of the bar. (If you are using a drill-press mortising attachment. set the gauge to the width of the chisel of the attachment.) Hold the gauge against the edge of one board, slide the bar through the fence until the points are centered on the board and tighten the fence thumbscrew Use the gauge to mark mortise and tenon. chisel out the mortise and saw the tenon in the ordinary way.
2. Test-fitting the joint. Clamp the mortised board horizontally in a woodworking vise and push the tenon into the mortise, tapping it gently with a mallet if necessary If you meet strong resistance. pull the tenon out and look for shiny spots on its cheeks, signs of bulges in the mortise or tenon Use a chisel to pare away the shiny spots, working across the gram with the bevel facing up. then test the joint again.
Pare the tenon until you can force it into the mortise. then separate the pieces If the tenon is loose in the mortise, glue and clamp a thin layer of wood to one or both cheeks, let the glue set and pare the tenon.
3. Assembling the joint. Spread glue on the tenon with your finger and inside the mortise with a thin scrap of wood, to prevent excess glue from being squeezed out when the joint is assembled. use only enough glue to barely cloud the surface of the wood and do not glue the base of the tenon near the shoulders Slide the tenon into the mortise (if you are assembling a window sash or a door with several joints, glue and assemble all of them at once) and set the pieces flat on a workbench.
Hold the boards together with a long bar clamp, using scrap blocks of wood to protect the surface, pinch the mortise around the cheeks of the tenon with a C clamp. Check the joint with a framing square, then tighten the clamps.