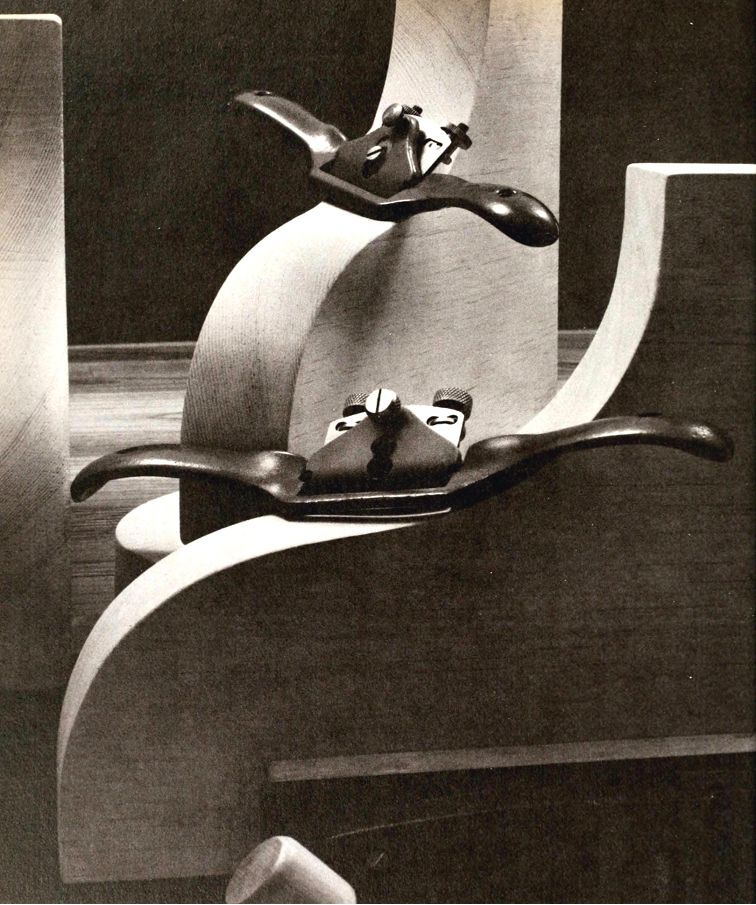
-------- Planes that smooth curves. Spokeshaves, miniature
variations of the everyday plane, are made with soles, or base plates,
so short that they can follow tight curves-here the curved edges of decorative
cornice braces. The spoke shave at top has a flat sole, for convex curves
and for some narrow straight cuts such as the chamfer shown; the one at
bottom has a slightly rounded sole, for concave surfaces.
Wood has always been special-spirits were said to live in it, and other gods and demigods were said to protect the trees that produced it. In part, this special reverence stems from the many uses of wood, from buildings to bowls, but certainly another reason must be the elegance and simplicity with which wood achieves these practical ends. It can be shaped into graceful forms. Its edges can be smoothed to meet for a seemingly seamless corner, or they can be shaped to lock in a grip that will endure over the centuries.
Of the hundreds of such jointing techniques that once were essential to the house carpenter's work, only a few remain in common use: miters, which fit trim around angles; kerfing, which flexes boards for curves; rabbets and dadoes, two related shapes used for joints; and mortises and tenons, which lock joints in moving assemblies such as windows and doors. All are ancient, still known by their old names.
And ironically, most are created today either by one of the oldest of tools, the plane, or by one of the newest, the router. The two tools are dissimilar. The plane (as well as its variant, the spokeshave) is a blade in a holder. The router is a spinning bit.
The plane is often the symbol of a woodworker's highest craftsmanship, not only for what it can do but also for its beauty as a tool. As early as the Roman era, the plane was a sophisticated instrument, and in Baroque times it flourished into a wide range of shapes and sizes to carve the moldings for lavish palaces. By the 18th Century, woodworkers made a separate plane for every wood shape, from delicate beading to structural joints.
The tools themselves were reverenced. Each workman made his own, fashioning each to fit his grip. With his plane the woodworker used his eye, his ear, but most of all his hands, and when he used it he had what admirers called the knack-the precise art of forming wood to the perfect shape, whether for a rabbet joint in a Quaker doorjamb or the fluted pilaster astride a Georgian window.
The whisper of a plane is now often replaced by the whir of a router. Electric motors and toughened steel led the way to speed in fashioning wood. And the router bit cuts so smoothly that it simultaneously shapes and finishes, making sanding almost superfluous.
Yet even in the machine age, using the plane and the router calls for skills. Both tools require adjustments so precise that only the eye can serve as arbiter. With both tools the worker needs to know how hard to press against the wood and how fast to push along the fibers.
Tools do not have the knack: craftsmen do. Once achieved, the knack leads to some of the most beautiful results in woodworking: a shape that perfectly fits its function, a look of warmth and rhythm, and a feel that only fingers can sense is truly smooth.
Planing a Board to Lie Flat and Fit Tight
For trimming and smoothing wood, no tool is more accurate than a hand plane with a razor-sharp blade. It is the ideal tool for such jobs as leveling a surface for a porch step; shaving an edge, such as the narrow top of a drawer; or, by using a technique called "shooting ", shaping the edge of a board exactly perpendicular to its face.
A hand plane's major shortcoming is its reliance on muscle power; on big jobs, such as smoothing the faces of large boards or trimming doors, you may want to speed and ease the work with a portable power plane.
Ordinary jobs are handled by two types of hand planes--two-hand bench planes and smaller, simpler, one-hand block planes. Bench planes come in a variety of sizes, but all have the same basic design. The blade, called an iron, is mounted about 45° from the horizontal with its bevel side down; it protrudes through a slit called the mouth, in the bottom, or sole. As the plane moves for ward, the blade pries up a thin shaving that is lifted and curled by a second iron, called the cap iron, which has a rounded " nose " rather than a cutting edge.
The depth of the cutting blade, its distance from the front of the mouth, and its position with respect to the cap-iron nose determine exactly how the wood is cut. The most versatile of the bench planes is the 14-inch jack plane, long and heavy enough for straightening edges and leveling surfaces, yet light enough for smoothing, a job requiring many fine, careful strokes.
The block plane is a one-hand tool originally designed for smoothing butcher blocks made by piecing together short boards, end grain up. Still the tool of choice for small end-grain jobs, the block plane is also used for light trimming and for smoothing plywood edges. To cross cut the exposed fibers of an end grain, the iron is set at a lower angle to the wood than that of a bench plane, and the bevel of the cutting edge faces upward. A good block plane has an adjustable blade depth and mouth opening, and a lateral adjusting lever.
Whatever plane you use, follow these general rules. Cut with the grain wherever possible, to avoid tearing the wood fiber; if the grain changes direction along the length of a board, change the direction of your stroke. Let the feel of the plane skimming the wood be a guide: planing should never be hard work. If you plane against the grain, you will immediately feel a roughness and hardness in the cut. When planing faces or broad edges, jobs in which the entire sole is in contact with the wood, rub paraffin on the sole to reduce friction.
When you finish planing or are interrupted in the course of a job, set the plane on its side to avoid damaging the iron. Test the trueness of a planed surface by placing a straightedge, a combination square or the factory-cut edge of a length of plywood on your board If light shows between the board and the straightedge, mark the high spots with a pencil, then plane off your markings.
Although hand planes are relatively simple tools, they are intricately assembled from a number of parts, each with its own distinctive name. Before using a hand plane, remove the iron and familiarize yourself with the parts. The lever cap secures the iron and cap iron in place; all three rest on an angled support called the frog; screws and levers change the depth of the blade, tilt it , or move it forward and back. With the plane disassembled, sharpen the iron until it can easily slice through the edge of a piece of paper held in one hand. Then reassemble the parts, taking special care in the precise adjustment of the blade.
----
The Ports of a Bench Plane
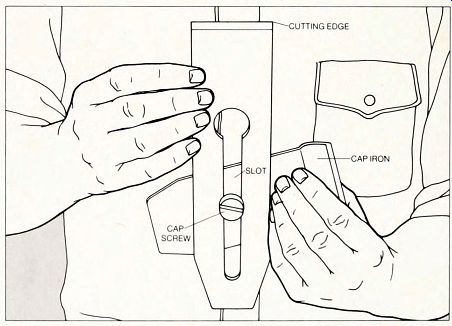
1. Assembling the iron and cap iron. Screw the knurled cap screw lightly into the cap iron, then hold the iron, bevel side down, at right angles to the cap iron, slip the head of the cap screw through the hole at the end of the slot of the iron and slide the cap iron at least halfway along the slot. Rotate the cap iron until the sides of the two irons align-make sure the front of the cap iron does not scrape across the iron's cutting edge. For general work on wood that is fairly easy to cut, such as pine, slide the cap iron for ward gently until the front of its nose is about 1/16 inch from the edge of the blade. Tighten the cap screw with your fingers, then give it an additional quarter turn with a screwdriver For wood that is more difficult to cut, such as oak, or for finishing work, advance the cap iron 1/32 inch closer to the cutting edge.
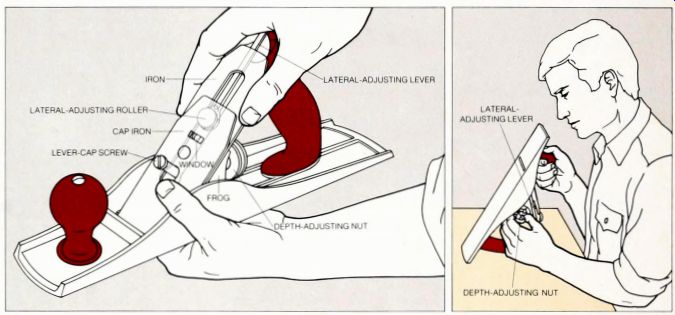
2. Installing the irons. Insert the blade into
the mouth of the plane, fit the irons over the lever-cap screw, and lay
the irons on the frog-the top of the depth-adjusting lug should fit into the
window in the cap iron and the lateral-adjusting roller should fit into the
iron's slot Set the lever cap on the irons, slide it down until the narrow portion
of its hole fits around the lever-cap screw, and snap the lever-cap cam down.
The cam should snap down with moderate thumb pressure. If it does not go, release
the cam and either loosen the lever-cap screw to decrease tension or tighten
it to increase tension.
3. Setting the depth of the blade. Hold the plane upright, with the heel resting on a light-colored surface and the sole facing away from you. Sighting down the sole, turn the depth-adjusting nut until the blade barely protrudes through the mouth; if the blade protrudes farther at one side of the mouth than at the other, use the lateral-adjusting lever to even it The mechanical link between the depth-adjusting nut and the depth-adjusting lug has a small amount of play Be certain that the final adjustment of the nut moves the blade deeper through the mouth otherwise the blade will slide back slightly during the first stroke.
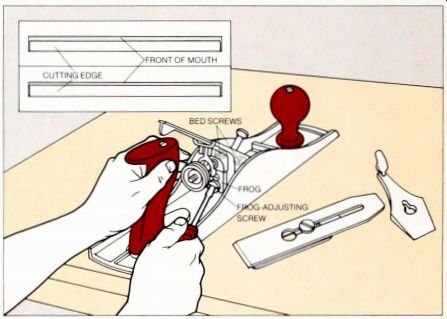
----4. Adjusting the mouth. Turn the sole toward you to check the mouth
width For easy-to-cut wood, use a wide opening, for harder material use
a narrow opening (the inset shows the correct widths, actual size) If the
opening is too wide or too narrow, remove the lever cap and the irons,
exposing two screws called bed screws in the frog Loosen these screws,
then retract or advance the frog-adjusting screw-only a slight adjustment
should be needed Reassemble the plane, check the mouth opening again, and
test it with a scrap of wood.
Working with the Plane
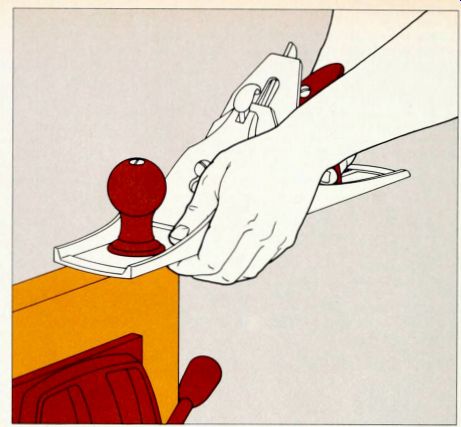
Planing an edge. Secure the board between two pieces of wood in a vise Place one hand on the rear handle of the plane, set the toe of the plane squarely on the end of the board and prepare to guide the strokes by curling the other hand around the side of the plane so that your thumb rests near the knob, your fingertips touch the sole just ahead of the blade and the backs of your fingers will brush the board beneath the plane. (If the wood is splintery, you may have to forego this method and instead guide the plane by placing your forward hand on the knob of the plane.) Begin the first pass with slightly more pressure on the toe than on the heel Allow pressure to shift naturally on the plane so that pressure is even in the middle of the pass To be sure that the sole runs flat on the board edge when the blade hits the corner at the end of the stroke, apply slightly more pressure there on the heel.
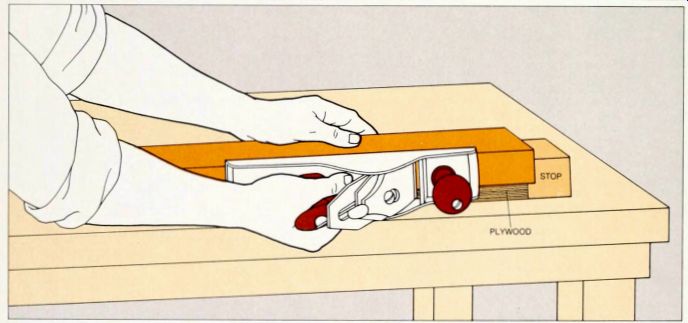
----- "Shooting" a right angle. To plane the edge
of a board perpendicular to its face, place the board on a flat piece of
plywood, with the edge of the board overlapping the edge of the plywood by
about inch; butt the plywood and the board against a stop fastened to the workbench.
Hold the board and the plywood firmly against the stop with one hand, lay
the plane, set for a fine shaving, on its side on the workbench and plane
toward the stop. Your cuts will result in a perfect right angle since the
sole and sides of a plane are milled to meet at 90° angles. Note If you
find it difficult to hold the board steady against a single stop, you may
prefer to secure both ends of the board and the plywood base with stops.
To shoot several boards in succession, build a permanent shooting board
similar to the miter shooting board shown. but cut the plywood as long
as your boards and substitute a perpendicular stop on one end for the mitered
stop.
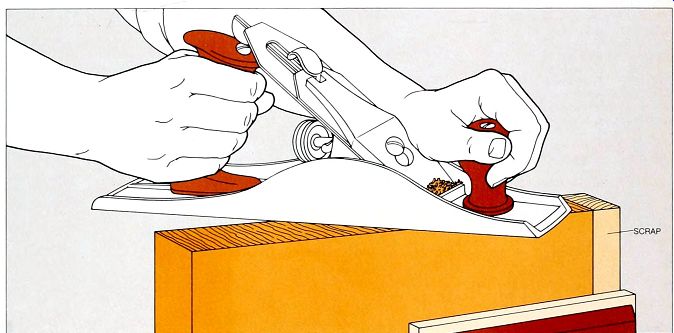
--- Planing end grain. Secure the board, end gram up. in a vise, along
with a piece of scrap to ex tend the planing surface beyond the edge of
the board If possible, clamp the scrap to the board so that the planing
action cannot cause the two to separate With the blade set for a very fine
cut. place the plane flat on the board as you would in planing an edge,
but place the plane itself at about a 30° angle with the board Plane along
the board end. holding the plane at the 30° angle to slice through the
tough end gram, and continue the strokes onto the scrap If you cannot fit
scrap into the vise, plane about three fourths of the way across the end
gram; then, after a few passes, reverse direction by starting the strokes
at the opposite side of the board and planing toward, but not over, the
portion you have already planed.
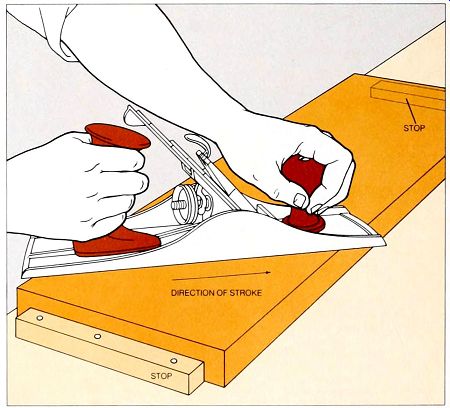
--- Planing a face. Secure the board between two stops
on a workbench, and plane the face in two stages, first for leveling, then
for smoothing In the first stage, set the blade for cuts about as deep
as the thickness of an index card, hold the plane at an angle of about
45° to the gram and make straight, slightly overlapping strokes with the
edge of the blade at right angles to the direction of the strokes. Before
beginning the smoothing stage, re-sharpen the iron and set the blade for
tissue-thin shavings; plane the face with straight strokes parallel to
the gram.
Working with a Block Plane
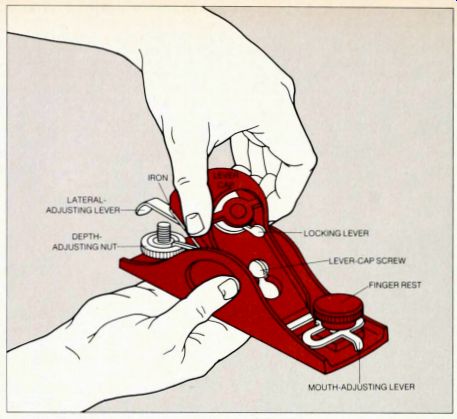
Adjusting the plane. Hold the plane in one hand and use the other to insert the iron, bevel up. fit the lever cap over the iron and tighten the locking lever Turn the plane upside down so that you can sight along the sole, then set the depth of the blade with the depth-adjusting nut and set the blade parallel to the sole with the lateral-adjusting lever For trimming edges on easier-to-cut woods, loosen the finger-rest screw and open the mouth to about 1/16 inch by shifting the mouth-adjusting lever; for end gram, for harder-to-cut woods and for plywood, close the mouth to about 1/32 inch Trimming the wood. Hold the block plane in one hand with your palm on the lever cap. your index finger on the finger rest, and your thumb and fingers on the sides. Begin each stroke with slightly more pressure on the toe, and finish it with slightly more pressure on the heel.
Small chips of wood rather than shavings should rise from end gram and plywood If the plane "chatters"--that is, vibrates--and is hard to push, adjust the blade upward for a shallower cut.
For Big Jobs: A Power Planer
Portable power planes range from small one-hand block planes to 10-pound bench planes, and many come with such accessories as fences and brackets for making square edges and accurate bevels, but all work in much the same way. A rotating drum turns at speeds up to 25,000 revolutions per minute, shearing away wood fiber through the mouth of the plane. Unlike hand planes, power planes can easily cut across the grain and even against the grain; nevertheless, plane with the grain for best results.
The only adjustment needed on a power plane is depth of the cut, generally regulated by a knob that raises or lowers the toe, which is independent of the rest of the sole; the depth of the blades them selves never changes. In most models, the maximum recommended cutting depth is about Vie of an inch, a depth suitable for work on rough wood.
Safety Tips for Power Planers
Fasten the wood securely -in a vise, with clamps, or between strong stops fastened to a workbench.
Keep both your hands on the handles of the plane at all times. Never curl your fingers under the sole to guide the plane.
Never set the plane down at the end of a job until the motor has slopped completely.
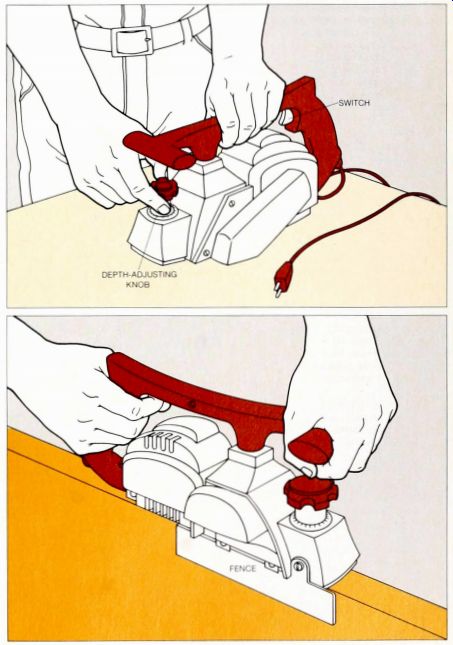
-- Setting depth of the cut. With the cord unplugged.
turn the adjusting knob; typically, a full turn of the knob raises or lowers
the blade about 1/16 inch. The manufacturers instructions generally recommend
specific depths of cut for various jobs, but make trial cuts on scrap to
be sure you have the depth you need.
--- Making the cut. Gripping both handles firmly, place the toe of the plane on the board; start the motor while the blades are still clear and let it reach maximum speed before beginning the cut Move the plane forward steadily, using more pressure on the toe at the beginning of the cut, and on the heel at the end. For smoother cuts, move the plane forward more slowly.
For such jobs as beveling or. as in this example. planing the edge of a door, attach a fence to the plane to guide the cut.
Shaving and Shaping to Angles and Curves
Although most boards in a house are squared off all around, some trim pieces are not. Giving them their final shapes requires special techniques and, in a few cases, special tools. A door edge, for ex ample, is planed to a slanted bevel across the entire width of the edge so that the door closes easily.
A plane, or its relative a spokeshave (opposite), shapes most edges. Ends cut to a 45° angle for a miter joint may need to be planed to shorten them or to smooth them for a perfect fit, particularly if the joint will have a clear finish and imperfections cannot be hidden by wood filler and paint. This precise planing is simplified with a homemade jig called a miter shooting board.
Also, sharp-edged corners-especially on posts-are relieved by planing just the corner, rather than the entire edge, into a " chamfer."
A decorative variant of the chamfer running only partway along the edge is cut with a spokeshave.
A spokeshave also finishes edges that curve, although a rasp or sandpaper often can serve. For some curved pieces--a curving section of baseboard or a jamb for an arched doorway--a special procedure must be used to bend a board so that its face curves.
To shape entire boards into a curve, professionals usually bend several thin boards in a large press and glue them together to form a single laminated board of the desired curvature. This technique requires equipment seldom available to amateurs. However, if the piece is less than I inch thick, you can bend stock lumber by cutting closely spaced saw kerfs partway through the back, then bending and nailing the board around a curved base. Though a kerfed board can be bent around a shallow inside curve such as the rounded corner of a room by flexing the kerfs open, the board will bend much farther around an outside curve like.
The kerfs that permit bending a board face will show on the edges of the board, and there is no way to conceal them that is both easy and completely satisfactory.
Many carpenters fill the edge cuts with wood filler, then sand the edge-a fairly simple job on the squared edge of an arch jamb, but difficult on a baseboard, which should have a shaped edge.
This problem can be avoided in the case of a baseboard if the curve required is shallow: use plain, unshaped stock for the curving baseboard, then cover the cut edge by nailing to it quarter-round or ogee molding, which is flexible enough to bend somewhat without kerfing.
For a board to be bent in this way, use straight, clear lumber, free of knots and cracks. Woods with long fibers-oak, pine and fir, for example-can be bent easily with this method; woods with shorter fibers, such as cherry and mahogany, are stiffer and cannot be bent into extremely tight curves.
Making Bevels and Chamfers with a Bench Plane
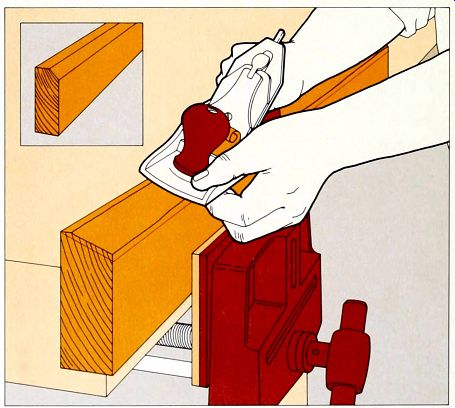
Freehand planing at an angle. Using a T bevel mark the angle of the bevel across the end of the board, then use a marking gauge to scribe a line for the bottom of the bevel along the face of the board. Plane the bevel as you would a square edge but tilt the sole of the plane roughly parallel to the line on the end of the board. As the plane nears the corner of the board at one face and the line on the opposite face, adjust the angle of the sole precisely, so that you reach both simultaneously.
Check the angle of the completed bevel with a T bevel and a straightedge, mark any high spots and shave them down.
To flatten a sharp corner over its full length for a " through" chamfer, mark the angle (usually 46°) on the end of the board and scribe matching lines on both the face and the edge, then plane the angle as you would a bevel To make a " stopped "chamfer, which does not run the full length of the corner, use a spokeshave as described on the opposite page.
Smoothing Decorative Trim with a Spokeshave
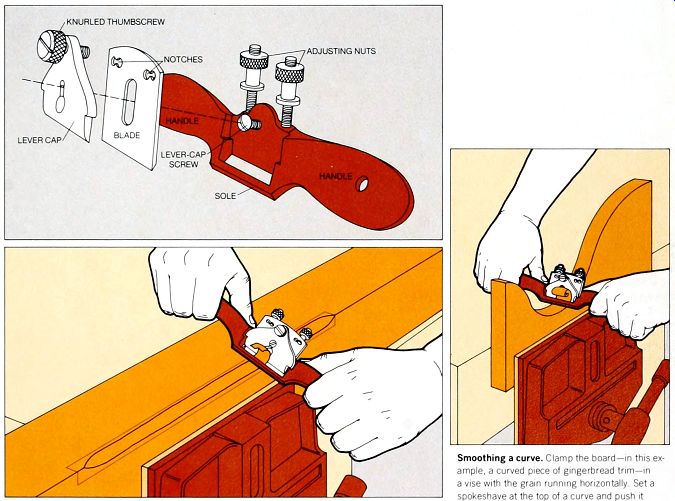
---- Anatomy of a spokeshave. The parts of a spokeshave
fit together in the same way as those of a bench plane, but the spokeshave's
short sole-flat for straight and convex shapes, rounded for concave ones-allows
it to plane curved surfaces. The blade, beveled like that of a plane iron,
fits into the body of the spoke shave with its bevel side down The depth
and angle of the blade can be adjusted with flanged nuts that are set in
notches in the upper corners of the blade. The blade is held down by an
iron lever-cap like that of a plane: the fulcrum of the lever is the locking
screw that fastens the cap to the body of the spokeshave. The lever-cap
can be tightened by a knurled thumbscrew that presses against the top of
the blade, forcing together the bottom edge of the cap and the bottom of
the blade.
To adjust the blade, tighten the locking screw until it is barely snug, turn the adjusting nuts until the cutting edge of the blade barely projects below the sole, then tighten the thumbscrew firmly by hand.
Check the depth adjustment by making trial shavings with a scrap of wood, the wood shavings should be tissue-thin. If the spokeshave vibrates and chops at the wood, reset the blade to a shallower depth.
----Making a stopped chamfer. Use a pencil to mark the ends of the chamfer and a marking gauge to mark the chamfer lines on the edge and face of the board. Sighting through the mouth, set a flat-bottomed spokeshave on the mark at one end of the chamfer, with the handles tilted 45° from the horizontal, and push the spokeshave for ward with the gram to a point about 1/8 inch from the other end After every two or three passes along the entire length of the chamfer, make a short cut at the far end to pare away the shavings. Shave the chamfer down to the marked lines, then set the blade on the mark at the far end of the chamfer and shave the stop to a smooth, gradual curve that matches the one you made at the starting point.
------- Smoothing a curve. Clamp the board-in this example, a curved piece of gingerbread trim-in a vise with the gram running horizontally Set a spokeshave at the top of a curve and push it slowly to the bottom, using a round-bottomed spokeshave for a concave curve (above) and a flat-bottomed spokeshave for a convex curve.
Then reverse direction and push the spoke shave down from the other side of the curve; work back and forth until the surface is smooth Do not push the spokeshave uphill, against the gram; it will gouge and chip the surface.
A Shooting Board for Miter Cuts
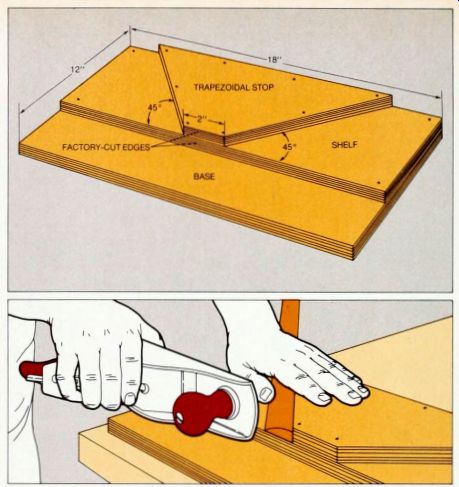
Building a shooting board. Designed to assist in accurate planing at an angle, this jig has an 18-by-12-inch base of 3/4-inch plywood, to which is screwed an 18-by-9-inch shelf and a trapezoidal stop. For one long side of the shelf, use the straight, factory-cut edge of the plywood, and attach the shelf so that this straight edge is the side stepped back from the base.
For the stop, cut a 9-inch rectangle of plywood. then, using a miter box. cut its ends in two op posing 45° angles about 2 inches apart Set the stop on top of the shelf, its 2-inch side flush with the factory-cut edge Check its angled sides with a combination square and move the stop until they form exact 45° angles with the factory cut edge, then screw the stop in place Planing the miter. Hold the board firmly against one side of the stop, with the mitered end about 7/32 inch beyond the edge of the stop Adjust a jack plane for a very fine cut (Step 3) and rest it on its side with its toe against the miter. Slide the plane forward repeatedly, starting each stroke with the toe against the miter and stopping it when the blade passes the miter-planing farther will plane the trapezoid and rum its straight edge. As you shave the miter down, edge the board forward so that it al ways protrudes about 1/32 inch beyond the stop If the plane becomes hard to push, rub paraffin on the shooting board and the side of the plane.
Bending a Board with the Help of a Saw

-- 1. Measuring the curve. Hold a straightedge at each end of the
curve and mark the spring lines where the curve begins (Step 2) Measure
the distance between the spring lines with a flexible steel tape and
transfer these measurements to the board you will bend, provide as much
unbent wood at each end of the board as is practical-no less than 6 inches.
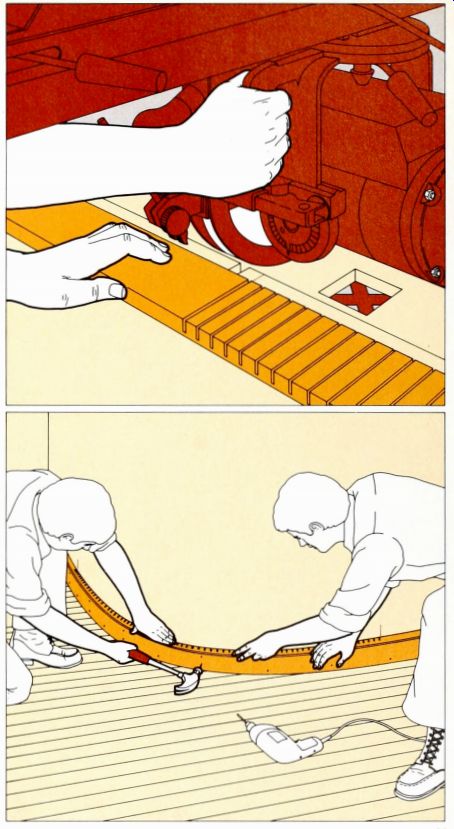
2. Cutting the kerfs. You will have to experiment to find the correct depth and spacing of the kerfs for your particular curve and type of wood. If you use a radial arm saw, start by marking the fence 0.5 inch from the right side of the blade and setting the blade depth 1/8 inch above the saw table. In a 2-foot scrap that matches the one you plan to bend, cut kerfs at 0.5 inch intervals. aligning each new kerf with the mark on the fence for the correct spacing Bend the kerfed scrap around a section of the curve to test its flexibility. If you hear cracking in the board or if you must strain to bend it. make trial cuts in other scraps, gradually increasing the depth of the cuts and decreasing the space between them until you find the minimum depth and maximum spacing that permits the necessary bend. However, to avoid serious weakening of the wood, you must leave at least 1/16 inch of uncut wood and space the kerfs at least 1/4 inch apart Use the depth and spacing measurements that you determined in the trials on scrap to make kerfs between the spring lines in the back of the board you plan to bend If you use a portable circular saw to cut the kerfs, guide it with the jig shown, or mark a line on the board for each kerf, allowing 1/8 inch for the width of the saw blade, and cut the kerfs freehand.
3. Nailing the kerfed board. While a helper holds the board-m this example, a section of base board-bent around the curve, nail the straight section at one end in the usual way, then drill pi lot holes every 8 inches through the uncut wood between kerfs and into the sole plate Fasten with sixpenny finishing nails.
To conceal the kerfs exposed at the edge of the board, fill them with wood filler.