Notches: Rough Passageways and Smooth Joints
A multitude of notches must be cut in the rough frame of a house for the pipes and cables that will run behind the walls and ceilings of the finished rooms. Since most of these notches are made in studs or joists that will later be concealed, you can fashion them roughly-typically by making preliminary cuts with a circular saw, then chopping away the wood. The ideal chopping tools are chisels with 3/4-inch to 1.5 inch beveled blades and steel-capped handles.
Though the notches are made by simple techniques, their planning and placement are anything but simple. Cutting into a framing member weakens it, and a notch in a board that supports weight for example, a stud in a bearing wall must conform to the prescriptions of your local building codes. Check the codes when you plan a notch--and do not be surprised if you find it difficult to meet their prescriptions literally.
A building code, tor example, may prohibit a notch larger than 2 inches square, while the outside diameter of a pipe measures 2.5 inches. Building inspectors will generally allow a larger notch if you reinforce the stud. In most cases, a small steel plate called a kickplate (opposite, center), placed over the notch to protect its pipe or cable from nails, may meet the legal requirements If it does not, you must notch larger steel plates into the stud following the same method you use to recess a kickplate.
While precision cutting is unnecessary for notches in rough framing, it is necessary for notches that serve as parts of finished joints-the mortise-and-tenon joints at the corners of doors or windows, for example.
Tenon notches, which must be measured and cut precisely, are generally made on the ends of the shorter boards in the joint boards that are easier to handle and to fix in a vise for cutting.
To match a tenon to the width, length and depth of a mortise, you must cut the end of the board with a hacksaw to form a notch with perpendicular shoulders, and smooth the corners between the notch and the shoulders with a chisel.
When the joint is completed and assembled, the squared shoulders of the tenon will fit flush against the wood at the sides of the mortise.
----
Notching the Frame of a House
A shallow V notch in an edge. Turn the bevel of a chisel toward the notch and drive the chisel into the wood at a 45° angle to cut one side, then reverse the bevel to chisel in toward the bottom of the first cut. forming the second side The wood will chip out of the notch as you cut A deep notch in an edge. Set the blade of a circular saw to the depth of the planned notch and make two cuts across the edge of the board to outline the notch, then, with a hammer, strike be tween the saw cuts to knock out the waste wood with a single sharp blow.
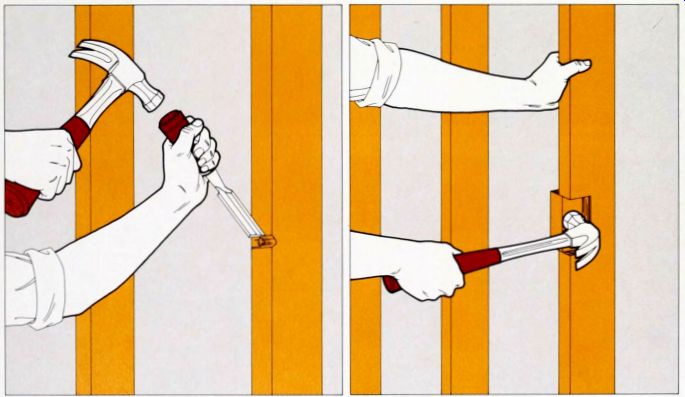
---- Notching a board face. With a circular saw set to depth of the desired notch, make parallel cuts across the face at each side of the notch and also at approximately 0.25 inch intervals between the sides. Secure the board, edge up, in a vise. Set the cutting edge of the chisel parallel to the gram and across the inner ends of the saw cuts, with the bevel facing the cuts, then hammer the chisel across the board.
--Recessing for a kickplate. Hold a steel kick plate, which may be needed to protect cable or piping in a face or edge notch, over the notch and score the wood at the ends of the plate with a utility knife. Set a chisel perpendicular to the board at each score line, with the bevel facing the notch, and tap the chisel 1/8-inch deep into the wood (near right). To remove the waste wood, set the chisel 1/8 inch inside the existing notch, with the bevel facing outward, and drive it to the end of the recess (far right). A shallow end notch. Secure the board, edge up, in a vise and outline the notch on the edge, the face and the end of the board.
Using a circular saw set to the depth of the notch, cut down across the edge of the board at the marked line, place the chisel blade, bevel up. at the mark on the end of the board and drive the chisel horizontally toward the saw cut.
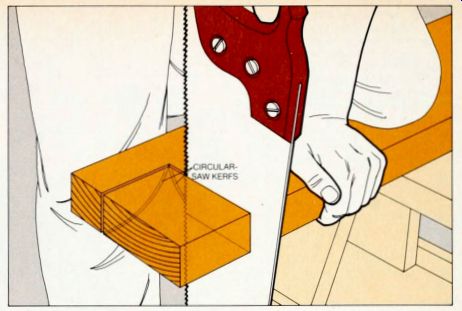
--- A deep end notch. If the depth of a notch exceeds the maximum depth setting of your circular saw, use the circular saw to cut along marks on the board face as far as the inner corner of the notch. To cut the corner on the underside of the board, where the circular-saw blade did not reach, slide a handsaw into each circular-saw kerf and, holding the cutting edge of the blade vertical, saw the rest of the way to the corner.
A Set of Precise Notches for a Tenon
1. Marking the outlines. Use a combination square and a sharp utility knife to score so-called shoulder lines across the faces and edges of the board at a distance from the end equal to the depth of the mortise minus 1/8 inch. Next, use a mortising gauge to score two parallel lines called tenon lines on the end of the board as far apart as the width of the mortise and to extend the tenon lines along the edges of the board to meet the shoulder lines. With a utility knife, score a line across the end of the board, perpendicular to the scored tenon lines, to mark off the length of the tenon; extend the line down both faces of the board as far as the shoulder lines.
2. Starting the tenon-line cuts. Secure the board at about a 60° angle in a woodworking vise, position a hacksaw at a 45° angle to the edge of the board and saw along the waste side of each tenon line until the kerf reaches the shoulder line Turn the board over and cut the tenon lines on the other edge in the same way.
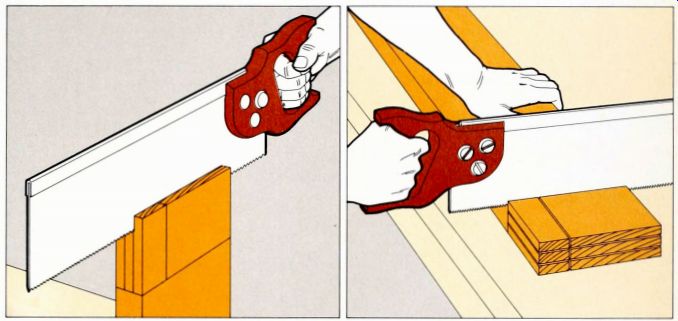
3. Completing the tenon-line cuts. Secure the board vertically, set the saw into the diagonal kerfs of each tenon line and. keeping the blade horizontal, saw down to the shoulder lines. Then set the saw across the end of the board on the line that marks the length of the tenon and saw down to the shoulder lines.
4. Cutting the shoulder lines. Set the board flat on a worktable and cut straight down along a shoulder line on the face to meet a tenon cut. Turn the board over and saw the second shoulder; then set the board on its edge and saw from the shoulder line to the tenon to remove the last piece of waste and to form the third shoulder.
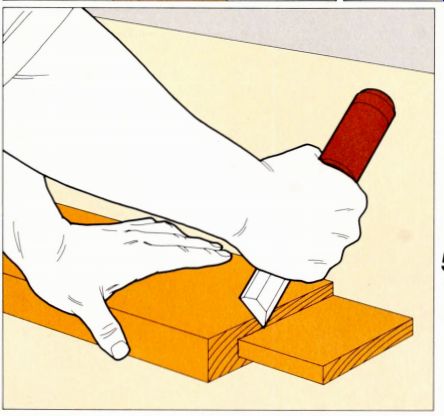
5. Finishing the corners. Grasp the blade of a chisel near the handle, place the flat side of the blade against the shoulder, and set the cutting edge in the corner where the shoulder and tenon meet. Raise one corner of the blade by tilting the handle away from you and slowly draw the chisel toward you to scrape any wood out of the shoulder-tenon corner.
Caution: This is one of the rare jobs in which you must chisel toward, rather than away from your body, work slowly and take special care to keep your fingers out of the path of the blade.
The Ins and Outs of Rabbets and Dadoes
The traditional way to make a strong, gap-proof joint between boards-for attaching a fascia board, laying flooring, putting up paneling or finishing stairs-is with an interlocking dado or an overlap ping rabbet. A rabbet is a step cut into the edge or end of a board. A dado is a channel cut within a board Either cut can be made laboriously and slowly with a saw and chisel, quickly with a router, or very exactly with a radial arm saw.
To rabbet a board with a handsaw, make two cuts at right angles to each other along the edge; produce a dado by making several saw cuts spaced as close as possible to one another within the groove area, then chiseling out the wood.
These hand methods, while adequate for a few cuts, are time-consuming and tend to be rough. For faster, more precise work, use a router-a power tool de signed to cut dadoes and rabbets.
A router requires a guide to keep it cutting in a perfectly straight line. Some rabbeting bits have built-in ball-bearing guides. And special attachments that fasten to the tool base will guide the cutting of both rabbets and dadoes at the desired distance from the board edge. But you can make a simple guide yourself from scrap lumber and C clamps. If you want to cut identical rabbets or dadoes in a small number of boards, homemade jigs will guide the router on the boards. How ever, when construction calls for a variety of cuts in many pieces of lumber, the best tool is a radial arm saw equipped with either of two special attachments, a dado head or a wobbler.
--------
The Router's Speed: A Mixed Blessing
Routers spin their razor-sharp bits at 22,000 rpm or more-a speed that gives this power tool its advantages of precision and ease of use, but also makes the router dangerous.
Fast rotation creates a twisting force that gives the tool a tendency to pull away from its user and expose the sharp cutter. Even after the motor is turned off, the blade does not stop at once.
The high speed of the cutter also makes a router jump if you turn the motor on when the bit is in contact with wood; always keep the bit free when starting up. Handle the router firmly-never gingerly-and use both hands when cutting with it. This is especially important when making cuts such as those with the grain or against the bit's natural tendency to move from left to right-that tend to cause "chatter, " or vibration.
----------------
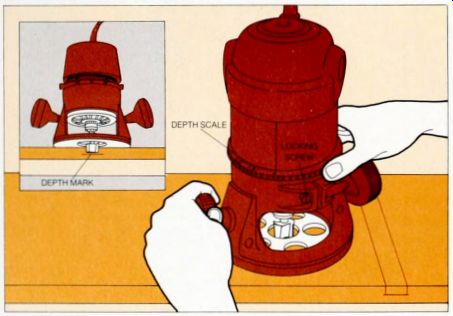
---- Setting the depth of a cut. Set the router on the
board, loosen the locking screw and turn the motor unit clockwise until
the tip of the bit just touches the wood; set the depth scale to zero.
Move the router bit to the edge of the board and lower the bit until the
depth scale registers the desired depth, tighten the locking screw.
To adjust the bit in a router without a depth scale, mark the depth of the desired cut on the side of a board, then turn the motor unit or the depth-adjustment collar to lower the bit until it aligns with the depth mark (inset).
Cut no deeper than 3/8 inch in one pass, lower the bit and make additional passes for deep cuts.
Guides for Straight Cuts
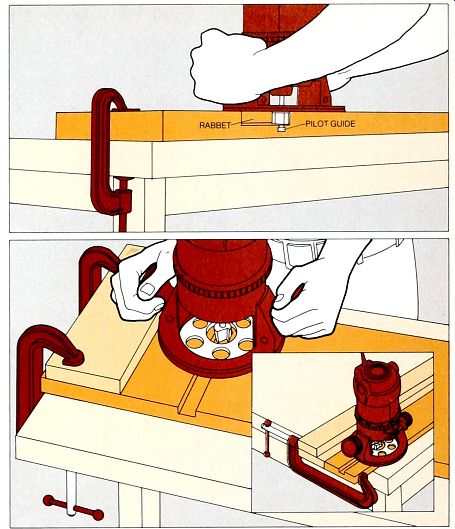
A self-guiding rabbet bit. This cutter has at its tip a ball-bearing pilot that rolls along the edge of the board and keeps the bit cutting at a uniform depth. To use the bit. hold the router with the bit overhanging the edge of the board 2 inches from the left end, turn the motor on and move the bit into the wood until the roller meets the board edge. Move the router from left to right, pressing the guide against the edge. Complete the rabbet by moving the router from right to left through the uncut edge. Each rabbet cutter is designed for one width of rabbet but depth is adjustable by the methods described at left, bottom.
A homemade guide for rabbets or dadoes. Clamp a perfectly straight piece of wood to the board to be cut and hold the router firmly against it as you feed the bit through the wood. To determine the position of the guide, first draw lines on the board for the width of the cut. Set the router on top of the board with the bit just above the surface; align the bit with the lines and mark the edge of the router base on the face of the board. Extend the mark across the board with a combination square and clamp the guide along this line.
To rout a board that is narrower than the router's base (inset), clamp a board of equal thickness beside the board to be cut. position a guide board atop this second board and nail through both into the worktable to secure them.
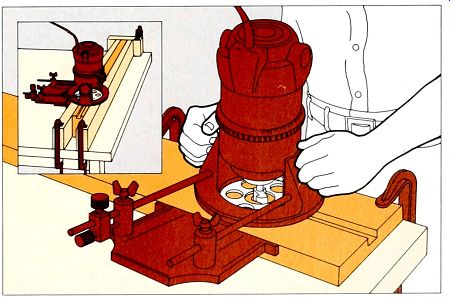
A
commercial guide for rabbets or dadoes. This edge attachment
fastens to the router base; mount it according to the manufacturer's
instructions To use it, measure from the edge of the proposed cut to
the edge of the board and set the guide plate that distance from the
corresponding edge of the bit; place the guide against the board edge
and keep it in firm contact as you feed the bit through the wood.
To cut boards narrower than the router's base clamp boards of equal thickness on each side of the piece to be cut Onset) Nail a stop board across the side boards at one end to steady the work. Clamp this assembly to the bench.
Jigs for Speed and Contro
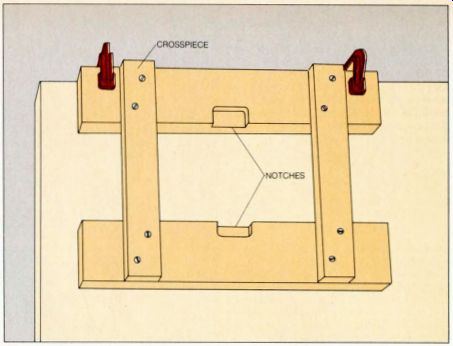
A homemade jig. To cut many straight dadoes or rabbets in lumber of the same dimensions, lay two boards--each 4 inches wide, at least 2 feet long, and the same thickness as the lumber to be cut-parallel to each other; space them the width of the lumber to be cut. Screw two 1-by-2 crosspieces across the boards, spacing them the diameter of the router base, if a wide cut will require more than one pass with the router, add the difference between the width of the proposed cut and the diameter of the bit to the diameter of the base when calculating the spacing of the crosspieces.
Clamp the jig to a workbench, set the bit depth and make a notch the width of the desired cut on the inner edge of each 4-inch board, centering the notches between crosspieces.
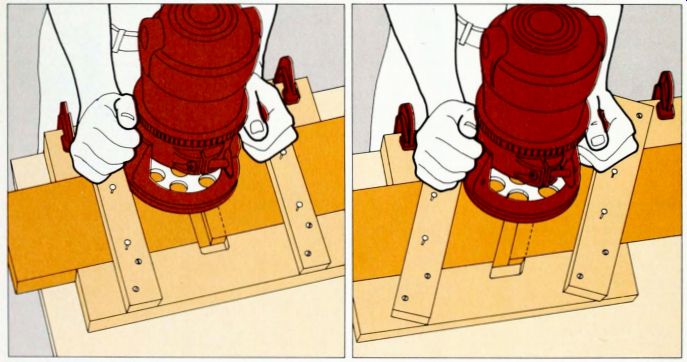
----Making straight cuts. Measure and mark the dado or rabbet
on each piece of lumber and slide the wood into the jig. Align the marks
with the notch edges and nail through the crosspieces temporarily to secure
the lumber Set the router bit in one of the jig s notches, turn the motor on,
and pass the tool steadily along one of the crosspieces to the other notch;
for a wide cut like the one illustrated, make a second pass, guiding the
router along the second crosspiece.
A jig for angles. To cut a dado at an angle or a rabbet on an angled end. alter the jig described at the top of this page by setting the crosspieces to the desired angle across the 4-inch boards and providing new or enlarged notches for the router bit Cut the angles the same way as you cut straight dadoes and rabbets.
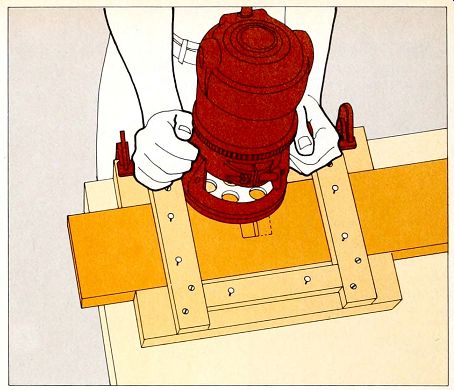
A jig for stopped cuts. To rout dadoes or rabbets that do not run completely across a board, alter the jig described opposite, top, by notching only one of the 4-inch boards and adding a 1-by-2 stop between the crosspieces. Screw the stop to the unnotched 4-inch board so that the distance from its edge to the inside edge of the desired cut equals the distance from the edge of the bit to the nm of the router base Follow the technique used for straight cuts, turning the router off when its base hits the stop.
Dado Blades for a Radial Arm Saw
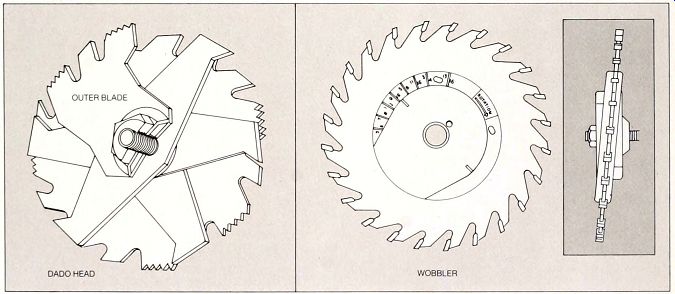
Two ways to cut a wide path. A radial arm saw can be adapted to cut dadoes and rabbets efficiently with either of two accessories. The dado head (left) replaces the regular blade with two saw blades separated by chippers and an assortment of washers. (In this drawing, the outer blade is largely cut away for clarity.) The width of cut-up to 13/16 inch--is adjusted by assembling the blades with the appropriate chippers and washers. Less expensive, but also less precise, is the wobbler (right)-two wedge-shaped washers that grip the regular blade between them, angling it on the axle so that it chews out a wide path. The wobbler washers are marked so that by turning them you can adjust for a cut as much as 13/16 inch wide.
Routing a Custom Molding
Although lumberyards sell millwork-the moldings that trim doors, windows and mantels and form baseboards and chair rails-in many styles, you cannot always find the one you want. But with a router you can produce custom trims to suit your own taste.
Router bits for shaping decorative edges or grooves come in a large range of styles and sizes that can make cuts as much as 1 5/8 inch wide and 3/4 inch deep.
By combining cuts with several bits, you can duplicate or create almost any molding. To check the cut that will be made by a bit or combination of bits, make test cuts on scrap wood. Use boards at least 1 inch thick, of white or ponderosa pine free of knots or warping.
A small amount of trim can be made by the normal routing technique, but if large amounts are called for--a roomful of window casings or baseboard, for example--convert your router into a home made shaper (opposite) by mounting it on a simple wooden table, which enables you to repeat the same cut accurately in several pieces of wood. Mount the router upside down beneath the table, mount the table on a workbench or clamp it to sawhorses, then adjust the router-bit depth and the table fence for your cut.
Since the router's rotating bit is ex posed above the table surface, be scrupulous about safety precautions. Keep hands well away from the moving bit and use push sticks to finish cuts. To make sure you can shut the tool off quickly and safely, power the router from a switched receptacle mounted on the worktable; connect the receptacle to your power source with 14-gauge flexible cord and a grounded plug.
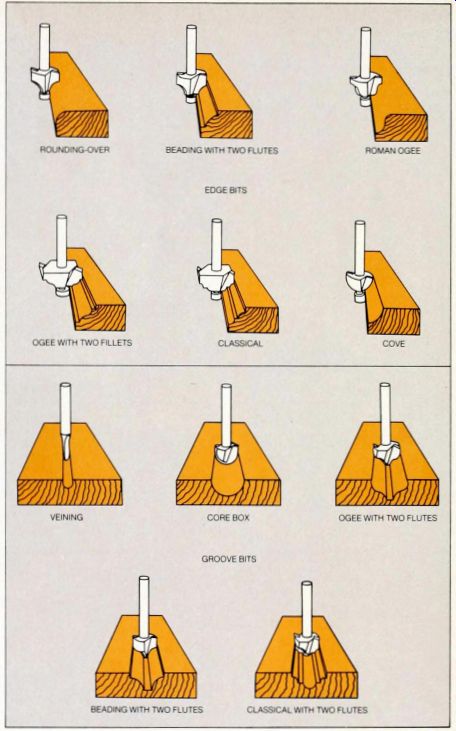
--- A catalogue of special effects. This selection
of router bits represents only a fraction of the pro files to choose from
for forming edges and grooves Edging bits generally have ball-bearing pilot
guides that ride along the side of a board to help position the router
The width of any cut is limited by the width of the bit, but bits can be
used in combination to create wider designs; for example, a deep cut with
a core-box bit next to a shallow cut with a rounding-over bit would produce
an ogee curve wider than the one that an ogee bit used alone can produce.
The router's depth of cut is adjustable and some cutters, such as the
ogee edging bit with two fillets, can produce more than one profile, depending
on the depth to which the router is set.
A Router Table for Mass Production
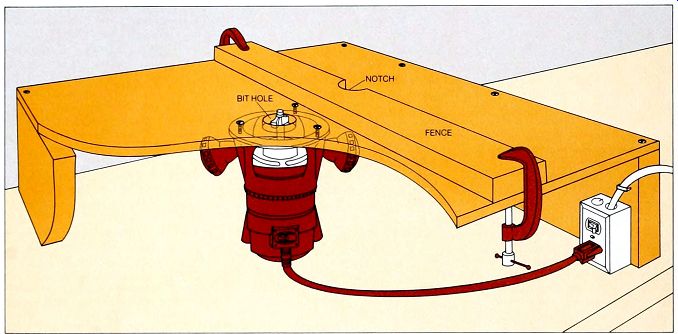
Building a router table. Fasten legs made of 2-by-8s on opposite sides of a piece of 1.5” plywood 2 1/2 to 3 feet square with four counter sunk wood screws Locate the board's center by drawing diagonal lines from corner to corner and drill a hole 1/8 inch wider than the widest bit you are planning to use.
With the router's base removed, center the tool over the bit hole and mark the location of the screw holes in the base. Drill and countersink holes for the machine screws that will hold the router upside down under the table. For safety and convenience, plug the router cord into a switched receptacle mounted on the table.
Make a fence that is the same length as the table, using a perfectly straight piece of 1-by-2 lumber.
In the center of one side of the fence, cut a semi circular notch to match the table's bit hole Use C clamps to hold the fence to the table, you will then be able to move the fence to accommodate boards of any width.
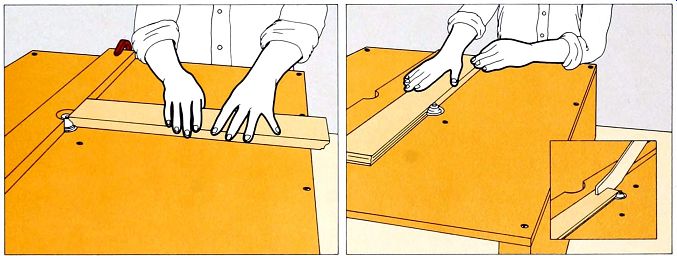
Shaping against the grain. Align the notched side of the fence over the bit hole and. with the bit rotating clockwise into the wood, push the lumber into and past the bit, Hold the wood firmly against both the table and the fence and keep your hands well away from the bit.
Shaping with the grain. Push the lumber be tween the router bit and the straight side of the fence, steadying the wood against the fence with one hand, feeding it past the cutter with the other. Finish the cut with a push stick to keep hands well away from the bit (inset).
Sharpening a Shaper to a Fine Cutting Edge
When a cutting tool that is used to re move thin parings of wood requires more than light pressure to do its job, its edge needs to be renewed; it should be sharpened by honing and stropping. If a cut ting edge is nicked or the bevel leading to the edge has become thickened or rounded, the blade must be reshaped with a grinding wheel.
The shape of the cutting edge determines how it is honed. Tools with straight blades and edges, such as plane irons, wood chisels and some drawknives and hatchets, are honed by rubbing the beveled edge of the blade against whet stones-first medium-grit, then finer grit-set on a flat surface. The burr, or wire edge, created by honing is removed by rubbing the flat side of the blade on a fine-grit whetstone.
Tools with edges that curve outward, such as adzes and some hatchets used for rough carpentry, are sharpened with a whetstone or round ax stone held in the hand. Tools with blades that are curved in cross section, such as gouges curved chisels--and some drawknives, are trickier. The beveled outside curve of the blade is honed by rubbing it against a whetstone lying on a flat surface; the flat inside curve is honed with a slipstone--a small, wedge-shaped stone having one rounded edge--held in the hand.
To accomplish these honing operations, a variety of whetstones are avail able. Natural stones made of the mineral novaculite--called Washita stones in medium grit, Arkansas stones in fine grit cut slowly but produce an extremely keen edge that stays sharp longer than one honed on an artificial stone. Considerably less expensive than natural stones, artificial stones are made of either aluminum oxide (sold under such trade names as India and Alundum) or silicon carbide (sold as Carborundum or Crystolon). Silicon carbide cuts faster, aluminum oxide gives a sharper edge. Most versatile are combination man-made stones, medium grit on one side, fine on the other.
Soak new stones overnight in mineral oil or a lightweight machine oil. Before each use, apply a light coating of oil; after use, wipe the stone with a clean cloth. Store stones in containers--covered wooden boxes are common-to keep them clean and safe from breakage To complete a sharpening operation, strop a blade on a piece of smooth leather that has been rubbed with a little oil, jeweler's rouge or emery powder. Tools can also be stropped with a buffing wheel mounted on a grinder. Honed tools should slice cleanly through paper or shave the hair on your arm.
If a tool requires more than sharpening and must be reshaped to eliminate nicks and correct the bevel, use a grinder, generally with a medium-fine 60-grit or 100-grit vitrified aluminum oxide wheel.
Follow the manufacturer's recommendations for the operation of your grinder and observe the safety precautions for grinders --because of their high speed of rotation, they can throw off fragments with killing force. Cut met al from the edge, working slowly, and dip the tool in water frequently to cool it.
Overheating the metal will draw its tem per, so that it will not take a sharp edge.
Careful storage can minimize the kinds of damage that lead to regrinding. Hang tools in racks, sheathe them in leather or keep them in canvas rolls. Oil each edge lightly after each use to inhibit rust. Store a plane on its side, with the iron retracted so that it does not protrude through the sole plate; store cutters or blades for power tools in the protective cases in which they are packaged.
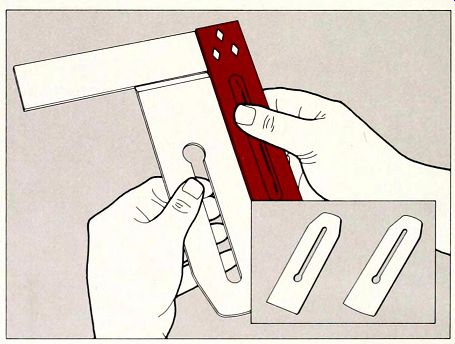
-- Straight-edged shapers. Use a try square to check the edge of any wood chisel or the iron of a block plane designed for precise cuts; the edges should be perfectly straight and should have perfectly square corners The corners of a plane iron designed for general-purpose work should be slightly rounded (inset, left) The iron of a jack or jointer plane, designed for the fast removal of larger amounts of wood, is ground with a slightly convex edge Onset, right), the center about inch higher than the corners.
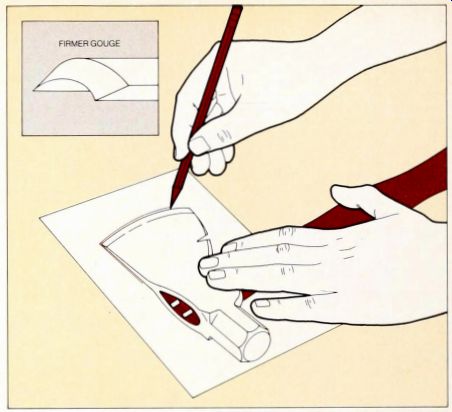
--------- Curved shapers. Trace the curved silhouette
of a hatchet or adz and use the tracing as a tem plate when reshaping damaged
edges The cutting edge of a firmer gouge, like that of a chisel or a plane
iron, is perpendicular to the tool's blade, the blade itself is curved
and is beveled on the outside of the curve (inset).
Bevel angles. Use a protractor bevel, which com bines the features of a protractor and a T bevel, to measure the angle of a tool's beveled edge when grinding the tool The bevels of chisels, gouges, plane irons and drawknives are hollowed slightly by a grinding wheel Onset), the bevels should be twice as long as the thickness of the blades and should be cut at a 25° angle to the flat side of the blade (Chisels used for precision cuts or easier-to-cut woods are sometimes ground to a 16° or 20° angle, but these thin edges are especially susceptible to nicking ). Hatchets are ground with slightly convex bevels for greater strength.
Some have only one bevel, ground at a 25° angle; others are double beveled. with the two bevels at a 30° angle.
Honing a Straight Edge
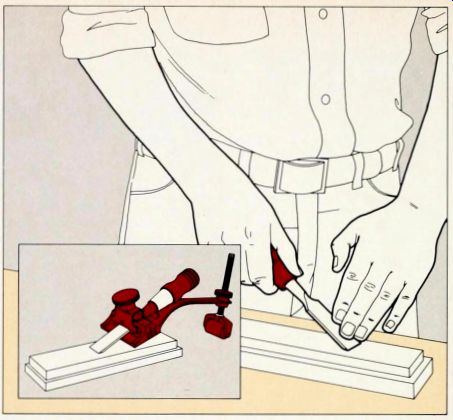
1. Positioning
the bevel. Standing with your feet
slightly apart, grip the tool comfortably and lay its bevel flat against
a medium-grit whetstone; hold the bevel lightly against the whetstone
with the fingers of your free hand. Brace your lower forearm firmly against
your body and stiffen the wrist of the hand holding the tool to maintain
the angle of the bevel as it rests on the stone.
If you find it hard to brace the tool on the stone, use a honing jig (inset) to hold chisels or plane irons at the correct angle.
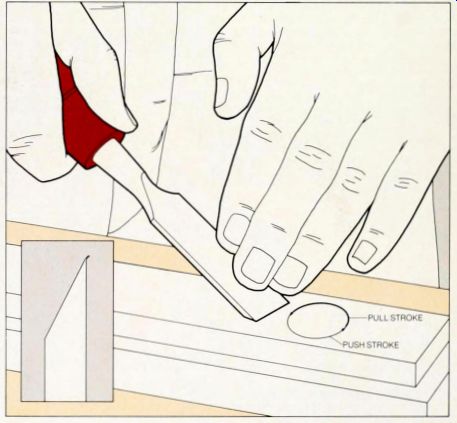
2. Sharpening the bevel. Rock your body in small circles from the ankles, so that the bevel moves in small circles or ellipses; with a honing jig, make straight push-pull strokes. Exert pressure on the circular or straight pulling strokes; use the pushing strokes to reposition the bevel for the next stroke. Keep the bevel flat on the stone-rocking it will dull the edge or round the bevel.
When you have worn a uniform, dull-gray scratch pattern across the bevel and no shiny spots show along the edge, repeat Steps 1 and 2 on a fine whetstone until you can feel a burr, or wire edge (inset), when you run a finger up the flat side of the blade and past the edge.
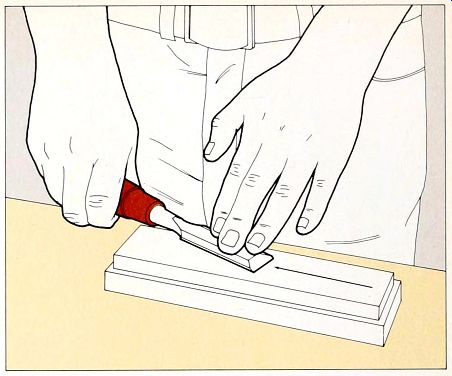
3. Removing the wire edge. Turn the blade over, hold it flat against a fine whetstone and pull the blade repeatedly along the length of the stone until you can no longer feel the wire edge. Finish honing with pulling strokes on a leather strap, on both the flat and beveled sides of the blade.
Honing and Stoning a Curved Edge
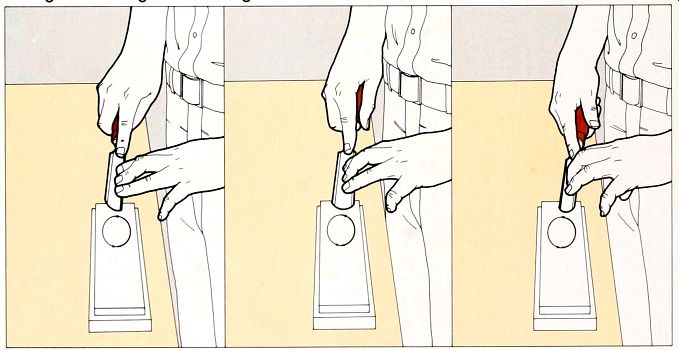
1. Honing a firmer gouge. Hold the tool as shown in Step 1 (opposite) and sharpen it as de scribed in Step 2 (opposite), but roll the tool from side to side as you work Start on one side of the curved edge (left), and move the bevel in several circles; roll the tool slightly, and hone the middle of the bevel (center), then roll it again to hone the opposite side (right) Repeat rolling and honing until the entire surface of the bevel has a uniform scratch pattern.
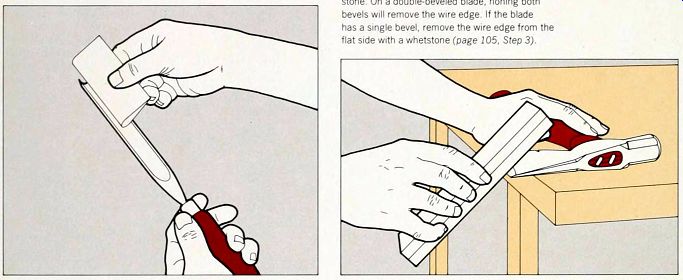
2. Removing the wire edge from a curve. Hold the curved edge of a slipstone flat against the in side of a firmer-gouge blade and slide the stone back and forth, repeat the strokes along the entire edge, always keeping the slip-stone flat against the blade. Strop the outer curve on a length of leather lying on a flat surface; strop the inner curve with a piece of folded leather.
Sharpening a Convex Bevel
Honing a hatchet. Hold a coarse or medium whetstone against the very edge of the hatchet's convex bevel; do not hold the stone flat against the bevel or you will deform the bevel shape Move the stone along the edge in small circles, then repeat the process with a finer stone. On a double-beveled blade, honing both bevels will remove the wire edge. If the blade has a single bevel, remove the wire edge from the flat side with a whetstone (Step 3).
Restoring a Hollow Bevel with a Grinding Wheel
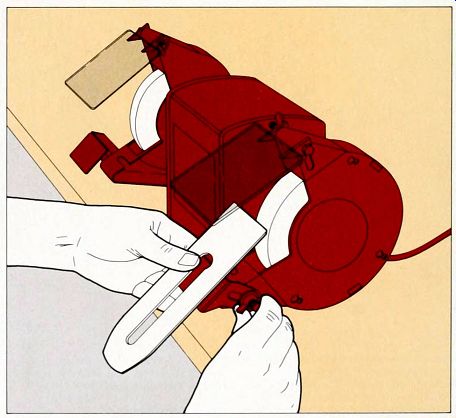
1. Setting the tool rest. Loosen the wing nut of the tool rest and adjust the rest so that, with the tool flat against it, the tool bevel meets the face of the grinding wheel at the correct angle and at a point above the wheel axis.
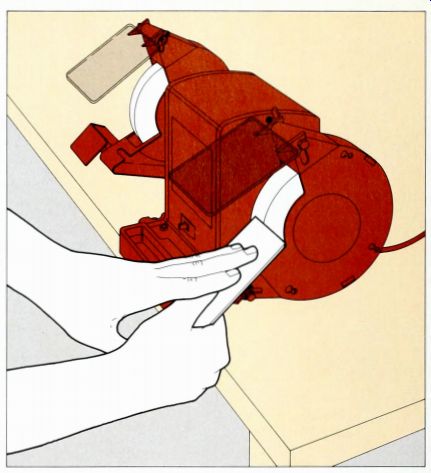
2. Grinding the bevel. With the grinder on. bring the edge of the tool into light contact with the circumference of the wheel. If you are grinding a straight-edged tool, move it back and forth across the circumference, if you are grinding a firmer gouge, roll it to present all parts of the bevel to the wheel. Make light cuts and quench the blade frequently in water. Use a protractor bevel repeatedly to check the angle as you grind it. When the bevel is held to strong light, you should see a uniformly shiny scratch pattern; a patchy surface with both shiny and dull spots indicates an unevenly ground bevel
Restoring a Convex Bevel
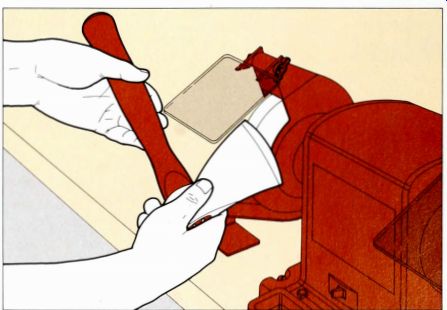
Freehand grinding. Hold the heel of a convex bevel against the grinding wheel and pass the blade across the circumference; if the tool has a curved edge, like the one at right, move it in a small arc to keep the heel of the bevel against the wheel. Before making the next pass across the wheel, raise the heel slightly and rock the edge forward, repeat this procedure until the edge of the bevel passes across the wheel. Cool the blade frequently, check the angle with a protractor bevel, and check the outline of a curved edge against your tracing of it.