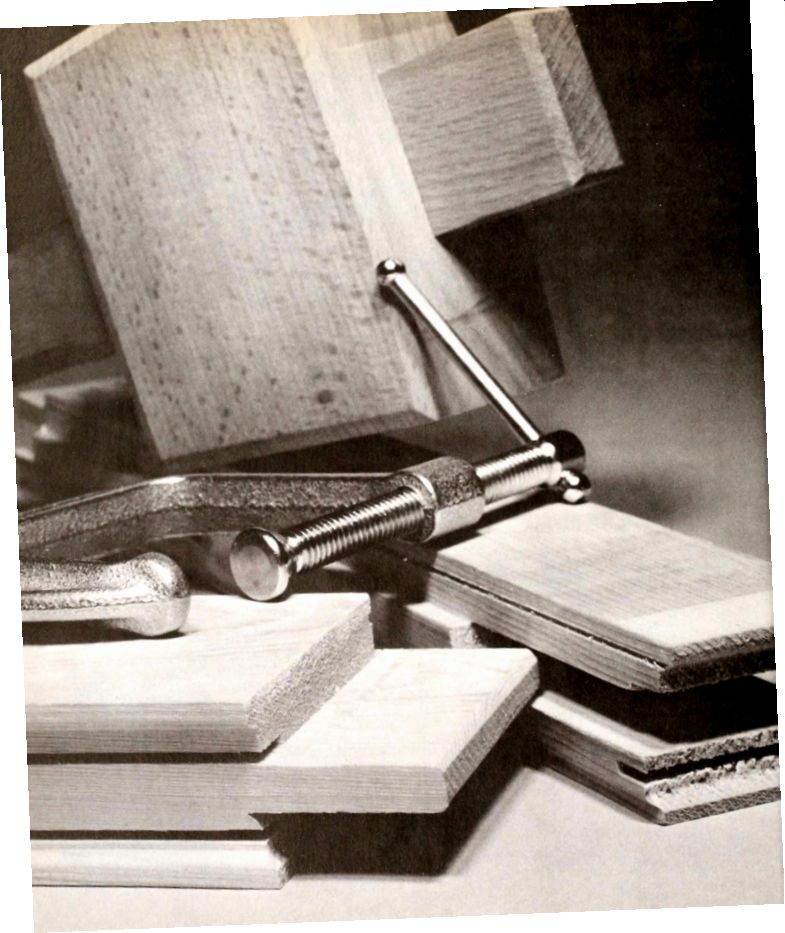
--------- A joint for a window sash. The slot and the projection, factory-cut
in these two boards, lock together in a secure mortise-and-tenon joint.
Years of rough use may loosen such a joint. If this happens, the joint can be separated and the parts coated with glue, tapped back together with a wooden mallet-itself an example of precise joinery-then pressed with a steel clamp until the glue sets and takes tight hold. Until the last century, houses were put together by the ancient art of joinery. One end or edge of a piece of wood was shaped to fit into a mating shape in the end of another piece. The two pieces inter locked like the parts of a jigsaw puzzle, and the stresses of weight, wind and movement , which act to pull apart the elements of a house, were resisted by the shapes of the wood. There were no nails; they were too costly to use for the routine purpose of fastening together parts of a house.
The machine age changed this way of building; metal, not sculpted ends, began to hold together most of the wood in a house. Steel, once costly, became plentiful and cheap. Nails no longer had to be forged and cut by hand but could be mass-produced by the machines that spun out threads of steel and readily chopped them to any length. Over the decades, a bewildering array of metal fasteners has been developed to make flat-faced connections strong and neat, thus saving the time and painstaking labor of sculpting wood ends and edges into interlocking shapes.
There are screws for joints that have to be extra strong, bolts for fastening timbers, corrugated or toothed fasteners to hold delicate pieces of wood, and splines for stair rails. For heavier joints, metal is shaped into framing anchors that strap joists and rafters into place.
There are even special nails that are made to hold extra tight-some of these are coated with resin that heats as the nail is driven into the wood to form an adhesive bond with the wood, while others have spiral shanks to increase their surface area and create more friction with the wood.
Yet for all the versatility of metal fasteners, some wood-shaped joints have survived-and are used today for the same reason that they were developed hundreds of years ago: they hold better. Their extra grip is needed where a small, weak joint, if rigidly connected, might work loose under repeatedly varying loads of changing stresses. Most are factory-made, in parts bought assembled from a mill, and demand attention only if they need to be re-glued or, in rare instances, repaired with a hand-cut replacement part.
The top of a door jamb, for example, is stepped into the side jambs in a rabbet joint, to help resist the twisting force of door slams. In window sashes and doors, mortise-and-tenon joints (opposite) hold against repeated pushes and pulls. Stair treads and risers are made with grooved joints to counter the shifting weight of the people using them. In these and several other joints around the house, metal fasteners must take a secondary role: the skills of the old carpenters, the beauty of shaped wood, and the strength of wood bearing on wood have survived the advances of the machine age.
An Arsenal of Specialized Metal Fasteners
Most joints in wood rely on metal fasteners. Although some joints are held by glue and others are shaped in interlocking parts, nails, screws, bolts and a host of specialized steel connectors give woodworkers the fastest, most efficient means of joinery. So many of these fasteners have been devised that choosing the correct one for a specific job can be difficult. The decision must take into ac count the strength needed for the joint, the possibility that it may have to be unfastened at a later time and the importance of its appearance. For the conventional solution to most problems in joining rough or finish pieces of wood, refer to the chart.
Nails, the most common fasteners, are quick, easy and inexpensive. Like all metal fasteners, they work by friction: a driven nail displaces wood fibers, which clamp the shank in place. However, nails with long, sharp points, though they enter wood easily, may split the fibers apart.
Blunt-pointed nails, either factory-made or blunted on the job, hold better because the blunt point clears a path through the wood and leaves a tight sleeve of un-split fibers around the shank.
Once a nail is in place, two kinds of force can dislodge it. One kind, shearing stress, is exerted at an angle perpendicular to the shank. The other, withdrawal stress, is applied parallel and opposite to the direction of entry. A nail withstands shearing better than withdrawal stress, and should be driven across the grain, so that the main force against it, once it is in place, is shearing force.
Screws have greater holding power than nails do against withdrawal stress because their threads present a larger surface area, creating greater friction with the wood fibers. What is more, they are easy to remove without splintering or gouging wood. But they are more expensive than nails and take more time to install. Before you can screw two pieces of wood together, you must drill one or more pilot holes.
Nuts and bolts are less commonly used than nails and screws, because both ends of the bolt must be accessible, an impossibility in many situations. However, they do form exceptionally tight, strong joints between pieces that are too large for the common fasteners. Still other fasteners are relatively specialized. For finish work, splines, which are thin metal plates, and corrugated or toothed fasteners make tight joints where nails or screws would split the wood, as in counter tops or frames for window screens. In rough construction, shaped metal plates called anchors or framing connectors secure structural members.
Glues, though more common in cabinetmaking than in house carpentry, add to the strength of any metal fastener. Epoxy resin, casein glue, vegetable glue and synthetic resin glue are all commonly used in joining wood.
From Common Nails to Nuts and Bolts
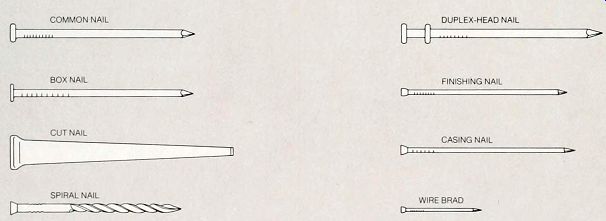
Nails. Common nails are used in general construction; box nails, almost identical, have a thinner shaft and are used on thin boards where splitting is a danger. Common nails and box nails are used for jobs in which the appearance of the surface is not important. Both types are avail able with a resin coating, which heats as the nail is driven and forms an adhesive bond between the nail and the wood. Cut nails have two main uses to join wood to masonry, and to give a rustic appearance when exposed in wood flooring. In tongue-and groove flooring joints, spiral nails are hidden from view but tightly grip the subfloor and the joists below. Duplex-head nails are designed for temporary installations, such as scaffolding and bracing--the top heads, raised above the wood, are easy to grip when the nails are removed.
Finishing nails and casing nails, used in finish work, are almost interchangeable, though the casing nail has a slightly thicker shank and provides greater strength for heavier jobs Both have small heads, which can easily be driven be low the surface of the wood with a nail set The wire brad, smallest nail of all, looks like a finishing nail but has a different system of sizes, it fastens the thinnest pieces of wood.
Nail sizes are usually given in "penny" ratings, which are not easily translated into lengths be cause the ratings arose from the nails' prices per pound in old England. The smallest nails designated in this way are two-penny 1 inch long. The largest are 60-penny-6 inches long-al though nails longer than 20-penny generally are sized in inches. Today many boxes of nails specify length in inches. Nails shorter than two penny are designated in fractions of an inch.

Screws. Screws for woodworking all have sharp threads that taper to a point. They differ in size, head shape and slotting, and some no longer have the traditional smooth shank.
Lag bolts, or lag screws, are the largest screws and are used for heavy work Their square or hexagonal heads are turned by wrenches; some have slots and can be turned by screwdrivers as well Lag bolts are sized in inches for both length and diameter.
Standard wood screws--those with smooth shanks and slotted heads--are available in three head shapes and two slot types. Flat-heads are the most common because they are easily countersunk below the wood surface and covered with putty. Oval-heads and round-heads generally are left exposed for decorative effect. Both single and Phillips slots are equally common; you need a special screwdriver for Phillips screws, but you have better control of the screwhead. Standard screws are sized by diameter in gauge numbers and by length in inches-standard gauges are No 4 (1/8-inch diameter) through No 14 (Winch diameter). Sheet-metal screws, which have threads extending to the heads, also are used in woodworking, especially for attaching plywood panels and hardware They come in the three common head shapes plus a fourth called a pan-head, and have either Phillips or standard slots. They are sized like standard wood screws.
Bolts. Though most common in metalwork, bolts, washers and nuts have important uses in wood construction. Rail bolts, the most specialized, join the rails of a stairway to newel posts and goosenecks. Stove bolts are used to join 2-by-4s for rough shelving, machine and carriage bolts, stronger and heavier, are used in steel reinforced headers.
Bolts are sized by diameter of the thread and by length from the bottom of the head to the end of the bolt. Flat-head stove bolts, however, are measured from the top of the head.

Finishing fasteners. Special fasteners with corrugated
edges or projecting teeth reinforce weak nail joints between butted pieces,
such as counter tops or the mitered corners of window screen frames. Splines,
which are thinner than the others and less obtrusive, are used on thick
pieces in situations where nails or screws would be ugly and insecure-typically
to join two sections of stair rail, end to end.
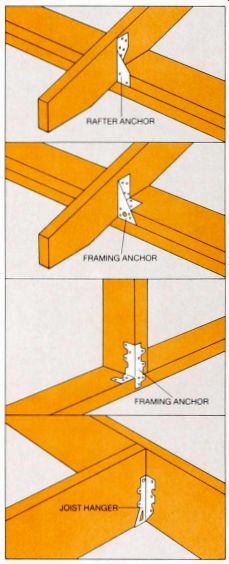
-------- Anchors. Framing anchors come in many shapes, designed for a wide variety of connections Originally developed in the 1940s to strengthen joints of buildings located in hurricane areas, they are increasingly popular because they eliminate toenailing and difficult hammering angles An anchor is fastened to wood by eightpenny common nails or by shorter nails pack aged with the anchor by the manufacturer.

---- A Fastener for Every Job

Matching the fastener to the job. In the first column of this chart,
common fastening jobs in house carpentry are listed alphabetically. The
second column gives the recommended fastener for each job; the third, the
recommended size for the fastener Nail sizes are given in two ways the
traditional "penny notation is written as a numeral and d (the old
British abbreviation for penny); next, in parentheses, is the length in
inches In screw sizes, the first figure is the gauge number, the second
is the length; in carnage-, rail- and lag-bolt sizes, the first figure
is the bolt diameter, the second is the length. The fourth column indicates
the usual placement of the fasteners. and the fifth contains special comments.
Unless otherwise indicated, nails should be face-nailed-that is. driven
straight through the face of one piece and into another piece.
How a Pro Hammers a Nail
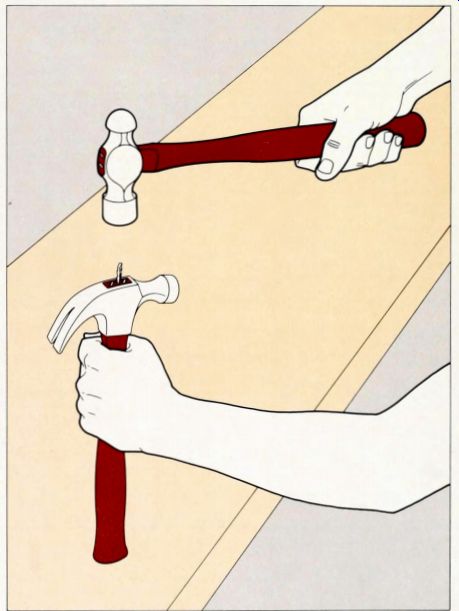
The first hard lesson every amateur carpenter learns is the difficulty of driving a nail straight and true. The skill of the professional comes only with practice, but some basic facts make expertise easier to acquire You need to know how to choose a hammer, how to set the nail at the proper angle and how to adjust your swing to the location of the nail. Even pulling nails involves special techniques.
Good nailing begins with the right hammer. The ones most used for carpentry come with several types of heads and handles and in several weights. A light weight 7- or 13-ounce hammer is best for finish work; it drives finishing nails easily and is less likely to mar trim if its face hits the wood. A heavier 16-ounce hammer can be used for finish as well as framing work, and is the preferred weight for general use; the other common size, 20-ounce, is used solely on framing jobs.
Handles are available in wood, steel and fiberglass, but choosing among them depends less on a specific job than on feel and ease of maintenance. Wooden handles absorb more of the shock of hammering, but they eventually loosen and must be retightened (below). Steel and fiberglass handles rarely come loose, but both vibrate badly when driving large nails; of the two, fiberglass is lighter but occasionally breaks, while steel is virtually indestructible.
The major difference in hammer heads concerns the shape of the claw, which may be curved or straight. The curved type, more common in house carpentry, is better for pulling nails because its head can roll back farther with a nail in its grip.
The straight-claw hammer is used mainly for framing and renovation work; its claw more easily wedges between boards to pry them apart. Some straight-claw hammers-and a few curved-claw models have a cross-checked face that reduces the tendency of the face to slip off a nail but leaves a checked pattern on the wood surface.
Nailing technique varies, not with the type of hammer but with the way the nail is to be driven-into a board face, at an angle for toenailing, or straight through and bent-over for clinch-nailing If you do bend a nail or drive it wrong, do not waste time trying to straighten it-simply pull it out and drive a new one. The claws of a hammer generally will do the pulling job well enough, such specialized tools as a cat's paw and a nail puller make the job faster and easier.
Never forget that hammering is hard on muscles and bones. Carpenters fall prey to the same ailments that affect ten nis players. If, in the course of a job, you feel twinges of pain in an arm or shoulder, stop immediately and rest.
------- Tightening a wooden handle. Use a cold chisel to make a groove
Vie inch deep in the top of the handle, halfway between and parallel with
the fastening wedges already inserted in the handle top at the factory.
Set a new wedge, sold at hardware stores, into the groove and drive it
into the handle with a ball-peen hammer until the wedge barely moves with
each blow; if you drive it further you may split the handle Using a hack
saw, cut all the protruding portion of the wedge flush with the top of
the hammer head.
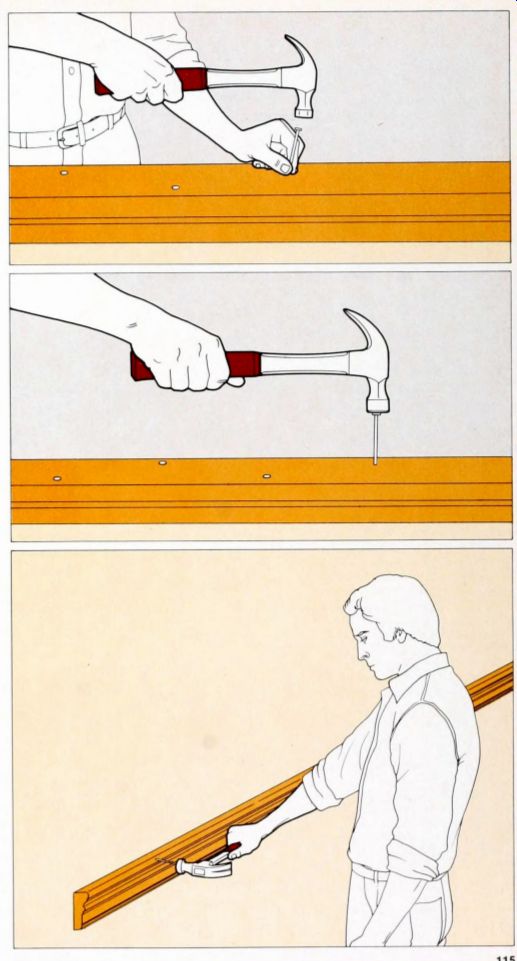
--- Starting the nail. Hold the nail near its tip be tween
your thumb and index finger, angle it about 10° from you-it will straighten
under the hammer blows-and tap it lightly Support the nail with your fingers
until it is driven deep enough into the wood to stand by itself.
--- Driving the nail home. Swing the hammer up to a point just behind your ear; then deliver the blow so that when the hammer strikes the nail its handle is at a 90 deg. angle with the nail shaft, and the nailhead is directly below the center of its face Adjust the force of the last blow to drive the head of the nail flush with the wood surface
--- Nailing out. When you must nail a joint located between knee and shoulder height in a space too restricted for a normal swing, nail horizon tally in front of your body, using a stroke called nailing out Grip the hammer with your thumb on the back of the handle for better control. Hold the hammer with its head in front of you. bend your arm back toward your body and drive the nail by swinging your arm outward.
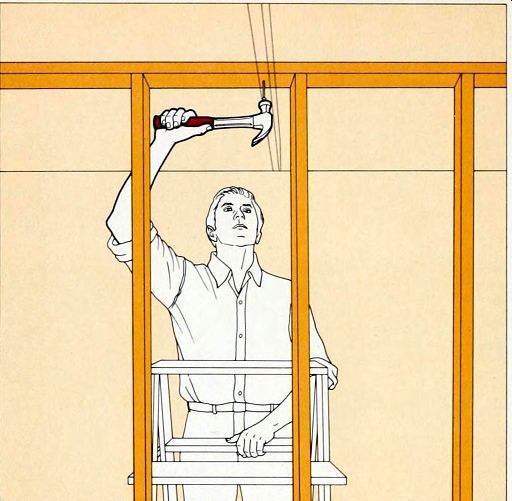
----Nailing up. When the joint you are nailing is above your head, grip the hammer as you would for nailing out and swing your arm upward with a full wrist, elbow and shoulder motion If the work is so high that your arm would be almost fully extended at the end of the swing and the hammer cannot hit the nail squarely, stand on a ladder so that your striking position resembles that shown at right.
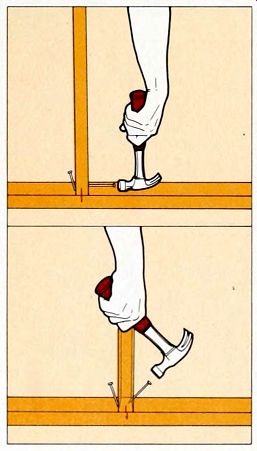
------ Toenailing. To brace the board being toe nailed
(in this example, a stud being fastened to a sole plate), drive a nail
at a 70° angle partway into the joint between two pieces, to make a check
in the accuracy of the final toenails, draw a short straight line along
the middle of the piece being toenailed and onto the second piece Locate
the starting point of the first toenail so that one third of the nail,
if driven at a 45° angle, will he in the piece being toenailed and two
thirds in the second piece, for an eightpenny nail driven into 2-by-4s,
this point is about 1 inch from the end of the piece being toenailed.
Start the nail at a 90° angle ; when you have driven it about 0.5 inch into the wood, tip it up about 45° and drive at that angle until its head dents the wood. If a second nail is needed, drive it in the same way.
Remove the bracing nail and toenail the pieces together on the other side. Check the pencil line; if its two parts have been displaced, hammer one side of the toenailed piece to bring the lines together. In rough framing an error of 0.25 inch is generally acceptable.
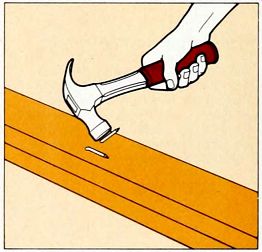
----------Clinch-nailing. To make a composite header or support post by
doubling boards, place the boards face to face and drive through them nails
30 percent longer than their combined thickness. Drive the nailheads flush,
turn the pieces over, set them on a hard, flat surface and hammer the projecting
nail shanks at an angle, bending them as close to the surface as possible.
Align the shanks with the gram for a smoother surface, but across the gram
for a stronger joint. When the shanks are nearly horizontal, strike them
with two or three vertical blows to seat them deeply in the wood
Driving and Setting a Finishing Nail
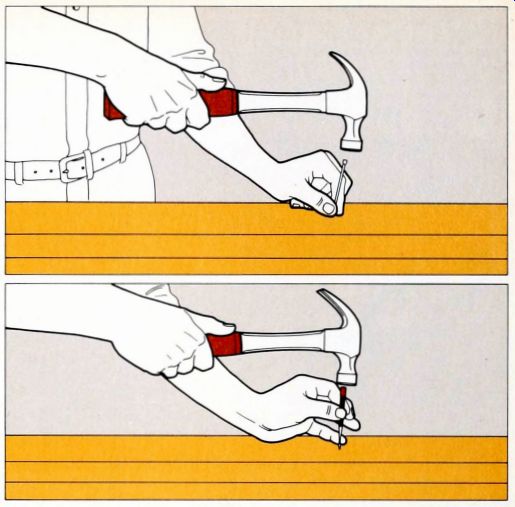
--------1. Starting the nail. Hold the nail as you would for rough work, but wrap your fingers around the hammer handle and set your thumb along the handle as illustrated Hit the nail lightly, supporting it with your fingers until it can stand by itself, then driving it until its head is about Ve inch above the surface of the wood
2. Setting the nail. Hold a nail set near its tip between thumb and index finger and center the recessed tip over the head of the nail. Rest your little finger on the wood to steady your hand, then hit the top of the set solidly with the hammer to drive the head of the nail about Vie inch be low the surface of the wood
Three Ways to Pull a Nail
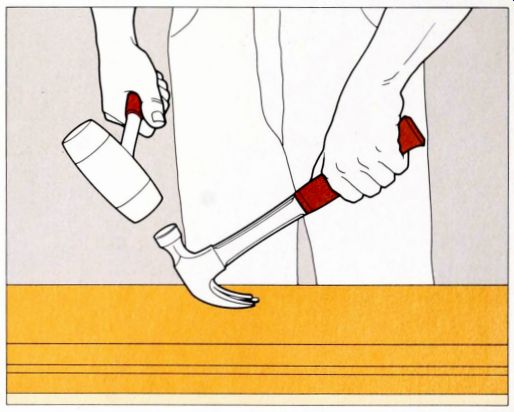
Starting with a curved-claw hammer. If the head of the nail is above the surface of the wood, slip the claw of the hammer around it; if the head is below the surface, set the end of the claw on the wood just next to it and strike the face of the hammer with a mallet until the claw en gages the nailhead Pull the handle of the hammer to a nearly vertical position and disengage the claw from the nailhead
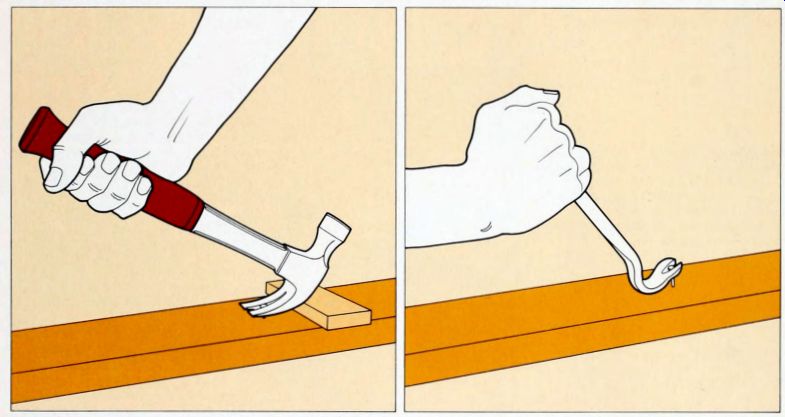
----Freeing a nail with a curved claw. Place a piece of scrap-about as thick as the height of the half-pulled nail above the surface--next to the nail and set the head of the hammer on the scrap. Slip the claw around the nailhead and pull the nail out of the board.
--- Using a cat's paw. The claw of this prybar/ nail puller is set around the head of the nail-if the head is below the surface of the wood, strike the curved section at the back of the tool with a rubber-faced mallet to drive the claw under the head Then pull back on the handle to remove the nail. When you need to pull a nail from finish trim, set a thin piece of scrap under the heel of the cat's paw to protect the wood
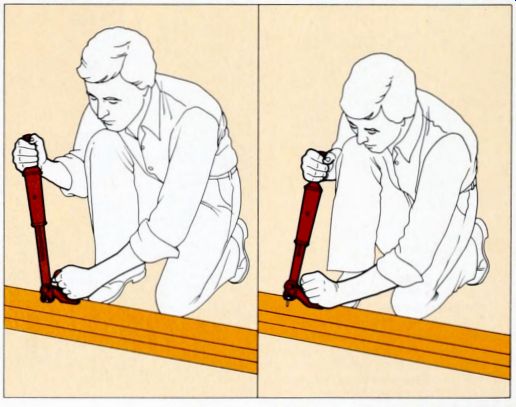
----Using a nail puller. This special tool pulls nails quickly and easily. Position the pincers above the nailhead, opening them so they are slightly wider than the nailhead (right). Hold the handle attached to the pincers, then raise the sliding iron handle and slam it down repeatedly to sink the pincers beneath the nailhead Close the pincers around the head Tilt the pincers sideways (far right), using the short handle attached to the pincers as a lever. Slowly pull the nail.
The Extra Strength of a Wood Screw
As fasteners of wood, screws have several advantages over nails. They bind pieces tighter, they do not mar the surface either entering or exiting, and with the proper pilot holes they do not split wood. But since they take more time and trouble to use than nails, they are re served for joints that need extra strength or precision assembly or that may have to be dismantled.
The fuss involved in installing screws is minimized by using the right tools properly maintained-not only to drive the screws but to drill the holes they require. All screws need at least one hole and some need as many as three. A pilot hole is the only hole required for those screws that are threaded all the way to the head, like sheet-metal screws or the screws often supplied with hardware kits or used for plywood. Other screws require additional holes.
Standard wood screws and lag bolts have smooth shanks between their threads and their heads; to accommodate the shank, a shallow hole slightly wider than the pilot hole is needed. If the screwhead is to be set flush with or below the surface of the wood--a necessity with flat head screws but optional with other types-a still shallower hole, the diameter of the screwhead, is required. A two or three-tier screw hole can be made with regular bits used one after the other, but the special bit called a combination countersink does the entire job in a single step.
A properly drilled hole makes driving a screw easy, if you use a screwdriver of the appropriate type and tip-and it the tip is sharp. The tip must fit snugly into the screwhead slot. Phillips screwdrivers come in three common tip sizes, flat-tip screwdrivers in four tip sizes.
Using the wrong size tip may ruin the slot or dam age the tip.
As important as the right size is sharpness. Rounded edges or ends will cause the screwdriver tip to slip. When wear rounds away the original sharp, straight forms of the tip, restore the original shape with a grinding wheel. Reserve your good, sharp screwdrivers for driving screws, and keep an old one for such odd jobs as opening paint cans and freeing frozen window sashes.
There are many styles and types of screwdrivers to serve special needs. Some have offset right-angle handles, extra short or extra-long shanks, easy-to-grip knob handles, or ratchet drives. A screw driver bit in a brace is useful for driving large screws In tight places.
For speed, a spiral-ratchet screwdriver (sometimes called by the trade name " Yankee") is a useful hand tool unless you are working in a cramped space from screwhead to elbow, you will need more than 2.5 feet for the standard mod el. An electric drill that you have fitted with a screwdriver bit is even faster, but it should be used only where marring the surface of the wood is of no consequence-the bit can chew into the wood if it slips from the screwhead.
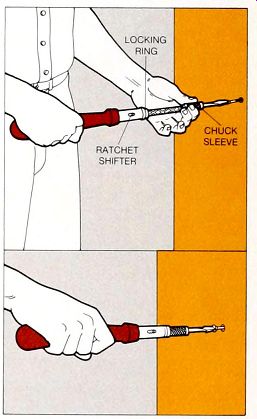
---------Using a spiral-ratchet screwdriver. With the ratchet shifter
forward, hold the chuck sleeve be tween thumb, index and middle fingers
as you insert the bit tip into the screwhead; push the handle forward (below,
top) When the handle meets the sleeve, pull the handle out and push it
forward in repeated strokes When the resistance of the wood makes it difficult
to drive the screw this way, disengage the screwdriver, push the handle
to the chuck sleeve and turn the locking ring counterclockwise.
The screwdriver can now be used like a conventional screwdriver except that its ratchet mechanism can be left in action to ease the job; you can turn your hand and wrist counter clockwise without loosening your grip or removing the bit from the screw.
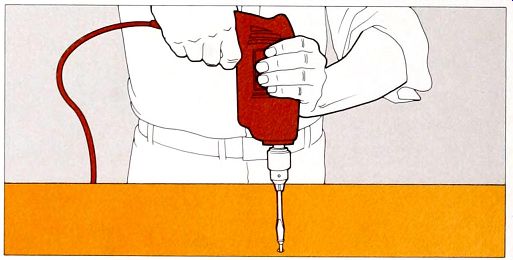
---Using an electric drill. With one hand gripping the drill handle, set
the palm of the other on top of the motor housing for working vertically,
underneath the motor housing for working horizon tally. and drive the screw
at low speed Stop the drill as soon as the screw is in place--additional
revolutions will strip the threads carved in the wood or break off the
screwhead.