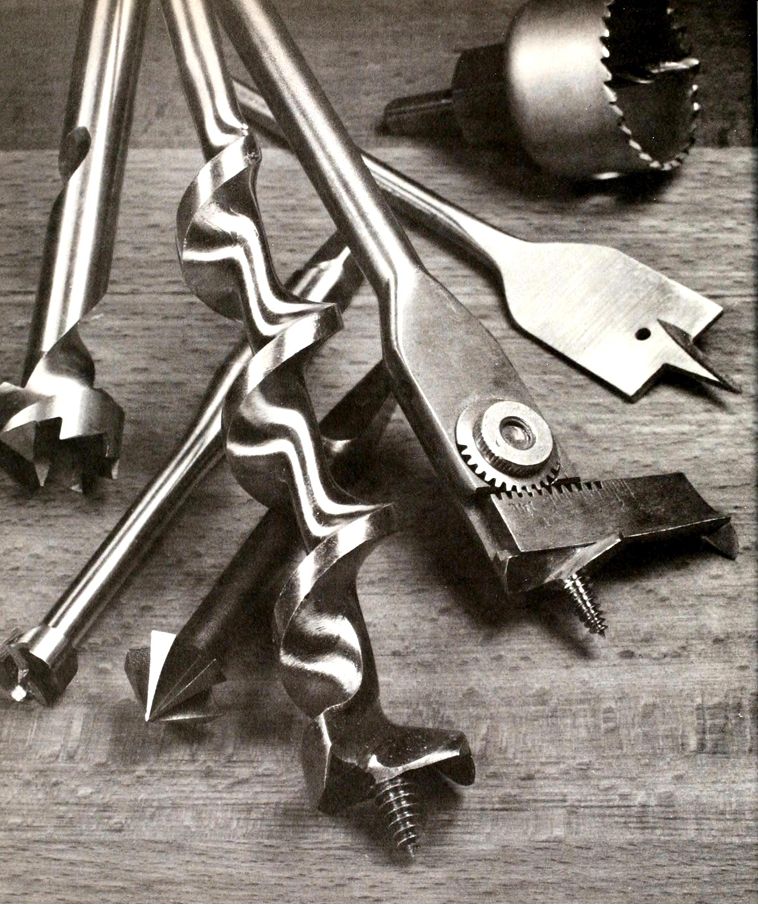
--- A battery of borers. The first three of these seven drill bits,
reading counterclockwise from upper left, are designed to leave a smooth
surface in wood the multi-spur bit cuts plywood without tearing, the Forstner
bit cuts a finished hole with a flat recessed bottom, and the star-shaped
countersink widens the top of a pilot hole. The next two bits make rough
holes the auger bit in cramped spaces, the expansive bit for large holes
For an electric drill, the preferred bits are the spade bit for most holes,
and the hole saw.
--
The American house is riddled with holes. On the average, more than 600 holes are cut through studs, joists and floors as passageways tor pipes and cables; larger holes accept the ducts of a modern heating system; innumerable pilot holes accommodate the screws that fasten every manner of object to wooden surfaces; and wide, shallow holes accept metal hardware.
The tools that carpenters use to make holes today are remarkably like those employed for the last several thousand years. Still essential is the auger bit (left), invented by the Romans, held in a brace with the adjustable chuck that was perfected more than a century ago by the British. For shallow holes, the tool most often chosen is the chisel, which traces its ancestry back to the Stone Age. Even newly designed bits and cutters resemble their ancient predecessors and are based on the same fundamental principles.
What has changed, and changed radically, is the power that drives the bits and cutters: it is now less often muscle power than electricity. Although hand tools continue to be popular--and, for some jobs, necessary--most holes that are drilled today are made with the aid of an electric motor.
The electric drill-heavy, powerful and so fast that many models spin their bits at more than 20 revolutions per second-has taken the tedium out of most drilling and reduced the physical requirements for the job. Unfortunately, it has done so at the expense of accuracy and control. A stationary drill press is a precise tool, but for the portable drills generally used in house carpentry, only drilling jigs can guide a bit to a predetermined depth or hold it firmly in position on a board. Some specialized jigs, like the ones used by locksmiths to make holes in doors, cost hundreds of dollars; most, like the ones shown, are inexpensive and designed for use by home craftsmen; many jigs are homemade. And improvements in the drill itself--a lighter casing, a variable-speed motor and newly designed handles and switches--have restored some of the control that was lost with the advent of electric motors.
Not all holes are made with drill bits, because not all holes are round. Straight-sided holes are best made by blades rather than bits.
Here too, electric power applied to traditional cutters is bringing ease and speed to what had been an arduous job. The large rectangular holes that pass heating and cooling ducts through floors and ceilings are best cut with a power tool-a saber saw or a portable circular saw. And even the shallow rectangular holes, called mortises, that hold door hinges and lock plates, can be cut not only in the old way, with a mallet and chisel, but also with one of the newest power tools of all-the router.
How to Bore Holes Straight, Clean and True
In principle, drilling holes is the simplest operation in carpentry; in practice, it can be one of the most frustrating. No matter how careful your planning and how steady your hand, drilling jobs never quite match the textbook rules: the drill will not fit into the cramped space be tween joists, it veers sideways in a bolt hole that must be perfectly straight, or it whips around and splinters wood as it breaks through a board.
You may be able to avoid these difficulties if you use the right tools and a repertoire of time-tested carpenter's tricks. Filing flat spots on the round shank of a bit will help it stay put in a power-drill chuck, for example, and a homemade guide helps prevent skittering when you drill at a shallow angle.
The basic tool for virtually any drilling task-from making a tiny pilot hole for a wood screw to boring a 2.5-inch opening for a plumbing pipe-is the portable electric drill; the type preferred by most amateurs is the 3/8-inch model that has a variable-speed trigger switch and a reversing switch.
The drill should be equipped with a double-insulating plastic case, which will prevent electrical shock if the bit runs into live electrical wires, and a lock on the reversing switch to prevent you from changing directions while the motor is running. A well-designed drill has its handle at the back of the case and an auxiliary handle to help you counter the twisting torque from a large bit.
On small jobs, particularly in hard-to reach places, you may want to drill holes with hand tools. For pilot holes less than 11/64 inch wide, a particular favorite with carpenters is the push drill (often called a Yankee, a trademark of the company that makes it)--a spring-loaded rod about a foot long, with a set of bits stored in its handle. An old-fashioned "egg-beater" drill can make holes up to inch wide; it is easier to control than a power drill, but takes more time and effort. For larger holes in cramped quarters, such as the spaces between studs or joists, a brace and an auger bit can be handy if the brace has a ratchet mechanism that allows it to turn in tight quarters.
Although a drill press--a large power drill permanently mounted on a stationary stand--seldom is found on commercial construction jobs, it is a workshop tool that can be very helpful in home carpentry. Work must be brought to it, and it cannot handle large panels (the standard 15-inch home drill press can drill to the center of a board 15 inches wide). However, it is faster, more precise and more versatile than other drills, and perfect for repetitious tasks, such as drilling a set of holes for dowels or louvers.
Almost all of these drills have a three jawed chuck, which will accept a bit with a cylindrical or hexagonal shank.
The only exception is the chuck of a brace, which has a pair of jaws, each with a V-shaped notch in the center; it is de signed for the four-sided shank of many auger bits (opposite corners of the bit fit into the notched jaws), but it also will accept a hexagonal shank.
The biggest problem that arises in the course of a drilling job is controlling the bit after it enters the wood. To set the bit for a precise hole, you may need an inexpensive drill guide or a self-centering jig; to control the depth of the hole, you can wrap tape around the bit at the correct depth or use a factory-made metal jig that clamps to the bit. Even with these aids, you occasionally will drill a hole in the wrong place or at the wrong angle. To correct such a mistake, glue a tightly fitting dowel or wooden match stick into the hole, wait for the glue to set , and re-drill the hole from scratch.
Choosing the Right Bit
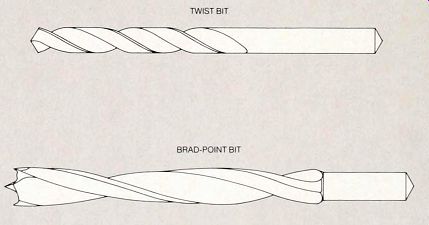
Bits for holes up to 1/2 inch. A twist bit (top)--of ten called a twist drill or simply a drill--is generally manufactured as an all-purpose tool that will drill through plastic and metal as well as wood. Less common is a bit, made especially for wood, that looks exactly like it but has a sharper tip-820 instead of the standard 118°. A brad point bit (bottom)--available in 1/16 inch intervals from 14 to inch--is a special bit that is preferred for dowel holes and exposed woodwork because it cuts a very smooth hole. The point at the center of the shaft guides the bit while sharp lips at the outside actually cut the hole.
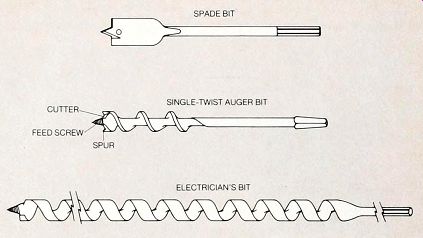
Bits for holes up to 1 inch wide. A spade bit (top), the most versatile and inexpensive of the larger bits, is used with a power drill to cut holes quickly; it tends to wander in deep holes and to leave ragged edges.
The more expensive single-twist auger bit (center) can be used in a hand brace or a power drill; it is slower but easier to control and leaves a cleaner, more precise hole. As this bit is pulled into the wood by a feed screw at the tip, spurs at the outside score the hole edges and horizontal cutters scrape away wood chips.
An electrician's bit (bottom) works on the same principle but is used for deeper holes and rougher work, particularly in the framing of a house, it is more flexible because it has no sol id central shaft, and more durable because it has no cutting spur that can be ruined by nails.
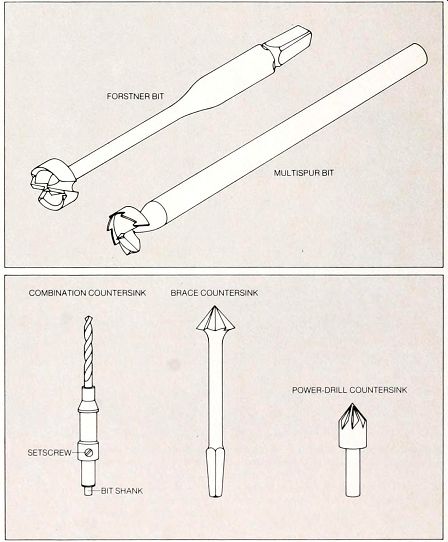
Two special-purpose bits. A Forstner bit has a flat, disc-shaped head that contains sharp cutting edges. It is expensive and slow, but has certain advantages, it can drill into any sort of gram, including end gram, it can drill at an angle to the board face without sliding off because its sharpened outer edges dig into the wood, and it makes an almost perfectly flat-bottomed hole--an advantage when you need a large counter bore or are drilling partway through a board.
A multi-spur bit, used mainly in drill presses, has a sharply pointed tip surrounded by a ring of teeth. It is particularly useful on thin paneling and veneered plywood because it cuts cleanly without shredding the surface.
Countersink bits to recess wood screws. The most common countersink, designed for use with a power drill, is the combination tool (near right) that in one step drills a pilot hole, bevels the top of the hole for a screw-head and. if required. counterbores a hole for a wooden plug Available for screws from No. 6 to No 12, this tool is essentially a hollow tube, slipped over the shank of a twist bit and fastened with a set screw; the depth of the pilot hole is determined by the position of the countersink on the shank.
If a pilot hole already has been drilled, if a screw-head is too large for a combination counter sink or if you need to countersink only a few holes, use an ordinary countersink The traditional type (center) must be used in a hand brace; a newer style (far right) is designed for power drills.
Two Ways to Hold a Power Drill
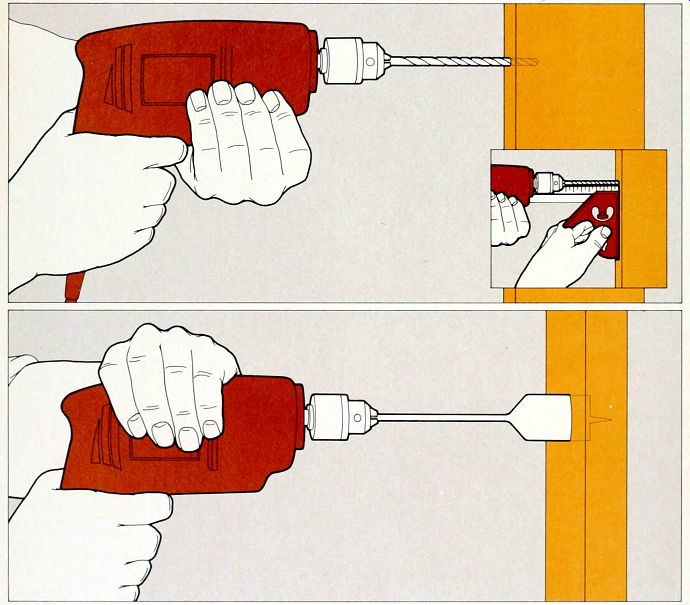
Cradling for a small bit. To start a twist or a brad-point bit. push an awl into the wood at the center mark for the hole. Grip the drill handle with one hand, cradle the underside of the drill with the other and set the point of the bit in the awl hole. Gently press the drill into the wood and squeeze the trigger slowly until the bit starts to turn, When the bit has made a hole that is approximately 1/8 inch deep, increase the speed of the drill to its maximum and bear down firmly. When the bit has drilled almost to the full depth of the board, reduce the pressure but maintain the speed of the drill as the bit bores through the last fraction of an inch. If the hole must be perfectly perpendicular to the surface of the wood, set a combination square against the board and sight the bit against it (inset) or use one of the jigs depicted opposite.
Steadying a large bit. To drive a bit with large cutting edges, such as a spade or Forstner bit, hold the drill handle with one hand and grasp the top of the drill firmly with the other, a grip that resists the twisting tendency of the drill better than the cradling grip illustrated at the top of this page. Press the bit firmly into the awl hole and begin the hole at a fairly high speed.
If the bit binds momentarily, maintain speed but pull the drill back a fraction of an inch, then bear down again (slowing the speed will in crease the tendency to bind). When the bit nears the other side of the board, reduce pressure and brace yourself, the drill may jerk and bind as it breaks through Turn off the drill as soon as the bit is cleanly through the board.
With an auger bit. work at a somewhat slower speed If the motor begins to labor, press the trigger to maintain speed Reduce the drilling speed as you come close to the end of the hole; when the feed screw breaks through the other side, the bit no longer will pull itself into the wood and you must bear down on the bit with additional force to finish boring the hole.
The Use of Hand Drills
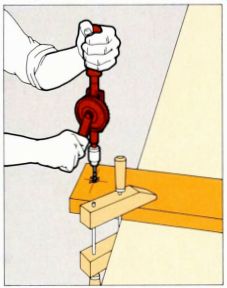
Using an egg-beater drill. For a few small holes,
many carpenters prefer this old-fashioned manual drill. Set the bit point
in an awl hole, press the drill lightly against the wood and turn the
crank clockwise When the bit breaks through the board, continue to crank
clockwise as you pull the bit out-cranking counterclockwise will release
the bit from the chuck.
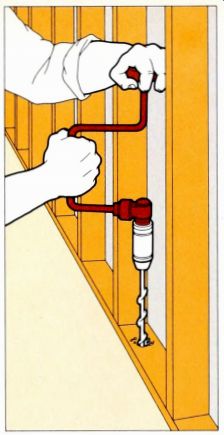
A ratchet brace for cramped quarters. Where there is too
little space to align a power drill properly, use a brace, adjusting the
ratchet set ting of the brace for a clockwise sweep Set the feed screw
of the auger bit into the awl hole, press hard on the brace head with one
hand and slowly swing the handle in half circles with the other until the
feed screw is buried in the wood and the bit begins to bore If the feed
screw does not dig into the wood, make sure you are holding the brace steady;
side-to-side movement loosens the screw.
When the bit breaks through the board, reverse the ratchet adjustment and pull the handle to back the bit out.
Guides and Jigs for Precision Work
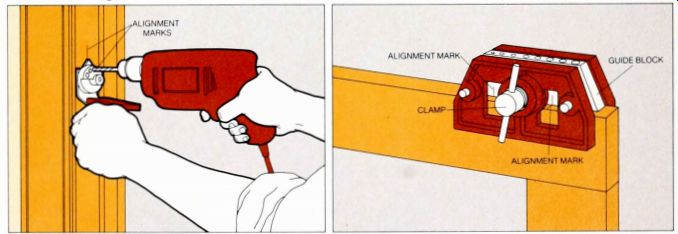
A hand-held drill guide. A revolving selector in this guide has holes of the common sizes of small bits to position a bit for perfect right-angle drilling Marks on the guide can be aligned with marks on the wood to help locate the hole A self centering doweling jig. The guide block of this jig has holes for five common dowel sizes and is automatically centered by a clamp; it sets dowel holes perfectly centered in board edges-as for corner joints on a door To align the jig. mark a square line across the board edge for each hole, line up the matching guide block mark, and tighten the clamp Drill the hole with a twist or a brad-point bit.
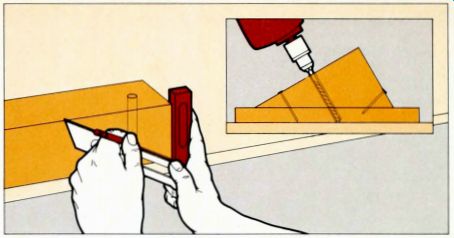
A homemade angle jig. Cut perfectly square ends on a
scrap of 4-by-4 about 1 foot long and, about 1 inch from one end. drill
a hole of the desired diameter at a perfect right angle to the face of
the board. Set a T bevel to the desired angle of the hole you are planning
to drill and hold the handle of the bevel against the end of the board,
so that the cutting edge crosses the path of the bored straight hole; mark
a line along the blade, and an X inside the angle of the T bevel. Using
a miter box, cut the 4-by-4 along the marked line (Step 1).
Temporarily nail the jig to the board you plan to drill, with its sawed face down (inset), and use the hole as a guide for the drill bit.
For Perfect Holes, a Drill Press
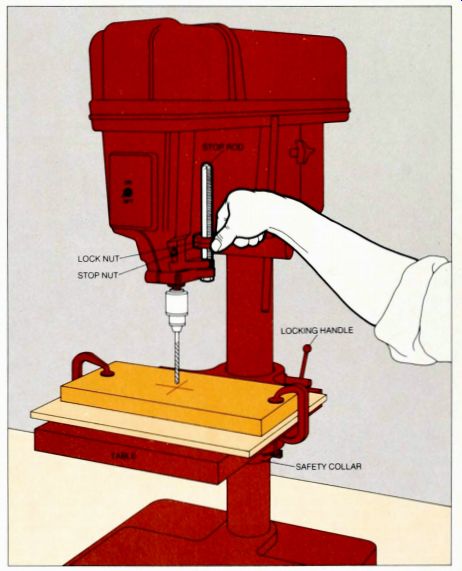
1. Adjusting the table. With the bit in the drill chuck, fasten the board to the drill-press table with C clamps Hold the table and loosen the locking handle that fastens the table to the column, then raise or lower the table by simultaneously lifting it and swinging it from side to side When the tip of the drill bit is about 1.25-inch above the board, tighten the locking handle and move the safety collar on the column to a position just beneath the table. Adjust the stop nut and the lock nut on the calibrated stop rod to set the depth of the planned hole.
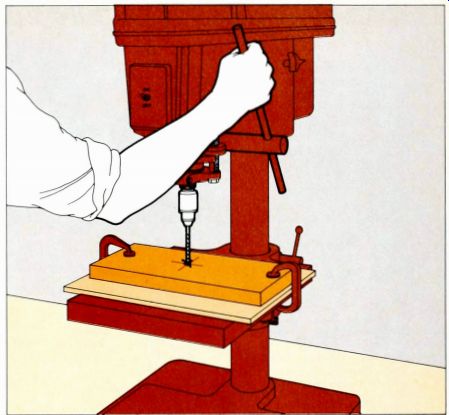
2. Drilling the hole. With the drill off, loosen the
clamps that hold the board and turn the feed lever until the bit almost
touches the wood; then shift the board to clamp it with the center of the
planned hole directly beneath the tip of the bit Let the bit rise to the
stop, turn the motor on and slowly lower the bit into the wood, using light
pressure on the feed lever.
Drill-Press Setups for Angled Holes
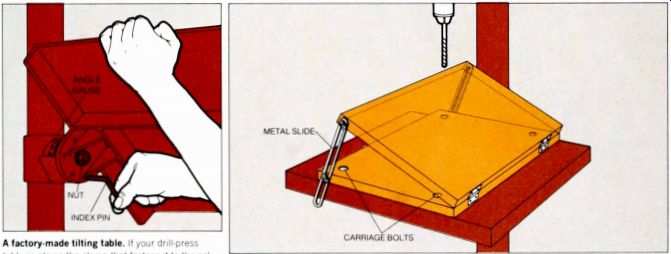
A factory-made tilting table. If your drill-press table pivots on the
clamp that fastens it to the column. as in the model shown here, loosen
the nut at the base of the table; remove the index pin from its hole in
the base and tilt the table to the desired angle. To drill a hole at an
angle of 45°, 90°. 136° or 180°, slide the index pin through the hole for
the angle and tighten the nut, for other angles, set the index pin aside,
align the arrow on the tabletop with the correct reading on the angle gauge
and tighten the nut.
A homemade tilting table. If your machine does not have a tilting table, cut two pieces of 1-by-12 to 9 1/2 by 11 inches; hinge them together lengthwise Set the assembly on the drill press table with the hinges at one side, on the lower board, mark the location of the table's mounting holes. Drill and counterbore a hole at each mark and fasten the board to the table with 0.25-inch carriage bolts and wing nuts
Fasten 8.5 in. metal desk-lid slides to the opposite sides of the boards with wood screws and washers. To use the table, temporarily bolt the lower board to the drill-press table, raise the upper board to the angle you want, checking with a T bevel, then lock the upper board by tightening the wood screws of the slides. Fasten the work to the angled table with C clamps and drill it in the usual way.