Prev.
Four Ways to Make Large Holes
Although the spade and auger bits shown can bore holes as wide as 1.5 inches, most holes more than 1 inch wide are made with a different set of tools. For holes between 1 and 3 inches in diameter, needed mainly for plumbing drains and vents, special bits are used; openings still larger than that-circular for stovepipes and round ducts, rectangular for chimneys, electrical outlets and square ducts--are cut with saws.
The drilled holes ordinarily require an electric drill--either the standard 3/8-inch size or, for particularly wide, deep holes, a 0.5 inch drill, available at rental agencies.
The preferred bits are hole saws-hollow metal cylinders with saw-like teeth, which fit onto a separate shaft called a mandrel (right). Hole saws can be fitted with such accessories as bit extensions-some as long as 4 feet-for very deep or inaccessible holes. If you must drill an odd-sized hole or lack the right hole saw for a standard one, you can substitute a brace and an expansive bit (bottom), which has a cutter adjustable to a range of diameters.
For sawing holes, the keyhole saw will serve, but a faster, more common tool is a saber saw, used free hand or with a yoke-like guide that guarantees perfect circles. A saber saw also can be used for large rectangular holes, but professional carpenters prefer a portable circular saw; to start each side of the cut, they "plunge" the blade of the saw into the middle of a panel, making what is called a pocket cut, then finish the side of the opening by using the saw in the normal way.
Bits for Holes Up to 3 Inches Wide
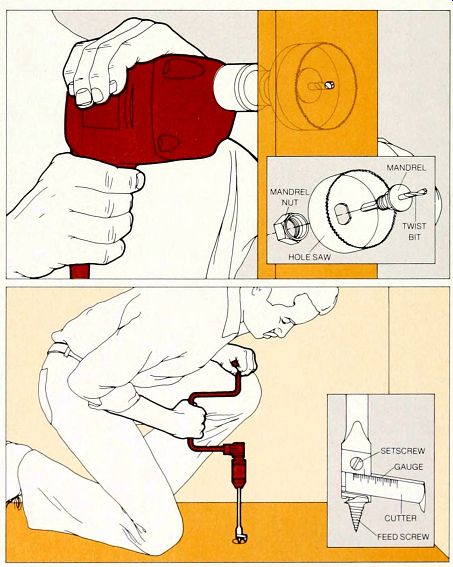
A hole saw. Slide the mandrel through the center of the hole saw (inset) and secure it with the mandrel nut (on some large saws, the mandrel screws into the hole saw), then clamp the shank of the mandrel in the chuck of the drill Mark the center of the hole with an awl and start the hole with the twist bit at the end of the mandrel; when the saw begins to cut, grasp the drill firmly to resist its twist. When the twist bit breaks through the wood, withdraw the saw and finish the job from the other side.
An expansive bit. Loosen the setscrew at the head of the bit (inset) and slide the cutter along its groove to the diameter of the desired hole, as indicated on the cutter gauge, then tighten the setscrew; if precision is essential to the job, check the cutter setting by drilling a trial hole.
Use the bit as you would an auger bit but take special pains to keep the brace perfectly vertical, so that the cutter shaves away the wood evenly. As the hole deepens, bear down hard on the brace; otherwise the feed screw will strip out of the wood and stop pulling.
Saws for Openings Any Size You Need
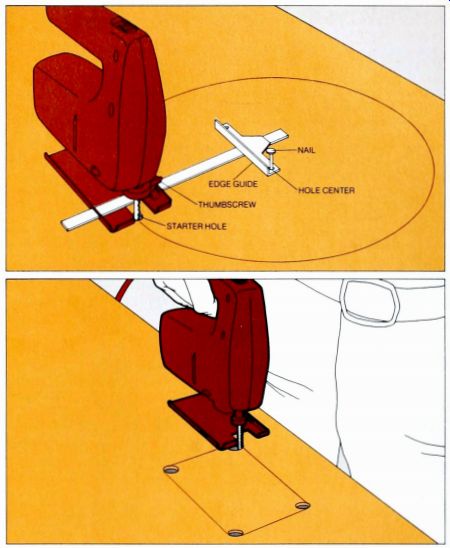
A saber-saw guide for a perfect circle. One end of the guide at right is fastened to the center of a planned hole, and the other is fastened to a saber saw To set up the guide, drill a 1/4-inch hole at a point on the edge of the planned hole and insert the saber-saw blade in this starter hole Slide the guide through the slots in the saw shoe, drive a nail through one of the holes at the end of the guide into the exact center of the planned hole and clamp the guide to the saw shoe. Start the saw and cut the hole by pivoting the guide around the nail.
A rectangular hole with a saber saw. For a hole less than 8 inches on a side, mark the outline of the hole with a pencil and combination square and drill a 0.25-mch hole at each corner Insert the saw blade in one hole and cut along the outline; at each corner, turn the saw oft and turn it to cut the adjacent side of the rectangle.
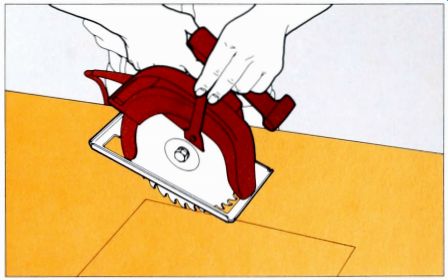
A rectangular hole with a circular saw. To cut a hole more
than 8 inches to a side, set the blade of the saw 0.25 inch deeper than the
thickness of the wood. Rest the toe of the saw on the wood, holding the heel
and blade above the wood Retract the blade guard with your free hand and
align the blade directly above one side of the hole; then start the saw,
slowly lower the blade into the wood until the base plate rests flat on the
wood and cut to the corner of the hole.
Caution: This is the most dangerous part of the job, hold the saw with special firmness and be prepared to turn it off immediately if it goes out of control Remove the saw and cut the other sides of the hole in the same way Where precision is important, stop your cuts short of the corners and finish them with a keyhole saw.
The Rectangular Holes Called Mortises
There are several kinds of the rectangular holes called mortises, and the kind you have to make determines the tools and techniques you should use. Some mortises are precise but shallow, like the re cess that houses a hinge. Others are rough and deep, like the pocket for the end of a hand-hewn beam. Still others are both precise and deep, like mortises in door and window joints.
The most common tool for both deep and shallow mortises is a chisel. However, shallow mortises are cut quickly and accurately by a router (the router gives round corners, but you can buy round cornered hinges and other hardware to fit router-cut mortises). Deep mortises are made with a drill and a chisel, a mal let and a special mortise chisel, or a mortiser--an attachment for a drill press that performs the seemingly impossible feat of drilling a square hole.
The best all-around chisel, called a heavy-duty butt chisel, has a metal cap at the end of a solid plastic handle and can safely be pounded with a hammer. One face of the blade is flat; the other is beveled along the sides as well as on the cutting edge. This sturdy tool is some times called "everlasting " by carpenters, because it is virtually indestructible in normal use and can be sharpened again and again.
For deep precision mortising, however, as in the joints of window sashes or panel doors, the quickest and simplest tool is the special mortise chisel, which must be used with a large, rectangular wooden mallet. Together they cut and pry out wood in a single step, generally for a mortise exactly as wide as the chisel blade. Long, thick and heavy, the mortise chisel can take hard mallet blows without twisting as it enters the wood, and the mortise it makes is so smooth that it rarely needs paring.
More expensive but most precise of all for accurate deep mortises is the mortise attachment on a drill press. Fortunately, one size will do many jobs-depth is adjustable, and it is possible, by boring square adjoining holes, to build mortises of any width or length. The attachment is easy to use, even without much practice, and it is fast , speeding the tedious job of making many mortises in a single spell of work. However, the time required to set up the attachment makes it slower to use than a mortise chisel when only a few mortises are needed.
Chiseling a Shallow Mortise
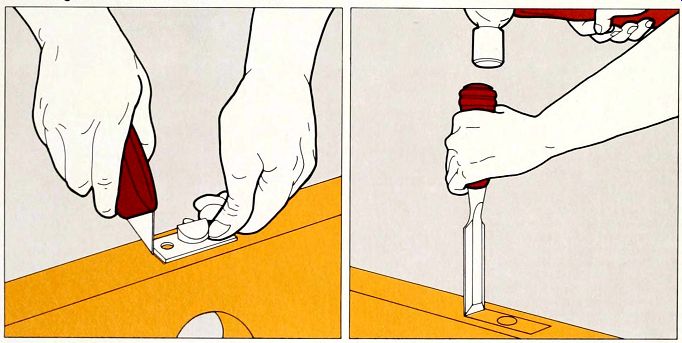
1. Marking the mortise. Press the hardware-in this example, the faceplate of a door catch against the wood and score along its edges with a utility knife, using repeated light strokes to cut the wood fiber so that the chisel will be less likely to splinter the surface. If the mortise will be open on one side, as for a door hinge, mark the mortise depth on the open side with a marking gauge.
2. Cutting the edges. Set a heavy-duty butt chisel to the wood, with its bevel facing into the out lined area and its cutting edge on the score line. Holding the blade vertical, tap the chisel with a hammer. Cut slightly deeper than the thickness of the hardware-you can gauge the depth of the cut directly on the chisel blade by holding a thumbnail at the junction of the blade and the wood, then pulling the chisel out of the cut. Repeat the cuts along all the score lines.
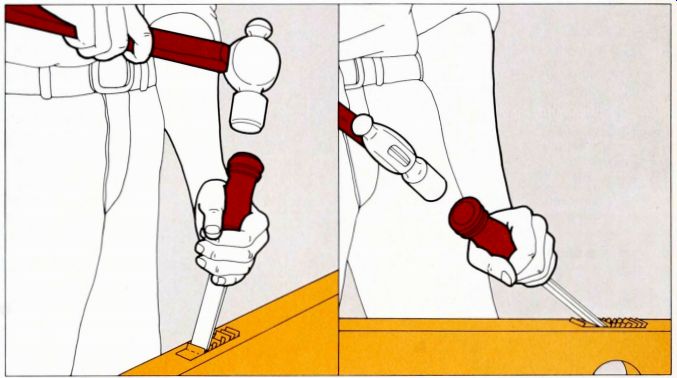
3. Scoring. Set the blade vertically across the outlined area,
about 0.25 inch from one end. with the bevel facing outward, then slant the
chisel slightly toward the bevel side and away from your hammer hand. Tap
the chisel to a depth slightly less than the thickness of the hardware. Repeat
this cut at 3/8-inch intervals to within 0.25 inch of the far end of the
mortise (left). Reverse the chisel and remove the 3/8-inch chips, holding
the chisel so that the bevel is almost horizontal and is at the full depth
of the mortise (right). Finally, reverse the chisel a second time to clear
out the far end of the mortise
Finishing the Mortise
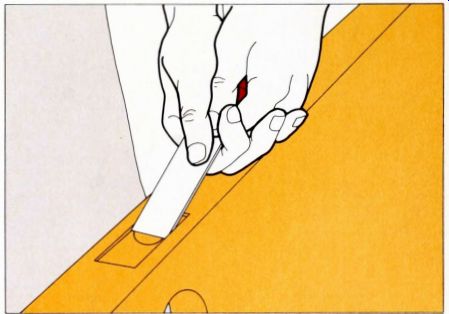
Paring a closed mortise. Hold the chisel, bevel down, with the heel of one hand against the end of the handle and the thumb of the other on the flat side of the blade. Make light shaving strokes parallel to the gram along the bottom of the mortise so that you produce a smooth, even surface Test-fit the hardware occasionally to check the depth of the mortise.
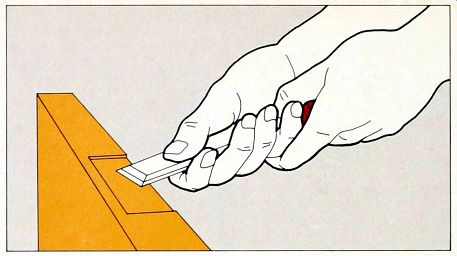
Paring an open mortise. Position the chisel, bevel up, at the open side
of the mortise, setting the flat side of the blade even with the mortise
bottom. Grip the chisel as you would for a closed mortise, holding the
index finger of your forward hand as far back from the cutting edge as
the width of the mortise, so that on each stroke, you can stop the blade
when the edge reaches the far side. Make light shaving strokes, working
at about an 80° angle to the gram.
Routing a Shallow Mortise
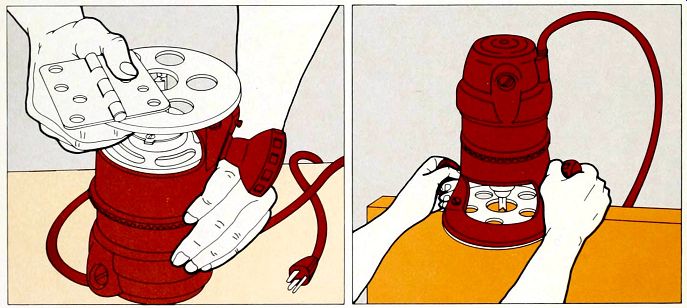
1. Setting the bit. Fit a straight bit in a router, hold the router with its bottom up. and set the hardware alongside the bit as a guide for adjusting the cutting depth. Score the outline and cut the edges of the mortise (Steps 1 and 2) If you plan to leave the corners round for round-cornered hardware, use especially light strokes at the corners--if the knife point is pressed too hard, it will tend to follow a straight path between fibers and stray from the rounded outlines.
2. Routing out the wood. For a closed mortise, set the router bit over the board at the center of the mortise outline, with the router slightly tilted; turn on the motor and lower the bit into the wood. For an open mortise, start the cut at the edge of the board, middle With the base plate flat on the wood, guide the bit to remove the wood within the outlined area As you work, try to keep the outline marks be tween the bit and your line of vision, but do not lean completely over the router. For a closed mortise, you may have to interrupt your work and move over to the opposite side of the board to finish the job.
If you need to have square corners in your mortise, use a chisel to square off the rounded corners that are left by the router.
A Mortise in Rough Lumber
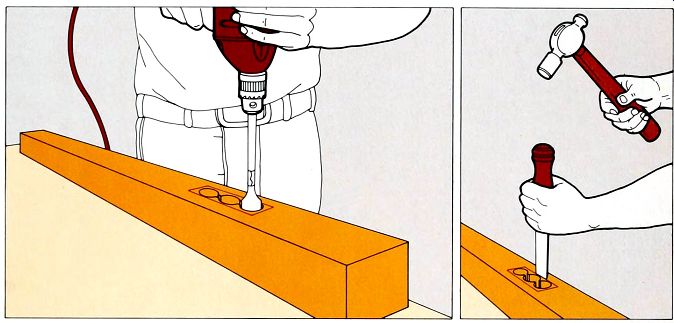
1. Starting with a drill. Choose a drill bit as close in size to the mortise width as you can, mark the bit shank with tape for the mortise depth, and drill repeatedly inside the mortise outline Locate the holes to barely touch one another and to come within Vie inch of the outline of the mortise.
2. Finishing with a chisel. Remove most of the remaining wood with a heavy-duty butt chisel and a hammer, holding the chisel vertical with the bevel facing out of the mortise. Then hold the chisel in two hands with the bevel facing into the mortise and pare the sides roughly vertical.
Cutting Deep Holes with a Mortise Chisel
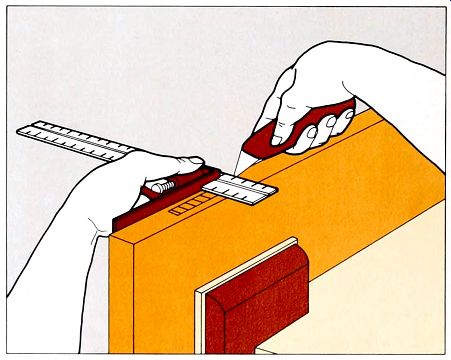
1. Marking the mortise. To fit the mortise precisely to the width of the chisel blade, mark it with precision tools: outline the sides with a mortising gauge, and the ends with a combi nation square and a utility knife; then use the knife and square to score a series of lines across the outline. Score the first line across the center of the outline and score lines 1/8 inch to each side, then, working toward the ends of the mortise, score lines at 3/8-inch intervals, with the last lines about 1/8 inch from the ends.
Use tape to mark the depth of the mortise on the back and front of the mortise-chisel blade.
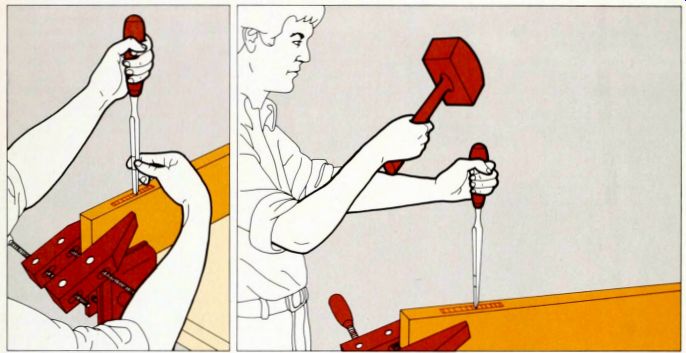
2. Aligning the chisel. Use a chisel that is exactly as wide as the mortise. Standing at one end of the mortise outline, hold the handle with one hand and use the other to set the blade, bevel facing away, in the center score line. Check to be sure that the sides of the chisel align with the sides of the outline.
3. Cutting. Hold the chisel blade exactly vertical and strike the end of the handle hard, using a wooden mallet with a large rectangular head, until the bevel is driven into the wood Remove the chisel, turn the bevel to face you, and align the cutting edge with the first score line on your side of the center line. Drive the entire bevel into the wood, then pull the handle down and to ward you to pry out a chip. Turn the chisel again, align it with the first score line on the far side of the center line, and repeat the procedure. Continue making cuts until you reach the full depth of the mortise and have cut to within Ve inch of the outline ends. To finish the mortise, turn the bevel to face inside the mortise and tap lightly with the mallet until the ends are vertical.
Drilling Square Holes with a Drill-Press Mortiser
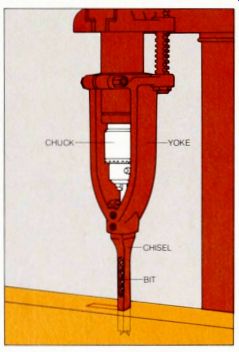
A motising attachment. In the assembly at right, a yoke clamped to the neck of a drill press holds a square, hollow chisel below the chuck of the press. The chuck itself holds a specialized drill bit that turns within the chisel While the tip of the bit cuts a round hole, the chisel chops corners on each side, and the auger-like shaft of the bit forces wood chips up and out through a slot in the front of the chisel. The depth adjustment of the drill press sets the depth of the mortise; long or wide mortises are made by drilling square holes side by side.
===========
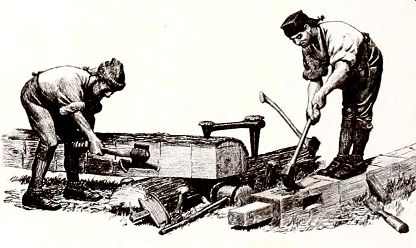
How the Housewright Hand-Hews Beams
On the American frontier, a woodworker began at the source of his material -- the tree. He made his own lumber from scratch with two axes: a poleax to fell the tree and make rough kerfs in the log, and a broadax to slice away wood between kerfs and square the sides. The poleax has a straight handle and a head weighing about 4.5 pounds, while the broadax has a curved handle (to keep knuckles from being skinned on wood) and a heavier head.
The lumber-making process began with selection of the tree; the housewright judged the size of the log from the smaller end of the trunk. Pine and oak were the woods most often used for log homes; weather-resistant walnut or locust were sometimes used for sill logs. The best trees were saved for floor joists and shingles, which have to be straight.
After felling his log, the housewright cut a rounded depression called a saddle notch at the larger end of the log, then rolled the log over and raised it on two smaller logs called saddle blocks.
The notch on the underside kept the log steady during the shaping process, and placing the log off the ground ensured that the ax would not strike the ground and ruin its edge (resharpening might take half a day).
The housewright next marked the sides of the log for hewing, using the equivalent of today's chalk line-a string dipped in a tin cup of berry juice, preferably from the deep-purple poke berry. His skill and sense of balance then were revealed as he mounted the log, spread his feet apart, swung his poleax above his head and brought the ax down into the side of the log to score a kerf. He swung his ax repeatedly, sidestepping his way down the log and scoring kerfs in a smooth, fluid motion.
To hew the kerfed beam square and smooth, the housewright next placed one knee on the log and worked his way down its length, shaving off sections with his broadax. The bark which was left on the top and bottom of the log-helped to hold the ax head against the wood and kept it from ricocheting dangerously.
The knack of using these tools to convert a tree into a neatly hand-hewn beam is all but lost. It is kept alive by a few modern housewrights, such as Douglas Reed of Sharpsburg, Maryland, who has helped restore a number of historic log buildings in that area. "To day we have some awkward notion that hand-hewn beams should look as if a madman butchered them, " says Reed.
But in the days of the early settlers, he points out, a beam that had been skill fully hewn with an ax came out looking as smooth as if it had been finished with an adz. A seasoned workman sought to leave half the pokeberry mark visible on the log after hewing and the best did.
===========
Professional Methods for Sharpening Drill Bits
Drilling with a dull bit lakes unnecessary time and effort; worse, it can break the bit, cause the drill to slip or ruin a drill motor. Small, inexpensive bits should be discarded and replaced when dull; larger, more costly bits should be sharpened.
And though a professional sharpener can do the job for you, you can easily learn to do a professional job yourself.
Part of the job consists in knowing exactly how the bit was shaped to begin with-the lengths and angles of the cut ting edges on the tip of the bit. These anatomical details are as important as the sharpness of the bit: a bit with unequal cutting edges will work off-center and cut an oversized hole; a bit with inadequate clearance between its head and shaft will bind and overheat.
Bits with delicate edges and complex anatomies must be sharpened by hand, preferably with files and whetstones especially fitted to the particular bit. An auger-bit file and a whetstone, for example, will hone the cutting edges of an auger bit without damaging the adjacent parts. (Since most brand-new auger bits should get a preliminary sharpening be fore their first use, these tools are a worthwhile investment.) Triangular stones and files are ideal for sharpening the fluted edges of a countersink bit.
To restore the cutting edges of twist and spade bits--the ones generally used with an electric drill--you will need a grinding wheel with a tool rest and a few simple accessories. A homemade jig (opposite, bottom) sets the correct angles for a twist bit, and a drill gauge-essentially a combination of a protractor and a ruler checks the angles and lip lengths of the sharpened bit; a stop collar that sets a bit firmly against the tool rest enables you to grind the wings of a spade bit symmetrically.
Caution: The innocent-looking grinding wheel is a dangerous tool because its high-speed rotation-generally more than 3500 rpm-generates powerful centrifugal force. It can strike off fast moving, hot bits of metal and if dam aged, it can disintegrate, exploding like a grenade in a shower of lethal fragments.
When using one, follow all safety precautions (opposite, right). If you are buying a new wheel, choose a 5- to 7-inch aluminum oxide wheel with a grit rating of 100 and a vitrified, or glasslike, bond (the bond is the medium used to form the grains of abrasive material into a stable wheel). Before mounting the wheel, check it visually for cracks or chips, then suspend it on a dowel or pencil inserted through the center hole and tap it lightly with a wooden mallet or screwdriver handle. Unless it is a wheel bonded with rubber or organic material, you should hear a clear metallic ring. If it is chipped or cracked or fails to ring clearly, replace it.
After mounting and using the wheel, check it periodically for roundness and wear. A shiny, glazed look indicates that the pores of the wheel are clogged with metal dust and particles. A glazed wheel will overheat and ruin a bit applied to it; you can recondition the wheel with a tool called a star-wheel dresser, which hooks on the tool rest and scrapes the wheel face with sharp, star-shaped steel teeth. Do not dress a wheel down more than 1 inch below its original diameter.
Between sharpenings, store your bits in partitioned boxes or in canvas rolls, and clean them regularly to retard the dulling process. Use fine sandpaper or an emery cloth to remove rust and wood sap. To clean the twist of a bit, dip a short length of manila rope in kerosene, then in powdered pumice (available at drugstores), and wrap it around the flutes; to clean the screw point of an auger bit, use a piece of stiff paper, such as an index card.
Cutting Angles of Basic Bits
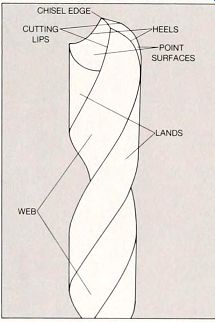
A twist bit. Two ridges called "lands" spiral around the central shaft, or web, of a twist bit At the cutting end, the lands are ground to meet at an angle of 118° (82° on some special wood bits), forming two flats, called point surfaces, that converge along a center chisel edge The front edge of each point surface, called the cutting hp, is slightly higher than the back edge, or heel. The clearance between the two allows the body of the bit to follow easily behind the lips as they cut away wood, the shavings move along the spirals of the lands and out of the hole.
The cutting lips are naturally the first parts of the bit to dull-the edges of the lips become slightly rounded, their clearance above the heels decreases and the bit binds and overheats.

----- A
spade bit. This flat-bladed bit has a point, or spur, that bites
into the wood and steadies the bit on center while winglike cutting lips
chisel the hole The edges of the lips and the spur are beveled at an angle
of 8°; on most spade bits the lips are perpendicular to the axis of the
bit, but in some they are set at an angle On a dull spade bit the bevels
are slightly rounded and the cutting lips slightly unequal and out of line
An auger bit. A central screw point draws the auger bit into the wood;
at the edge of the hole, spurs score the wood ahead of the cutting lips,
which cut wood within the scored circle.
The twisted throat carries chips out of the hole The bit should be sharpened when the edges of the spurs and cutting lips are dull or chipped The spurs should project far enough to score the wood fibers thoroughly before the cutting lips make contact; the lips should be equal in length and beveled in the same plane.
---
Safety Tips for Grinding Wheels:
- Do not use a grinder without lowering the safety shield over your work; wear goggles also.
- Check a wheel carefully for cracks or chips before mounting it, and do not use a wheel that has been dropped, even if you cannot see any damage.
- Mount a wheel with the correct met al flanges and paper discs, called blotters, and use a wrench to tighten the wheel nuts just enough to keep the wheel from slipping.
- Do not use a grinder without a wheel guard that covers at least three fourths of the wheel circumference.
- Stand to one side when you start the grinder, and let it come to a steady speed before using it.
- Do not grind a drill bit on the side of a wheel; use only the face.
- Do not leave a gap greater than 1/8 inch between the tool rest and the face of the wheel.
- If the motor labors or slows or the bit gets very hot, stop grinding immediately; when you resume work, apply less pressure to the bit.
----
Grinding a Twist Bit
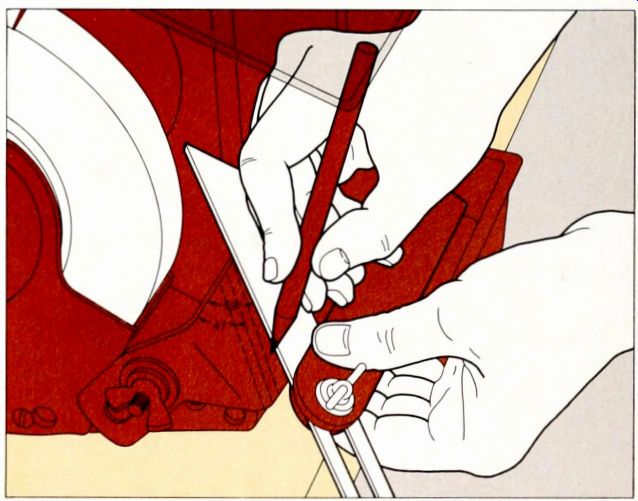
1. Setting up a guide block. Use a T-bevel and a pencil to draw a line across the tool rest of the grinding wheel at an angle to the face of the wheel that is half of the correct angle for the bit tip-for most twist bits, set the T bevel to 59°; for special wood bits, to 41°. To the left of this line, at 1/4-inch intervals, lay out several parallel lines at an angle 12° less than the first-usually this will be a 47° angle Use a C clamp to se cure a small block of wood to the tool rest, at the right of and flush with the 59° line For twist bits smaller than 1/8 inch, omit the parallel lines but adjust the tool rest so that the back edge is 12° lower than the front edge.
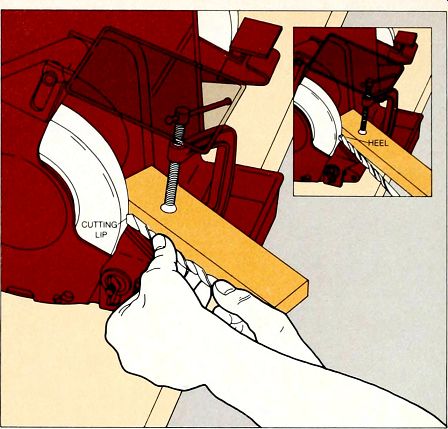
2. Grinding the bit. Wearing safety goggles or a face mask, start the motor and let the grinding wheel run until it reaches a steady speed Hold the shank of the twist bit in your right hand and use your left to position the bit against the guide block with one cutting hp perfectly horizontal. Slowly move the bit forward until it makes contact with the wheel, then simultaneously rotate the shank of the bit clockwise and swing the entire bit parallel to the 47° lines. Time the movements so that when the bit reaches the 49° position you have rolled from the cutting hp to the heel of a point surface (inset).
Position the bit with the other cutting hp horizontal and grind the second point surface in the same way. Alternate the passes between the point surfaces, grinding each equally until the bit is sharp. After each two or three passes, stop to cool the bit.
Position a bit smaller than 1/8 inch in the same way, but do not swing or rotate the bit.
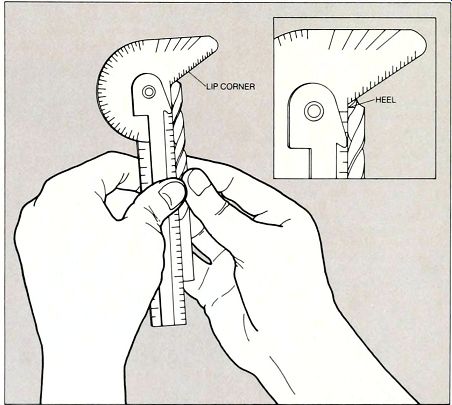
3. Checking the bit. Set the bit in the hp corner of a drill gauge to compare the lengths of the cut ting lips, then turn the bit slightly to check the clearance at the heels (inset). If the lips or clearances are unequal, re-grind the bit.
Correcting the Bevel of a Spade Bit
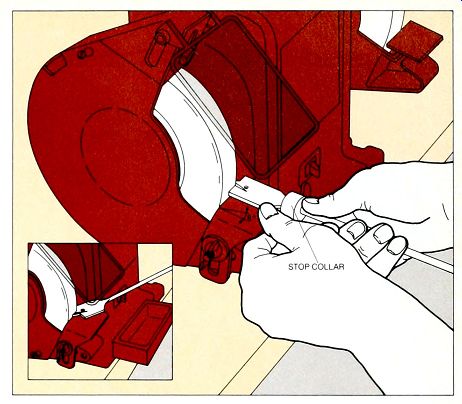
---Grinding the edge bevels. Set the tool rest at an angle of 8° to the horizontal, with the higher end facing the grinding wheel, and tighten a stop collar on the shank of a spade bit so that when the stop bears against the edge of the rest, the bit's cutting lips will bear against the wheel face Hold the bit flat on the tool rest and apply a cutting lip, bevel facing down, to the wheel face When one lip has been ground, flip the bit to grind the other lip. To grind the bevels at the edges of the spur, swing the bit about 90° and guide it against the wheel freehand (inset). Flip the bit to grind the opposite spur edge, taking care to grind both edges equally so that the spur remains centered.
Remove burrs on the spurs and lips with one or two light strokes of a whetstone on the flat faces.
Filing Auger Bits and Countersinks
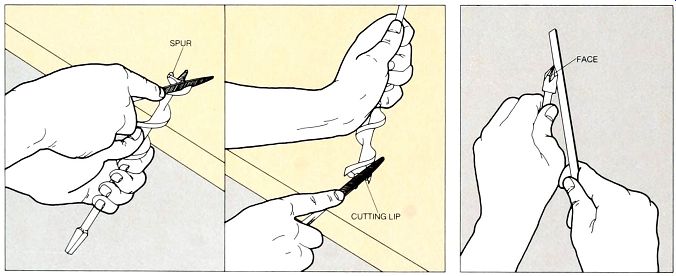
An auger bit. Hold the throat of the bit against the edge of a worktable so that the cutting head projects above the table, and make straight, even, pushing strokes with an auger-bjt file to sharpen the inside edge of each spur (left). Do not file the outsides of the spurs, as this will reduce the size of the hole that the head bores and cause the shaft of the bit to bind. Rest the head of the bit on the worktable and file the top of the cut ting lips to a sharp edge beveled at about 45° (right). Take special care to file bevels that are equal in length and angle, and be sure that you do not undercut the base of the screw point Do not file the underside of the cutting lips, next to the screw point.
To complete the job, lightly whet the filed edges with an auger-bit whetstone.
A countersink bit. Holding the bit in your hand, use a small triangular whetstone to sharpen the faces of the fluted cutting edges with light, even strokes, take special care to keep the stone flat against each face Do not sharpen the backs of the cutting edges, as this may alter their height so that they will not cut, but complete the job by removing the burr from each back with a single, light stroke of the stone.