Panels: Awkward Sizes and Difficult Materials
Much carpentry today requires the cut ting of large, awkward and refractory panels. Subflooring. roof sheathing and cupboards are now made almost always of plywood or particleboard, and commonly used interior doors are covered with particleboard (even paneled doors are of particleboard with molded panels).
Panels are difficult to cut partly be cause of their size but also because of their composition. The glues and binders that hold together the veneer layers of plywood or the chopped-up wood in particleboard quickly dull saw blades.
The big problem, however, is size. To hold clumsily large pieces, you need a firm work surface; to make a long cut straight, you need a guide.
Two sturdy sawhorses alone provide support when crosscutting with a circular saw, but ripping requires additional stiffeners--two 2-by-4s that prevent the panel from sagging as the saw passes along the panel's midsection. With a radial arm saw, use two outrigger tables bolted to the floor; smooth tops reduce friction as the panels move past the blade. A third outrigger table helps when cutting many panels--it supports the waste piece and lets one person do the entire job.
Straightedge guides are equally important. A radial arm saw already has one the fence--that is convenient for ripping, but needs the help of two others, made of scrap, for large crosscutting jobs. You can make a guide for a circular saw, using the perfectly square factory-cut edge of a piece of particleboard. A two-piece, permanent jig is best for repeated crosscuts; a one-piece jig, assembled for a single job, is sufficient for ripping.
For smoothness as well as straightness of cut, the blade you choose is important. Standard rip and crosscut blades dull quickly. A carbide-tipped combination blade will stand up longer to the materials in plywood and particleboard, but it will give a relatively rough cut. A special plywood blade will give a cleaner, smoother cut but will dull faster than the carbide-lipped combination.
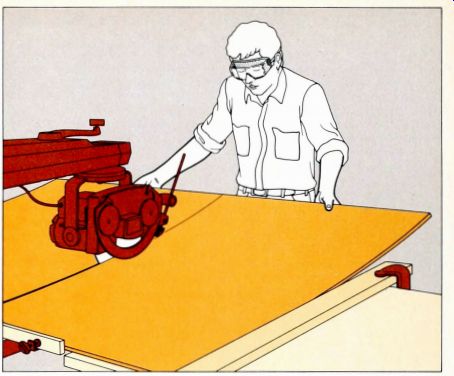
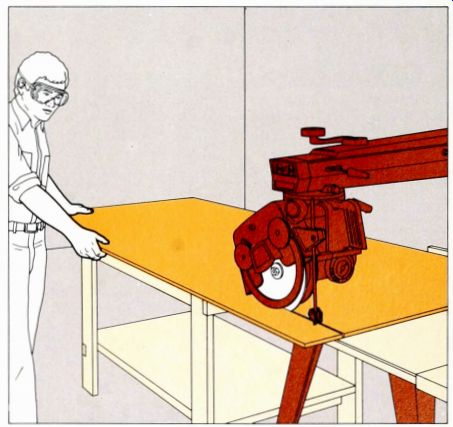
If you own a radial arm saw, use it for panel cutting when you can do the job conveniently in your workshop. Its built in straightedge, the fence, is easily adapted to production work. It will crosscut up to 48 inches if you adapt the saw. You can rip widths from 14 to 24 inches with the saw in the out-rip position (bottom). And if the piece to be ripped from the panel is wider than this, simply measure the piece you need, subtract that measurement plus the kerf width from the width of the panel and set the saw up for an in-rip cut (Steps 7 through 5).
A Homemade Guide for Crosscuts
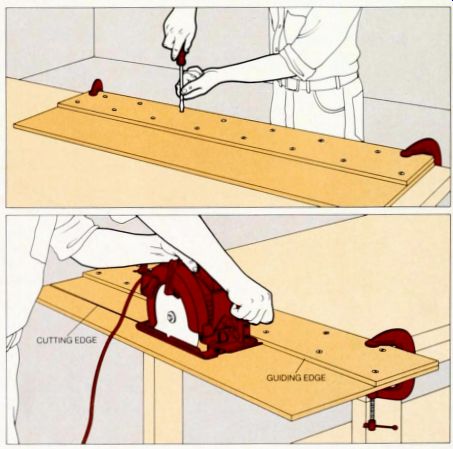
1. Assembling the jig. Screw together two 4-foot lengths of 0.75-inch particleboard, one of the pieces 12 inches wide and the other 4 inches wide, cut from an end of the panel that has an unmarred factory-cut edge. Align the two pieces so that the factory-cut edge of the narrow piece faces into the middle of the wide piece.
2. Trimming the jig. Clamp the jig to the bench top so that at least 6 inches of the wide board ex tends over the bench edge. Set the base plate of the saw against the factory-cut edge of the narrow piece, and saw through the wide piece along its entire length. The edge of the narrow piece thus becomes a guide to position the saw blade at the edge of the wide piece--the jig's cutting edge. Varnish the jig to reduce warping.
3. Cutting the panel. Align the cutting edge of the jig base with marks for the amount to be cut off, clamp the jig to the panel and then, using the cutting edge of the jig as a guide, score the panel with a utility knife or, to prevent gouging the jig. a chisel held bevel side out (Step 5) but tilted toward you.
Set the blade depth to account for the thickness of the jig base as well as that of the panel to be cut, position the base plate against the guiding edge of the jig as in Step 2. and then saw through the panel, using the cross-cutting technique described. Steps 1 and 2.
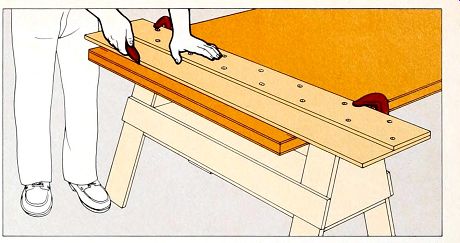
Making Clean Cuts with the Grain
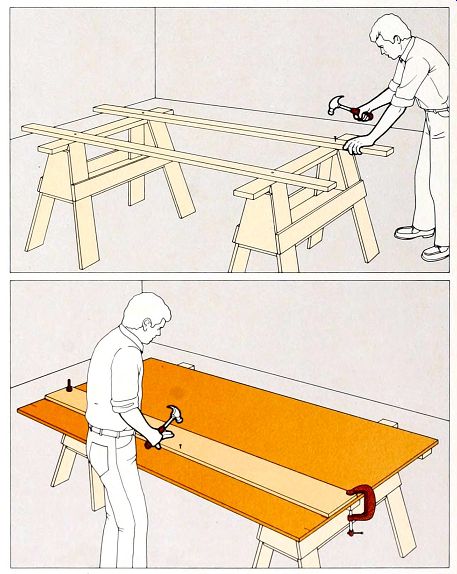
1. Building a work surface. Set two sawhorses at a distance 2 feet shorter than the length of the panel to be cut. Nail two 2-by-4s as long as the panel to the sawhorses, keeping the 2-by-4s parallel and about 3 feet apart.
2. Positioning the jig. Mark both panel ends for the amount to be cut off, make a second pair of marks further into the panel a distance equal to the distance between the saw blade and the base plate's left side; then clamp to the panel at the second pair of marks a piece of 3/8-inch particleboard that is 10 inches wide by 8 feet long and has been cut to leave a factory-made edge as a base-plate guide. At three places along the mid section of this jig, check that the jig edge and the panel edge are the same distance apart as at the ends; at these places nail the jig to the panel. Cut the panel following the technique de scribed in Step 3, above.
If the plywood panel has been previously cut, its edge may be bowed or out of square. In this case, use a string to check alignment of your jig.
Crosscutting Panels with a Radial Arm Saw

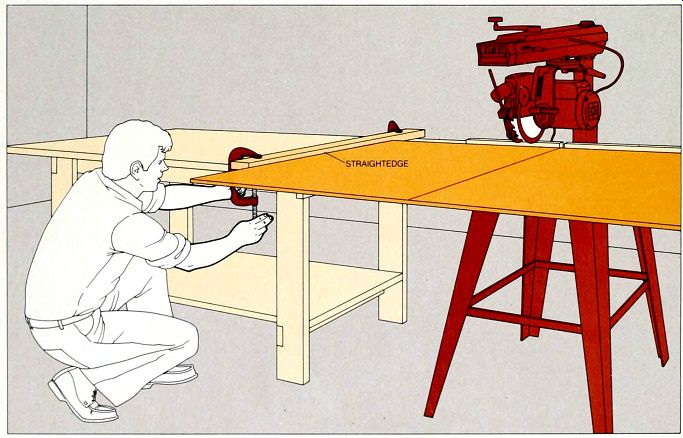
1. Expanding the work surface. Move the fence closer to the arm's support post by loosening the clamps behind the table and sliding the spacer boards toward you. Position the fence between the clamps and the spacer boards and tighten the clamps. At the sides of the saw, set up worktables that are at least 25 inches wide and the same height as the saw table.
2. Setting up a large crosscut. At the rear of the arm,
raise the saw and turn the yoke 180° so that the teeth of the blade face
you, then lock it in position. Mark the panel for the cut and align the
mark with the blade. At both ends of the panel. fasten 24-inch straightedges
to the worktables and then pull the panel back 12 inches. Lower the saw,
start the motor and slowly feed the panel into the blade until the far
panel edge hits the fence. Unlock the motor and pull the saw toward you
until it reaches the end of the arm. Lock the saw in position while the
motor is operating.
----
3. Extending the cut. With the saw still operating, place
your hands under the panel and. keeping pressure against the fence, slowly
lift the panel, cutting it farther, until it hits the bottom of the motor.
Lower the panel to the table, unlock the saw and push it back to the rear
of the arm Now turn it off and lock it in place With a helper, turn the
panel over and place it on the table between the straightedges with the
far edge several inches in front of the blade. Start the saw and again
slide the panel into the blade until the far edge hits the fence Then unlock
the motor and pull the saw toward you as before to complete the cut across
the panel.
Using the Saw for Long Rip Cuts
Beginning the cut. With the fence in the back position (opposite. Step 1), turn the saw to the out-rip position (blade parallel to the fence, motor between blade and fence). Set the panel t the left of the saw with the leading edge against the fence, align the blade with the cutting line on the panel end and lock the motor in place.
Adjust the blade guard and anti-kickback fingers (Steps 2 and 3), start the motor and. with your left hand on the back of the panel and your right keeping pressure against the fence, feed the panel into the blade. After the blade has made a kerf about 1 foot long, you may have to turn off the saw and drive nail through the kerf into the table surface to keep the blade from binding (Step 4). Restart the motor and continue feeding the panel toward the blade. If you are working with a helper, do not have him take hold of the waste piece until it is two thirds of the way past the blade, from that point on, have him merely support the wood and not pull it. Finish the cut a you would for in-ripping (Step 5).
The Tricks of Putting Curves into Wood
The basic frame of a house fits together along straight lines, but much of the finish carpentry involves curves, trickier to cut. Some of the curved cuts are utilitarian--for example, in holes through walls, floors and roof for pipes or ducts. Others-the scalloped trim of a porch, the arch of an elegant door or the curve of a circular window-are decorative.
Whatever the curve's purpose, it requires tools and techniques different from those used for straight cuts. For most curves the best tool is an electric saber saw, ideally one with variable speed control. Blades 0.25 inch wide with 8 to 10 points per inch are suitable for most jobs, but other blades are available for special uses: a hollow-ground blade, for example, will make splinter-free cuts in plywood; a blade with 12 or 14 points per inch is advisable for scrollwork.
When power is not available or when work space is too cramped for a saber saw, turn to any of several handsaws de signed specifically for cutting curves. A coping saw has a delicate blade and a limited cutting range; it is best suited to finish joints in woodwork and to fine, intricate scrollwork. The keyhole saw can tackle heavier tasks, while the compass saw serves for still rougher work. Both come with an assortment of blades de signed for different materials. The blades are tapered, with narrow tips for turns and for cutouts started from small drilled holes; and because the blades can be reversed, compass and keyhole saws are ideal for use in jobs with light clearances and awkward undercuts.
Since you must guide all of these saws freehand, it is essential to mark a guide line before cutting any curve. More often than not, you can simply hold an object to be duplicated-a section of decorative trim or a window sash, perhaps-in place and trace its outline. But some situations demand more complex calculations and marking techniques. For instance, to mark an elliptical hole for a round pipe passing through the roof, you must plot the pitch of the roof and the size of the pipe on cardboard, then cut out the marked cardboard as a template to transfer the ellipse to the roof.
In other situations you must resort to scribing, a marking technique for fitting material to an existing curve. Generally it consists of setting the wood-the floor boards in a semicircular alcove, for in stance-against the curve and running a simple school compass around the curve to duplicate, or scribe, the arc on the boards. If you are scribing overlapping boards, as when you fit siding around a circular opening, you must position the work carefully and set the compass to the exact distance that will provide the overlap. And for some jobs, such as the cutting of a curved casing for an archway, you must combine template-making and scribing.
When you cut a curve, be especially careful of the pressure you apply; under excess pressure, a handsaw blade will buckle and a saber-saw blade may shoot out of the cut or snap in two. Mark the guidelines for a saber saw on the unfinished side of the board if possible, because the upstroke cut of the blade splinters the wood; if you must work on the finished side, cover the guidelines with transparent tape to minimize the dam age. Steady the board by clamping it to a worktable or setting it on sawhorses.
Sawing an Irregular Outline
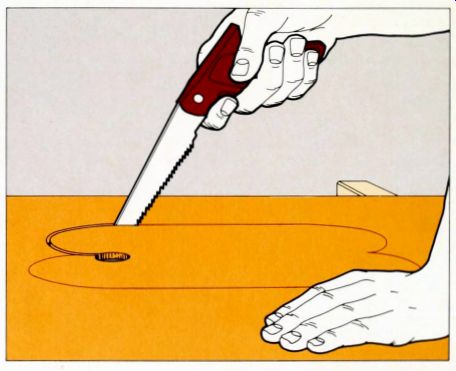
Cutting an interior curve with a handsaw. Drill a 3/4-inch starter hole through the waste area, insert the tip of the saw blade-in this example, a keyhole saw-and make a few short, vertical strokes to start the cut. Then lower the blade to a 45° angle and follow the curved guideline with long, even strokes and light pressure-too much pressure on the blade will bend or buckle it To saw around sharp turns use short strokes, made with the narrow tip of the blade.
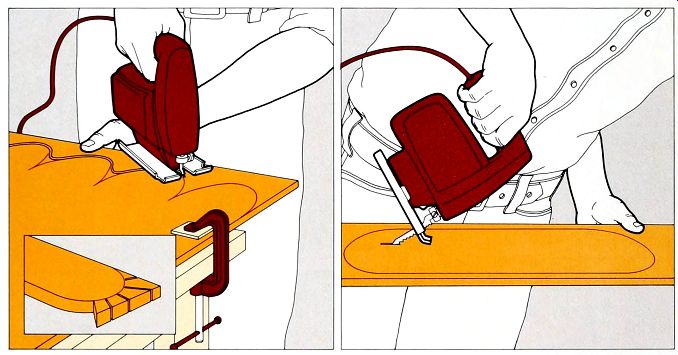
---- Cutting with a saber saw. Pressing the saw down
and forward, and keeping the base plate flat against the wood, follow the
broad curves of a pattern Bypass any sharp turns-forcing the saw or pushing
it sideways for these curves will damage the blade. When you have cut the
waste wood away from the broad curves, go back to the sharper angles. On
a tight curve, where the saw blade is likely to bind, make radial cuts
in the waste area, then saw along the outline. The waste will drop off
in pieces as you saw, giving the blade more room to turn (inset).
---A plunge cut for an interior curve. With the saw motor off and the blade clear of the wood, rest the front edge, or toe, of the base plate on the waste area near the marked guideline Turn the motor on and, pressing firmly on the base plate toe, slowly lower the back of the saw until the blade touches and cuts through the wood. When the base plate rests flat on the wood, saw to the guideline and cut in the normal fashion.
--- Scribing a Gentle Arc
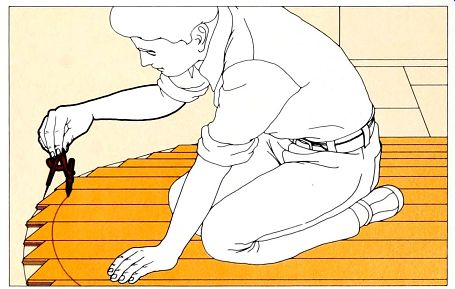
Copying a curve with a compass. Butt the material against the curve it must fit-in this example the material is floorboards, the curve is that of an alcove wall-and set the legs of a compass to a distance slightly greater than the widest gap be tween the curve and the edges of the boards Keeping the plane of the legs at a right angle to the surface you are marking, and in a line that is at a right angle to the curve, move the compass point around the curve so that the pencil point marks a corresponding curve on the boards.
----
Fitting Siding to a Curve
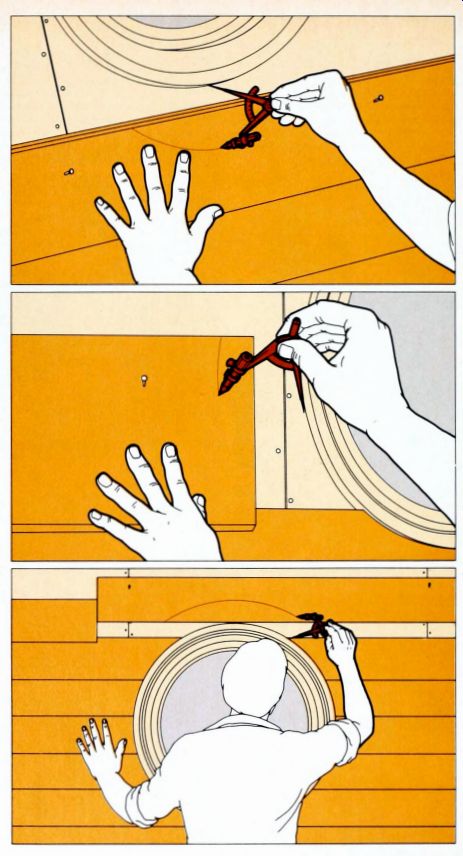
1. The bottom board. To fit clapboard siding around the curve of a circular window frame, you must scribe and cut a series of arcs on the clapboards. Tack the first board to be cut directly over the last complete board below the frame, add the width of the siding overlap to the distance between the bottom of the frame and the top of the tacked board, and subtract the total from the width of the board. Set the legs of a compass to this distance and use the compass to scribe an arc on the tacked board. Take the marked board down, cut the curve and install the board at the bottom of the frame.
2. The side boards. Tack a side board at its correct level and about 2 inches from the frame, set the legs of a compass as you would for simple scribing, and scribe the arc on the board. Mark, cut and install all the side boards before starting the final step of the job.
3. The top board. Above the frame, tack a board perfectly level, with its bottom edge resting on the frame. Set the compass legs to the width of the siding overlap plus the distance between the last side board and the tacked board, and move the compass point along the top of the frame to scribe the final arc.
--
How to Mark an Oval
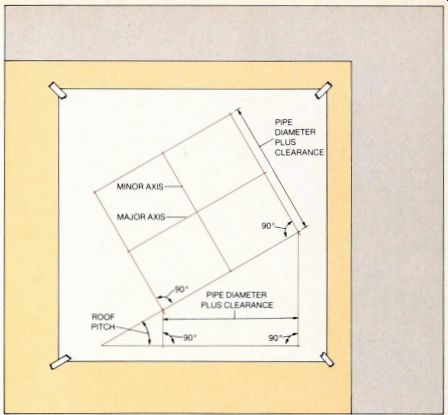
1. Finding the axes. To plan an elliptical hole for a cylinder passing through a sloping plane-typically. a cylindrical vent or stovepipe passing through a roof-first find the axes of the ellipse by the following method On a large piece of cardboard, draw a horizontal and a sloped line at the exact angle of the roof pitch. In any section of the horizontal line, mark off the diameter of the pipe plus any required clearance, then draw perpendicular lines from the marks to inter sect the sloped line.
From the intersection points, extend two more lines perpendicular to the sloped line, mark off the pipe diameter plus clearance on these lines, and connect the marks to form a rectangle with its base on the sloped line Finally, draw two lines bisecting the four sides of the rectangle The longer line is the major axis of the ellipse; the shorter one is the minor axis.
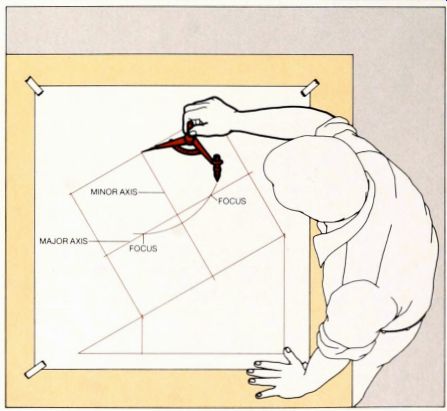
2. Finding the focuses. Set the legs of a compass to half the length of the major axis, place the point of the compass at either end of the minor axis and swing the pencil in an arc that inter sects the major axis at two points These points are the focuses of the ellipse.
----
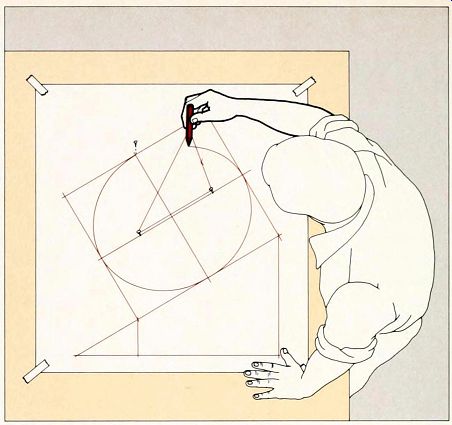
3. Drawing the ellipse. Set the cardboard on a piece of scrap wood and drive nails partway into the wood through the focuses and at one end of the minor axis. Tie a string tightly around the three nails; then replace the nail on the axis with a pencil and. keeping the string taut, swing the pencil around to outline the ellipse Cut out the cardboard ellipse as a template for transferring the curve to the roof.
Tracing an Archway
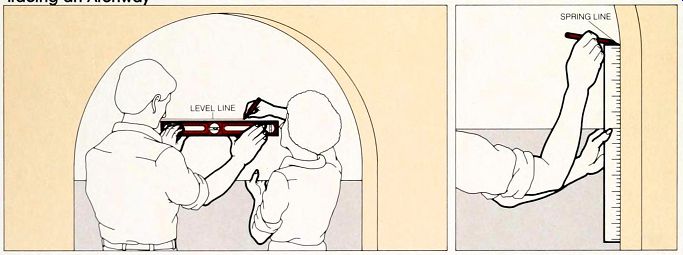
1. Transferring the curve to paper. To cut a large arc from straight boards, as in the casing for an arched doorway or window opening, make a set of templates. First tape a piece of paper over the arc and outline the entire curve on the paper. Have a helper hold a level against the paper within 2 feet of the top of the arc, and mark a level line across the paper.
2. Finding the spring line. If the curved part of the casing joins a straight section, as in an arch, move a straightedge up and down against the straight section and mark the paper at the highest spot where no space can be seen between the straightedge and the straight section. This marks the spring line, where the curve of the arc begins Mark the spring line on the other side of the arch, then lay the paper on the floor.
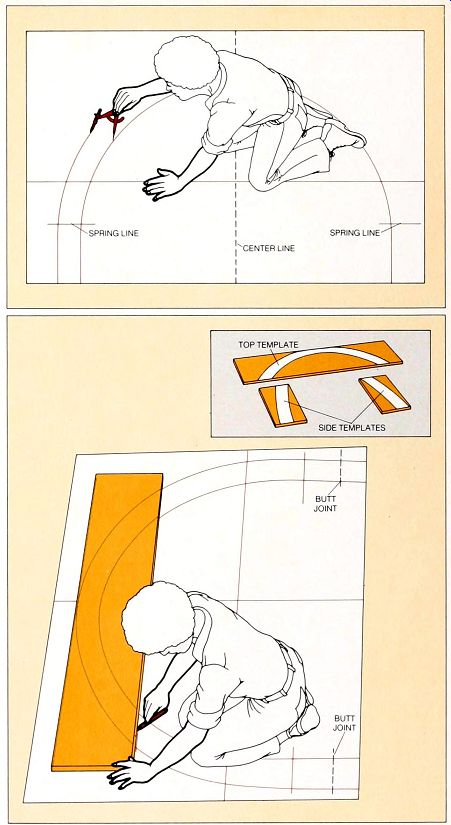
3. Scribing the template. Set the legs of a compass to the width of the pieces you will cut--generally, the casing width-and run the point along the marked arc to scribe a second arc above it. From the center of the level line, draw a perpendicular line up through the double arc.
4. Dividing the template. At the top of the double arc, draw a line perpendicular to the center line and parallel to the level line below. Along this top line, set the top edge of the board you will cut; on the template paper draw a line along the bottom edge of the board to intersect the double arc on both sides. This second line marks the divisions between the top and side templates.
To complete the side templates, draw lines across the double arc about 5 inches below each of the spring lines and parallel to the level line. These lines mark the butt joints at the bottoms of the two side templates. Cut the paper at both curves, at the division lines and at the butt pints, making three sections. Tack them to boards (inset), and trace their outlines as guidelines.
Table Saw and Band Saw--Handy Extras
House carpentry rarely calls for stationary power tools--the radial arm saw is the only one that is discussed in detail in this chapter. But two other types of stationary saw, the table saw and the band saw, are common in home workshops. Neither of these can offer the combination of versatility and accuracy that distinguishes the radial arm saw, but if you have either tool, you may want to consider using it for some cutting jobs.
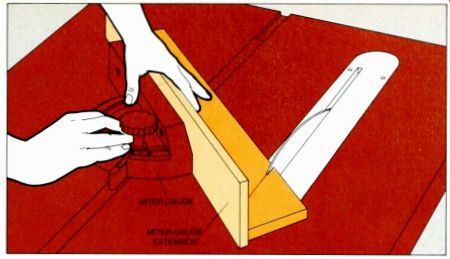
A table saw consists essentially of a power-driven circular blade that projects through a slot in a metal worktable (the safety guard that always covers the blade has been omitted for clarity in the pictures below and opposite, top). The saw has an adjustable rip fence and a completely unobstructed space around its blade so that it can make rip cuts in long boards. However, because the wood must be moved past the blade, large panels are troublesome to handle. A second fence, which is set at an angle to the blade with a miter gauge, is used to push boards past the blade for crosscuts and miter cuts, and a crank or lever tilts the blade for bevel cuts.
On the band saw the blade is exactly what the name implies-a continuous steel band. It runs in tracks on an upper and a lower wheel, and is covered at the wheels by guards and at the rear of the saw by a throat, or vertical arm, so that only the section above the worktable is exposed. Using a thin, flexible blade-as narrow as 1/8 inch--you can pivot the wood freehand for precise curves. With stronger, wider blades-the maximum width is generally 1.5 inches--you can take advantage of the saw's great depth of cut (up to 6 inches on the majority of models) to make straight cuts on very thick lumber or to slice a thick board into thinner ones.
Both types of saw call for careful planning and adjustments. On the table saw you must adjust the blade height so that the teeth will protrude about's inch above the surface of the wood you are cutting. For an accurate rip cut you must set the rip fence to an exact distance from the blade (If the tips of the saw teeth are alternately slanted left and right, measure from a tooth that slants in the direction of the fence).
For an angle cut you will need to slide the miter gauge into a slot to the left or right of the blade (carpenters prefer the left slot for the majority of cuts), set the gauge to the desired angle, mark an exact guideline on the board and use a miter gauge extension-a straight piece of wood that screws or bolts to the gauge to hold the board steady while the cut is made. For cutting wide boards and panels, table extensions and a helper are generally necessary.
The band saw has special problems of control. Because you need to guide the board freehand for curved cuts, be sure to mark guidelines that are especially ac curate. And because the throat of the saw can obstruct the movement of the board in the course of a long curve, you must plan your starling point and your movements with care-for certain cuts, the best strategy is to lay out the cutting lines on both faces of the board and flip the board in mid-cut.
With both saws, take the general safety precautions that apply to all power tools-and for a table saw add a few special ones. Stand to the side of the blade--if it binds, the board may shoot backward. Use a push stick to feed the board for a narrow rip cut (bottom, center), and insert a wedge in the kerf of any rip cut that is more than 3 feet long, to prevent the blade from binding (top).
Other shop tools such as the edge straightening jointer come in handy for occasional jobs. And one homemade tool--a sturdy sawhorse --is almost a necessity.
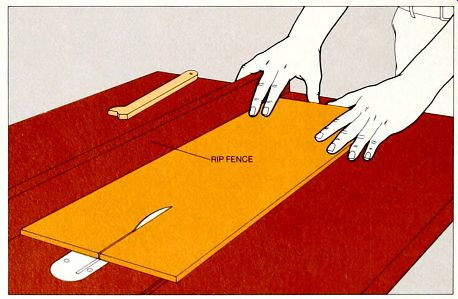
Making Straight Cuts with a Table Saw
Ripping a board. Turn the saw on, press the board lightly against the fence with your left hand and hook the last two fingers of your right hand over the fence; use the first two fingers and thumb to push the board toward the blade, and remove your left hand at least 6 inches before the end of the cut. If the distance between the rip fence and the board is 6 inches or more, complete the cut with your right hand, bringing the hand back in a high arc above the table; if the distance between fence and board is less than 6 inches, use a stick to push the work past the blade.
Some boards can be allowed to slide off the far end of the table after the cut is made. For boards longer than 2 feet, however, have a helper ease the board off the table; for wide panels, station another helper at the left of the table to keep the panel flush against the fence.
A miter cut. Set the miter gauge, fitted with
a smooth wood extension, to the desired angle, then hold the board against
the extension with your left hand and. with your right, push the gauge
for ward The blade will tend to pull the board off course during the cut.
take special care to keep the cutting line on the board aligned with the
blade by using firm forward pressure and holding the board tight against
the gauge extension
Cutting Curves with a Band Saw

1. Adjusting the blade support and guides. After putting a new blade in place, turn the blade support adjustment nut to set a 1/64-inch gap between the support and the back of the blade Use the lateral guide-adjustment nut to set the edges of the guide-pm brackets flush with the gullets between the teeth of the blade To adjust the clearance between the guide pins and the blade, loosen the brackets with a hex wrench, wrap a piece of heavy paper around the blade brown wrapping paper will do-and press the guide pins together against the paper, then tight en the brackets and remove the paper.
----

2. Making the cut. Set the blade guides to a distance of 0.25 inch above the board with the vertical guide-adjustment screw, then turn on the saw, feed the board into the blade with your right hand and turn the board with your left to keep the blade on the guideline Cut at a steady pace if you stop or move the board too slowly, the blade will burn the wood At all times, keep both hands well away from the blade; hook the fingers of your right hand over the near edge of the board and move the left hand back whenever it gets within 3 inches of the blade As you finish the cut. your hands will necessarily draw close to the blade, take care to keep your fingers clear of it. Pull your hands back by moving them in wide arcs to each side of the blade; turn off the saw and leave the board on the table until the blade has stopped completely.
When a turn is so sharp that the blade tends to bind, do not increase your feeding pressure If you have reached a point close to the edge of the board, run the blade out of the board through the waste area and then cut back in from another angle. If you have just begun the cut, turn off the motor, backtrack the blade through the cut, and reposition the board so that you can approach the curve from another direction
The Necessity: A Solid Sawhorse
Making a sawhorse is a traditional test of a carpenter's skill. Construction foremen often ask a new man to build a sawhorse from scratch-and hire him or not, ac cording to the quality of his work. Unlike most tests of skill, the job produces something useful, for a sawhorse is an essential tool in working with wood, and good ones cannot be purchased ready made. The ones sold as kits, to be assembled from 2-by-4s and metal brackets, are not as desirable as hand-made ones because their brackets can damage saw blades and they are not sturdy enough.
The homemade sawhorse illustrated here resists tipping, is rigid enough to support almost any load and wide enough to stand on comfortably. Its braced shelf stores tools, a wide top serves as a portable workbench, and strong sidepieces make a low scaffold, complete with built-in steps. For general work, most sawhorses have more or less standard dimensions: a length of 42 inches, to support 4-by-8 sheets of ply wood; a height of 24 inches, to hold work just above knee height for easy sawing; and a width at the base of 14.5 inches, to fit between studs spaced 16 inches apart.
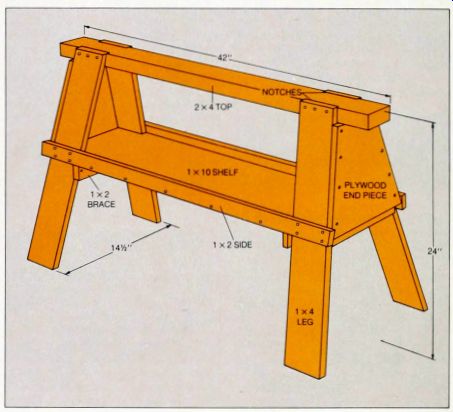
----- A standard sawhorse. The 1-by-4 legs of this
saw horse, splayed for stability and braced by ply wood end pieces, fit
snugly into angled notches in the 2-by-4 top. a -by-10 shelf, notched for
the legs, fits tightly beneath the endpieces Raised 1-by-2 side braces
keep tools from rolling off the shelf and serve as steps when the sawhorse
is used as a scaffold; 1-by-2 cross braces beneath the shelf provide extra
support and stability for both the shelf and the legs.
Putting the Pieces Together
---
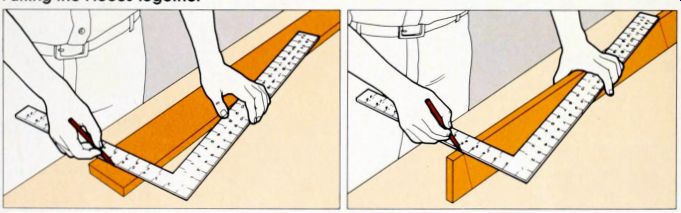
1. Marking the leg length. Set the tongue of a framing square across a 1-by-4, align the 4-inch mark on the outside of the tongue and the 24-inch mark at the end of the body with the edge of the board, and draw a line along the tongue to mark the bottom of a leg. At a point 24 5/8 inches along the board, use a T bevel to mark a parallel line for the top of the leg.
2. Angling the leg bottom. Turn the board on its side, align the 5.25 -inch mark on the tongue with the bottom line of the leg, align the 24-inch mark on the body with the edge of the board and draw a pencil line along the tongue Use the T bevel to mark a parallel line at the top of the leg. Cut the leg to length along the lines and use it as a template to cut the other three.
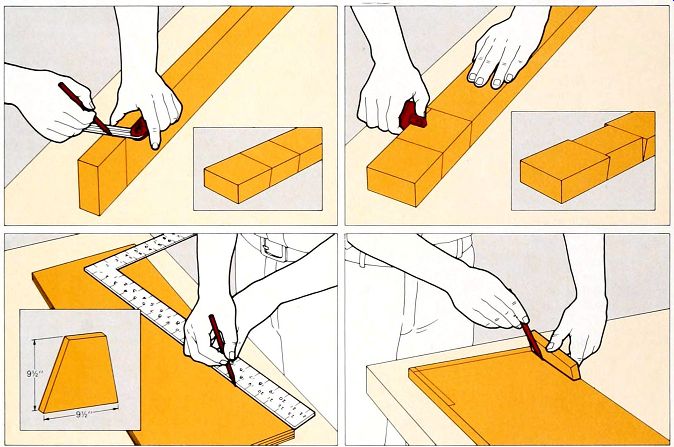
3. Fitting the legs to the top. Draw a line across a 42-inch 2-by-4. four inches from one end Set a T bevel to the 4-in-24 angle of a leg, hold it on the edge of the 2-by-4 at the end of the marked line and slanting out toward the end of the board, and draw a line along its blade. To determine the width of the notch, set a leg against the angled line and draw a line along the other side of the leg, from this line, draw a square line across the 2-by-4 (inset) and draw matching lines on the other edge with a T bevel Mark the other end of the 2-by-4 in the same way.
4. Marking the depth of the notches. Set a marking gauge (bottom right) at 3/8 inch and score the top of the 2-by-4 on each side between the square lines (the bottom of the notch will meet the edge of the 2-by-4) Saw along the angled lines and chisel out the waste between saw cuts Onset). Lay out and cut the notches at the other end of the 2-by-4, then fasten each leg into a notch with coated eightpenny nails.
5. Making the ends. Set a framing square on a strip of plywood 9.5inches wide, the 24-inch mark on the body against one corner and the 5.25-inch mark on the tongue against the edge, and draw a line from the corner along the body; turn the square over and draw a matching line from the other corner. Draw a square line across the plywood 9.5 inches from the end, completing a trapezoid shape. Cut the ply wood along the trapezoid lines and use it as a template to cut a matching piece Fasten the endpieces to the legs, positioning them tight beneath the top, with coated eightpenny nails.
6. Adding a shelf. In a 1-by-10 board 39.5 inches long, lay out notches for the legs by drawing a line 0.75 inch from each end At each corner of the shelf, hold an angled scrap-leftover from cut ting the legs (Step 1)-against the line and the edge of the board, and trace around it Cut within this outline with a handsaw, try the shelf for fit and pare out the notches with a chisel to fit perfectly. Nail the shelf to the legs and ends Cut two 39-inch 1-by-25 to use as sidepieces.
Hold each one against the sawhorse, flush with the bottom of the shelf-plane away the edge of the shelf if necessary-and fasten it to the shelf and legs with six-penny nails. Cut two 1-by-2 braces 10 3/4 inches long and nail them across the legs, tight beneath the shelf.
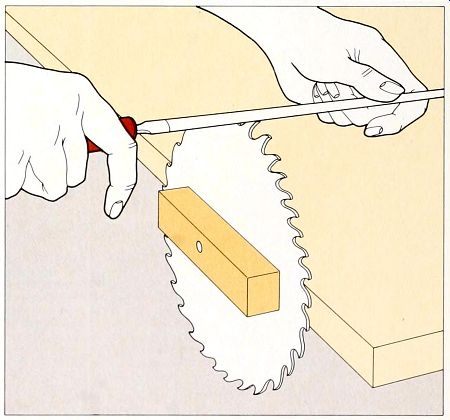
The Old-timer's Techniques of Sow-Sharpening
Using a saw with a dull blade mars the work and damages the tool. The blade cuts slowly and leaves rough edges; the added force needed to push the blade and keep it on course can buckle a hand saw or overheat a power saw until the metal cracks or the teeth break. On a power saw a dull, overheated blade can scorch the wood and ruin the motor.
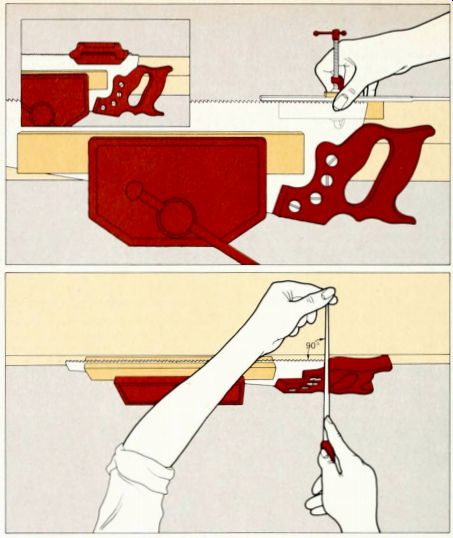
It makes sense, then, to check your saws for sharpness from lime to time.
Run your thumb lightly over the tops of the teeth; sharp teeth will prick your skin, but your thumb will slide over dull ones.
On a handsaw, visually compare the teeth near the handle-which are rarely used--with the teeth at the middle of the blade: worn teeth will have rounded points; sharp teeth, angled points.
Some blades, particularly those on circular saws, are so inexpensive that they are more easily replaced than re-sharpened. Others must be left to a professional; only a professional saw filer's specialized equipment can sharpen a carbide-tipped blade or restore a misshapen circular-saw blade.
But you can re-sharpen a handsaw or an ordinary circular-saw blade yourself, by simply clamping the blade between long wood strips or in a special saw vise, and touching up the edges of the teeth with a file. For handsaws use a triangular taper file; for circular blades, use either a mill bastard file with a round edge, or a cant (triangular) file with a 120° angle whichever allows you to sharpen the edges of a saw tooth without touching the adjacent teeth or the valleys be tween the teeth.
On a handsaw, you can go beyond sharpening to master a craftsman's techniques for completely refitting a badly worn saw. To begin with, you "joint" the saw-that is, file the tips of the teeth flat; to a uniform height. With another file you reshape the flattened teeth; then, with a plier-like tool called a saw set, you bend them alternately to the right and to the left. Finally, you sharpen the saw as you would in retouching. Total refitting is an intricate job, in which every step must be performed with special precision. You may have difficulty locating professionals who perform this work properly, but with practice on an inexpensive blade, you can train yourself to meet the high standards of the old time saw sharpener.
Start any job on a saw blade by checking the teeth for accumulations of pitch and sap, which can clog a file. If necessary, clean the teeth by soaking the blade overnight in kerosene or a solution of either baking soda or lye, then scrubbing it gently with a wire brush. To reduce the need for cleaning, use blades coated with a non-sticking plastic, or oil your steel blades lightly after each use.
Designs for Cutting
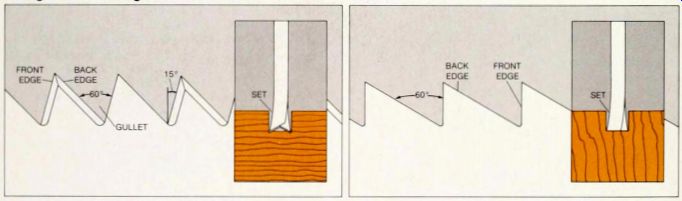
---- A crosscut handsaw. On each tooth of this saw. two beveled
edges meet at a sharp point. The front edge of a tooth is angled 15° from
the perpendicular, and meets the back edge of the next tooth at a 60° angle,
the valley be tween two teeth is called a gullet The teeth are bent, or set,
alternately left and right of the blade, and each tooth is beveled on the side
opposite the direction of its set.
As you saw, the points of the set teeth score parallel grooves across the wood gram; then, on both the forward and return strokes, the beveled edges of the teeth slice through the wood fibers between the grooves. Because the grooves are farther apart than the thickness of the blade, the saw cuts a kerf that is wider than its blade, and is therefore unlikely to bind.
A ripsaw. The un-beveled edges of each tooth meet at the point in a chisel-like cutting edge. The gullets form 60° angles, like those of a cross cut saw. but the front edge of each tooth is perpendicular to a line along the tops of the teeth A ripsaw tooth cuts like a tiny chisel, paring away wood on each forward stroke. The set (inset) may be greater than that of a crosscut saw, cutting wood faster but leaving it rougher.
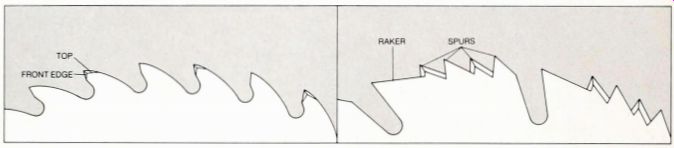
----- Two circular blades. On a typical combination blade (left), designed for ordinary crosscuts and rip cuts, the top of each tooth and part of each front edge are filed to form a sharp point: the backs of the teeth are rounded and unfiled The bevel angles of the filed edges vary from one manufacturer to another, but the bevel of each tooth always slants away from the direction of its set A blade designed to cut plywood is similar to this blade, but has smaller teeth.
On a hollow-ground planer blade, de signed for especially smooth cuts, the teeth are arranged in groups of five Each group consists of one large tooth, called the raker, followed by four smaller teeth, called spurs The spurs are beveled on both faces and cut wood like the teeth of a crosscut handsaw: the raker, which sits 0.25-inch below the spurs, is un-beveled and clears the wood chips from the kerf The teeth of this blade are not set: instead, the area be tween the hub of the blade and the gullets is ground thinner than the teeth to create a clearance for the body of the blade within the kerf.
---- Files for Saws

Choosing the right file. The left-hand column of this chart lists handsaw sizes according to the number of tooth points per inch of saw blade; the right-hand column lists the corresponding sizes of triangular taper files for sharpening the saws Manufacturers generally stamp the saw size on the blade near the handle: if you do not find it there, set a ruler just under the saw teeth, with an inch mark directly below a tooth point, and count the number of points in 1 inch, including the two points right above the marks.
Sharpening a Handsaw

Touching up the teeth. Secure the saw, with the handle to your right and the gullets 0.25 inch above the wood blocks or vise jaws. At the handle end, place the file in the gullet in front of the first tooth set toward you. On a crosscut saw, like the one shown here, set the file in the gullet at an angle of about 15° from the horizontal, swing it to the left to a 60° angle with the blade, and rotate it about 15° counterclockwise. Push the file forward with a light, even pressure, lift the file from the gullet, and repeat the forward strokes until the beveled edges on each side of the gullet are shiny Use the same number of strokes to file every second gullet along the blade Reverse the saw in the vise and follow the steps above, but swing the handle to the right and rotate it clockwise for each stroke (whatever the saw position, point the file toward the handle) File a ripsaw with the same method used for a crosscut saw. but keep the file horizontal and perpendicular to the blade, and rotate it 30°.
Refitting a Handsaw
1. Jointing the teeth. Secure the saw, with the teeth about 2 inches above the wood blocks or vise jaws holding it. Use a C clamp to fasten a flat file to a small wood block, with half the width of the file extending beyond the edge of the block. Holding the block flat against the saw blades so that the file rests lightly on the tops of the saw teeth, run the file in forward strokes from the heel to the tip of the saw until each tooth has a small flat dot at the point; one or two strokes is usually sufficient.
If you find it hard to keep the block flat against the blade or the file flat on the teeth, use a manufactured hand jointer to secure the file (inset).
2. Shaping the teeth. Secure the saw as you would for touching up and choose the appropriate triangular file (center). On ripsaws, and on crosscut saws with teeth that accept a file in the touching-up position, use the procedures for touching up.
On a crosscut saw with teeth so flattened or misshapen that you cannot position the file for touching up, place the file in the front gullet of the first tooth that is set toward you, holding the file horizontal and perpendicular to the saw blade. Rotate the file 15° counterclockwise and file straight across the blade, using pushing strokes only, until the gullet conforms to the shape of the file. Shape every alternate gullet in this way. then reverse the saw and the rotation of the file to shape the other gullets.

3. Setting the saw. Secure the saw, with the blade about 2 inches above the wood blocks or vise. At the heel of the saw, position the first tooth that is set away from you between the anvil and the plunger of a saw set (inset). This tooth is normally unworn, and does not need resetting; therefore, set the stop-adjusting and anvil adjust screws of the saw set so that when you close the handles tightly, the anvil and the plunger pinch the tooth without bending it. (Do not rely on adjusting-screw markings for different saw sizes; make your judgment by eye and feel.) Apply the saw set to every alternate tooth along the saw, squeezing the handles each time; reverse the saw to set the other teeth.
Complete the refitting job by touching up the edges of the teeth. This final touching up is necessary after resetting, even if the teeth were touched up as part of Step 2
Touching Up a Circular-Saw Blade
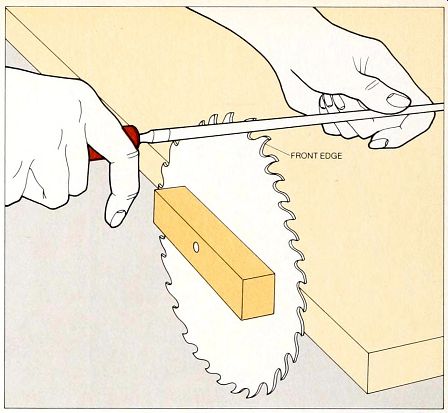
1. Filing the front edges. Secure the blade-in this example, a combination blade-to the edge of a worktable by driving a nail through a small wood block and the blade center hole into the table edge; the top of the blade should be about 2 inches above the table and the teeth should point clockwise. At the left of the blade, just above the level of the blocks, set the file against the front edge of the first tooth that is set away from you. and swing the handle until the face of the file lies flat against the beveled part of the tooth-you will generally have to move the handle to the left and downward.
Keeping the file clear of the bottom of the gullet, file in forward strokes until the bevel is shiny, but do not use more than eight strokes Use the same number of strokes to file the front edge of each tooth that is set away from you in the part of the blade above the table. On hollow-ground blades, sharpen the front edge of the teeth on which the bevels face you.
2. Filing the back edges. Return to the first tooth mm you worked on and align the file with the other cutting edge, generally located on the top or back of the tooth in a combination blade, on the back in a planer blade; file this edge as in Step 1 above, to form a sharp point on the tooth. On the rakers of a planer blade, file the point 1/64 inch below the points of the other teeth. Repeat the procedure on all the teeth set away from you or beveled toward you in the protruding blade section, and rotate the blade clockwise in the vise to get at additional teeth; when you have sharpened every alternate tooth, flip the blade in the vise and sharpen the others.