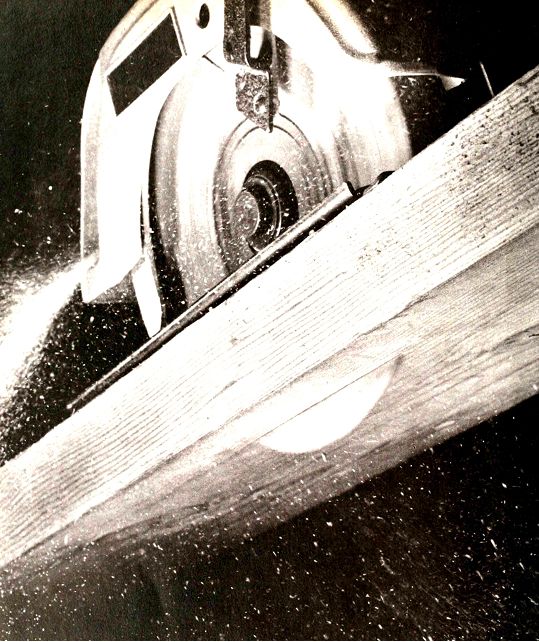
A saw in action. A circular saw. the all-purpose tool used in carpentry, cuts with the gram through a rough 2-by-6 The blade spins counter clockwise, spewing most of the sawdust out the spout at the back of the saw, the blade guard has retracted under the hood of the saw, protecting the operator without interfering with the cut. Combined with homemade jigs and guides, this saw can be nearly as precise and versatile as more expensive stationary power tools such as the radial arm saw or the table saw.
Wood is the ubiquitous building material. Nine of ten houses in the United States and Canada have wooden frames-and those that have walls of brick or stone often have a wooden skeleton. There is wood in floor joists and flooring, partitions, rafters and roof sheathing; and there is wood throughout the interior, in doors and doorframes, staircases, wall paneling, window sashes and molded trim.
Wood is the material of choice for good reasons: it is very strong, exceptionally durable, light in weight, weather-resistant and a good insulator. Furthermore, wood is beautiful, whether covered with paint or stained to emphasize its own striking patterns of color, texture, grain and shadow (see color portfolio section). And from the practical viewpoint of the carpenter, wood is universally available, relatively inexpensive and capable of being shaped and assembled in an infinite variety of ways with simple tools.
The skills needed for working with wood are basic ones: sawing boards to size, making holes in them, shaping them with planes, spoke shaves, chisels and routers and joining the pieces neatly and securely with fasteners or glue. Nearly all eighth-grade boys-and these days, most girls--learn a smattering of these skills in a school shop class. But even those who have not forgotten what the shop teacher taught soon discover that he did not teach enough. The craftsmanship needed to repair or improve a house, from building foundation forms and rough framing to installing finish woodwork, is unlike that needed to build a napkin holder for the kitchen. House carpentry is more difficult: the work generally must be done free hand, with portable tools and homemade jigs, rather than stationary power tools that guarantee precision; and construction lumber is rougher and less forgiving than the select boards that are used in a woodworking shop.
There are tricks to every basic operation--from the seemingly simple chores of driving a nail and planing a square, straight edge, to the complications of scribing an elaborate curve and joining fancy moldings-and mastery of those tricks distinguishes a good carpenter from an ordinary one. A generation ago, apprentice carpenters learned the nuances of their trade by watching and imitating a master--the sort of craftsman who walked onto the job a half hour early every morning, carrying a homemade wooden toolbox, to shoot the breeze and sharpen his tools. In this era of metal toolboxes and mass-produced houses, such perfectionists are a dying breed. But the keys to their craftsmanship-the small, critical techniques of handling tools the right way-remain the same. These techniques are not difficult to acquire. And once acquired, they make every carpentry job go fast and come out right.
The Carpenter's Material: Wood from Tree or Factory
"We may use wood with intelligence only if we understand it," architect Frank Lloyd Wright once said-and he spoke for craftsmen as well as architects. The quality of a carpenter's work depends as much on his knowledge of wood as on his skill with tools. Wood is a notoriously capricious material that can frustrate the finest workman-by tearing roughly when planed, perhaps, or by stubbornly refusing to accept a coat of paint. Such problems are so common that many people accept them with resignation. In fact, trouble often can be prevented by choosing a wood (or a wood product, such as plywood) with its particular properties in mind.
You can learn a great deal about the strength and woodworking characteristics of a board simply by looking at it.
At the end of a log or a board, you can see a series of thin, concentric circles.
These annual rings, one formed each year during a spurt of growth, actually consist of a pair of rings: a light-colored one called early wood or springwood. and a darker, denser one called latewood or summerwood. Boards with wide rings of early wood generally are weaker than those in which latewood is predominant. Trees are classified as softwoods or hardwoods. Hardwood lumber--which is used only for fine interior trim, flooring and paneling, because of its high cost comes from broad-leaved trees, which drop their leaves every fall. Softwood lumber, from needle-leaved evergreen trees, is the builder's mainstay.
Lumbermen size softwood boards in several categories, such as board lumber, dimension lumber and timbers. When you order lumber, however, you need specify only the grade (a letter or number designation indicating the appearance and strength of a board), the species and the size-for example, a No. 2 spruce 2-by-10; the grade and the species generally are stamped on each board As a general rule, order the lowest grade and cheapest species that are strong enough-and, in finish lumber, hand some enough-for the job (chart). Higher grades than necessary rep resent a needless expense.
The sizes specified in ordering lumber are nominal rather than actual measurements. At one time, lumber sizes were based on the dimensions of green boards as they came from the sawmill, but lumber industry standards governing the sizes have changed with time. Today, a nominal 2-by-4 is actually 1.5 inches by 3 1/2 inches. The current nominal dimensions will match those of the lumber in a fairly modern house, but for an older house you may need to have boards cut to the correct width or buy slightly larger boards and cut them yourself.
When logs are sawed into boards at a mill, they contain a large amount of moisture. As this green lumber dries, its length remains virtually the same, but it tends to warp and to shrink in width and thickness: a green 2-by-10, for example, shrinks 1/16 inch in thickness and 3/8 inch in width. This is relatively unimportant in vertical wall studs, but in horizontal members-top and sole plates, joists and headers--it can cause sagging floors, cracked wallboard and popped nails. Always buy lumber that is stamped kd (for kiln-dried) or mc-15 (for a moisture content of only 15 percent).
You may not be able to check each piece when you buy lumber, but when you select individual boards for a job, look for defects that impair its strength:
--Knots less than 1/4 inch wide, common in virtually all rough lumber, do not weaken a board, although they may mar its appearance. Larger knots, particularly near the edge of a board, can weaken the board substantially. Such boards can be used for studs, firestops, blocking and similar jobs; they should not be used for load-bearing members such as posts, joists, rafters and headers.
--Cross-grained boards, in which the gram runs at an angle to the edge rather than parallel to it, are relatively weak; restrict them to nonbearing uses.
--Pith, the dark core of a tree trunk, weakens lumber; do not use boards with visible pith for structural lumber.
--Reaction wood-a section of a board with large gaps between annual rings and a rough, uneven gram-is found around many knots. It weakens the wood and is difficult to cut and shape with tools.
--Cracks in wood may be harmful or not, depending on their location. A shake-a wide crack between annual rings, caused by wind damage or decay--is a serious weakness. But checks, small cracks across the annual rings, are a purely cosmetic defect caused by uneven drying.
Factory-made wood products-particleboard, hardboard, fiberboard and ply wood-are free of these defects and have several other advantages over ordinary boards, particularly for covering large surfaces. These products have consistent thickness and strength, and do not warp or shrink as much as wood.
Plywood, the most common of the four, is made by gluing together several thin sheets of wood called plies, with the grain of each ply at right angles to that of the adjacent ones. Two types are avail able: exterior, more expensive because it is made with a waterproof glue; and interior. The grade stamped on a plywood panel consists of two letters separated by a hyphen: the first letter identifies the face of the panel, the second identifies the back. Grade A is free of knots; grade B permits tight knots; grade C (the minimum allowed for exterior plywood) permits 1.5 inch knotholes and some splits, and grade D permits knotholes up to 2.5inches wide.
Plywood intended for structural uses also is stamped with two numbers separated by a slash the first number is the maximum rafter spacing for a sheet used as roof sheathing, the second is the maxi mum joist spacing for sub-flooring. Thus, a sheet labeled ext c-c 32/16 would be exterior type, with up to 1/2-inch knot holes on the face and back; it could be used on rafters spaced up to 32 inches apart or on joists up to 16 inches apart.
The other board products, weaker and less common than plywood, are made differently. Hardboard, sometimes used for siding, is manufactured by reducing wood to its individual fibers, then heating and compressing the fibers to form panels. It comes in two basic grades, Standard and Tempered; the latter has chemical additives to improve rigidity, hardness and strength Fiberboard is made in the same way, but generally is impregnated with asphalt for weather resistance. Particleboard--used tor floor underlayment--is made by mixing wood particles with adhesives, then pressing the mixture into panels.
Watching for Warps
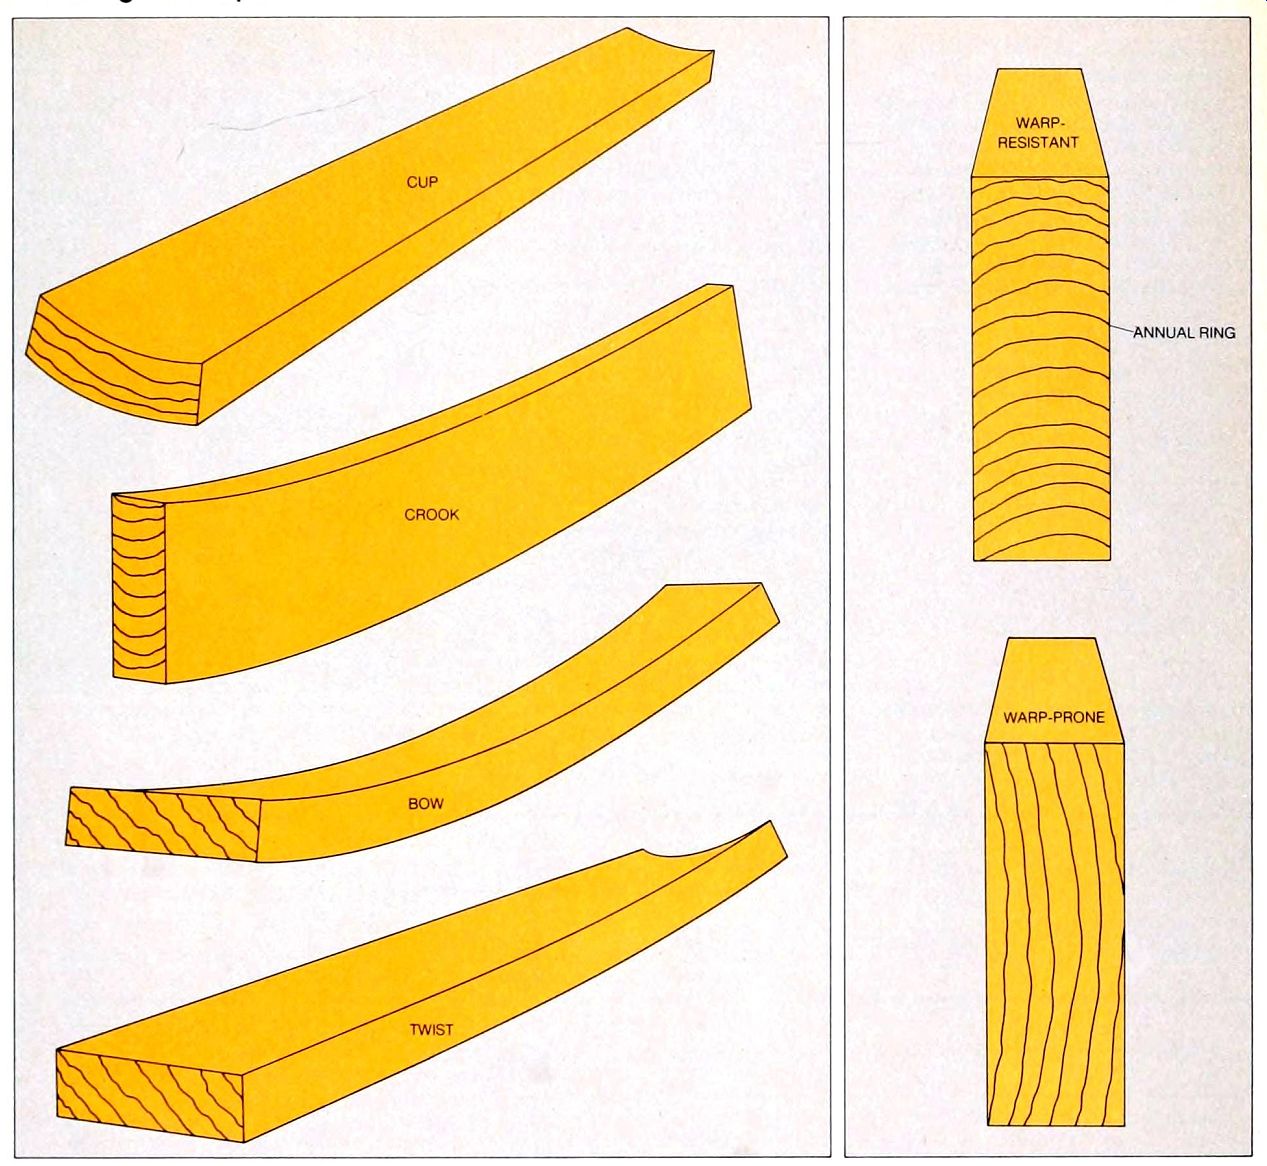
Four types of warping. Check the straightness of a board by sighting along all four of its sides A cup-a slight curve across the width of a board does not seriously impair its strength or usefulness for construction A board that has a crook (an end-to-end curve along an edge) or a bow (an end-to-end curve along a face) can be used horizontally with the convex side upward-the board will eventually straighten under the weight it bears-but should not be used vertically in a load-bearing wall Boards with a twist are unstable and likely to distort more as they continue to dry; use them only if strength and straightness are unimportant, as in firestops.
Good and bad ends. Lumber with the annual rings-visible as thin, concentric lines at the end of a board-parallel to its edges resists warping Boards with the rings parallel to the faces tend to warp from seasonal changes in humidity and temperature Do not use them where appearance or straightness is critical-in the rough framing for a door or window, for example.
The Right Way to Store Lumber
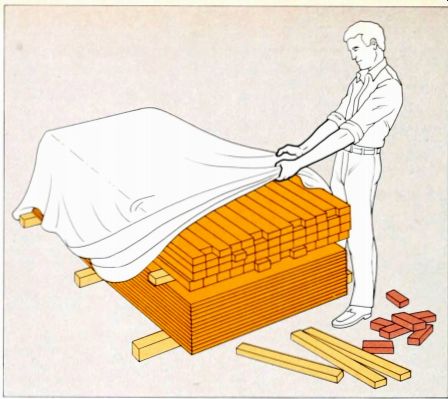
Stacking wood outdoors.
Arrange lumber or plywood in tight stacks, raised 4 to 6 inches above the ground on scraps of 2-by-4. then cover the stacks with sheets of 4-mii plastic to keep moisture out. Use bricks on top of the sheeting and scrap lumber around its edges to anchor the cover loosely enough to let air circulate under the pile and remove condensation from the under side of the plastic Use the wood within four months, otherwise the bottom boards may warp.
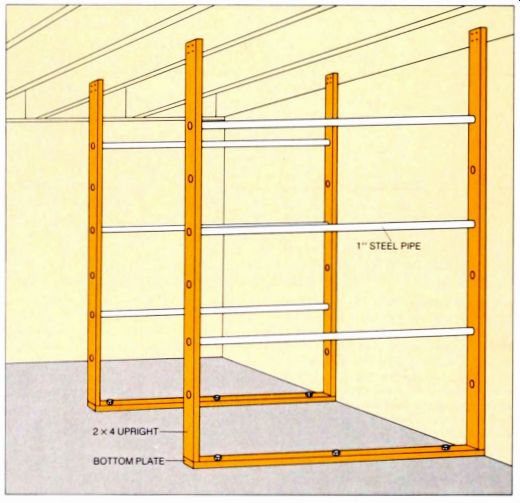
Racks for indoor storage. Build racks at 2-foot intervals; nail 2-by-4 uprights about 4 feet apart to a bottom plate, nail or bolt the bottom plate to the floor and nail the uprights to the exposed floor joists overhead or to a top plate fastened to the ceiling. Drill matching 1 1/8-mch holes through each upright at 1-foot intervals and slide 1-inch steel pipes through the holes to support the lumber Two racks will support boards up to 4 feet long, use three racks for lumber up to 8 feet and four racks for longer boards.
------------------------
The Qualities of Woods
Material | Characteristics
MATERIAL:
SOFTWOODS
Cedar
Fir. Douglas
Fir. true
Hemlock
Larch
Pine (except Southern pine)
Pine. Southern
Redwood
Spruce
HARDWOODS
Birch
Oak
BOARD PRODUCTS
Fiberboard
Hardboard
Particleboard
Plywood
--
Characteristics:
Used for shingles and shakes, exterior siding and fence posts, because of its unusual resistance to rot and termites Western varieties are light, soft and very weak, eastern are somewhat heavier and harder Cedar is easy to shape with tools, is usually stable and bonds well with glue and paint; it does not hold nails well.
The preferred softwood for load-bearing members such as girders and joists, because of its exceptional strength and relatively low cost Douglas fir is a fairly heavy wood and holds fasteners well It should not be used for visible woodwork or interior trim: it tends to split when exposed to the elements, does not take paint well and tears badly when shaped with tools, A common material for rough framing Fir is light in weight, fairly soft and slightly stronger than average Although fir sometimes is used for interior trim and sash work. it does not take paint or hold fasteners well.
Common for rough framing, often mixed with true fir and sold as HEM-FIR Eastern varieties are light in weight, fairly hard and relatively weak, western ones are somewhat stronger Hemlock tends to split and does not take paint or hold nails well.
A standard construction lumber, prized for its strength and nail-holding characteristics. It is heavy, fairly hard and quite rigid. This wood should not be used for exposed trim; it has many small knots, shrinks badly, splinters and tears when shaped with tools, and often splits when nailed Larch boards are often mixed with Douglas fir and sold as LARCH-FIR.
The best softwoods for interior trim, because they are easy to shape and to finish; lower grades commonly used in rough framing.
Pine is relatively light and about average in hardness and strength; it does not shrink or warp significantly as it dries, and it holds nails, glue and paint well.
Commonly used in stairways, girders and rough framing because of its great strength Southern pine is heavy, harder than any other softwood, and very rigid; it shrinks a great deal as it dries but is stable afterward This wood holds fasteners well, but is difficult to shape with tools, tends to split when exposed to the weather and does not hold paint well.
Commonly used for girders, siding, fence posts, outdoor decks and shingles, because of its combination of beauty, strength and resistance to decay Redwood is light, stable, fairly rigid and fairly hard, it is easy to shape with tools and to glue and paint It ordinarily is used for exposed surfaces only, because of its high cost.
Used primarily for rough framing Spruce is light, soft and stable, with average strength It is easy to shape with tools, bonds well with glue and holds fasteners well but is difficult to paint.
Used for fine interior trim, doors and paneling. Birch is heavy, hard and strong, it is fairly easy to shape with tools, but tends to warp and. when nailed or screwed, to split. It does not bond well with paint or glue, clear finishes are generally used.
The most common hardwood for flooring, doors, paneling and interior trim, because of its hardness and reasonable cost Oak is heavy, hard and very strong, it is difficult to shape with tools and does not bond well with glue This wood holds nails well, although it tends to split when nailed; pilot holes must be used.
Used as insulation and sheathing for exterior walls Fiberboard is light, soft, fairly flexible and very weak It is easy to cut with tools and to glue, but does not hold nails and tends to shred when cut.
Used for siding, interior paneling and floor underlayment Hardboard is fairly heavy, hard, and somewhat brittle It is easy to shape with tools, though it shreds when cut, it takes glue and paint well but does not hold fasteners.
Used for underlayment and shelving, sometimes called chipboard or flakeboard Particleboard is generally heavier and slightly stronger than hardboard Panels can be cut and glued easily but tend to split when nailed on the edges and are difficult to paint.
Used for sub-flooring, wall and roof sheathing, exterior siding, interior paneling and shelving Heavy, fairly hard and much stronger than the other board products, plywood is easy to cut and shape with tools, and takes glue well, fasteners hold
--------------------------
Special properties for special needs. The first column of this chart lists the woods and wood pro ducts commonly used in house construction, grouped in three categories: softwoods, hard woods and board products (such as plywood) The second describes the applications and characteristics of each wood weight, softness, strength, nail-holding characteristics and the like Woods that do not respond to changes of humidity are called stable; if a wood tends to swell, warp or split when the humidity changes, the particular fault is indicated Materials, grades and sizes of wood for specific jobs of house carpentry are given in the chart on pages 12-13 To use the chart, match the characteristics of the woods available in your area to the requirements of your job
For example, decay-resistant woods such as redwood and cypress are good choices for an outdoor deck; Douglas fir and Southern pine are best for important structural parts of a house because of their strength.
--------------------
13
14
Matching the Material to the Job
Component , Material , Grade , Sizes , Comments
------------------
Matching the material to the job. The first column of this chart lists the components of the frame and flooring of a house. The second specifies the right material or gives a choice of materials to use for each component when building or renovating In this column the generic term "softwood" stands for a variety of suit able woods, including larch, fir, Douglas fir, hem lock and pine, use the one that is least expensive in your locality. The term "structural softwood," specified for such load-bearing components as joists and rafters, indicates that the strength of a board is critical; use the strongest softwood available, generally Douglas fir or Southern pine. For " hardwood," oak is the most common choice, but other woods can also be used (chart).
The third column gives the minimum grade suit able for each component, in the terms most commonly used to order boards from a lumber yard, if the salesmen in your area use different terms, ask for the equivalent of the grades given here. The fourth column recommends sizes of boards for each component. Wherever these dimensions are matched to a span, as in joists.
headers and rafters, the chart can be used only as a general guide, consult an architect, a structural engineer or your local building code to check the exact size you need
A Clean and Simple Cut across the Grain
A cut straight across the grain of wood is the most common cut in carpentry, for a simple reason: the grain runs with the length of a board and standard-length boards generally must be shortened. Fortunately, such crosscutting, at 90° to the board edge, is also the easiest cut: it is generally a short one, and the teeth of a crosscut-saw blade need only slice the wood fibers, a cut that requires less effort than the scraping and ripping performed by a rip saw.
Which tool to use for crosscutting depends on the precision required and the volume and location of the job.
Most of these cuts-particularly in framing lumber-can be made with a portable electric circular saw. For precise work on trim, you need a stiff-bladed backsaw and a miter box. Both rough and precise cuts across the grain can be made quickly and easily with a radial-arm power saw (pages 19-21). The crosscut hand saw is still sometimes necessary-for rough cuts in cramped areas, for jobs where there is no electricity, and for boards that are too short to be steadied safely for a power saw.
When you buy new tools, there are certain features to look for. The teeth of a crosscut handsaw are set alternately to the left and right of the plane of the blade, and are not only pointed, but also beveled front to back. A better blade is also wider near the teeth, to keep the kerf from binding the blade. A blade with 10 teeth-“-points"--per inch is generally useful; an 8-point saw makes quicker but rougher cuts.
While every carpenter owns a hand saw, he most often uses a portable circular saw, which makes rough cuts nearly instantly and. with a simple jig, cuts lengths very accurately. A model with a 1 1/2 -horsepower motor and a blade of 7 1/4 inch diameter, which can saw completely through a 2-by-4 at a 45° angle, is adequate for home use. Some models have special safety features, such as a brake that stops the blade quickly when the trigger switch is released. All, however, are very dangerous tools, and must be used with careful attention to safety.
The multipurpose blade that comes with most circular saws, its teeth a com promise between the designs used for crosscut and rip handsaws, is excellent for crosscutting. If you do a great deal of cutting, however, you may want to substitute a more expensive blade that has carbide tips brazed to its teeth-the carbide-tipped blade makes a slightly wider kerf than an ordinary steel one, but it stays sharp more than 10 times as long.
For especially smooth cuts, use a hollow ground steel blade. Set the cut ting depth for any of these blades so that one entire tooth will protrude below the bottom of the board you cut.
Even in a jig, a circular saw cannot match the accuracy of a miter box guiding a backsaw, its fine-toothed blade reinforced to keep the cut straight. For good work you need more than the simple, slotted box of wood or plastic that sells for a few dollars Versatile models like the one on the cover-made of metal and able to accommodate boards 3 to 4 inches thick and 4 to 8 inches wide at any angle-are available at prices that range from modest to high. In them, the saw slides within guides and can be locked in a raised position while you align a board on the frame below. Any miter box should be anchored to a workbench; use bolts and wing nuts so that it can be easily removed for work elsewhere.
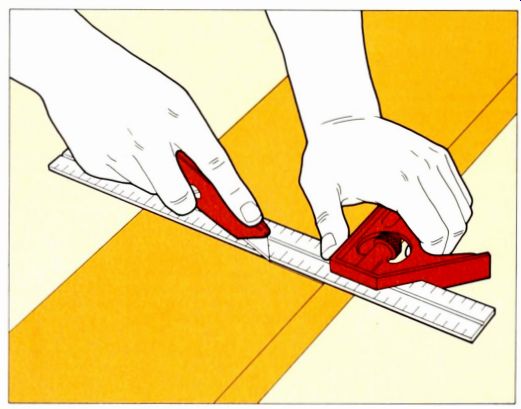
--- Marking a crosscut. For most 90° crosscuts, hold the handle of a combination square firmly against the edge of the board and mark along the blade For rough work, use a pencil, for finer work, score the wood several times with the point of a utility knife-the scored line is sharper and helps prevent splintering as the wood is cut
Crosscutting with a Handsaw
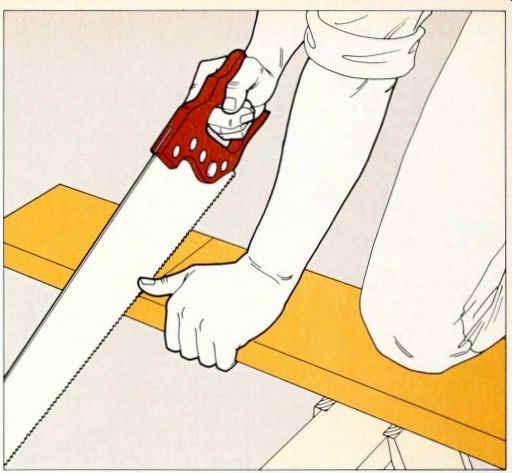
1. Beginning the cut. Lay a board across two I sawhorses, steady it with the knee opposite your cutting arm and grip the handle of the saw so that your index finger rests along the blade to help keep the saw course true Set the heel, or handle end. of the blade on the board edge at an angle of about 20°
For rough work, the teeth should lie directly on a penciled line; for fine work, on the waste side of a knife mark Holding the thumb of your free hand against the blade as a guide, draw the saw halfway back toward you. pressing lightly to cut into the wood Lift the blade from the wood, reset it to the starting position, and then pull backward again, do this several times until the kerf is at least as deep as the teeth Then lengthen and deepen the kerf with short, smooth back-and-forth strokes that cut in both directions.
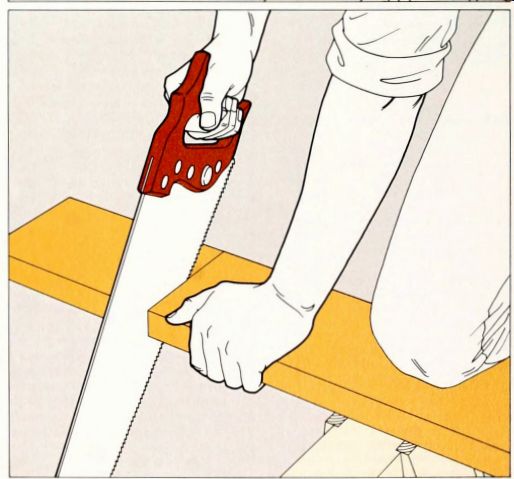
2. Cutting through the board. When the kerf is about an inch long-sufficient to establish the direction of the cut-pull your index finger back to help grip the handle, gradually increase the angle of the saw to 45° and lengthen your strokes, cutting mainly on the forward stroke and using moderate pressure. Use most of the full length of the saw. from about 3 inches from the tip nearly to the handle When the cut is al most complete, reach over the top of the saw to support the waste piece so that it does not fall and splinter the wood If the saw binds in green or warped wood, rub paraffin on the blade or drive a wedge into the kerf behind the blade. If the blade twists and binds as you attempt to correct a straying cut, either begin the cut at a new spot or widen the old kerf by re-sawing it until you reach uncut wood.
----------
Safety Tips for Circular-Saw Crosscutting
Using a circular saw demands the utmost care. Follow the standard power tool safety rules: wear goggles; do not wear loose clothing, a necktie or jewelry; keep children, pets and clutter out of your work area; use a grounded outlet for tools with three-wire cords. But also take extra precautions:
Never place your fingers beneath a board being cut.
Unplug the saw when adjusting or changing blades.
Do not stand right behind the saw; if the blade binds, the saw may leap back.
Never carry the saw with your finger on the trigger.
Before setting the saw down, check to see that the blade guard is closed.
------------
Freehand Cuts with a Circular Saw
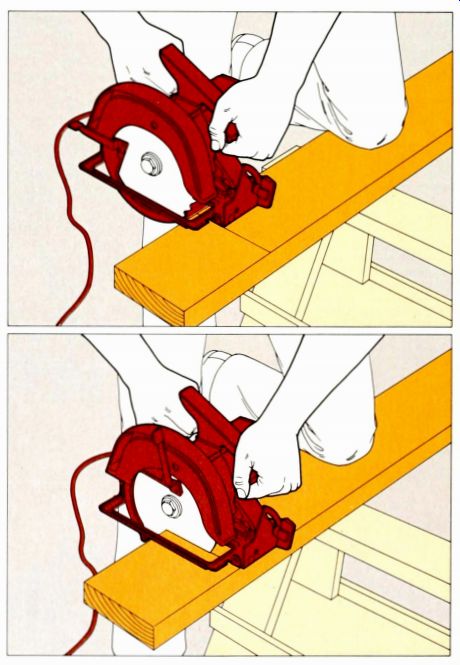
1. Aligning the saw. Lay the board across two sawhorses and steady it with either a foot or a knee, depending on the height of the saw horses and your sense of balance. Place the front of the base plate on the board with the blade at least inch from the board edge, and hold the saw so that entire plate is level, then use the guide in the base plate, or the blade itself, to align the blade with the cutting line. The guide in the base plate is generally an effective device for aligning a straight cut. but after you change or sharpen the blade, the guide it self may not line up properly with the teeth of the blade Experience with your own saw will tell you how to compensate for a misaligned base plate guide or whether to use it at all.
2. Making the cut. Start the saw and. applying pres sure forward but not downward, push the blade smoothly into the board, watching the guide or blade to be sure that the blade cuts along the line. Near the end of the cut. slow the forward motion, then quickly push through the remainder of the board in a single stroke. Immediately re lease the switch and move the saw away from the board, checking to be certain that the blade guard returns to its closed position If the blade binds or goes oft course, release the switch immediately. Pull the blade from the kerf, reset it to the starting position and start sawing again, cutting slowly into the kerf Allow the blade to work its own way-with minimal pressure forward-through the wood that was binding it before, or through new wood along the cutting line to correct a wayward first cut.
A Guide and a Jig for Accurate Speed
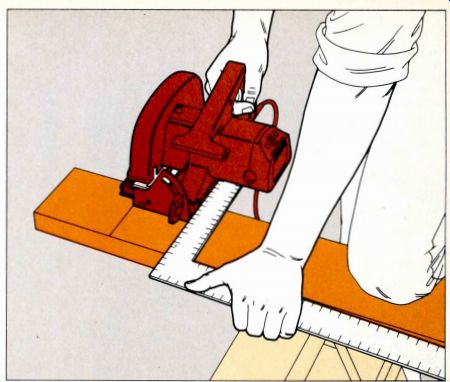
A square for right angles. Hold the long leg of a carpenter's square against the far edge of the board and set the base plate against the outer edge of the short leg Slide saw and square along the board until the blade aligns with the cut ting line, then make the cut by moving the saw along the short leg of the square.
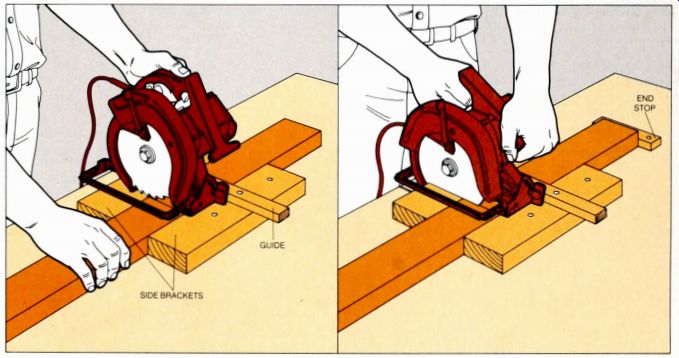
A jig for cuts of equal length. Set the marked board that you are going to cut on a sheet of ply wood. and bracket it with two long wood scraps as thick as the piece to be cut; nail these side brackets to the plywood Nail a wood-strip guide across the top of the scraps at right angles to the board and set the saw, with its blade fully elevated, against the guide (left) Slide the board beneath the saw until the cutting line is below the blade, then, at the far end of the board, nail a block of wood to the plywood as an end stop Set the blade to the proper depth and cut through the board and the side brackets by running the saw along the guide (right) To cut more boards to the same length, slip one at a time into the jig and against the stop To cut several pieces at once-for example, to cut boards for fence pickets-widen the jig to hold the pieces side by side and make a long stop exactly parallel to the guide.
A Miter Box for Precision
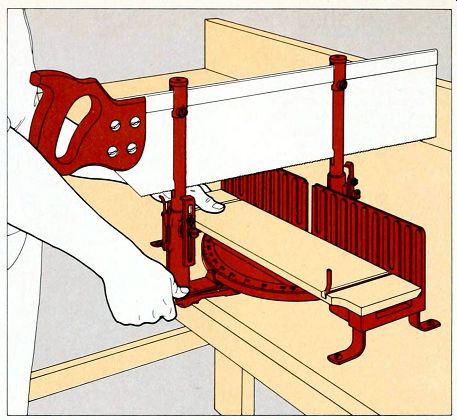
1. Setting the angle. With the blade raised, release the catch of the miter box's angle-setting knob and move the pointer to the 90° mark. Position the cutting line of the board approximately beneath the blade, release the front and back saw guide catches and then, holding the blade 0.25 inch above the board, make a final adjustment in the position of the cutting line.
2. Making the cut. With the thumb of your free hand, steady the board against the frame. Be gin the kerf with several backward strokes, as for any crosscut, but hold the saw level to cut the entire upper surface of the wood along the cutting line. Then, cutting on both forward and back ward strokes, cut the rest of the way through the board Use long, smooth strokes that fall just short of pulling the blade from the rear guide or running the handle into the front guide.