Prev.
The Versatile Radial Arm Saw
The multi-jointed stationary power tool called a radial arm saw is one of the most versatile, useful and ingeniously designed of all machines for working with wood. While it is expensive-5 to 10 times the price of a portable circular saw-it can make any cut that could be made with a handsaw, circular saw or miter box, but with a combination of speed and precision that is not found in any one of the other tools It is the preferred shop tool for carpentry; it is better adapted than a table saw for cutting many boards to the same length and angle, as in rough framing, or for making many cuts through large pieces of trim.
The blade and motor of the saw ride above a worktable along the track of a horizontal arm. Cutting is always above the table, where the blade position is clearly visible, and crosscutting is simple--you pull the saw by its handle straight toward you until the board is cut, then push the saw back. But the arm that supports the saw can also pivot more than 180° over the table and the saw can tilt on this arm to any angle; the pivoting and tilting together can position the blade for a cut at any angle. Scales and locks are used to adjust the blade settings with the accuracy of a miter box; safety guards shield the blade itself.
Crosscutting blades for a radial arm saw include the standard multipurpose steel blade and the long-lasting carbide tipped blade, both described .
For fine cutting, especially for trim, use a planer blade, which is slower but makes an extremely smooth cut.
Most radial arm saws come equipped with a warp-resistant particleboard table top. Protect this table surface-which otherwise will be gouged as the blade penetrates the first board being cut -with a layer of Vi-inch plywood secured with rubber cement. Cover the edges of the plywood with masking tape, to pre vent splinters from snagging your clothes.
Set tables at the sides of the saw to sup port long boards.
Since both the plywood cover on the table surface and the replaceable wood en " fence" that helps to hold boards in place are going to be cut by the blade in use, many craftsmen prepare the cover and the fence for use by making cross- cuts, angle cuts and rip cuts in them in advance. Such preparatory cuts will then help the user to align boards for accurate cutting.
In addition to the plywood cover, there are other accessories that increase the saw's usefulness. A wooden block placed as a stop at a fixed distance from the blade helps when you need to cut many pieces to the same length. An extra-tall guide, or fence, used as a temporary re placement for the standard fence helps when you need to cut accurately through several boards simultaneously.
--------
Safety Tips for Radial-Arm-Saw Crosscuts
Do all your planning before starting the motor; concentrate completely on the cut at hand, and turn the motor off as soon as the cut is done.
Hold the board being cut firmly against the fence, keeping your hand well away from the blade. Never put fingers on the back of the fence.
Pull the blade forward only until its bottom edge emerges from the wood; push the saw immediately to its rear position and turn it off.
(For safety in rip-cutting.)
---------
Anatomy of a Radial Arm Saw
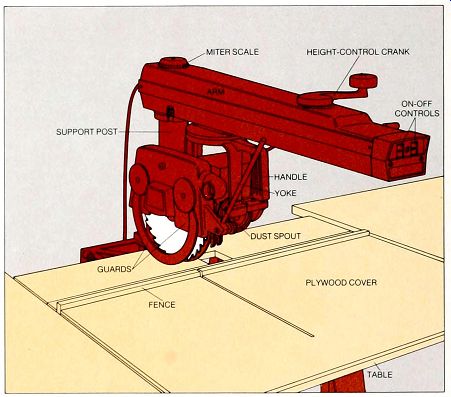
---- A versatile cutter. This saw whose teeth cut downward and away from you, is suspended with its motor in a yoke that permits it to tilt 100° right or left. The yoke also can turn more than 360° in its swivel mount, which rides in a track beneath a horizontal arm. The arm can move as well-manually 105° to both right and left, or up and down when you turn a height-control crank that adjusts the arm' s support post. A miter scale shows the angle of the blade in relation to a replaceable wooden fence against which the board to be cut is set A replaceable plywood sheet covers the worktable, In use the saw is pulled from back to front along its track in the arm, the blade cutting through first the fence and then the board as it skims the plywood table cover. Upper and lower guards shield the blade, and a dust spout directs sawdust to the side Other scales, locks and safety features are provided for angle cuts and rip cuts.
The Basic Setup for a Crosscut
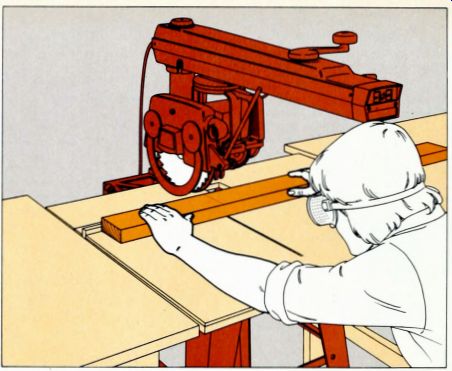
1. Setting up the job. With the motor off and in the rear position, set the arm at 0° on the miter scale and the blade 1/8 inch below the level of the plywood table covering. Place the board against the fence, positioned so that the blade will cut on the waste side of the cutting line. Rest the fingers of your left hand on the board at least 6 inches from the cutting line, and press the board against the fence with your thumb.
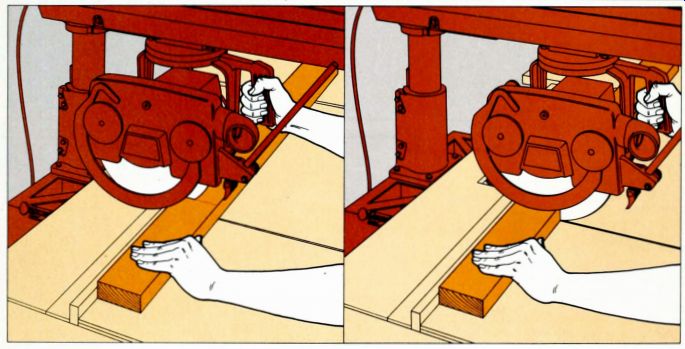
2. Making the cut. Start the motor and. keeping a firm grip on the handle, pull the saw into the board (left), if the blade tends to climb over the board and bind there, lock your elbow by straightening your arm When the bottom of the blade emerges from the front edge of the board (right), return the saw to the rear position and shut off the power If you pull the blade completely through the cut board, the saw teeth moving upward at the rear may catch the waste piece and hurl it over the fence If you cannot keep the blade from climbing over the board, shut off the power at once, then start the cut again, this time in two passes For the first pass, raise the blade to make a kerf about half as deep as the board; for the second position the saw at the normal cutting height.
Special Setups for Awkward Jobs
Stops for repeated cuts. To crosscut a number of long boards one after the other to the same length, nail a 2-by-4 block that is chamfered beveled-at the bottom to keep sawdust from building up and distorting your measurement, to a worktable at the side of the saw (below left). The block will serve as a stop, as in cuts made with a circular saw.
As a stop for short boards, fasten a woodworker's clamp to the saw fence, leaving a gap below the clamp for accumulations of sawdust (below right).
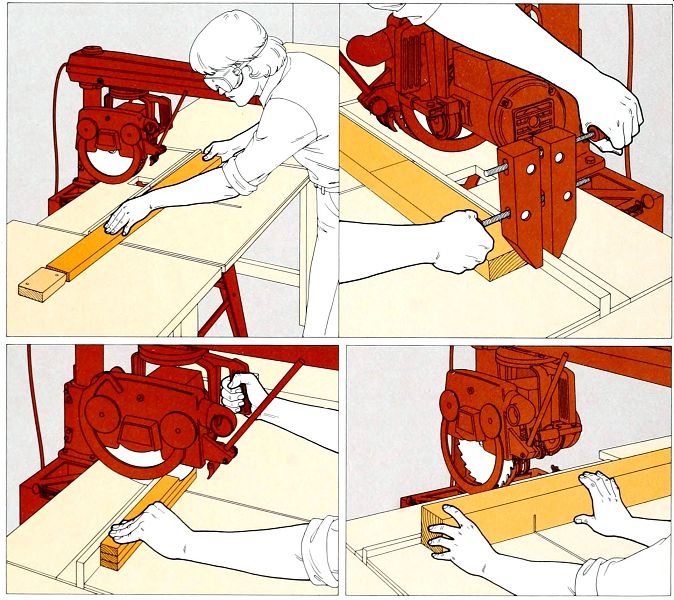
--- A tall fence for multiple cutting. (above left) To cut a number of boards in one pass, stack them against a taller replacement for the standard fence use a 1-by-3 or a strip of plywood or particleboard % inch thick and 3 inches wide.
---Cutting thick lumber. (above right) To crosscut a board that is as much as twice as thick as the distance between motor and blade teeth, raise the blade until the motor clears the board to be cut, then make a first cut. Turn the board over, align the kerf you have made in it with the blade, and pull the saw through for the final cut.
Sawing with the Grain for a Rip Cut
Cutting a board lengthwise, with the grain, in what is known as rip cutting, used to be a major part of a carpenter's work. It is so no longer-modern saw mills cut and plane boards to the standard dimensions of house carpentry-but many boards still must be trimmed to width on the job. Among them are fur ring strips, stair treads and risers, odd sized jambs for plaster walls, and new studs cut to match old, full-sized lumber.
None of these jobs are easy. A rip cut, which scrapes and tears the fibers of a board, requires about five times as much work as a crosscut, which neatly severs the fibers. It is harder to keep straight, because the saw blade tends to follow the grain, which is never quite true. And it leaves a rough edge that must be planed smooth on exposed pieces of wood; in marking such pieces for a cut, allow an extra 1/16 inch for the planing.
Most rip cuts are now made with power saws, but a handsaw remains the only suitable tool when a board already is nailed in place in a hard-to-reach spot, or when a piece of wood is too small to be cut safely with a power saw. The preferred hand tool is a 5 1/4- or 6-point rip saw, which has teeth designed specifically for efficient rip cuts (opposite, top); an alternative is an 8-point crosscut saw, slower but more commonly available.
A portable circular saw, the standard ripping tool, is fast and durable but not particularly precise, even in skilled hands, when the cut is made freehand. For somewhat more accurate results, you can use the rip guide shown overleaf; on boards more than 12 inches wide, use one of the panel-cutting guides shown. For all of these cutting methods, the power saw is fitted with the same blades that are used for crosscutting--a steel combination blade (or its carbide-tipped equivalent) for rough cuts and a hollow-ground planer blade for somewhat smoother ones. Pitch and res ins gradually build up on either type of blade until it sticks in the kerf; these deposits are easy to remove with kerosene or commercial solvents.
The radial arm saw, best for both production and precision, can rip with these blades, but for easier, cleaner cuts with this shop tool you may prefer to buy a special rip blade, which has chisel shaped teeth with deep recesses be tween them. The saw is easily set up for ripping, but to cut long pieces, you will need to slide boards along worktables that you have placed on each side of the saw table.
Three Ways to Mark for a Rip
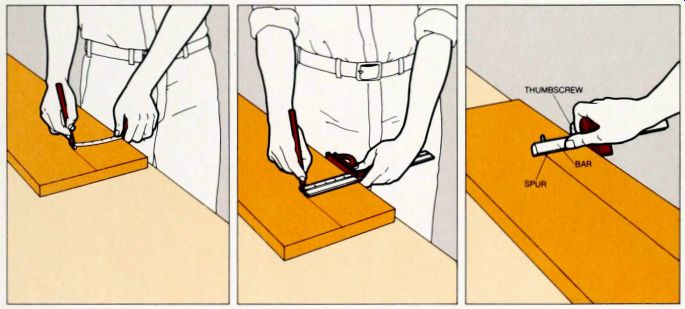
A steel tape for rough work. Hold the tape case in the palm of one hand, extend the tape to the measurement for the cut. and set the case next to the edge of the board, with your forefinger tight against the edge, with the fingers of your other hand, hold a pencil against the end of the tape-many tapes have a V-shaped notch there. Slide both hands smoothly along the boards, use your forefinger as a guide, keep the tape perpendicular to the edge and keep the length constant by clamping your fingers firmly on the tape.
A combination square for convenience. Extend the blade of the square to the measurement for the cut and lock it with the knurled nut in the handle Set the square, machined face of the handle tight against the edge of the board with one hand and hold a pencil against the end of the blade with the other, many blades have a groove here that will help hold the pencil. Slide the square and pencil along the board together to mark the cut, holding the machined face of the square tight against the edge of the board.
A marking gauge for precision. Mark the start of the cut at one end of the board Hold the head of the marking gauge flat against the edge of the board, slide the bar out until its spur touches the mark and tighten the thumbscrew on the head Hold the head of the gauge in your palm and roll it forward until the spur barely touches the board, then push the gauge along the board, press the head firmly sideways against the edge and brace the bar with your thumb The spur should score a clear, shallow line.
--- The Old-fashioned Way: Ripping with a Handsaw
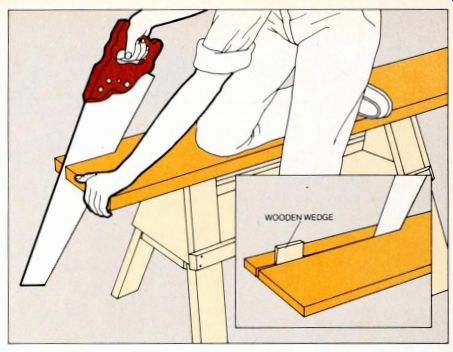
Using a ripsaw. Set a small board on a saw horse as you would for a crosscut; support a large one between two sawhorses Start the cut as you would a crosscut (Step 1): then, when the cut is about an inch long, raise the angle of the saw to about 60° and apply most of the force on the push stroke. If the blade buckles or skips through the cut, lower the angle of the saw slightly; if the board pinches the blade, tap wooden wedges into the kerf (inset).
When using one sawhorse, edge the board for ward little by little; halfway through the cut. turn the board around and saw from the other end.
When using two sawhorses, cut to within a few inches of a horse, then slide the board back and resume cutting on the other side of the horse.
---- Ripping with a Circular Saw
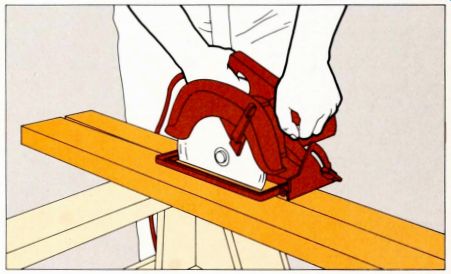
A freehand cut. Clamp or tack the board to two sawhorses and set the saw blade 0.25 inch deeper than the thickness of the board. Rest the saw nose flat on the end of the board and align the base-plate guide mark or the blade itself with the cutting line, then start the saw and slowly push it into the board. Near the end of the cut, a base-plate guide mark will slide off the end of the board, guide the saw by the blade alone.
If the saw motor slows and labors, pause until it gains speed, then push it forward more slowly.
If the cut goes off the line, angle the saw slightly toward the line for a few inches, then straight en it when the cut returns to the line. If the blade binds, turn off the saw and tap a wooden wedge into the kerf near the blade (above, inset).
--------------
Safety Tips for Circular-Saw Rips
Stand to one side of the saw, not directly behind it. If the saw kicks back-a common occurrence in a rip cut-your leg could be gashed.
Do not rest your fingers on the kerf; it is the path of a possible kickback.
Do not hold the waste piece with your hand, let the sawhorses support it or let it fall.
Wear goggles to protect your eyes from the large amounts of sawdust filling the air around a rip cut.
---------------
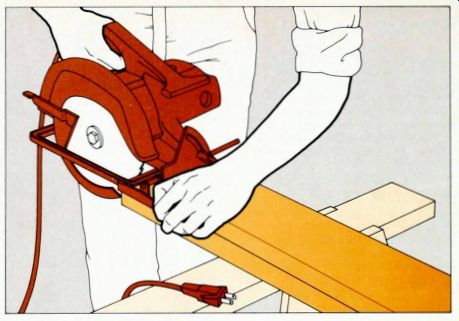
----- Using a rip guide. With the saw unplugged, set the nose of the base plate flat on the board and align the blade with the marked line. Slide the arm of the guide through its base-plate holder until the guide shoe fits against the edge of the board, then tighten the guide arm in position.
When you make the cut. maintain a gentle sideways pressure on the saw to keep the guide shoe tight against the edge of the board
Ripping with a Radial Arm Saw
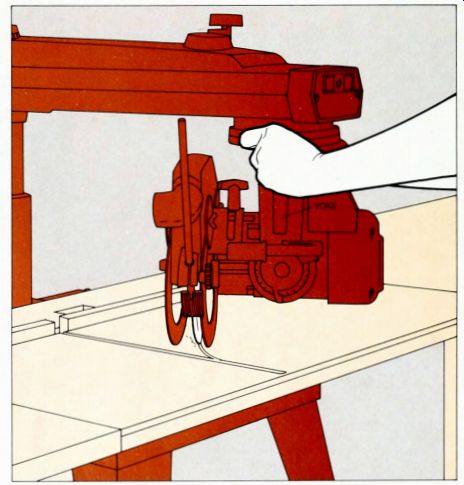
1. Setting the "in-rip" position. With the motor off and the blade depth set 1/8 inch below the table top, pull the saw forward to the end of the arm and tighten the rip lock. Start the motor, grip the saw handle with your left hand and release the yoke lock with your right Pivot the motor slowly to the right with both hands, cutting a shallow quarter circle into the plywood table covering, at the end of the quarter circle, a cog in the yoke mechanism will lock the blade parallel to the fence, in the in-rip position, that is. with the motor away from the fence Leave the motor on and proceed immediately to Step 2.
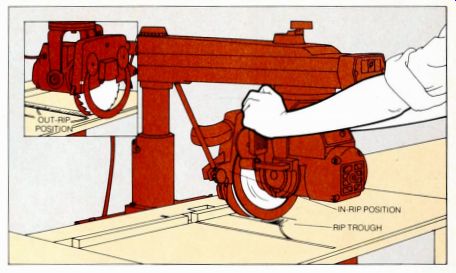
2. Making the rip troughs. Release the rip lock and using both hands, slowly push the saw toward the back of the table, cutting a shallow trough in the table covering. When the blade guard reaches the fence, pull the yoke back to the end of the arm and tighten the rip lock.
Release the yoke lock and pivot the yoke 180° to the " out-rip" position (inset)-that is, put the motor next to the fence Loosen the rip lock and slowly push the saw back, making a second trough that runs into the end of the first
Setting the Saw and Making the Cut
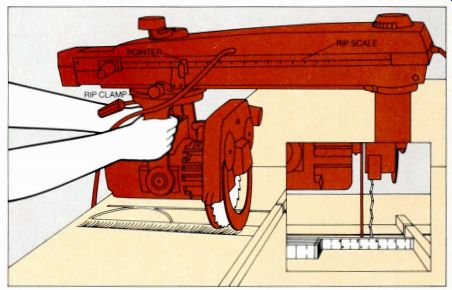
1. Setting the width of the cut. Turn the saw motor off. To cut a width less than 8 inches, move the yoke to the in-rip position and lock the yoke clamp (bottom), for wider cuts, move the yoke to the out-rip position Push the yoke along the arm until the pointer on the arm's rip scale shows the correct width and tight en the rip clamp. For absolute precision, lift the guard closest to the fence and measure the cut width between the fence and the edge of a blade tooth set toward the fence (inset)
---------------
Safety Tips for Radial-Arm-Saw Rips
In addition to the basic safety rules, observe these precautions:
Wear goggles.
Set and test the guard and anti-kick back fingers (overleaf, Steps 2 and 3) before you make a cut.
Feed the saw from the right when in ripping, the left when out-ripping.
Stand beside, not behind, the board.
Do not let a helper push the board against the fence on the far side of the blade; the pressure can pinch the kerf around the blade and cause a kickback.
Keep your fingers at least 2 inches from the blade; never insert them underneath the guard.
Do not reach near the blade to move the waste piece when the cut is completed; push it with a scrap of lumber or pull it from the other side of the blade.
-------------
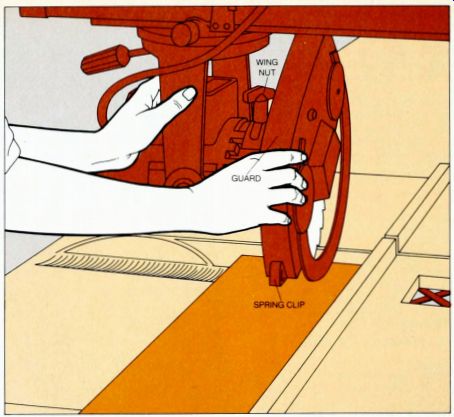
2. Adjusting the guard. Place the board (or a scrap of the same thickness) beside the blade and loosen the wing nut that locks the guard to the motor. Rotate the guard until the spring clip on its nose is inch above the board, then tight en the wing nut, locking the guard.
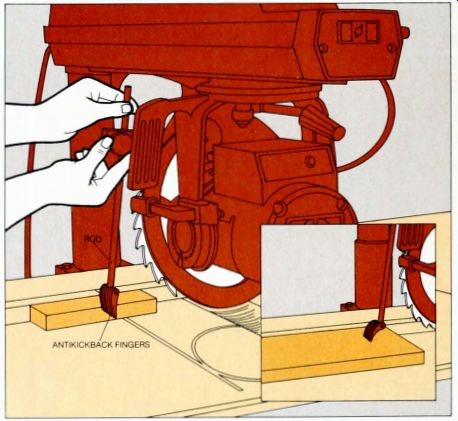
3. Setting the anti-kickback fingers. Place the board alongside the anti-kickback fingers at the back of the guard The fingers hang from the end of a rod; loosen the clamp that fastens this rod to the guard, lower the rod until the fingers dangle 1/2 inch below the top of the board and tighten the clamp. To test the fingers, slide a board under them from the blade side, then try to push it back toward the blade Onset); the fingers should bite into the top of the board and prevent it from moving backward. If they do not grab the board, adjust the rod until they do.
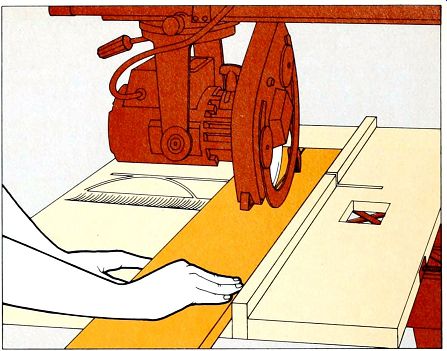
---4. A Starting the cut. Set the board flat against the fence, on the right side of the table for in-ripping, the left for out-ripping (the drawing at right shows the correct position for an in-rip cut) Turn the saw on and place your hands on the board about 18 inches behind the blade, with one hand next to the fence and the other on the near edge of the board Slowly push the board into the blade with the hand next to the fence, use your other hand to press the board gently down and toward the fence with your other hand, but not to push.
When your hands are about 6 inches from the blade, move them back along the board and resume the cut. When your hands are on the end of the board and 6 inches from the blade, proceed directly to Step 5.
If the blade binds, shut off the saw and drive an eightpenny cut nail, filed to an oval, through the kerf into the saw table about 2 inches be hind the anti-kickback fingers.
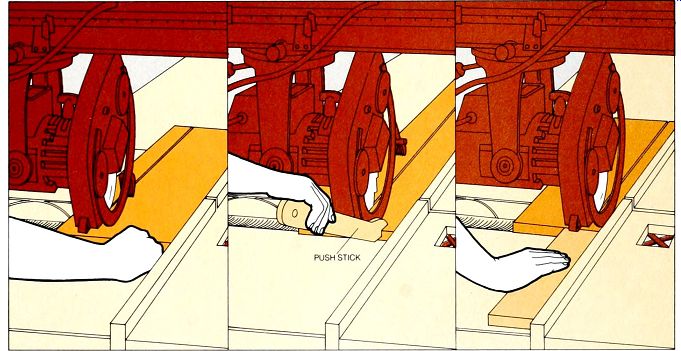
5. Completing the cut. If more than 6 inches of the board he between the blade and the fence, you can complete the cut by hand (left) Place the hand nearer the fence at the end of the board, with the thumb tucked under the palm, and take your other hand away from the board. Push the board through the saw, keeping your fingers together and your hand tight against the fence, well away from the blade and guard, then move your hand behind the fence, pull it back and turn off the motor.
If 1 to 6 inches of the board lie between the blade and the fence, use a push stick (middle). Cut a notch at one end of a scrap of 1-inch lumber 16 inches long Set the notch on the end of the board, centered between the blade and the fence, and push the board through the saw, then move the stick and your hand behind the fence and pull them back. If the distance between the board and the fence is less than 1 inch (right). set a scrap of wood about 16 inches long and 3 inches wide at the end of the board and against the fence Feed the scrap partway through the saw, cutting the scrap while at the same time pushing the board past the blade, then slide the scrap back along the fence.
The Angle Cuts: Miter, Bevel and Compound
All the myriad angled cuts required in carpentry tall into three basic types. A miter cut, like the one on a rafter end at a roof peak, slants across the face of a board. A bevel cut slants across an edge of a board between opposite faces, as in the top of a gable stud cut to fit the pitch of a roof. And a compound cut, used primarily for finish joints in trim and molding, combines the first two types to provide a board that is mitered across its face and beveled across its edge.
Angle cuts are made with the same tools used for square cuts-the crosscut handsaw, the circular saw, the radial arm saw, and the hacksaw and miter box but the techniques differ somewhat.
When using a handsaw to cut an angle, for example, you may want to clamp a guide to the work to prevent the saw from slipping sideways along the board.
To start a rough angle cut with a circular saw, you must lift the blade guard; and since the base plate tilts only as far as 45° in one direction, you must calculate and cut a complementary angle to make a sharper bevel than 45° (opposite, bottom). With the miter box and hacksaw used for the delicate work of cutting trim pieces such as casings, chair rails, base boards and molding-you must position the wood on edge to make a bevel cut.
For any angle cut with any type of tool, you must take special pains to lay out the work for precision of fit. Generally you can hold one board against another and trace the line of their intersection. In other cases no measurement is needed because the angle is calculated in degrees or is obvious-a 45° miter on window trim, for example. Often, however, you must measure with a protractor and a T bevel-a wooden handle bolted to a pivoted metal blade.
For simple angle cuts, fit a T bevel into an angle you wish to copy, lock the blade and hold the tool against a board to mark the cut. To set a circular saw for a bevel cut, hold a T bevel against the saw blade-with the saw unplugged-while you adjust the tilt In situations where it is difficult to align the saw blade by eye but you have a scale on the tool-as in setting a radial arm saw for a bevel cut use the T bevel to transfer the angle to a scrap of wood, use a protractor to mea sure it and set the scale of the tool to the measured angle.
The scales on tools are supposed to align exactly with the saw blade, so that a simple setting cuts the angle you want.
They rarely do. While the error generally is small-around 1°--it is enough to spoil a visible joint, and it changes as the tool is used. Test periodically to determine the correction needed. And for any angle cut requiring special precision, make a test cut on scrap wood and check the result with a protractor.
Making Miters in Rough Lumber
--------
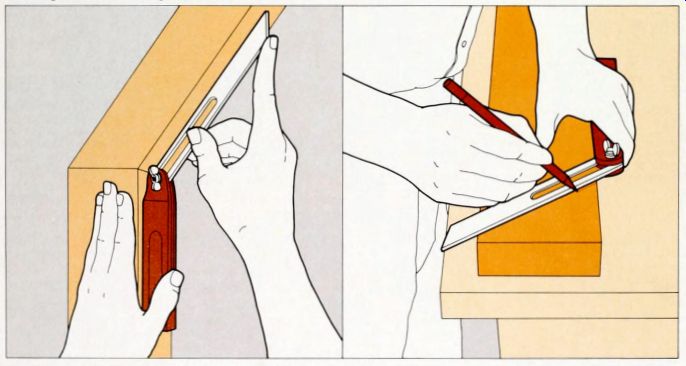
Transferring an angle. Extend the blade of a T bevel and adjust the wing nut on the handle so that the blade moves easily but does not swing free Fit the T bevel into the angle you plan to transfer (above, left) with the blade corresponding to the line you are going to cut, and tighten the wing nut Hold the handle of the T bevel against the edge and the blade across the face of the board to be cut, hen mark the cut ting line along the blade (above, right).
Cutting an angle with a handsaw. If you are unsure of your ability to follow the cutting line of an angle cut. which is more difficult to start accurately than a straight cut, clamp a piece of scrap-a 2-by-4 will do-to the stock so that it is exactly lined up with the cutting line and over laps each edge Begin the cut as you would a square crosscut. After you have established the kerf, remove the saw from the stock and check to be sure you are following the cutting line. If you are not, restart the kerf.
Cutting an angle with a circular saw. A guide tacked parallel to the cutting mark on the non waste side of the mark is generally advisable for long cuts and is also helpful on short ones.
Rest the base plate of the saw against the guide, then, before turning on the power, lift the blade guard Hold the guard up as you begin the cut, and release it after it has cleared the edge of the board Use the guide to keep the blade aligned, but if it strays, start the cut over: do not attempt to force it back on course.

Using a Circular Saw for Bevel and Compound Angles
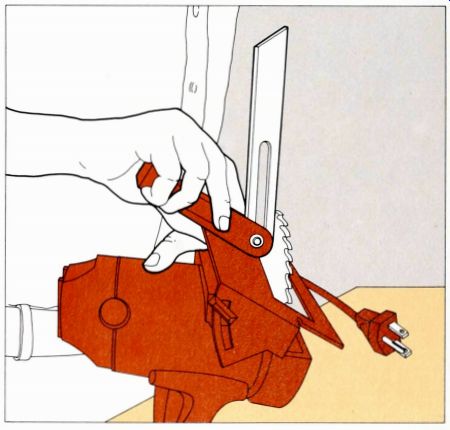
Setting the blade for a bevel cut. While a handsaw makes this cut quickly if you are adept at cutting to a line-a guide is impractical the circular saw is far simpler to use For a bevel no sharper than 45°, set a T bevel to the angle of the cut (opposite, bottom left), then unplug the saw, set its blade for the maximum cutting depth and lay it upside down Hold the handle of the T bevel firmly against the bottom of the base plate, loosen the protractor nut on the blade angle scale at the front of the saw. retract the saw guard and tilt the base plate until the blade of the T bevel lies flat against the saw blade Tighten the protractor nut to secure the setting Mark a line square across the board and align the blade with it, using the guide at the front of the base plate (Check the alignment of the blade and the line carefully by eye. many guides are imprecise ) Start the cut with the guard raised as described for angle cuts (above, right).
For a bevel sharper than 46° in construction lumber, use a protractor to set the T bevel to the complement of the angle desired, then use the T bevel to set the saw blade as described above. For sharp bevels in shaped boards, such as trim, use a miter box (overleaf).
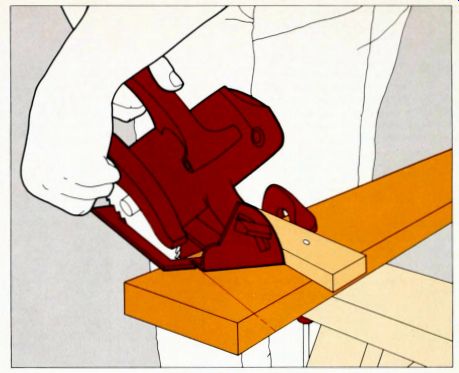
--- Making a compound cut. With a handsaw, this two-directional
cut generally requires two separate operations-a simple angle cut followed
by a bevel cut With a circular saw it is done in a single pass. Lay out
the simple angle, then set the saw blade for the bevel (bottom), but follow
the cutting procedure that is used for a simple angle (fop right).
Cutting Trim with a Miter Box
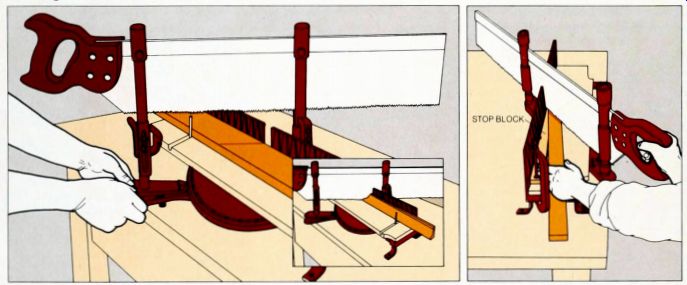
Making simple angle or bevel cuts. Set the saw angle desired, correcting for scale error if necessary. For a simple angle cut. place the board flat side down in the box and secure it in position--using miter-box clamps or woodworking clamps--so the saw will cut on the waste side of the mark. Lower the saw and make the cut. Follow the same procedure for a bevel cut, but place the board on edge, with its flat side against the back of the miter box.
Making a cut sharper than 45°. Measure and mark the angle to be cut and place the marked stock in the miter box. Move the saw blade as close to the cutting line as possible, then shift the stock to align the cutting line with the blade. Fit a block of scrap wood between the back of the miter box and the stock and clamp the block in place. Hold the stock firmly while you make the cut. checking constantly to see that the cutting line does not stray from the plane of the saw.
A Radial Arm Saw for Speed and Precision
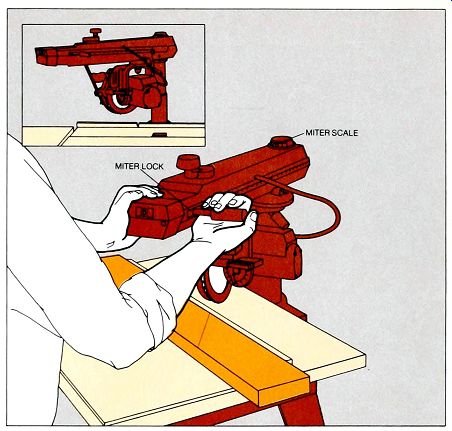
Setting the saw for simple angle cuts. For a right-hand angle cut. loosen the miter lock and swing the arm to the right, setting the indicator on the miter scale to the angle you will cut, correcting for scale error if necessary. On a typical radial arm saw, the arm will lock automatically at 45°. and you must release the lock to move it. Mark the stock and brace it against the fence with your left hand, positioning it so that the blade will cut on the waste side of the mark; use your right hand to pull the saw through the board If precision is important, make a test cut on scrap.
To cut a left-hand miter in a flat board, flip the board upside down and use the right-hand miter position. If the board surface is shaped and will not lie flat when you flip it. move the fence to its rear position and swing the saw to the left to lock it in the left-hand miter position (inset).
Use a supplementary worktable, if necessary, to support the wood, and pull the saw through the board with your left hand.
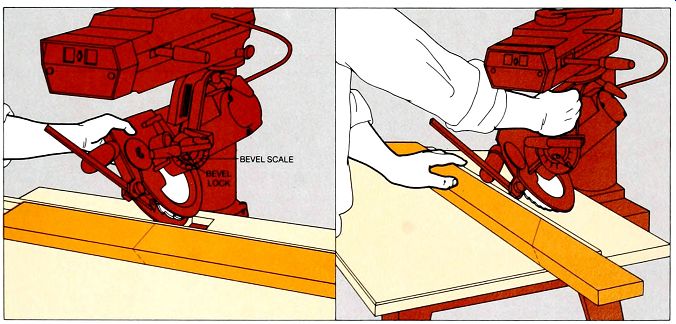
---------- Making bevel and compound cuts. For a bevel
cut. raise the arm of the saw until the blade clears the table by about
3 inches; release the bevel lock and tilt the blade counterclockwise to
the correct degree reading on the bevel scale, then retighten the bevel
lock (left) Make sure that the saw guard has enough play so that it will
not jam when you move the saw; if necessary, clear the guard of sawdust
and lubricate it. (If the guard jams while you are pulling the saw. stop
the saw immediately and free the guard). Use your right hand to position
and steady the wood, and your left hand to pull the saw Make a test cut
to check accuracy. For a compound cut, set both the miter and the bevel
scales. The cutting procedure follows that used for a bevel cut, but you
must switch hand positions if the saw is set for a right-hand miter (right).