Ortho Home Improvement books
Conceiving the kitchen of your dreams takes imagination and flair. Turning those dreams into reality requires close attention to the nuts-and-bolts details of kitchen construction. The structure of the walls, floor, and ceiling; the systems and utilities hidden within them; and the finishes that cover their surfaces determine more than anything else whether the kitchen meets your needs as a pleasant and practical place to work and entertain. The variety of finish materials available for the modern kitchen allows you to develop the design you want in a number of price ranges.
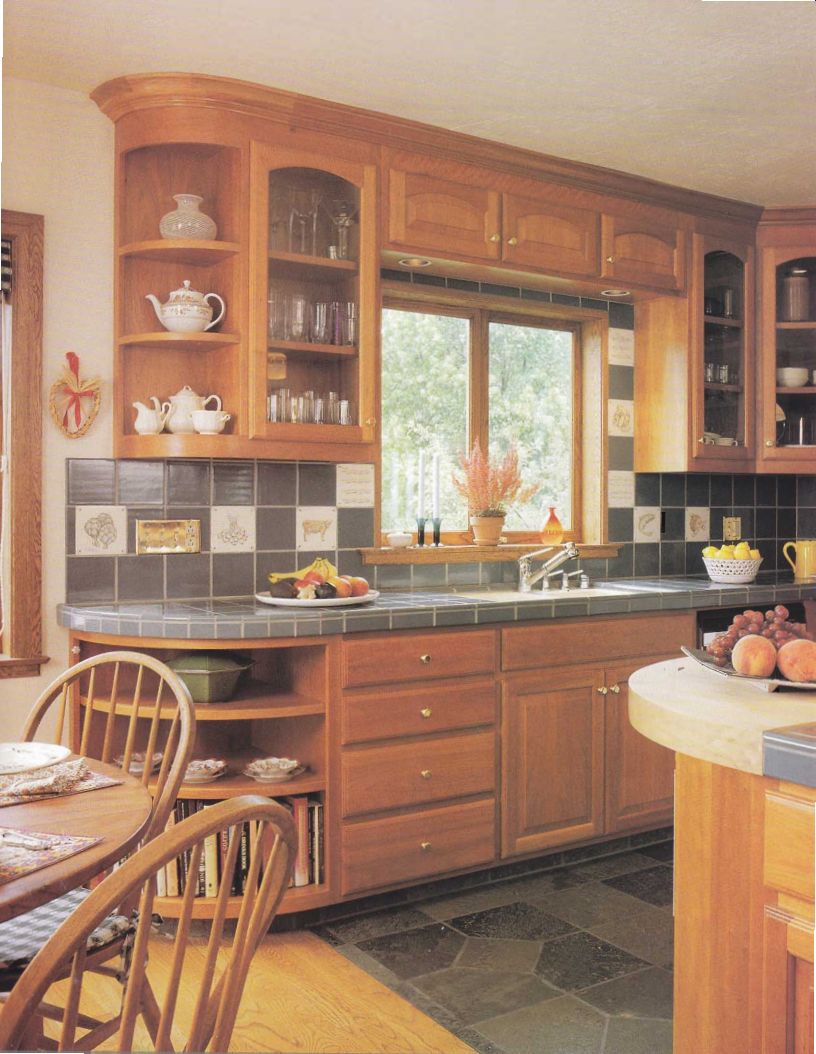

-------------- Some construction elements can be personal as well
as practical. Specialty tiles in this backslash reflect one homeowner's
dual career: Site is both a musician and a cookbook author. The cabinets reflect
the talents of the co-owner: They were designed and built by his construction
company.
+++++++++++++++++
WALLS
While deciding which walls stay, which walls go, and where new walls are needed, you must also determine what work must be done within the walls themselves to make them sound. Once their placement is set, all walls must be finished to suit the new look.
Keeping Walls
Leaving an existing wall light where it is saves much effort and expense, but it doesn’t mean the wall must remain un touched. Check the condition of the wall surface; if it has more than superficial damage, is not flat, lexes when pressed on, or shows obvious patching, the surface material-usually wallboard or plaster over lath should be torn off the underlying studs. In a major remodeling job this usually entails removing the entire wall surface, because it is easier to refinish a wall from corner to corner than to patch a large area neatly.
Exposing the framing this way has several other advantages. With the wall surface re moved, the wiring, pipes, ducts, and insulation can be inspected, and the framing can be examined for insect damage, rot, and construction errors.
Watch for the following common problems:
. Headers that are not adequate for the span they cover
. Studs that have been cut away and not supported
. A sink vent stack that does not extend through the roof
. Hot wires hanging loose in the wall
. A range hood duct that vents into the attic
Alterations to the electrical and plumbing systems are most easily done with the wall wide open. You can even re build the wall itself. With the framing exposed, for example, you can convert a typical 2-by-4 stud wall to a 2-by-6 wet wall-thick enough to contain 3- and 4-inch stack pipes-by nailing 2 by 2s to the studs.
If you decide not to expose the framing on a retained wall, you may incur unexpected expenses related to conditions hidden inside. A contractor bidding on a kitchen job often specifies in the bid that corrections to unforeseen problems carry an extra charge.
Adding Interior Walls
If you're lucky enough to have a large space to work with, you may decide to subdivide it into specialized centers-a mud room, a laundry, an office-by adding walls. Such interior walls are also known as partitions.
A partition wall is simple to build and install. The frame, made of 2-by4 or 2-by-6 studs, is nailed together on the floor and then raised into place.
Doorways, pass-throughs, and built-in shelving nooks are framed into the wall at the same time. Once the frame is raised, the planned electrical wiring, plumbing, insulation, duct work, blocking for cabinet supports, and other in-wall systems can be installed efficiently before the frame is enclosed with wallboard.
Partial Walls
Not all walls completely enclose a space. Your kitchen design may include partial walls.
A wing wall is a partition that extends only partway across a room. A wing wall is a viable solution for a partially open kitchen design; the wall separates the kitchen from an ad joining room without the feeling of closure that a door way causes. It can also be used to enclose a refrigerator or end a row of cabinets.
A pony wall, or kneewall, stops below the ceiling, usually at counter height, and provides a casual but definite boundary for peripheral areas of the kitchen, such as the home office desk or the laundry. It can double as a shelf or support a bar counter. A wall with a foot or two of open space above can admit light from another room, thus brightening the kitchen.
Partial walls are built in much the same way as full walls and can support plumbing, electrical wiring, appliances, and cabinets. In fact, cabinets help strengthen such walls. Freestanding walls that do not reach the ceiling must be stabilized by extra supports.
Finish Treatments
Once you’ve made practical provisions for installing sound walls, you can indulge in the fun of deciding how to decorate them. In the past, poor ventilation and greasy, sooty cooking required that kitchen walls be finished with a wipe-clean surface, but technical advances in ventilation and wall-treatment fabrication have greatly in creased the options. The finish treatment you choose must not only be practical but should reflect the look of the kitchen and-especially if the walls are visible from other rooms-the design concept of the entire house. In choosing finish treatments remember that two or three well-coordinated types are often combined in one room.
Paint
Paint offers the most variety for wall color. Many paint dealers now have color-mixing computers that can " look at" a sample of tile, countertop material, or fabric and mix a paint that matches exactly. Paint is an in expensive and practical choice for a hardworking cook's kitchen, particularly if the walls are within reach of small children. A typical gloss paint is scrubbable and, in case of surface damage, can simply be painted over.
For the kitchen, choose a high-quality wall paint, either latex or oil based, with a gloss or semigloss finish; flat paints are absorbent and difficult to wash.
To estimate the amount of primer and paint needed, multiply the width times (he height of each wall or wall segment to get their areas, add them together, then subtract the area of each door and window. Double this figure if applying two coats over a previously painted wall (to cover a dark color with a light one, for example). New kitchens are usually painted before cabinets are installed; retained cabinets do not have to be removed.
Remember to add the areas be hind appliances. The paint dealer or the label on the paint can will tell you how many square feet each gallon covers.
Wallcoverings
Durable modern wallcoverings can be a smart choice for the kitchen. For large wall expanses In a room you’ll inhabit so much, a conservative pattern will feel most comfortable.
Used in small areas, however, bold patterns can accent plain painted walls. Patterns that imitate tile or brick are am attractive faux look for a back splash. Many wall coverings have matching or coordinating print fabrics for curtains, blinds, or tablecloths. These are detailed in sample books, available from any wall covering dealer.
For ease of maintenance, choose an all-vinyl or a vinyl coated wallcovering. Vinyl with a fabric backing is the most durable and is easiest to hang. Make sure the sample book "describes the wallcovering as "scrubbable," not just "washable," unless you plan to protect splash areas with sheets of clear acrylic. Avoid delicate papers and textured coverings such as grass cloth or cork.
Wallcoverings cost somewhat more than paint but far less than other specialty finishes, such as wood or tile. Considering its design impact and its durability, wallcovering is an attractive and economical choice.
Wallcoverings are measured by the roll, which, regardless of width, covers about 35 square feet (European wallcoverings will do about 28 square feet).
Two or three rolls of wallcovering may come in a single pack age-check the label. To determine how much you need, measure the area to be covered and add at least 10 percent for waste, trimming, and future patching. Wall covering tools are specialized but simple and are often avail able in kits where wallcoverings and adhesives are sold.
In addition to wallcoverings, myriad borders are available, in widths from approximately 2 to 6 inches. They are usually pre pasted, and make a strong design accent when used alone or when coordinated with full-wall wallcoverings. In a kitchen, borders can be applied along the ceiling, level with the top edge of wall cabinets and window frames, or at counter level for a chair-rail effect.
Ceramic Tile
Although expensive and labor intensive, ceramic tile walls for kitchens are burgeoning in popularity, and for good Tea son. Tile lends a natural air to increasingly high-tech kitchens, and its resistance to water, heat, and grease make it practical and long lasting. Tile can be installed on an entire wall, or it can be used as a design accent or to cover a small area that receives hard use, such as a backsplash. Tile may be required by local code around a commercial range or a wood burning stove. For kitchen walls, choose a glazed vitreous or semivitreous tile; avoid tiles described as unglazed or non vitreous.
Tiles cut from marble, granite, or slate, called dimensioned stone, can be used sparingly on walls if they are cut thin enough to adhere vertically.
The tile dealer will help you determine how much tile is needed-based on the square footage of the walls to be covered and the linear measurement of any areas requiring edging or trim tiles-and can provide the proper adhesive, grout, and tools as well.
Wood
The most typical use of wood as a kitchen wall finish is for wainscoting. Usually, tongue-and-groove boards are installed vertically along the bottom half of the wall and capped with trim at chair-rail height. Depending on the type of wood and finish you choose, this look can coordinate with themes as diverse as American country, French provincial, and Victorian. Kitchen wainscoting that continues into a dining area will visually tie the spaces together.
Of course, wood can be used as a wall finish throughout the kitchen, with a few practical requirements. Wood used near wet areas, such as a sink back splash, must be coated front and back with a water-resistant sealer before applying a poly urethane or other synthetic finish; avoid latex paint. For easy cleanup, choose a smoothly milled, close-grained wood and apply a high-quality alkyd paint or urethane varnish.
Wood wall treatments are moderate to very expensive, but not difficult to install.
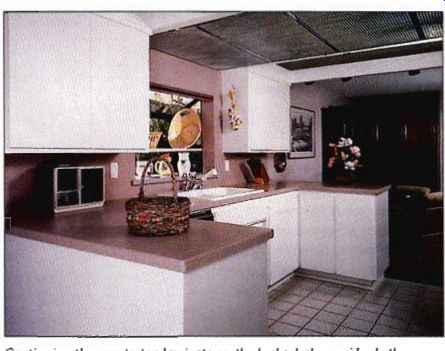
----- Continuing the countertop laminate on the backsplash provides
both design rhythm and ease of maintenance in this contemporary kitchen.
Tim In its simplest form, wood trim is used to finish the casings of doors and windows and for baseboards. Its original purpose was to conceal joints. But with imagination, wood trim can become a potent design feature in its own right. The style of trim-or the choice of no trim at all-will subtly influence the look of the entire kitchen. trim can be used to tie together disparate kitchen elements and to create lines of sight that the eye follows. For example, a cornice molding applied at the lop edge of the wall cabinets can be extended around the room as a picture rail; or window sills can be positioned and designed so that they continue as a handy backsplash ledge along the countertops. Integrating these details requires forethought.
Now is the time to start thinking about the relationships among the various parts of your kitchen and how trim might pull them together.
Most trim is made from small-dimension lumber, such as 1 by 2s, and from inexpensive wood-molding stock, which comes in hundreds of decorative shapes.
Decorative trim doesn’t have to be wood. Lightweight pressed-foam trim-often shaped to mimic intricate wood designs--is available in a variety of styles, is easy to cut, and is not difficult to install with a bit of practice. Ceramic tiles can be used to decorate windows or doors or to form an eye-catching chair or picture rail.
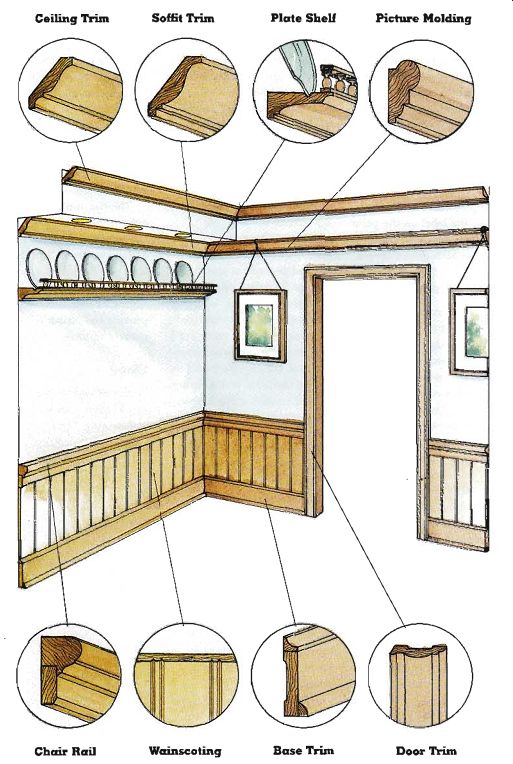
------ Wall trim Treatments: Ceiling Trim Soffit trim Plate Shelf Picture
Molding
Wainscoting Base trim Door Trim Chair Rail
------------------
+++++++++++++
DOORS
Efficient traffic patterns into and around the kitchen are enhanced by the placement and design of doors. The right door complements the style of the house as well as the kitchen.
Energy efficiency and ease of maintenance are other worthwhile considerations.
Door
Types Standard doors for the exterior and interior come in prehung packages or can be built on site.
Prehung door packages, which include the side jambs, the head jamb, and a door already mounted on hinges, are usually slightly more expensive than building your own jambs and mounting your own hinges, but the assembled units can save hours of painstaking work. When designing your floor plan, you must keep in mind the height, width, and swing clearance for every door.
If you plan to purchase pre hung packages, follow the manufacturer’ s specifications.
When ordering a prehung package, you must specify whether the door will open from the right or left, whether it will swing in or out, and the width of the jamb (usually 4 1/4 inches for wallboard walls and 5 3/8 inches for plaster walls). If you buy your lockset before ordering the door, the manufacturer can dill the door to the lock specifications.
If you are not changing the location of the kitchen door, you can probably install a standard, new door in the existing frame, with the following exceptions.
. If the old door is shorter than 80 inches, you’ll have to cut down the new door; if the old door is taller than 7 feet, you’ll have to order a custom made door.
. If the new door has a different thickness, check the door-frame stops; if they are rabbeted into the jambs rather than nailed to the surface, you will have to replace the jambs to reposition the stops,
If your kitchen door opens into the garage, most codes re quire a special solid-core door that is resistant to fire and the passage of fumes.
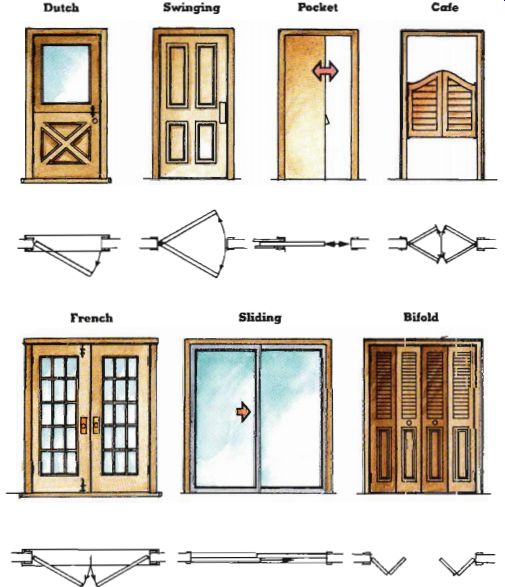
---------- Doors Dutch: French Swinging Pocket Cafe
Sliding Bifold
------------------------
If you are installing a door that is antique or otherwise one of a kind, expect to rebuild the frame to fit it.
Exterior Doors
Exterior doors are classified either as entry-the front door-or auxiliary-the side and back doors. The kitchen door is nearly always an auxiliary door. So long as there is an entry door at least 36 inches wide, most codes allow an auxiliary door to be 32 inches wide. However, wheelchair ac cess requires a 36-inch width.
Exterior doors are normally 1 3/8 inches thick and not less than 80 inches tall.
Exterior doors are a part of the weather seal of your home.
You must ensure that they it snugly and are properly weather-stripped. Some codes require that exterior doors swing outward; if you are changing the door location, be sure to check current codes.
Wood Panel
The most popular style, this solid-wood door has a stile-and rail construction enclosing panels. The type of wood and panel shape can be adapted to any traditional-style kitchen.
Wood doors are available in many wood species, can be stained or painted, and are naturally insulating. They can be trimmed to it on all four sides and also come prehung.
Steel
Steel doors have a wood inner frame with a foam core encased in steel front and back. Styled to look like wood doors, they are usually painted. Steel doors are increasingly popular be cause of their security advantages and ire resistance. Their insulating qualities and tight it make them an excellent choice for areas with severe weather; they , re especially resistant to heat transmission. These doors must be purchased prehung or must have a new frame built for them because they cannot be trimmed.
Sliding Glass
Basically a wall-sized window, sliding glass doors are an attractive choice for a kitchen over looking a patio, garden, or deck. They are sold in kits that include the panels, frame, and necessary hardware, and come in widths of 5 to 20 feet and heights from 6" 1/4 to 8 feet, with two, three, or four panels. The frames may be wood or aluminum. Wood is heavier and more expensive, but it insulates better; it also looks better, if the house windows are wood.
Tempered shatterproof glass makes the door safer, and local codes may require it. Specify double-glazed glass, which effects quite an energy savings, in any but the mildest climate.
The threshold of a sliding door must be kept scrupulously clean to operate properly, and the door usually enquires a window treatment for privacy.
French
Also called double doors, French-style wood doors are al most always fully paned and are overtaking sliding glass doors in popularity for their window-wall effect. Clean lined yet warm, French doors work well with most themes, from Colonial to Victorian to Palladian.
In a double door, or set, one door is called inactive. It has a strip along the edge, called an astral, and is flush-bolted top and bottom to the door frame when not open. The active door closes against the astral, preventing the doors from being jimmied apart. Most sets have 3-foot-wide doors, though narrower ones are also avail able. They are available pre hung like a conventional door, and can be used as a main entrance.
Dutch
The traditional door of Holland, a Dutch door is cut in two horizontally, so the top half of the door can swing open independently. Dutch doors can be used as interior doors as well, and are useful when the kitchen adjoins a playroom:
Children can be seen without getting underfoot. A Dutch door must be custom-made on site from a conventional panel door. It is sawed at the center rail position, and two hinges are applied to each section. A ledge can be installed on the lower half. The top half is held shut by a flush bolt.
Interior Doors
Most kitchens are designed with an open traffic flow from the dining area or family room.
But if your kitchen opens onto several rooms in the house, you’ll need doors to keep the kitchen form being used as a hallway, and to provide privacy and quiet to those other areas. You’ll probably also want a door on a kitchen pan try, utility room, or mud room.
The swing of a conventional door can get in the way of cabinets and appliances, so consider cafe doors, bifold doors, or a pocket door for tight areas.
Interior doors normally measure 32 inches wide, but they are available as small as 24 inches wide, and must be 36 inches wide for wheelchair access. Standard height is 80 inches. The details of ordering, wall framing, and installation are similar to those for an exterior door, but an interior door is not weather-stripped and often will not have a threshold.
For a doorless passageway, the wall is cut through and framed as though for a door installation, but then the edges are simply trimmed to finish it.
This is also the wall preparation for swinging, bifold, and cafe doors.
Panel
Like its exterior counterparts, an interior panel door is a solid-wood, stile-and-rail door.
As a special design touch, look for a door-new or used-that matches your cabinets; perhaps a beautiful Old " door of oak or pine with unique panel detail.
You can trim the edges of the panel door to it the existing frame. New panel doors are available in prehung packages and can be painted or stained.
Hollow-Core
Inexpensive hollow-core doors are typical in new houses. A hollow-core door has a flat surface of wood veneer applied to a light wood-frame edging, with a stiffener such as card board honeycomb inside. It is light and easy to install, and should be used if necessary to coordinate with other doors in the house, or in a location where budget is more important than looks. Hollow-core doors come in a paint or stain grade and are available pre hung. They can be trimmed only 1 inch in height and 2 inches in width.
Solid-core doors are a variation on this design. They have an interior of particleboard, and may be sheathed in a higher-quality veneer. They are heavier, stronger and more fire-resistant than the hollow core type and are required by some codes at furnace-room or garage entrances. Solid-core doors are more soundproof as well, and are therefore a sensible choice for a laundry or bath room adjacent to the kitchen.
Swinging
A swinging door between the kitchen and dining room is a traditional convenience for a cook laden with heavy dishes, because the automatic closure keeps lite kitchen private.
Swinging doors are available in full-length and cafe versions.
To prevent collisions, a full length swinging door should have a small window at eye level, and is not recommended for families with small children. Any solid-wood door can be made into a swinging door by adding a spring-operated floor hinge and a top pivot, following the manufacturer>s instructions.
Cafe doors, the swinging doors of Old West saloons, close only the mid-part of the doorway, screening the kitchen but allowing people to see each other. These specially doors swing on gravity-pivot hinges screwed to the side jambs and are suitable for a casual kitchen, particularly one with a southwestern theme.
Bi-fold
Folding doors come in a single or double-door arrangement. When open, they do not project far, making them ideal space savers for closing off a small kitchen or for screening areas such as a laundry or pantry.
Louver doors lend a casual look; the solid-wood pane) style is dressier. Bifold doors are in stalled with pivot hinges on the side jambs, and usually have a track at the top and bottom for the door-guide pins. Widths range from 24 inches to 6 feet or more.
Popular in the Victorian era, a pocket door slides into the wall entirely. Closed, it walls off the kitchen completely; opened, it makes two rooms into one.
Glass-paneled pocket doors al low in light and views while shutting out drafts and noise.
The pocket frame is available as a kit. A conventional panel or hollow-core door up to 3 feet wide hangs from brackets in an overhead track or on the door edge; a pair of pocket frames can be installed for a double door. As existing wall sheathing must be removed and a doorway framed, this project is easiest with a new wall. The portion of the wall that houses the pocket door must not contain pipes, wires, ducts, or any other utility.
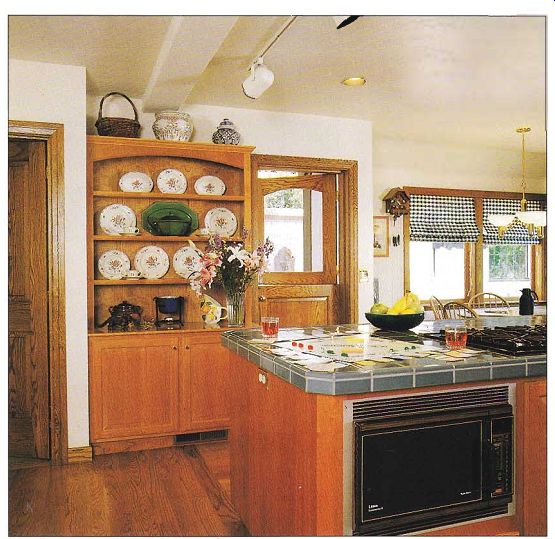
------- Dutch doors can be used on the interior and exterior. The
glass panel on the lop half of this door allows a view of the backyard
from the island cooking center. In the foreground (ire an under-counter
microwave oven and an island cooktop This kitchen is also pictured earlier.
++++++++++++++++++++
WINDOWS
Striking the balance between limited wall space and a desire for view and light is a matter of choosing the placement and design of windows and skylights. Airflow and emergency access are considerations when deciding whether windows are to be fixed or openable. Specialty window glass can add dramatic dimension to any kitchen.
Window Types
Like exterior doors, windows have three purposes. One function is to admit light and views while protecting against weather and dust. The second is to provide an exit in an emergency. The third is to enhance the design. Windows should have a look that complements the design of the house and kitchen. Consider all three purposes as you decide on the kinds of windows you want for your new kitchen.
There are so many styles and manufacturers making slightly different versions of the same window-that the big problem is deciding what type you want. Familiarize yourself with the key aspects of different kinds of windows, both their qualities and their limitations, and then examine all the windows available from sup pliers before you make your choices.
All window types are avail able prefabricated. Standard windows are originally in stalled with flanges to protect the opening in the Exterior wall from leaks. So-called replacement windows, on the other hand, are designed to slide into an existing window frame.
These work out quicker and cheaper because they save construction costs. Use the original window frames wherever your kitchen design permits. Ask the window dealer whether a pre fabricated window that fits your existing frame is available. Most windows come with built-in screens. When shopping, check that the screen is sturdy and convenient to remove.
The considerations for opening an Exterior wall for a window are the same as for an exterior door. The window manufacturer will specify the rough-opening size you need. Installing a new window in an existing opening is simple. If the opening must be enlarged, keep in mind while designing that lowering the original sill plate is easy, but raising the header is a substantial structural change.
Frame Materials
Windows are framed with aluminum, wood, or plastic. The different materials affect cost, looks, and energy efficiency. Check the energy statistics when you comparison shop.
Aluminum windows come with or without thermal breaks, which encase the exterior of the frame and minimize the transmission of heat or cold. You’ll never need to paint these frames, but the color se lection is limited.
Metal frames without thermal breaks transmit cold and heat, which may lead to condensation problems. They are durable if the Exterior is vinyl clad or painted regularly to prevent rust.
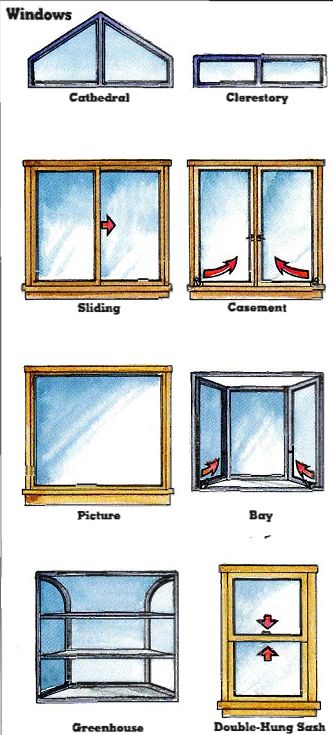
------------- Windows: Cathedral Clerestory Sliding; Casement; Greenhouse; Double-Hung Sash
---------------
Traditional wood frames have excellent insulating qualities and seal lighter than metal frames. However, a skilled carpenter must install them, and they must he painted regularly.
Clad-wood frames are factory-covered with protective vinyl on the exterior in a wide variety of colors, so no painting is required. In extreme cold, however, vinyl is brittle and may crack. Many clad-wood frames are left unclad on the interior side so they can be finished in keeping with the kitchen style.
Plastic window frames are usually the least expensive, but don't hold up as well as other materials under heavy use and come in limited styles.
Fixed Windows
Decorative windows that do not open are perfectly suited to the kitchen. These windows can be custom-made, but the hundreds of prefabricated ones anticipate nearly every design need and are much less expensive. Fixed windows are in stalled like other prefabricated windows.
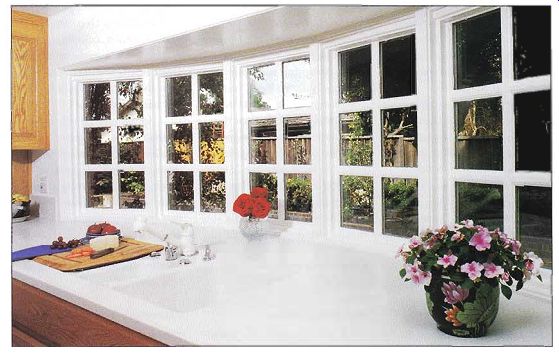
------ A view from the kitchen sink is an oft-desired feature. An angled
bow (above) and a square greenhouse (below) each do the job.
Greenhouse
Also called a garden window, this popular style admits light for plants on three sides and from the top, while also creating a shelf for them. Though considered a fixed window, some have a pane or two that open for ventilation. A western exposure is too intense for most plants, but a greenhouse window will make the most of a northern exposure. It looks at tractive above a sink, and at countertop level is convenient for watering. Many prefabricated variations are available; some are inexpensive--and look it. Because the window protrudes, it is especially important that it complement the architectural style of the house in order not to look stuck on as an afterthought. Choose double glazed glass, which prevents condensation, a common problem with greenhouse windows.
Bay
Similar in concept to a green house window, a bay window is usually the focal point of a room. It consists of a large picture window with a narrower window on each side angled back toward the wall. A bow window is similar but is shaped as one large curving surface. A bay window may take up the entire end wall of a breakfast nook, vastly enlarging the perceived space, in creasing the light, and even providing seating. Make sure the view outside is worthy of such a grand frame, or install colored or stained glass to screen an unwanted view. Be sue that the bay window coordinates with and doesn’t overwhelm the house.
Bay windows are expensive and come in limited sizes. Even prefabricated ones may need to be partly assembled on site by the installer. If you decide a bay is the window you want, consult closely with the manufacturer to prepare the wall and roof properly.
Picture
A standard of gracious suburban living, the picture window is a must if the surrounding outdoors is lovely to look at.
Simply a pane of glass in a frame, it is easy--if somewhat unwieldy--to install, and is inexpensive compared with many specialty windows. As with any large expanse of glass, it should be double-glazed, except in a very mild climate.
Consider the location of the sun in summer and winter when designing for a picture window; intense light, such as a western exposure, can be un pleasant and hot. Follow the manufacturer’s recommendations for rough-framing the wall; the large expanse of glass may require extra bracing. In most neighborhoods, a large window usually calls for a substantial window treatment for privacy, another design factor--as well as expense--to consider.
Decorative Glass
Once a traditional-and some what ponderous-look, today’s decorative glass windows have come into their own as a practical, interesting design element.
Practical, because in this day of zero-lot-line and communal building, they offer privacy as well as luxury. Decorative glass-stained, colored, leaded, frosted, or textured-is an excellent design choice for a window that gets plenty of light but has a poor view.
Another alternative is an overlay. This thin sheet can be applied to any window for the effect of stained, frosted, or textured glass. It is stronger and more weather resistant than real specialty glass, and you can design any motif to complement your kitchen. Ask the overlay dealer for a catalog of examples.
Clerestory and Cathedral
Unusual options for window placement are especially useful in the kitchen, where wall space is in short supply. Clerestory windows allow for extra light and privacy and are in stalled in a narrow band along the ceiling or in the wall over the cabinets. Windows that it such a space are available prefabricated. Although they are short, their width requires a specially reinforced header.
Cathedral windows ill the triangular space where a wall meets a vaulted ceiling. These are usually custom-made to fit the space, with or without a finish frame. Consider this type of window as a source of light if you decide to vault the kitchen ceiling.
Some manufacturers offer triangular shapes and fanlike multi-paneled windows, which can become the focal point of a kitchen wall.
Openable Windows
Windows that open for ventilation are particularly necessary in the kitchen, where cooking produces heat, fumes, steam, and, inevitably, the occasional smoke. Of the many different window mechanisms, most are one of two basic types: sliders and swingers.
Sliding
A sliding window has a frame that moves in tracks. The two types of sliders are sash windows, which open vertically, and gliding windows, which open horizontally. Sliding windows open to a maximum of only 50 percent of the window area, but they seal out the weather better than swingers.
Sash windows, the traditional over-and-under type, are available double-hung, in which both panes slide independently, and single-hung, in which only the bottom pane moves. The glass area may be left plain, or it can be divided by mullions into various panes.
A gliding window has sashes that slide horizontally in tracks at the top and bottom.
Swinging
A swinging window has a geared mechanism that pivots outward to open. Swingers include awning windows, in which the bottom edge pivots outward; hoppers, in which the top edge pivots inward; and casement windows, which swing or crank open sideways on hinges. Swinging windows are suitable for mild and warm climates for several reasons:
The window area opens 100 percent and, in the case of awning windows, the panes deflect rain (and, if tinted, sun as well). In general, swinging windows, because they protrude when open, tend to get dirty faster than sliders.
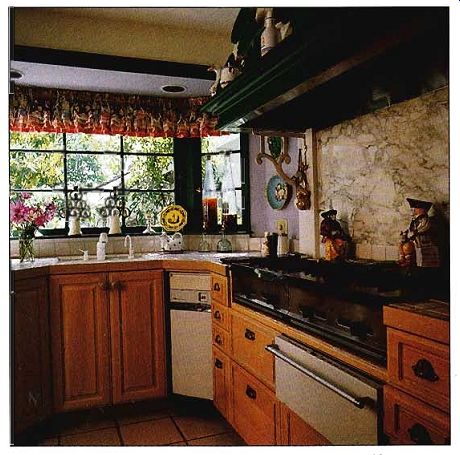
-------- Including some openable windows in a bow arrangement provides
ventilation as well as views. These multiple panes match those in the French
doors pictured here.
++++++++++++++
FLOORING
Floors have the toughest job of any kitchen surface. They are expected to stand up to traffic and spills yet look lovely again with the swipe of a damp mop. A surprising variety of flooring materials is available, many designed with kitchens in mind, that will meet this challenge-and beautifully to boot.
Structural Changes
What is called the floor is really just a protective and decorative surface treatment. Underneath, a sandwich of construction materials, called the subfloor, sup ports the house and provides a firm, smooth surface for the finish floor. Most homes have either a concrete slab or wood frame subfloor.
Concrete Subfloor
A concrete slab is strong and stable. It provides an excellent foundation for rigid flooring materials, such as ceramic tile, and flexible materials, such as resilient sheet flooring. Some wood flooring products, such as parquet tiles, can be glued directly to concrete; others, such as wood strip flooring, require a " sleeper floor " of plywood and 2 by 4s as a nailing surface. Note that this raises the floor surface by more than 2 inches-a difficult side effect to design around. For any flooring, the slab must be dry; if yours has a moisture-accumulation problem, consult with a specialist to correct it before proceeding. Check the existing finish floor for clues, such as loose tiles, lifted seams, or bubbles.
Wood Subfloor
A wood-frame subfloor has a smooth Layer of plywood nailed directly to the joists. It is usually topped by felt paper, then covered with tongue-and groove strip flooring or other type of flooring material. To accept a ceramic-tile floor, the subfloor must be very rigid; this normally requires installation of additional plywood or tile backer board acceptable for floor use. For a very heavy floor, such as stone, the joists themselves must be reinforced, usually by blocking between them. A smooth, even surface of floorboards may be left in place as the subfloor for most materials, but must be overlaid with 3/8- or 1/2-inch plywood.
Remember that for any additional subfloor layer, you must add its thickness to the finish floor height. This will affect your kitchen design in terms of floor-to-counter measurement, light switch placement, threshold transition, and other small but significant details.
Existing Finish Floors
Check your existing floor for water damage, especially around the sink and appliances, and plan on repairing it.
Any high points in the floor must be sanded down, and low points filled, before a new floor can be laid.
In most cases, a new finish floor can be installed directly over existing flooring if it is solid and the subfloor underneath is healthy. Of course, carpeting must be removed, and very cushioned resilient flooring is too giving a surface for a subfloor. If you suspect that the existing floor might contain asbestos, the safest course is to cover it. If it must be taken up, call a professional service specializing in asbestos removal.
Design Considerations
A multitude of kitchen flooring materials and finishes offer a range of looks as varied as for the rest of the house. Your choice will be a highly personal one. Remember, with some effort several finish floors can be combined effectively within a single kitchen.
Looks are not everything.
Keep in mind that you may be on your feet in the kitchen for several hours each day. This fact makes the "feel" of the floor, both real and perceived, relatively significant. Flooring materials range from cool to warm and are hard or y fielding.
In choosing flooring, consider your climate and life-style. Do you go barefoot indoors? What feels good against your stocking feet? Do you have toddlers who will undoubtedly tumble on the floor? The kitchen floor plan and the type of anticipated activity centers have an impact on the appropriate finish floor. If the kitchen includes an eating area, the type of floor beneath the table should be easy to clean. If the room contains a laundry center, consider the potential noise as well as how water from an overflowing washing machine would affect the floor.
You must also think about traffic patterns when choosing the finish flooring. If the room contains an exterior door, people will be passing through the kitchen directly from out doors, which means that dirt and water will be tracked onto the kitchen floor.
Aesthetic considerations are fundamental to the future enjoyment of the room. The color, texture, and pattern of the flooring should coordinate without competing-with the overall design concept of the kitchen. This takes some fore thought, because the floor is the largest unbroken surface in the room. A common mistake is to choose a patterned sheet flooring based on a small sample; once on the floor, how ever, the pattern repeat be comes overwhelming.
It is also possible to unintentionally introduce pattern into a room by your choice of materials. For example, a neutral ceramic-tile floor can set up an unanticipated grid pattern if the grout is a contrasting color.
A unique floor pattern can be an exciting design element; to emphasize it, keep your countertops and wallcoverings very simple. Texture works the same way. A rough slate floor is best complemented by smooth, simple surfaces.
The most basic maintenance feature for a kitchen floor is washability. If you have children and pets, the floor must stand up to a daily mopping with floor cleaner; choose a high-quality resilient sheet or tile. If your household is more sedate, you must still ask how much maintenance is accept able /or you. Is the mellow appearance of an oiled wood floor worth regular stripping and waxing? It may well be.
When shopping for floor coverings, be sure to ask what maintenance will be required.
Wood
Wood floors in the kitchen have had a surge of popularity for several reasons: Kitchens are now seen as rooms for living, not just using. Modern finishes, such as polyurethane and waterproof sealers, make wood floors practical in a hardworking environment. Oak is by far the most popular and practical wood flooring for the home, ft Is very durable and is much cheaper than maple-the hardest surface. Pine is also popular for its traditional country roots, but it dents more easily and is more porous, so for the kitchen it must be finished carefully.
Most wood flooring is tongue and-groove strips 2 1/2 inches wide, blind-nailed to the subfloor through the tongues.
Choose Clear or Select grades for a light, natural finish; Select or #1 Common will do for a stained floor. The subfloor should be 3/8 inch or thicker plywood, clean and level.
Measure the square footage of the floor and allow 10 per cent extra for waste. Hardwood floors usually stop just 1 inch beyond the toe kick of floor cabinets, saving some cost. Re member to extend the floor under the refrigerator, range, and any other movable appliance.
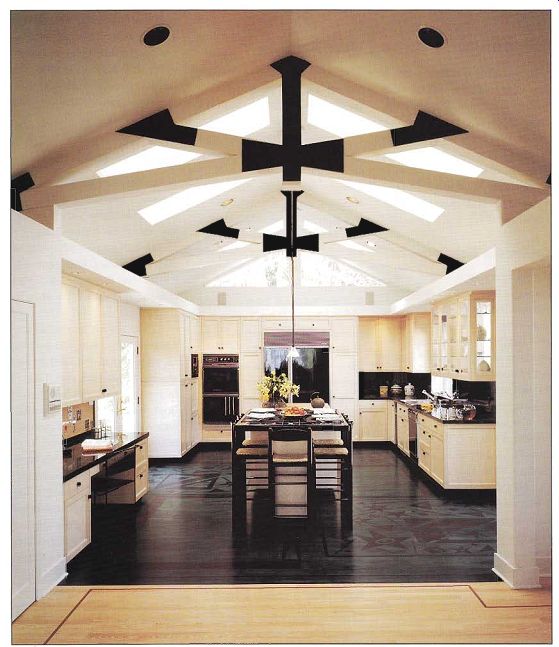
------- A fancifully painted floor is a perfect visual balance to
the spectacular use of clerestory windows in this kitchen. The paint effect
was achieved by applying a colored stain on a wood floor, stenciling the patterns,
and then using two coats of polyurethane finish to protect the delicate design.
Resilients
This versatile, durable flooring material was designed with kitchens in mind, but is used throughout the house. Resilients are available as sheet flooring and tiles. Resilient sheet flooring is often mis named linoleum; linoleum is a different product that was used extensively on kitchen floors for many years but is rarely used today.
Both sheets and tiles are in expensive, waterproof, easy to clean, and, of course, resilient underfoot. Both types are avail able in myriad colors, patterns, and textures.
The predominant consideration when choosing resilient flooring is quality. Choose a medium or heavy gauge with a thick " wear layer " --the protective topcoat over the pattern.
A thick cushion backing is quieter, more comfortable, and more forgiving if you drop something breakable. Higher quality means higher price, but it’s a worthwhile investment.
Most sheet flooring is avail able in rolls 6 and 12 feet wide.
Tiles are usually 12-inch squares.
More than any other flooring, resilient requires an absolutely smooth, clean subfloor, every pit and crack will show through and eventually cause uneven wear. If you cannot perfect the subfloor, choose an other finish floor surface.
Ceramic Tile
A highly durable flooring, ceramic tile offers any look from rustic to ultramodern, and new glazes provide deep, saturated colors. A tile floor is relatively expensive, but the variety of sizes and colors allows you to express yourself by creating one-of-a-kind patterns and color combinations to suit your kitchen. Coordinating tile on the countertops and backsplash lends a unified effect, but too much tile can be overwhelming. Be sure you choose a tile specified for use on the floor; wall tile is not strong enough, and a slick designer glaze can be dangerous. Keep in mind that a tile floor remains cool, which is a plus or a drawback depending on your life-style and climate.
Ceramic floor tiles are usually square or octagonal, in any size from 1 inch, tailed mosaics, to 18 inches but 4- to 6-inch tiles are typical. Mosaics and intricately shaped arabesque tiles are arranged in groups on a mesh backing for easier installation. The subfloor must be smooth, rigid plywood or tile backer board.
Dimensioned Stone
Marble, slate, and granite come in thin, polished 12-inch squares called dimensioned stone tiles. These natural products are an expensive floor treatment, but offer a stunning, elegant effect, worth the cost for dressing up a tiny jewel of a kitchen or for a kitchen that opens directly onto a formal entertaining area. The veining in every tile is unique; try to view as large a sample as possible, and remember that a strong pattern will rivet the eye. A stone floor may make itself the focal point of your kitchen. Coordinating stone floors and countertops can be effective, but as with ceramic tile, don't allow stone to be come overwhelming.
Kitchen Carpet
Use caution when choosing carpet for the kitchen. Kitchen carpet offers unsurpassed com fort underfoot, excellent noise reduction, and warmth; it also camouflages small surface flaws in a subfloor. But it absorbs liquids, may stain, and over time accumulates ground in dirt and food particles. It cannot be wet-mopped; it must be vacuumed and periodically shampooed. Carpet is well suited for a breakfast nook or a social area away from the food preparation and cleanup centers. A small pattern can help disguise stains. The carpeting used for kitchens has a short, dense loop pile of nylon on a foam backing and doesn't re quire a pad. It comes in 6- and 12-foot-wide rolls.
Edge Treatments
Almost any finish floor requires some sort of trim around its edges, which seals the joint where Floor meets wall and protects the wall when the floor is washed. Trim set lush with the wall is called a baseboard. The area recessed under cabinets is called the toe kick. Both are fundamental design elements, which will strongly influence the look of the kitchen.
Wood
A wood baseboard treatment is appropriate for any floor. The baseboard may be a single curved piece, called clamshell molding, or may consist of several fancy moldings applied to a 1-by board for a formal look.
Traditionally, a shoe molding, or quarter-round, applied at floor level, is the finishing touch, but this seems to be going out of style. Wood base boards can be stained to match the kitchen floor or cabinets, and are available in hardwoods.
Vinyl
Vinyl cove is a practical, washable edge treatment for resilient vinyl floors and for toe kicks. Its use with other, more expensive types of flooring, however, will cheapen their effect. Purchase vinyl cove by the linear fool, and attach it with the same adhesive used for resilient flooring. Some vinyl cove has a peel-and-stick backing. Vinyl cove is bent around corners rather than cut.
Tile
Ceramic border tiles are an attractive, practical, washable edge treatment for ceramic floors. Tiles can also be used effectively to edge other flooring materials, especially if the edge-treatment tiles are coordinated with countertop and wall tiles. For edge treatments, specify tiles with one rounded, or bullnose, edge at the top. The edge tiles can be continued along the toe kick.
Thresholds
A threshold serves as a transition where unlike flooring materials meet at a doorway; it can also soften the contrast between different floor levels.
At an exterior door, it helps seal the bottom of the entrance.
A threshold is not needed in a doorway where the same flooring material is continued into the next room unless there is a seam.
Thresholds are made of wood, metal, or-in rare in stances-stone. Wood is used to match a wood floor, especially where one type of wood flooring joins another of a different layout pattern or species. A wood threshold is cut to length and nailed to the floor.
Interior metal thresholds are thin, lat aluminum bars that finish off the edges of vinyl flooring or thin carpet. These are cut or scored and snapped to length and usually come with tacks for attaching. They are available in several colors.
Exterior-door metal thresholds are more substantial and may have built-in weather strip ping. These are cut to fit and then screwed into place.
A reducer strip is an additional threshold treatment, useful when a new floor is in stalled over an old one.
++++++++++++++++
Ceilings
Many kitchen-remodel jobs require that you strip the existing ceiling to the joists in order to upgrade the wiring. This is a perfect opportunity to rethink the ceiling design.
Vaulting the ceiling, exposing the beams, or adding a skylight will brighten the room and make it seem larger
Existing Ceilings
If you are moving any walls, or stripping the substrate from the studs, it is most practical to go ahead and remove the ceiling surface as well. Even if the walls will stay in place, consider replacing the ceiling if any of the following conditions is met.
. The ceiling is made of plaster and lath that is cracked or sagging-
. The wallboard is uneven or has obvious joints, nails, or tape.
.The ceiling was water damaged at one time.
. You plan to redesign the kitchen lighting.
. You want to add insulation between the ceiling and roof.
If the ceiling is sound and its configuration fits the planned kitchen design, consider yourself lucky and by all means keep it in place, Visual Tricks
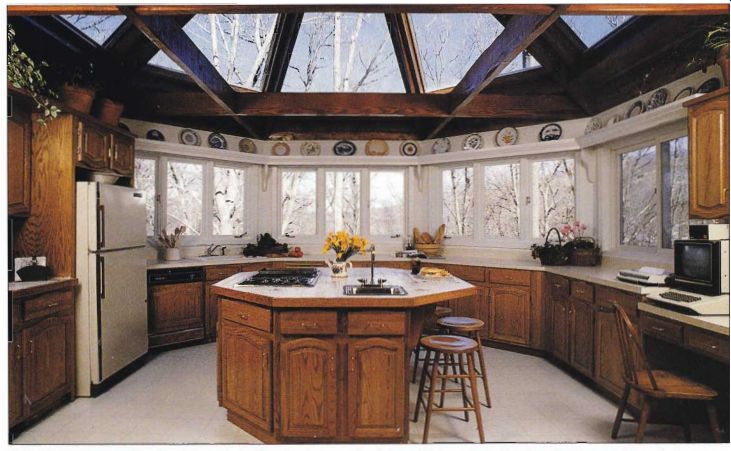
--------- Skylights placed between the rafters of this vaulted ceiling
allow for stargazing during midnight stacks. Raising the ceiling increases
the perceived square footage of any room.
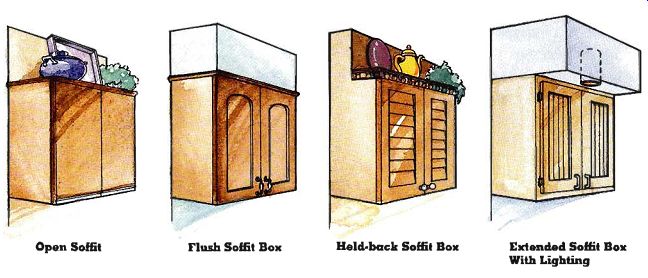
------ Cabinet Top Treatments Open Soffit Flush Soffit Box Extended
Soffit Box With Lighting Held-back Soffit Box
The ceiling configuration can be altered using visual tricks.
Lower a too-high ceiling by painting it a darker color than the walls; papering it to match the walls; applying a -wallcovering border or a picture-rail molding to the wall about a foot below the ceiling and painting the area above it darker; or in stalling a suspended ceiling, A suspended ceiling is a simple network of metal framing strips that can hold ceiling panels and luminous fluorescent panels for improved lighting.
The old ceiling, above the lowered one, may be unattractive or even damaged, so long as it is structurally sound To make a ceiling look higher, paint it a lighter color than the walls, using semigloss rather than gloss paint, install wallcovering with a vertical pattern, and avoid horizontal trim near the ceiling. A ceiling that is too low can feel oppressive and make the kitchen hot.
If the ceiling is lower than 8 feet, strongly consider raising it structurally to feel comfortable and to make it proportional to modern cabinets and appliances. Local code may require a higher ceiling if you do any remodeling. If an existing suspended ceiling is lower than 8 feet, remove it and install recessed lighting in the structural ceiling instead.
Ceiling Configurations
With floor area at a premium in new-ho use construction, architects and designers have discovered the ceiling as a design element. Modern ceilings may be vaulted, coffered, or cathedral style. All of these terms refer to a ceiling that extends to the roof rafters, or nearly so, rather than running flat at the horizontal joists. Obviously, in order to accomplish this, the kitchen must not be situated below living space. Although extending the ceiling this way does not add square footage to the room, it does add cubic footage to the Interior space, introducing light and air-in short, breathing room.
Redesigning the ceiling may be the most dramatic way you can alter the atmosphere of your kitchen. On the practical side, extending the ceiling up ward makes room for more windows and storage space and draws heat away from the cooking center.
Soffit Areas
The space between the tops of wall cabinets and the ceiling is the soffit area. One treatment is to leave it open and use it for display or storage space, al though this becomes a dust catcher that may drive a neatnik crazy. Another idea is to extend the cabinets all the way to the ceiling, adding considerable storage space, albeit difficult to reach. Often, the soffit is filled with a framed box, which is covered with wallboard and finished to match the surrounding walls. The box can be built flush with the cabinets, held back halfway for a display area, or extended over them.
Often an extended box is wired to contain recessed light fixtures that aim cones of light on specific work centers.
Skylights
Since the walls in a typical kitchen are mostly taken up by built-ins, the ceiling is a sensible place to look for window space. A well-placed skylight can provide all the light a kitchen needs during the day.
In fact, it provides much more light than a window of the same size, and high-quality units can be extremely energy efficient.
A skylight is installed on the roof, either with its own built in lashing or else set on a built-up curb. To keep costs down, make sure that there is nothing structural in the attic to get in the way of the sky light. Also, purchase a skylight made to it the spacing be tween the rafters, usually 16 or 24 inches on center, although wider skylights are available.
Some styles open and close for ventilation, either manually, with a remote control, or with a time-controlled sensor.
+++++++++++++++++
PLUMBING
The structural survey familiarized you with the existing plumbing system in your house.
Depending on the locations and types of appliances and plumbing fixtures planned for the new kitchen, changes or additions to this system may be necessary. This might also be an opportune time to upgrade the system with modern, efficient materials.
System Requirements
The basic plumbing in a kitchen is located in the clean up center, which usually consists of the main sink, garbage disposer, and dishwasher. A set of supply pipes for hot and cold water, and a drainpipe serve this sink. A branch drain may connect the drainpipe to the main drain of the house. If the sink is far from the main soil stack (the upper extension of the main drain, which vents it through the roof), it will have its own secondary vent pipe extending up the wall and through the roof. The dish washer and disposer drain into the trap and drainpipe of the main sink. Water supply pipes for other kitchen fixtures and appliances usually branch off of the main sink pipes.
Gas piping uses materials and techniques similar to simple plumbing.
Locating plumbing fixtures in the kitchen depends on three primary considerations:
.The location and accessibility of existing plumbing
.The requirements of the local plumbing code
. The ease of fitting new plumbing pipes into the existing house structure
Adding a second sink or moving the present one to an other wall requires additional plumbing. However, shifting fixtures just a few inches can be done by connecting extenders to the existing pipes. Always consult local codes for exact requirements prior to making adjustments and adding appliances to an existing system.
The DWV System
The existing arrangement of the drain, waste, and vent (DWV) system may influence the new design; plumbing codes are quite strict about such details as pipe size, angle, and length of run, so you may prefer to leave fixtures where they are to avoid costly in-wall re structuring.
All plumbing fixtures must be vented through the roof.
Some fixtures have vent pipes that return to the main stack, or they may vent independently.
When making decisions regarding plumbing changes, remember that the bulk of the expense is in gaining access to pipes and running new ones through the existing house structure. Adding a new vent pipe requires installing it in an existing wall, which can be complicated, or building a new wall for it-a thicker wall made of 2 by 6s, called a wet wall.
For any changes such as these, check the projected locations of the new pipes to make sure no critical components of the house are in the way.
However, don't let the existing DWV system curtail your creativity, so long as your changes are legal. Instead, Jet your ingenuity solve the problems. For example, if you want a window over the sink, the vent pipe can’t extend straight up through it; but by using a pair of 45-degree bends you can send the pipe up along one side of the window, and still satisfy the code.
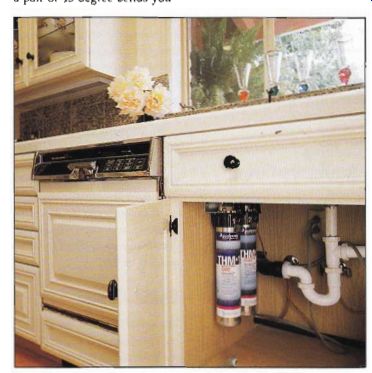
---------- Remodeling is a good time to consider updating the plumbing
system to include in water-purifying feature like this one.
The rules for water supply lines are somewhat simpler.
The size of the pipes-and what they are made of-is specified by code, based on such details as the type of fixture and the length of the pipe.
Pipe Types
Depending on the age of the house, the existing DWV pipes are probably made of cast iron and galvanized steel, and the supply pipes of galvanized steel, rigid copper, and some plastic pipe. Steel pipe is not recommended for new plumbing; copper or plastic can easily be added to a steel system.
Accepted cautiously when it was first introduced, plastic pipe has become the material of choice for plumbing remodeling, and is now allowed by most codes. However, check your local code before using it.
It is lightweight, somewhat to very flexible, and the joints are simply glued together.
Different types of plastic pipe, each with a unique chemical formulation, are suited to different uses. For the DWV system, ABS (acrylonitile butadiene-styrene) pipe is recommended. For the supply sys tem, choose PVC (polyvinyl chloride) pipe, or the newer CPVC (chlorinated polyvinyl chloride) pipe, which is better for hot-water lines. PVC pipe can also be used in the DWV system. PB (polybutylene) pipe can be used for supply lines in some localities. It is joined with compression fittings, not glued.
The fittings used for any type of pipe must be of the same material as the pipe. Cement used to join plastic pipe must be formulated for that plastic. In addition, most codes specify that pipes of different plastics cannot be mixed in the same system. Plastic pipe comes in the same nominal sizes as metal pipe, and has all the same fittings. A variety of adapter fittings connect plastic pipe to a metal system.
If codes do not allow plastic pipe, or you prefer not to use it for the supply lines, the best bet is copper. Copper pipe is corrosion resistant and fairly light. It can be bent around corners, requiring fewer joints. However, copper pipe is much more expensive than plastic.
Appliance Requirements
Plumbing is required for the sink, garbage disposer, and dishwasher. You may also have a second sink, a washing ma chine, a water heater, and a refrigerator with an ice maker and water dispenser, each of which has plumbing requirements. Gas ranges, clothes dryers, and water heaters also require gas piping.
Some plumbing aspects for individual fixtures and appliances are dictated by code; others are determined by the location of the item in the over all kitchen design. Every fix ture or appliance should have a cutoff valve, also called a sup ply stop, on an accessible part of each supply pipe, so that water to it can be turned off independently for service. Each supply pipe should also have an air chamber, a vertical ex tension that is capped at the top. This prevents water hammering when the water is turned off.
Sinks
All sinks require hot and cold supply pipes with cutoff valves that connect to flexible tubing in the faucet assembly. The drainpipe requires a P-trap. A double sink requires only one trap, which can be located be low one of the sinks or centered between them.
Garbage Disposers
Each disposer fits onto the drain outlet of the sink. On a single sink, the drainpipe for both sink and disposer exits the disposer, then forms a P-trap.
On a double sink, the drain pipe and P-trap exit the non disposer side, and the disposer drains into them via an extension pipe that enters the drain pipe above the P-trap. The connection between the extension pipe and the drainpipe is a directional tee, which helps keep disposer contents from backing up into the sink.
Dishwasher
The supply line for the dish washer is 3/8-inch flexible copper tubing. This can feed directly off the sink hot-water supply pipe with a tee fitting, but it should have its own cut off valve. The drain hose from the dishwasher is connected to the sink drainpipe above the trap. It is routed through a high loop-the drain hose must rise at least to the level of the top of the dishwasher to prevent back flow. At this point it should have an air-gap assembly in stalled on the sink ledge.
Refrigerator
An automatic ice maker or water dispenser normally uses M-inch copper tubing, but refer to the manufacturer’s specifications. This is connected to a cold-water supply pipe, usually under the sink, with a tee fit ting and a cutoff valve. If the sink supply pipe is too far away, check in the wall behind the refrigerator, or under the floor, for another cold-water supply pipe.
Clothes Washer
This will probably be the only appliance in the kitchen with its own supply pipes for both hot and cold water. Each pipe ends in a hose bib, a type of faucet onto which the washer hose is screwed. The inlet valves in the washer close immediately once it is full; to avoid damage from water hammering, the supply pipes must be fitted with 18-inch air chambers or with shock absorbers.
Unless the washer drain hose empties into a laundry tub, it requires a drain standpipe. This should be about 3 feet tall and have a P-trap at the bottom, within 18 inches of the floor.
Water Heater
Every water heater requires a cold-water supply pipe of V* inch, with a cutoff valve on it.
The exit pipe for the hot water may be 'A inch or y« inch. A temperature / pressure- relief valve on the body of the heater or on the exit pipe will have a vertical drainpipe. A gas heater will have a gas pipe with an easily accessible cutoff valve. If allowed by code, gas and water pipes may have flexible hoses, which make it easier to position the heater.
Gas Lines
There are local variations in the codes relating o gas service.
Check the requirements in your area before you decide how to install a gas appliance. Generally, gas lines are galvanized or ungalvanized steel or heavy gauge copper pipe, and must have an easily reached cutoff valve positioned near the appliance. A permit is required for any new gas lines, and the sys tem must be inspected and tested before it can be turned on.
+++++++++++++++++++++
ELECTRICAL
If your remodeling plans include improved lighting, new appliances, or more receptacles, changes need to be made to the electrical system. Decide on the number, location, amperage, and voltage of the individual kitchen circuits. Then determine whether the existing service will be adequate. You may need to upgrade the service-entrance box.
Determining Needs
In many locations, any changes or additions to kitchen wiring will require that the whole electrical system be brought up to current code. This could mean rewiring the entire house, including adding extra receptacles in every room.
Check local codes for requirements or consult an electrical inspector, and familiarize yourself with the regulations in the Notional Electrical Code (NEC).
Local regulations may also restrict the kinds of electrical work you are permitted to do yourself.
In general, a house with a modem, well-equipped kitchen will benefit from a 200-ampere, 240-voJt electrical service (the voltage needed to run a range or clothes dryer). This is called a three-wire service: Two 120 volt hot wires provide electricity, and a third wire completes the circuit. The amperage rep resents the maximum volume of electricity that is available to the system at one time.
You may be able to get away without an expensive upgrade if you already have a modern three-wire, 240-volt service of at least 100 amps. This provides 24,000 watts of power, considered the bare minimum for a typical home. If the appliances and circuits planned for the new kitchen will not require more wattage than what is presently used, and the existing service performs adequately, it is probably sufficient. How ever, do not shortchange your self on electricity. It is better to upgrade the service while you have the permit and the opportunity than to suffer later with insufficient power or too few receptacles.
Circuits
The parts used in electrical work are simple and inexpensive, although their sizes, materials, and configurations are carefully controlled by code.
If your kitchen remodel re quires opening the walls any way, it is actually smarter to give your dreams free rein and upgrade the electrical service to the maximum. Wiring is the most economical major improvement to make and it is easy and methodical to do. A kitchen has very specific minimum-circuit requirements but, of course, you can add any other circuits that will make the kitchen more convenient.
Once you've determined the electrical appliances you want in your new kitchen and the number and location of new receptacles, calculate, with the help of the NEC and local code guidelines, the additional amperage these will require. Compare the result to the amperage of the existing electrical service.
If the projected amperage exceeds what’s currently available, upgrade the service at the service-entrance panel.
If the service-entrance panel doesn’t need to be upgraded, but space is tight, try adding half-size wafer breakers. Alter natively, consider installing a subpanel for just the kitchen circuits. Although a subpanel provides space for more circuits, it does not increase the overall amperage of house electrical service.
Receptacles
Receptacles may be either 120 or 240 volt, and have outlets for two- or three-pronged plugs of various configurations and amperages. Major appliances, such as ranges and clothes dryers, have plugs that require a specific style of electrical receptacle. Combination switch receptacles are also available.
Switches and receptacles must have the same amperage and voltage rating as their circuit.
An electrical box is required for every receptacle, switch, light fixture, built-in appliance, and wherever else wire connections are made.
As a general rule, receptacles over counters are located no more than 4 feet apart, with a receptacle over any counter wider than 12 inches. They are usually 42 inches from the floor, but plan their location to it the design, especially if you are planning to tile the walls or backsplash.
Although your kitchen will have specific requirements, be sure to include the following often-forgotten receptacles:
. Inside an appliance garage
. For a gas range with electric features
. For a hood/vent with electric features
. For a microwave oven at use height
. One 2 feet from the floor for the refrigerator
. One 14 inches from the floor for a floor buffer or vacuum cleaner GFCI
Many codes require GFCI (ground fault circuit interrupter) protection around kitchen sinks and other wet areas. The GFCI will shut off the power instantly before electricity can be grounded through you. To ensure GFCI protection, use a GFCI circuit breaker in the panel or a GFCI receptacle. Regular receptacles can be GFCI protected if they are wired through the GFCI receptacle.
Special Systems
The kitchen is sometimes de scribed as the nerve center of the modern home. Indeed, as cooking and cleaning become simpler, the kitchen is given over more to entertainment, communication, and home management duties. Take ad vantage of the fact that you’re opening the walls for electrical work to run hidden wires for these systems.
Telephone
Since deregulation, the tele phone wall jacks and interior cables are owned by you, the subscriber. You may extend the lines from one jack to wherever another jack is needed. The components are modular, inexpensive, and available at any telephone-supply or home electronics store. The extremely low voltage is not dangerous to work with, unless you have a pacemaker. Don’ t forget jacks for the computer modem and fax, which you will probably need eventually.
Doorbell
You may wish to add a chime unit in the kitchen so you can hear the front door better, add a push button at an exterior kitchen door, or install an entirely independent system for the kitchen. The doorbell trans former, on a junction box, steps down the house current to 10 to 20 volts. The wiring is low voltage 16, 18, or 20 gauge.
Television Cable
Check with your cable supplier to be sure you are allowed to add additional cable outlets. In the wall where the cable enters your home, you can install a splitter, and then run a second cable through the wall to the kitchen. If this weakens the signal, you can install a small booster, or amplifier. AJ1 of these inexpensive, modular components are available from a home-electronics store.
Stereo Speakers
Bring music to the kitchen by running 12- or 14-gauge double wire, called lamp cord or zip cord, from the stereo through the walls and ceiling to the desired location in the kitchen.
Construct recesses in the walls, soffit boxes, or special cubby holes in the cabinets to house the speakers and wire.
Smoke Detectors
Hard-wired smoke detectors are required by some codes, especially in rental units. They can be wired so that when one alarm is activated, they all sound-a wonderful advantage if the kitchen and bedrooms are far apart. This requires that they all be on a single circuit, wired with a three-conductor cable. A photoelectric alarm is best for the kitchen; ionization alarms are easily tripped by normal cooking fumes.
Surge Suppressor
If you will have a computer in the kitchen, a built-in surge suppressor eliminates the need for a modular one. The surge suppressor receptacle is in stalled in an electrical box like a regular 120-volt receptacle.

------63 Renumber electrical needs on kitchen islands. A strip of receptacles
provides juice for a multitude of modern appliances on this cantilevered work
surface.
++++++++++++++++
LIGHTING
Well-planned lighting in the kitchen is a matter of efficiency and safety, as well as good looks. Fixtures must be positioned both for soft ambient light and for useful task light.
Switches should provide convenient control from several locations and allow various combinations of lighting type and intensity.
Lighting Design
Although light is not tangible, it must be as carefully designed as every other element in a kitchen. Even the most elegant kitchen is ultimately a work room, and must be lighted with utility in mind.
Throughout the day, the kitchen lighting needs will vary: perhaps none at all on a sunny day, to full lighting for evening dinner preparation and socializing, to a dim nightlight for the midnight snacker. Every kitchen needs both general and task lighting, as well as lighting at a certain minimum level.
Within these guidelines there is wide leeway for ex pressing your personal style.
Do you feel cheeriest in a kitchen bathed in cool, white, shadow-less light? Or do you prefer focused light that entertains your eye with varied levels of intensity? Do you wish to emphasize the sleek, smooth surfaces of a modern kitchen, or to bring out the dramatic textures of rustic wood and tile? Would a piece of neon art add light and drama to your kitchen? You can design lighting to it any of these preferences while providing a safe and efficient workplace.
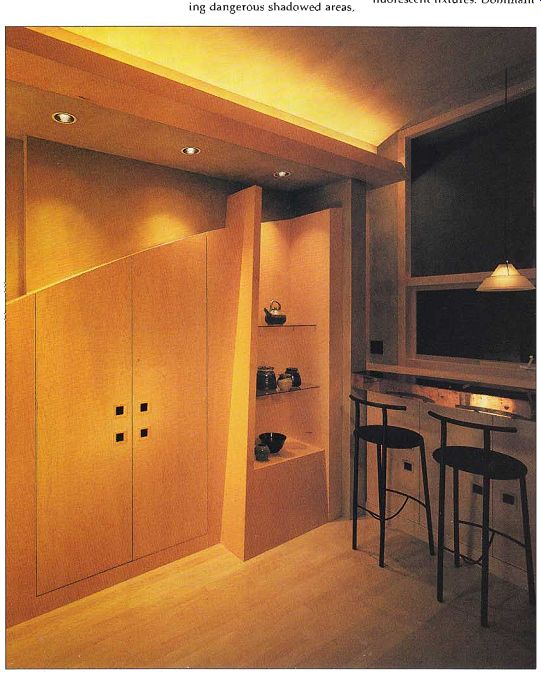
------- Along with filling general and specific task needs. lighting
can also achieve Special effects in the nighttime kitchen. Lighting from
long incandescent tubes in the soffit space gives this kitchen ceiling n moonlit
glow.
While deciding on your needs in general and task lighting, consider how the two will work together for optimum convenience and variety.
General Lighting
General lighting illuminates the space as a whole, eliminating dangerous shadowed areas, and allowing you to see into cabinets and drawers. This may be accomplished with ceiling fixtures, fluorescent panels, pendant lighting, or down-lighting, either recessed or on tracks.
Energy codes for new construction or remodeling require the dominant lighting to be fluorescent fixtures. Dominant refers to (he light turned on with the switch at the entrance to the room. Existing fixtures can be refitted with fluorescent bulbs or replaced with up-to date fixtures that incorporate the use of fluorescence.
Experts differ on how much general light a kitchen should have. Needs determine this to a large extent. Contemplate your taste in lighting, remembering the visual needs of family members (older people need more light). Speculate on the future activity level of the new kitchen, because multiple uses require extra light.
The colors you use in the kitchen affect whether light is reflected or absorbed: Light colored cabinets and countertops require less lighting than dark wood tones. A kitchen with a ceiling higher than 8 feet requires more general light; a kitchen with a lot of task lighting may require less. With these variables in mind, consider the following figures as minimums in establishing a general-lighting level.
Incandescent 80 square feet-200 watts 150 square feet-300 watts 250 square feet-500 watts Fluorescent 80 square feet-150 watts 150 square feet-220 watts 250 square feet-350 watts
Task Lighting
Task lighting must be carefully planned for direct illumination of the kitchen work centers food preparation, cleanup, and home office. It also fills in the dark nooks and crannies on countertops created by over hanging wall cabinets. For the latter, nothing beats fluorescent lubes, surface-mounted on the underside of the cabinets. A tube should be two-thirds the length of the counter it lights and provide about 8 watts of power per foot of counter.
For example, a 6-foot run of counter calls for a 4-foot fluorescent tube of about 48 watts-a 40-watt tube would suffice. The tube should be mounted close to the front edge of the cabinets. It can be concealed by adding a valance-a matching strip of wood or laminate--to the bottom edge of the cabinet. In a traditional kitchen, a stained-glass valance provides a beautiful effect when lighted. To enhance a high-tech style, mini track lights can also be mounted un der cabinets; no valance is necessary.
The conventional choices for illuminating work centers, including islands, are recessed downlights, track lights, or pendant lights. Keep in mind that none of these will fully light a countertop beneath a wall cabinet. Each work center should be lighted with a mini mum of 100 to 150 watts of incandescent light or 40 to 60 watts of fluorescent light more if you prefer it bright.
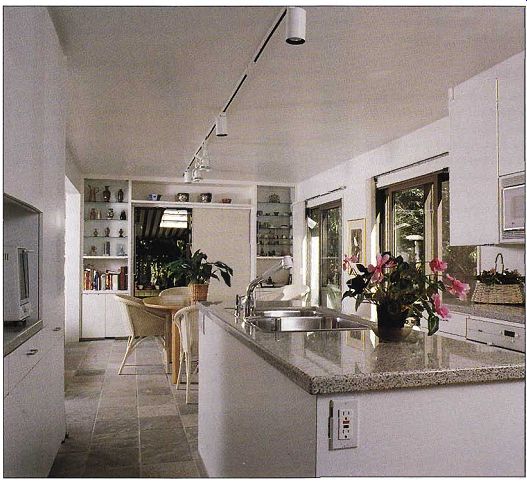
-------- Consider combining several types of lighting within your
kitchen. Here, tracks illuminate the work centers while small recessed
lights spotlight items on the display shelves.
Fixture Types
All permanent fixtures are wired into the electrical circuit at an electrical box. You must plan the location of your fixtures in advance so that the boxes can be installed when the wiring is done. Kitchen lights must be on their own 15-amp or 20-amp circuit, not part of any appliance or receptacle circuit.
Panels
Fluorescent panel fixtures are the most common means of producing general light in the kitchen. Tubes are housed in rectangular box fixtures. Individual fixtures may be recessed into the ceiling between joists or surface-mounted on the ceiling, although this is less attractive. Several fixtures may be surface-mounted and covered by a suspended ceiling-trans lucent panels in a metal or wood frame-which diffuses the light.
A variation of this is the dome-light ceiling, in which fluorescent fixtures are mounted around the ceiling perimeter and the translucent panels fitted between the ceiling and wall, often forming an angled soffit over wall cabinets.
This is a practical style for ceilings that are only 8 feet high and allows another fixture to be mounted in the center of the ceiling. All panels bathe the room in a cool, even glow, but dome lights may be more strictly directed and still illuminate the room.
Pendants
Also called hanging lights, pendants achieve both general and task-lighting needs. As an accent install a pendant low over a table or bar. For general lighting the fixture should cast diffused light downward, out ward, and upward toward the ceiling, where it will bounce back down into the room. A heavy fixture, such as a light with a ceiling fan, needs to be supported by screwing the box into a stud, and sometimes affixing a horizontal metal mounting strap as well.
Recessed
For task lighting, nothing beats a recessed light, aimed at a specific work center. Plan the cones of light to overlap, adding to the ambient light. Recessed fixtures include canister shaped downlights, as well as fluorescent fixtures, which are usually in the form of a metal box. Recessed light can be in stalled in the ceiling or in an overhanging soffit box. Install lights upward from cabinet tops to wash the ceiling with a glossy, white general light.
Make sure there is enough vertical clearance to accept these fixtures. They need space around them to dissipate heat.
Tracks
Track lights enable several fixtures to run from one electrical box. Tracks are fitted to mounting clips attached to the ceiling or attached to it directly. Some tracks are designed to be wired into two different circuits for greater lighting flexibility.
Accents
Use the soffit space or picture rail molding to encase strands of Tivoli bulbs, like Christmas tree lights, or neon strips for creative designs.
Switches
Each entrance to the kitchen should have switches that control the primary general and task lights. Switches are usually located 44 to 48 inches above the floor-you may locate them differently for special needs or to accommodate your design. If the kitchen has two or more entrances, use three-way switches. Any sped a I-purpose task light that you wish to operate independently, such as a grow light for plants or a light over a bar, should have its own switch on the wall nearest it.
One convenient switching arrangement is to wire the task lights to one switch and the general lights to another, so that you can use one or the other or both at once. Another method is to wire the fluorescent lights and the incandescent lights to separate switches, to allow for different temperatures and lighting moods.
Dimmers must be installed on separate switches. You may also want to put a pendant light over the dining table on a separate switch.
A light switch requires an electrical box, the same as fixtures and receptacles. At each kitchen entrance, you may combine the electrical boxes for two or even three or more switches-these are called gang boxes. Several different styles of switches provide fine control over lighting.
. A single-pole switch, the typical on-off switch, offers control from only one location, making it suitable for a kitchen with only one entrance.
. Three-way switches work In pairs. One is placed at each of two entrances, enabling you to turn lights on at one en trance and off at the other.
. They are a must if your kitchen has an Exterior door or if you are able to walk through the kitchen from one room to another.
. A dimmer switch allows you to adjust the intensity of the light to your mood and needs. The switch uses a rheostat to reduce the flow of current.
The most economical is a rotary or sliding dimmer, which requires that you dim the light all the way to reach the off position; gradually extinguishing a light this way increases the life of the bulb and saves energy. Dimmers are available for fluorescent lights, but they are expensive and re quire a special fixture in limited styles. A simple alternative is to wire fluorescent fixtures on two different switches.
Specialty switches range from practical to fun. A mercury switch uses a rolling drop of liquid mercury to turn on and off smoothly and absolutely silently. A time-clock switch has a dial that can be set to turn the lights on and of at preset times. A lighted switch has a toggle that glows in the dark so it's easy to locate. A clock switch has a tiny digital time display built-in.
++++++++++++++
Heating and cooling
When planning kitchen heating, keep in mind that the range, refrigerator, dishwasher, and clothes dryer all do their part to keep the room warm, especially if it’ s well insulated. Cooling the kitchen will be requisite, and may be as simple as ensuring proper ventilation and installing sunshades on the windows.
System Solutions
In most kitchen remodeling, the existing heating and cooling systems are kept intact, and require only small modifications to fit the new floor plan.
In a central forced-air system, this might entail extending an air duct to reposition the vent.
If your ducts run under the floor or over the ceiling, as most do, this is fairly simple, but in some systems a change may require opening the wall or ceiling. The ducting may be rectangular sheet metal, or a flexible insulated tubing. A convenient vent position is in the toe kick of the cabinets; this is basically a floor vent with a 90-degree adapter sleeve called a transition elbow. The sink toe kick is often recommended as a location, but you might be bothered by the blast of hot air on your feet as you do the dishes. Locate a vent to direct heating or cooling to where it’s most needed: a breakfast nook surrounded by windows, for example.
To save work and expense, make an effort to extend the existing ducts as simply as possible. If the new kitchen will add square footage to the house, check whether the existing furnace and air conditioner can handle the extra load.
Rather than upgrading the sys tem, you might prefer to install supplemental heating or cooling in the new kitchen. Some options include a 240-volt base board heater, or a window air conditioner/heat pump-each requires its own electrical circuit. These are simple, efficient solutions for a space that was never tied into the central heating system of the house.
If the house has a hot-water heating system, replace any radiators in the kitchen with baseboard convectors to gain space and increase design options. Most heating pipes are galvanized steel, but new pipes may be copper, unless local codes prohibit this. Moving or extending the heating pipes is a straightforward plumbing task, complicated, of course, if you need to enter the walls for ac cess. Shift any exposed pipes into the walls, or construct a box, called a chase, around them if this can be done unobtrusively.
For the ultimate luxury in hot-water heating, look into in stalling an under-floor radiant heating system. Pipes beneath the subfloor warm the floor, which gently radiates heat up ward. This is a lovely feeling, especially for a ceramic-tile floor in winter. It also circum vents the lack of kitchen wall space for heating units.
Non-system Solutions
Naturally, heating and cooling do not have to be mechanical.
Well-placed windows can moderate the temperature through much of the year by providing cross-ventilation. Sunshine, especially through a skylight, will warm the kitchen dramatically. In summer, this effect can be minimized by using blinds or installing a sunshade on the skylight. Install awnings to shield windows from the sun, and interior shutters, especially if they are lined and padded, to insulate from the cold.
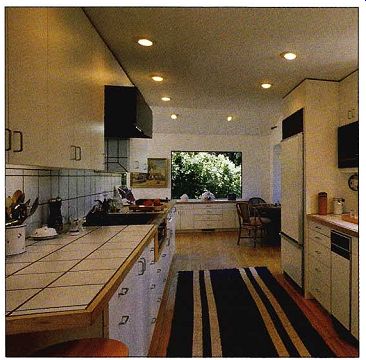
------- Plan healing vents away from warmth-generating appliances,
such as ovens, cooktops, and dishwashers, and near areas where the heal
will be welcomed. A practical heating-vent placement, as in this kitchen,
is in the toe kick near the eating area.
A wood-burning stove can provide the main source of heat for the kitchen; of course, it will also make itself the focal point of your kitchen design.
The stove must have at least 36 inches of clearance from the wall, and may require heat shielding on the walls and floor. It has an insulated chimney pipe that extends out through the roof. The local building code has installation requirements. A prefabricated fireplace insert with glass doors and a venting system can also be counted on for heating, but a conventional fireplace may rob more heat than it creates, depending on its construction.
A ceiling fan with a reversible motor draws cool air up ward in summer and circulates warm air downward in winter.
Insulation has a great impact on energy efficiency and should be upgraded during remodeling. All Exterior walls must be insulated. Any work that re quires opening an exterior wall provides an opportunity to re place the insulation if necessary.
================