Ortho Home Improvement books
Once you have a thorough understanding of your existing kitchen and some specific ideas of what you want from the new one, the next step is to put the two together in a design that is beautiful functional, and fits the space. Time spent trying out various designs on paper to arrive at the best possible plan before beginning construction is well invested. This chapter presents ways to add space to a room and to organize kitchen elements into practical work centers. These processes are based on tried and-true research and use professional drafting techniques.
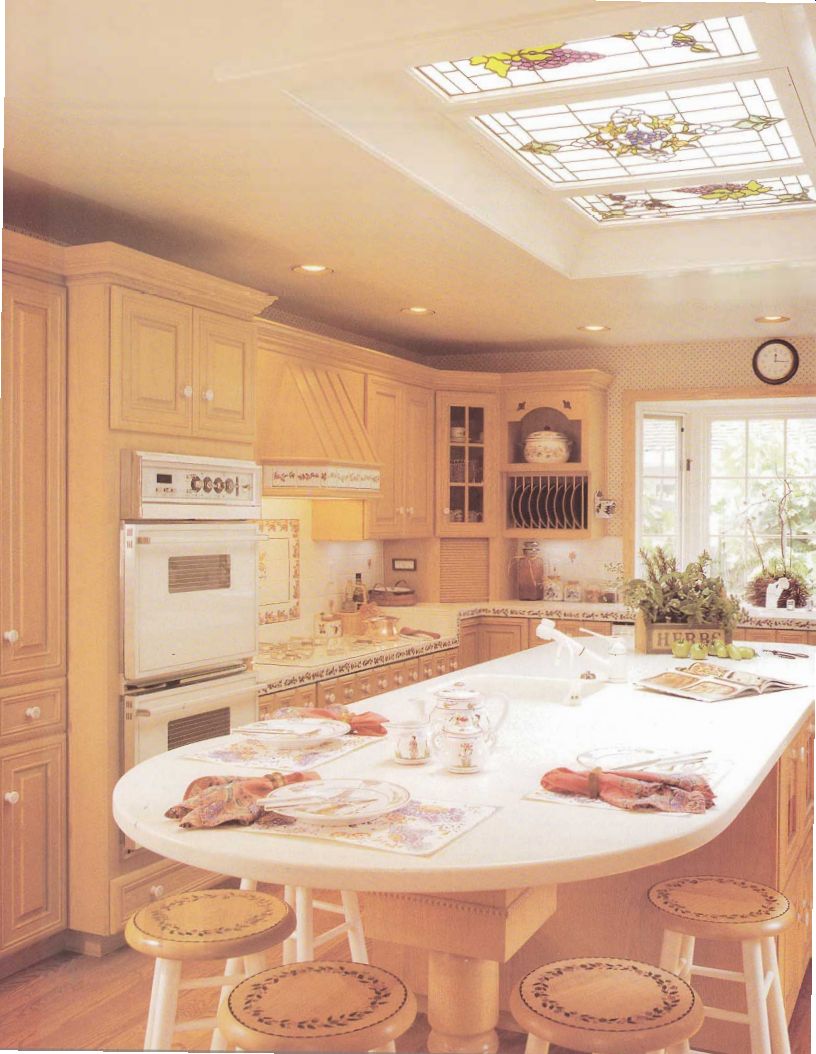

---Every surface-walls, ceiling and floor-must be considered when designing
a room. In litis kitchen n desire for more light mean! changing Ihe outside
wall by adding nil angled bay window and changing the cciling by adding
a
skylight. There is another view of this kitchen shown
earlier.
++++++++++++++++
ADDING SPACE TO THE KITCHEN
When evaluating your family's many kitchen activities, you may have concluded that the existing space just isn't big enough. This problem is not insurmountable; by looking around with a creative eye, you’ll find adding space to the existing kitchen can be quite simple.
Using Space Effectively
There are many methods of acquiring additional space without adding actual square footage to the kitchen. The most basic is ensuring that you store in your kitchen only those items and appliances you actually use. Selling redundant items at a garage sale or donating them to charity may be your most effective means to gaining extra kitchen space.
Within the kitchen proper, consider the simplest options first. If there are any odd jogs in the walls, examine them they may cover an unused flue chase, ventilation duct, or old chimney. By removing the finish wall you can gain several feet of storage space or just the nook you need for the home office desk.
Assess the spaces between studs for smaller storage areas. Although sixteen inches wide and four inches deep doesn't sound like much, it's an ideal space for a spice rack or collection display.
Check your traffic patterns. You can add several feet of floor space by closing off an unused door or unnecessary window.
Adding Windows
A brighter room feels larger. If the kitchen seems dark or cramped, add a window.
Greenhouse and bay windows incorporate space from outside without a major structural change to the house. In addition, a greenhouse window provides shelf space, and a bay window can add floor or seating space, especially useful as a breakfast nook. By flooding a kitchen with light and establishing a high visual focal point, skylight windows give the illusion of space.
Skylight kits are designed to it between standard rafters, and installing them does not require a huge amount of construction expertise.
Another way to bring the outside in is to install sliding glass or French doors opening onto a patio, deck, or porch. To link the indoor and outdoor spaces, finish the two floorings similarly.
Raising the Ceiling
Rooms can be expanded up as well as out. If the kitchen has a suspended ceiling, such as a -- grid of translucent light panels, removing them will expose the ceiling. If the roof or an attic is directly over the kitchen, you can take down the ceiling and cut out any joists to create a vaulted ceiling open all the way to the roof rafters.
Adding Square Footage
A more complicated method of adding space to the kitchen is to go beyond the walls of the existing room. You can do this by expanding into an adjoining room, or by moving an exterior wall, thereby actually adding square footage to the house.
Moving Interior Walls
If adding kitchen space is a priority, consider nearby rooms that can be sacrificed for the cause. The simplest ways to expand the space visually are to cut a pass-through in an interior wall or widen a doorway and raise it to the ceiling. To physically enlarge the kitchen, do a little sleuthing to discover underused space on the other side of the walls. Older homes were often designed as a net work of small rooms with distinct functions and often include a utility room off the kitchen. As appliances have changed, this room may have been relegated to storage.
Would the space be better utilized as part of the working kitchen? Your house may have a formal dining room near the kitchen; does your family use it? Would you be better served by incorporating the space into the kitchen? Next consider annexing all or part of an adjoining living area to add to the kitchen. You needn’t take over the entire space; perhaps moving walls just a few feet into an adjacent room would gain desired square footage. How much do you need that closet or bath room just off the kitchen? Check the often-idle space beneath stairs for locating storage or a specific appliance.
Load-Bearing Walls
The most critical consideration in removing a wall or adding a door, window, or pass-through is whether the wall bears the load in supporting the house structure. Assume that all exterior walls are load-bearing.
Interior walls that run perpendicular to the joists are often load-bearing as well. If a wall runs the entire length of the house, with few doors, or there is a wall upstairs and down stairs in the same position, chances are it is load-bearing.
If you alter a bearing wall, you must install a ceiling beam or a post to assume its load.
Non-bearing walls may be re moved as you wish, without affecting the house structure. If you have any doubts, consult a professional before making your plans.
Before any wall can be re moved or altered, the utilities within it--wiring, plumbing, and ducting--must be disconnected and their alternate routing determined.
===========
Legalities
As soon as you've decided to remodel the kitchen, pay a visit to the local building department to find out the building codes that pertain to the job and how to obtain the necessary permits. Codes vary by locality, so be sure you get correct, firsthand information.
Codes that might affect a kitchen remodel include building, plumbing, mechanical, and electrical codes. There may also be additional state and local codes, most of which conform to--but may also contradict and override--the national model codes. Get up-to-date copies of all aides--condensed versions will do--and study them.
Neighborhood homeowners' associations may also have covenants that restrict the changes you can make to your house. Also peruse your deed for any restrictions on the use of the property.
Permits In general, cosmetic changes and routine maintenance may be performed without a permit. These include removing cabinets, laying floor covering, installing a new countertop, and replacing a door or a window. But any job that affects the structure of the house or its utilities is regulated. You will need one or more permits to do structural work. Permits en sure that the work on your house-and nearby houses-is being done according to codes determined best for the public safety. Remodeling done with out required permits can result in problems obtaining home owner’s insurance or selling the house. In some areas, you are allowed to do only the most minor plumbing or electrical jobs; a licensed plumber or electrician will have to apply for the permits and do the bulk of the work.
Ask the following questions before you start the permit process.
. What permits are necessary for the project?
What must you present to apply for each permit?
. What are the permit fees?
. How long is the typical wait between application and approval?
. When will inspections be made?
Zoning
A kitchen remodel that will change the size or exterior appearance of the house may be controlled by zoning regulations. Zoning protects the character and quality of a neighborhood. If your plans conflict with zoning regulations, you can apply for a variance; a hearing may be necessary. The decision is made by the local planning board. It may regulate some of the following construction aspects.
Architectural style: This may affect the type of siding, the roof style, the size and style of windows and doors, and the compatibility of the addition with the style of the house.
Setback: This is the mini mum distance between a building and the property line.
You must know the exact boundaries of your property. A second story must sometimes be set back farther than the ground floor.
Height: Some regulations restrict second-story additions.
If you are considering expanding the kitchen, check that you can do so both structurally and legally.
Parking: If enclosed off street parking is required, you may not be able to expand the kitchen into the garage.
=============
Moving Exterior Walls
If you cannot expand enough within the house, explore going outside. If a porch or patio is adjacent to the kitchen, consider enclosing it or attaching a prefabricated greenhouse, either of which would add us able space to the kitchen.
An exterior wall can be ex tended 2 or 3 feet by cantilevering the floor joists out from the foundation, eliminating the need to add to the house foundation. Additions greater than 3 feet require the construction of additional foundation piers.
In either case you must consider the continuation of the roof line or construction of a new roof.
Additional costs include the foundation and wall construction materials, including framing lumber, exterior siding, insulation, doors, windows, interior wallboard, and subflooring. If you are expanding onto a porch, you may have to build up the porch floor to make it level with the interior floor, and augment the walls and foundation to bring them up to code for interior construction.
In addition, you will be faced with zoning laws concerning exterior changes to the house and minimum setbacks.
If you must have a bigger kitchen and you cannot expand the existing space satisfactorily, you can move the kitchen to a different area of the house or add a new room entirely. While both of these options involve major construction, the design and planning stages remain the same. An advantage of this idea is that you can continue using the current kitchen as you build the new one.
++++++++++++++++
ORGANIZING THE FUNCTIONAL AREAS
Since the 1950s, researchers have been developing standards for kitchen design modifying them as family life changes. Your new kitchen can benefit from the very latest design principles, detailed here.
Standard Practices
The elements that make up the kitchen must fit together harmoniously so that movement within the kitchen is efficient and unimpeded. Basic kitchen design has (or decades organized space into three work centers, with their relationship forming a work triangle around which traffic flow's diverted. The triangle is based on a study done at Cornell University for the Small Homes Council in the 1950s. Since then, dramatic life-style changes-two-career families, multiple cooks, labor-saving appliances, and recycling, to name a few-have altered the role of the kitchen. Seeing the need (or standards that would Lake kitchen design into the twenty-first century, the National Kitchen and Bath Association recently asked experts at the University of Minnesota to reevaluate (he Cornell standards. The new NKBA Minnesota standards provide br the multiple-cook kitchen. the kitchen as a (amity activity center, and the proliferation of modern appliances. This section incorporates these latest standards.
-------------
==========
Design Professionals
If the desired changes in your kitchen are complex, or your confidence in your design skills is limited, consider seeking the help of a design professional.
Qualified kitchen designers have the initials CKD--for Certified Kitchen Designer -- listed after their names. This signifies that the person has passed rigorous written and design tests through the National Kitchen and Bath Association. Kitchen designers work independently, in association with architects and builders, or are allied with re tail dealers.
There are a number of ways to find a kitchen designer. Ask people who have remodeled their kitchen for recommendations. Track down the firm or individual designer who worked on a kitchen featured in the local press. Check out the designers who have worked on nearby showcase and model homes. If you have worked with an interior designer, ask for recommendations of qualified kitchen designers. If your plans include an extensive addition to the house as well as a kitchen remodel, you may want to pursue the overall design through an architect, who may have a kitchen designer on staff. If you plan to hire a contractor, ask him or her for referrals.
Stop by local building-supply outlets and cabinet show rooms, or let your fingers do the walking through the telephone directory. Many kitchen-supply retailers em ploy certified designers, whose services often come gratis with major purchases.
Finding a kitchen designer who is right for your job is much like seeking the right dentist, doctor, or other professional. Much is contingent on rapport and your respect for the designer’ s experience, taste, and specialized knowledge. Ask to speak to former customers and visit completed jobs, if possible, to view a designer’s work before making any commitments.
The better the designer understands what you want, the more likely he or she will pro duce the perfect kitchen for you. When meeting with a kitchen designer initially, bring your wish list, your clip file of favorite looks, the survey of the existing structure, your preliminary plans, and your budget requirements.
Kitchen designers can be fairly flexible in their role, which can include checking that the plan you designed is workable, providing a complete floor plan, or overseeing the entire remodeling job.
Whatever best suits your time and your budget, as well as the designer's schedule, should determine how active a role the designer will play in your remodeling project.
=============
Work Centers
The NKBA-- Minnesota study designates primary arid secondary work centers. A work center is the spot where a major kitchen activity is focused.
Your kitchen must include the primary work centers, and may include the secondary work centers as needed.
Each work center has a suggested minimum countertop space, which is measured along the front edge, called the countertop frontage. The surface area at an inside corner doesn’t count toward the minimum. If the countertops for two work centers are contiguous, the length of the combined countertop should be the longer of the two, plus 12 inches.
Primary Work Centers
The primary centers are those that must be included in every kitchen. These should be the first functional areas designated in the new design.
Cleanup Center
Although your kitchen may feature more than one sink, the primary sink is the heart of the cleanup center, which also includes the dishwasher, drain area, disposer, and trash and recycling bins. At least two waste receptacles are recommended. There should be at least 24 inches of counter space on one side of the sink, and 18 inches on the other. Allow 3 inches between the edge of the sink and the inside corner of a countertop. Determine by your dishwashing style whether the dishwasher should be on the right or the left of the sink.
There should be 21 inches of standing space on both sides of its open door, and no more than 36 inches from the edge of the dishwasher to the edge of the sink. All electrical receptacles within 6 feet of a sink must be GFCI protected. The kitchen should have two waste receptacles.
Cooking Center
Depending on your cooking style, different appliances will be appropriate for your cooking center, but it should include as fundamentals a surface cooking appliance-either the range top or a separate cook top-and an oven, and possibly a microwave. There should be at least 15 inches of counter space on one side of the cook top, and at least 9 inches on the other. If the cooktop is next to an end wall, it must have 3 inches of clearance; the wall must have a flame-retardant surface of ceramic, stone, or stainless steel; and there should be 15 inches of counter space on the other side of the cook top. The cooktop should not be placed beneath an openable window unless there are 3 inches of clearance behind it and 24 inches above it. There should be at least 24 inches of clearance above the cooktop; 30 inches if the overhang is combustible. The cooktop should have a ventilating system, exhausted to the outside, with a minimum air-movement rating of 150 CFM (cubic feet per minute). A ire extinguisher should be located across from the cooktop, and a smoke detector just outside the kitchen.
Refrigerator Center
Most fresh foods are stored in the refrigerator, and it is the first stop for both a shopper with grocery bags, and a cook.
There should be at least 15 inches of counter space on the latch side of the refrigerator (or on the left, for a side-by-side); or, the counter may be across from the refrigerator, if no more than 48 inches away. The refrigerator may be located next to an oven if each is properly insulated. A separate freezer needn't be located in the refrigerator center.
Food-Preparation Center
An area between the cleanup center and the refrigerator center is ideally situated for the food-preparation center. This counter may be used for other activities when meals are not being prepared. The recommended locations are next to a sink, between a sink and cook lop, or between a sink and refrigerator. For kitchens designed for only one cook, there should be at least 36 inches of uninterrupted counter space.
For multiple cooks, each needs 36 inches of space. Two cooks working side by side should have 72 inches of straight, continuous counter space. A major appliance, such as a dish washer, should not be located within the food-preparation center. However, a garbage can or compost bin for food waste should be included.
Secondary Work Centers
The number and type of secondary work centers depend on the additional activities you perform in your kitchen. Secondary work centers often include a specialty cooking area-such as for a wok or for baking-or a bar sink.
Secondary Sink
Recommended by the NKCBA, a secondary sink is useful for food preparation and entertaining and is often incorporated into a bar. IFI may be smaller than the primary sink, but it should have hot and cold water and a garbage disposer. If part of a bar, there should be storage space for washing supplies and for glasses and mixers.
A small refrigerator and ice maker are also handy for a bar.
If you have a large family or entertain a lot, an additional dishwasher can also be incorporated. A secondary sink may be located 3 inches from an inside corner of the counter, so long as there are at least 21 inches of counter space after turning the corner; if not, the sink should be at least 18 inches from the corner.
Ovens Some cooks prefer the oven to be separate from the cooktop.
Ovens may be positioned un der the counter or in a wall oven cabinet. Each oven should have 15 inches of counter space next to or above it. This counter may also be across from the oven if the distance is no more than 48 inches and if the passageway is not a primary traffic area. Ovens may be located next to the refrigerator if both are properly insulated.
A relatively smaller and freestanding appliance, the microwave oven may have its own center, be incorporated into the cooktop or oven center, or be located in the refrigerator center. The microwave calls for 15 inches of counter space above, beside, or below it. The bottom edge of the microwave should fall between the counter and the user’ s shoulder; the most convenient height is at the user’ s elbow, plus or minus 6 inches.
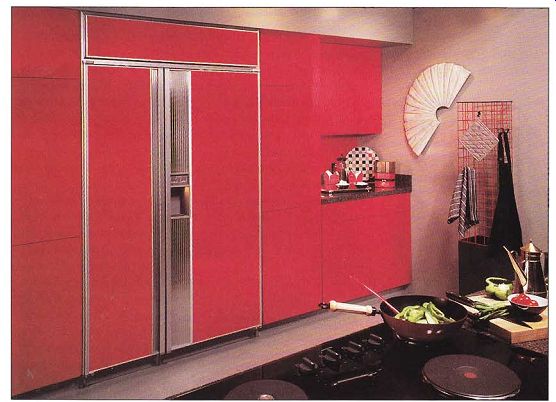
---------- Plan landing space within the refrigerator center lo set
groceries while pulling them away. The ideal landing is a minimum of 15
inches wide on the latch side of the refrigerator; it can also be located
across from the appliance.
The landing for this subzero refrigerator doubles as a food-preparation surface next lo the cooktop.
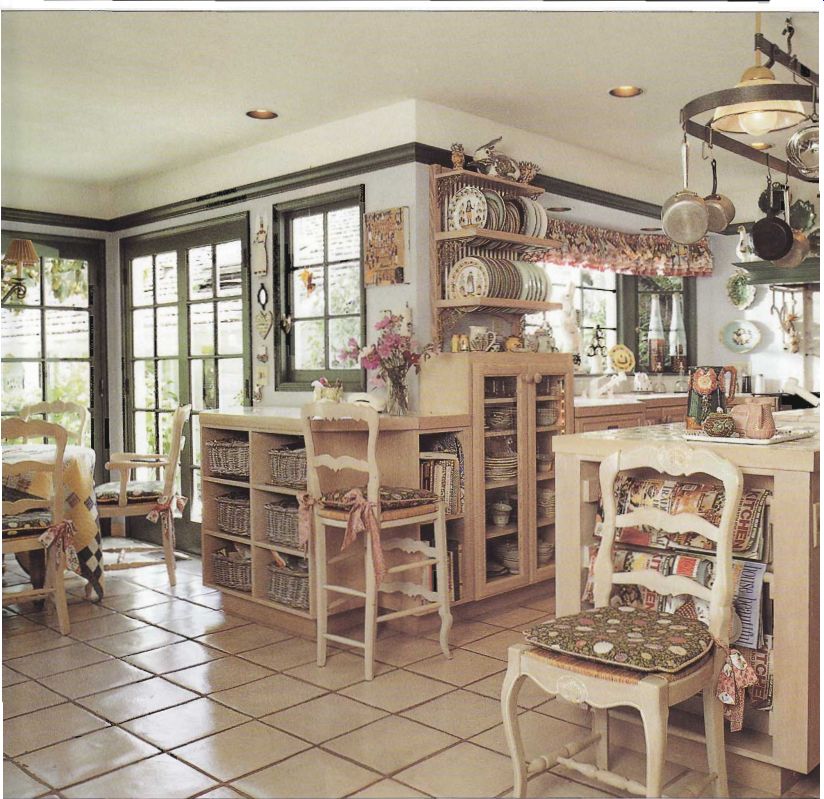
----------- In kitchen design, the eating and communications areas arc
considered secondary work centers. Here, the two centers are combined in
a light-filled space on the short leg of an L-shaped room. The eating area
is served by the handy island cleanup center: a second sink in the island,
a dishwasher behind the magazine rack, a dish-drain cupboard for everyday
dishes across from it, and flatware and linen storage in the baskets under
the desk. The pantry wall of this kitchen is pictured on page 52.
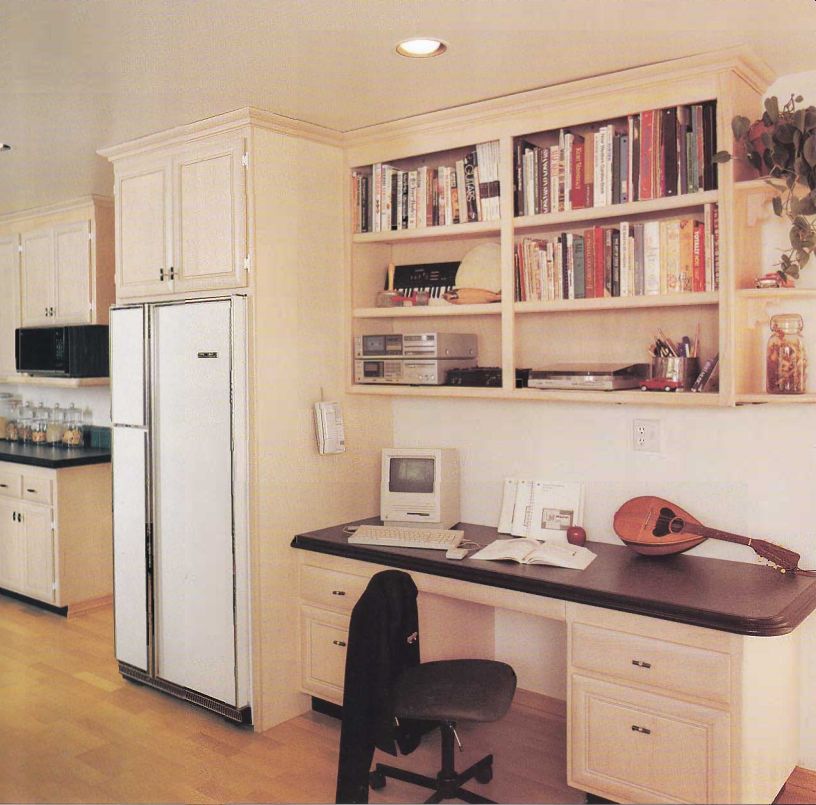
---------- An in-kitchen desk provides a space to grab some computer
time while dinner cooks. A communications center used exclusively for work
allows you to leave projects in progress without fear of them being disturbed
by other kitchen activities. However, because the desk counter-top here
matches others in the room, it can be cleared and used as a serving buffet
when the family entertains.
Eating Area
Opting for an in-room eating space depends on the size of the kitchen and your family’s life-style. Minimum counter or table space for each person is 24 inches wide by 12 inches deep. Chair or stool space should measure 24 to 30 inches square; chair space plus a walk way should measure 36 to 42 inches. Heights of eating surfaces vary: Counter height is 36 inches from the floor; table height, 30 inches; bar height, 42 to 44 inches. Chairs and stools must be proportioned accordingly.
Communications Center
One of the most significant aspects of the modern kitchen is the need for a dedicated office area. Ideally a home office has a horizontal work space that is not used for other purposes, so that work may be left out during food preparation and eating. Plan storage and file drawers, telephone receptacle, and surge-protected electrical receptacles for office machines. Also consider various media requirements for intercom, TV, cable, and speakers.
Work Triangles
The traditional kitchen work triangle was formed by drawing lines to connect the three primary appliances; range, sink, and refrigerator. Although every kitchen must have at least one primary work triangle, the wealth of work centers in the modern kitchen cannot be forced into one triangle. While the work-triangle concept is still relevant today, it has been expanded to include two or more interacting triangles. Triangles incorporating secondary work centers can be designed to suit your specific needs. For example, a secondary triangle can be formed by combining the refrigerator/ microwave/eating space or the refrigerator/baking center/ wall oven.
Defined as the shortest walking distance connecting three work centers, the perimeter of each triangle should mea sure 12 to 26 feet. A two-cook kitchen should have two primary triangles, each with a sink, refrigerator, and cooking appliance. But this doesn’t mean you must double up on everything. The triangles may share a point, or even a leg, so long as the legs don't cross. The best point to share is the refrigerator. Then, for example, one cook can use the primary sink and the cooktop, the other cook uses the secondary sink and the wall oven, and both use the refrigerator-without crossing paths. If the triangles have a common leg, the two cooks can share the refrigerator and the sink, while one uses the cook top and the other uses the microwave.
An island, peninsula, or table should not jut more than 12 inches into a work triangle, not should a door swing open into one. No two primary work centers may be separated by a tall cabinet, refrigerator, or wall.
Traffic Patterns
The new NKBA-Minnesota guidelines regarding kitchen traffic corridors differentiate between working aisles and passageways, and call for different dimensions for each.
A working aisle has a work center on one or both sides. A passageway is a thoroughfare with a work center on one side or none at all. A working aisle should be at least 42 inches wide; 48 inches wide /or two cooks. A passageway with no work centers should measure at least 36 inches wide; corner--to corner clearance between cabinets should be a minimum of 32 inches. A door into the kitchen should have a mini mum clearance of 32 inches, wider for wheelchair access.
Traffic should never be routed through a working aisle or a primary work triangle. Traffic through a secondary work triangle should be avoided, although sometimes this is not possible.
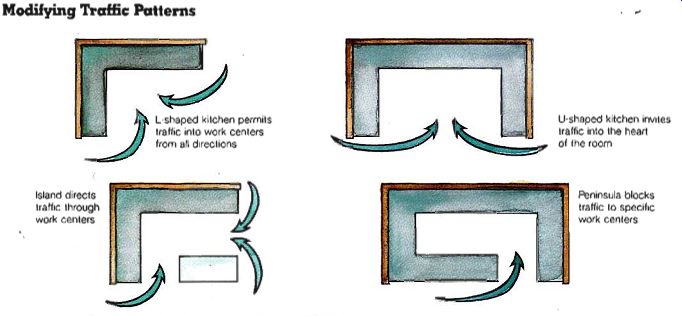
---------- Modifying Traffic Patterns
L shaped kitchen permits traffic into work centers from all directions
Island directs
traffic through work centers
U-shaped kitchen invites traffic into the heart of the room
Peninsula blocks traffic to specific work centers
---------------
++++++++++++++++++++
DRAWING PLANS
A plan is a graphic representation, drawn to scale, showing the exact size and location of every feature in a room. Use plans to visualize the kitchen layout, determine the exact size of fixtures and appliances, route utilities> and obtain building permits.
The Base Plan Once you've collected all your ideas and formulated some preferences, you , re ready to jump into designing the space.
Start by drawing an accurate plan of the existing kitchen, in 1/2-inch scale.
Measuring the Space
To draw a plan of the existing kitchen, you must first take precise measurements, which you will then scale down and transfer to paper. Start by sketching on a large pad of paper the basic outlines of the kitchen. Include doors, windows, trim, half walls, duct chases, pantry, and any other architectural features.
Use this sketch to record your measurements.
The best tool for measuring is an 8-foot carpenter's folding rule with a slide-out extension for fractions of inches. An adequate substitute is a 25- or 30-foot retractable steel tape measure. Have a companion help you hold the tool. Use inches only, rather than feet and inches, for all measurements. This will make the transfer to a 3/8-inch scale easier to calculate.
To measure, start in one corner of the room, at about waist height. Extend the rule along the wall to the next feature for example, the outside edge of the window trim--and write this measurement at the corresponding location on the sketch, in inches, to the nearest 1/8 inch. Next, measure across the window to the opposite outside trim edge, and note the window measurement. Continue measuring the wall, noting each feature separately, until you reach the next comer.
Now, measure the entire wall, corner to corner. Add together your first measurements; the result should equal the second measurement exactly. If not, take all the measurements again, until they match.
Measure and record each wall this way, around the perimeter of the kitchen. There can be no fudging! If opposite walls that should be the same width are off by an inch or so, do not be alarmed-not all rooms are square. Note the differences.
To check whether a corner is square, make a mark exactly 3 feet out from the corner on one wall, and a mark 4 feet out on the other wall. Measure the diagonal distance between the two marks; it should be exactly 5 feet. If it’s more than 5 feet, the corner angle is greater than 90 degrees; if it’s less than 5 feet, the corner angle is smaller than 90 degrees. Note this on your sketch.
Next, measure the positions of electrical switches and receptacles, water pipes, vents, tele phone jacks, the gas line, and other utilities and record them on your sketch (both distance from the corner and height off the floor).
On the sink wall, measure from one corner to the center of the sink. Measure the height of windows and their distance from the floor, the height and width of door and window trim, and the positions of stairways.
Measure built-in shelves, pass-throughs-every architectural detail. Measure and note the thickness of each wall (minus any trim). If you cannot see the wall profile, insert a thin wire through the wall and measure the difference. Also measure and record the height of the ceiling.
If you are considering expanding the kitchen into any adjoining rooms, add them to your sketch, and measure them the same way you did the kitchen, including the thick ness of the walls between them. All of these measurements will be used to construct an accurate base plan of the existing kitchen.
Putting the Plan on Paper
Begin the plan by taping a piece of graph paper to a drawing board. In one corner, write 1/2": 1' to indicate the scale used (1/2 inch equals 1 foot). This scale should appear on all drawings. Divide the inch measurements on your sketch by 12 (to get the number of feet).
Then convert each foot to a half inch and each fraction of a foot to its corresponding fraction of a half inch. This gives you the measurements for the scale drawing. An architect's scale simplifies the conversion pro cess immensely.
Using a straightedge, draw light lines representing the basic perimeter of the kitchen, using the converted measurements. Use the lines on the graph paper as a guide. Around the outside of this perimeter, draw lines representing the wall thicknesses. Then add the perimeters of any other rooms or spaces you measured.
Now, go back and put in the details. Working your way around the plan perimeter, draw each wall segment, window, door, trim piece, duct chase, pass-through, and every other permanent feature, based on the measurements you took.
Indicate the exact positions of the receptacles, switches, pipes, vents, and other utilities. Indicate whether doors swing in or out, left or right. As you draw each feature, note its actual measurements on the plan.
Make several high-quality photocopies of your final base plan to keep as spares and for sketching ideas. Never use photocopies of photocopies for scaled design work. The slight distortions caused by most copy machines will be accentuated and can throw off your measurements.
Use a copy of the base plan to draw an existing plan-one showing all features in the existing kitchen. Again, use exact measurements. Draw the kitchen as it is now, complete with cabinets, counters, appliances, light fixtures, and furniture. If the kitchen is fairly standard, a kitchen-fixture tem plate will have cutouts of the right dimensions that you can trace. You now have a bird’s eye view of the faults and virtues of the existing kitchen. Save copies of this existing plan; it may be required by the building department.
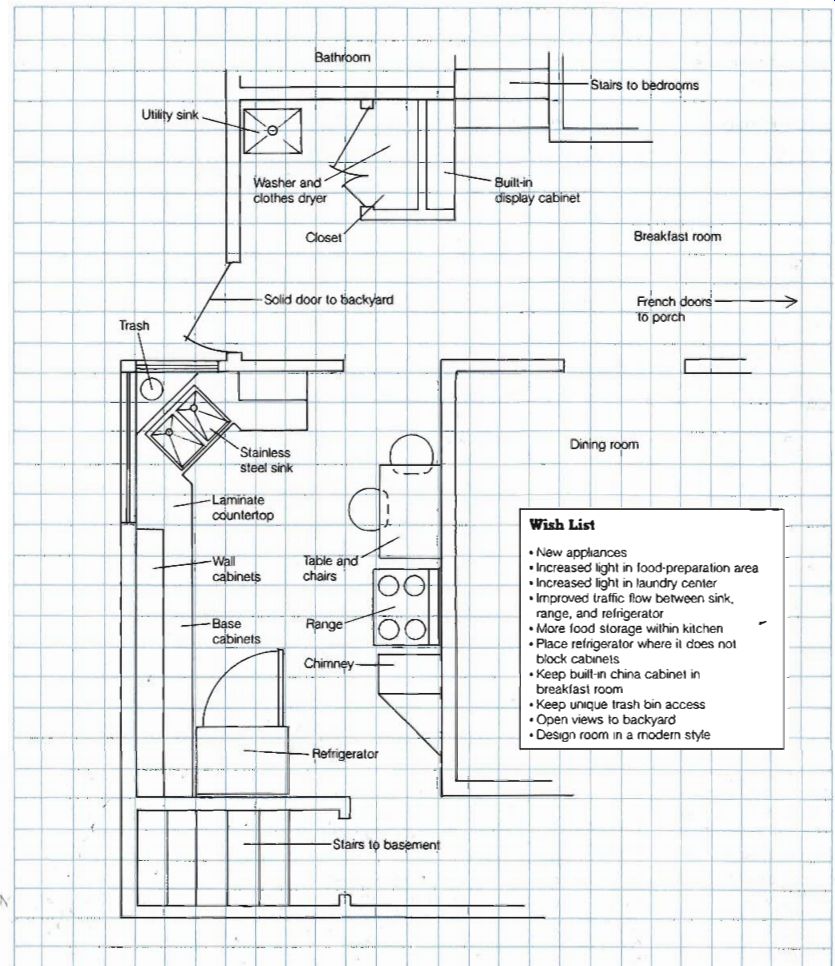
------ The Base Plan
View the final plans for this remodeling project on page 107.
Wish List
. New appliances
. Increased light in food-preparation area
. Improved traffic flow between sink, range, and refrigerator
. More food Storage within kitchen
. Place refrigerator where it does not block cabinets
. Keep built-in china cabinet in breakfast room
. Keep unique trash bin access
. Open views to backyard
----------------
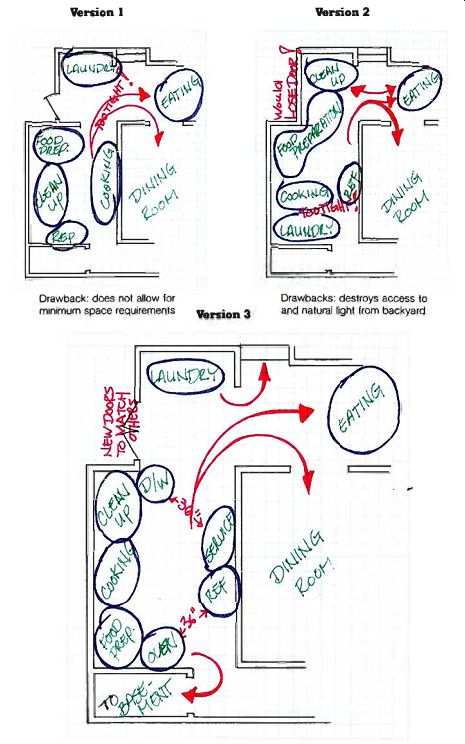
----------------- Bubble Drawings
Version 1 | Version 2
Drawback: does not allow for minimum space requirements
A sensible basis for a preliminary floor plan: fulfills most items on wish list while disturbing the fewest plumbing fixtures
------------------------
Making Bubble Drawings
Next, it's time to use your imagination. Tape tracing pa per over the original base plan (or use the photocopies) and sketch circles showing where you’ d like your various activities to take place. Consult your wish list of desired activities and, using the information from the NKBA-Minnesota study, locate the primary and secondary work centers.
Bubble drawings provide a graphic representation of the activity areas in a room and the flow of traffic though it; they show which arrangements work and which don’ t.
Professionals call this a motion study.
For those of you frustrated by precise drafting techniques, this is the fun part.
If you’ve always wanted an eat-in kitchen, circle an area designated as the eating center and try to build around it. Be creative. Close off doorways, eliminate walls; it’ s just on pa per at this point.
When a bubble plan looks as though it’s coming together, use the template to start adding appliances, cabinets, and other fixtures to see what fits. Use a different-colored pencil to test traffic patterns.
When you're satisfied with one plan, draw a new one! Move the appliances, move the doorways, and see what hap pens to the work triangles and the traffic flow. You’ll use lots of paper; this is idea time. For this exercise, you may wish to make templates by tracing the kitchen fixtures onto index cards and cutting them out, so you can move them around like pieces on a game-board.
Evaluate each bubble plan, comparing it with the existing kitchen and with your wish list. Does it fulfill your family's activity needs and wants? Does it solve space and traffic-flow problems? Investigate various kitchen shapes and configurations.
Would adding a peninsula or island fulfill counter space and work center requirements? Draw lines that show the movement among work centers during typical kitchen activities. Are they too close or too far away? Will two cooks run into each other? Next, draw lines indicating traffic through the kitchen, in and out of every door. Does this traffic flow cut through a work triangle? Is it awkward to get from one part of the room to another? Draw lines of sight showing views out the kitchen windows and views of the kitchen from other rooms.
Don’t be concerned with materials and styles at this point, but do start thinking about your budget. If the plan calls for major structural or utility changes, such as building an addition or rerouting the plumbing system, can you afford it? A creative design can still achieve a desired feel and flavor, even with a limited budget.
Discuss the bubble drawings with family and friends great insight can come from a fresh perspective. If you can, put the plans aside for a few weeks to distance yourself from your work, and then re examine the plans to see if your perspective-and ideals-have changed over time.
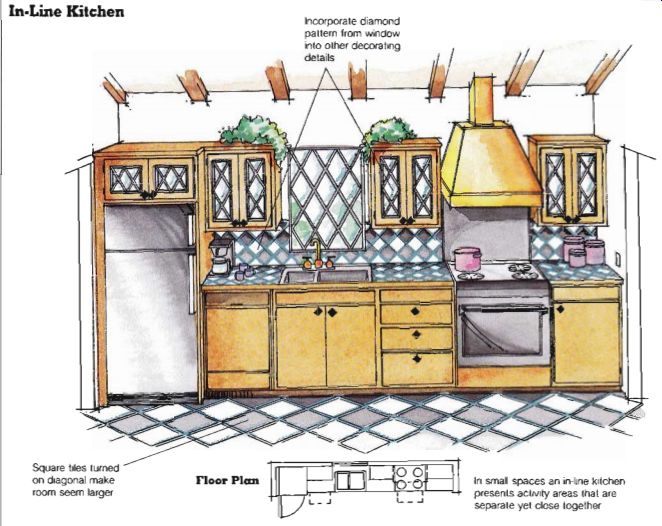
---------------- In-Line Kitchen: Incorporate diamond pattern from window
into other decorating; Square tiles turned on diagonal make room seem larger;
Floor Plan: In small spaces an in-line kitchen presents activity areas that
are separate yet close together
----------------------
Understanding Shapes
The confines of the room you are remodeling or adding will be rectangular or square, but the way the doors, windows, countertops, and other features are placed defines its shape. No one shape is better or worse than any other--just different.
Play with various shape options as you develop your bubble drawings. Understanding the common shapes defined here will give you a reference for when you discuss the design with remodeling professionals.
If space allows, building peninsulas and islands within the kitchen adds work centers and storage space without adding square footage to the room. The shape of these features should complement the shape of the room.
In-Line
Placing all the work centers in a straight line works well for small kitchens and for kitchen areas in studios that will be closed off with sliding or folding doors or a screen. However, an in-line plan can also work successfully in a large, long kitchen, so long as you allow for plenty of space between work centers.
Galley
Like its namesake on a ship, a galley kitchen places the work centers in two parallel lines with an aisle between. This lay- out works best when one end of the kitchen is a wall and the other end opens onto an eating area, family room or to the outside. The aisle needs to be at least 36 inches wide; 48 inches is better.
L-Shaped
Named for the letter it resembles, the L-shaped kitchen is formed by two legs of equal or unequal lengths joined at a right angle (see opposite page).
To avoid diminishing the apparent size of the kitchen, tall appliances and cabinets should be placed at the end of one leg rather than at the ends of both.
Using a peninsula, form an L-shaped kitchen within a larger rectangular room to di vide the space into separate food-preparation and eating centers. This is a popular solution if you’ d like a discrete eating area and do not have a dining room.
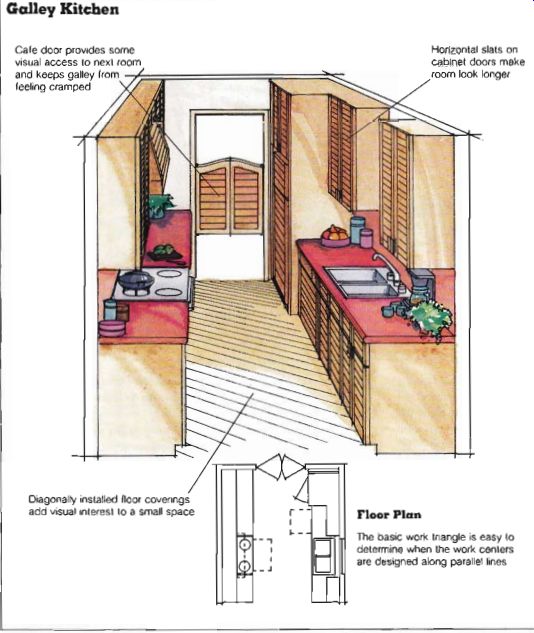
---------- Galley Kitchen: Cafe door provides some visual access
to next room and keeps galley from feeling cramped
Horizontal slats on cabinet doors make room look longer
Diagonally installed floor coverings add visual interest lo a small space
Floor Plan
The basic work triangle is easy to determine when the work centers are designed along parallel lines
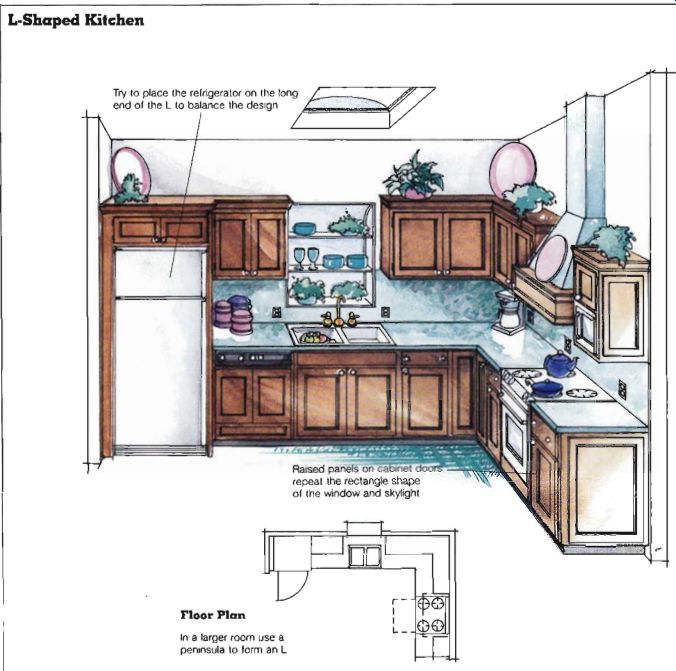
------ L-Shaped Kitchen
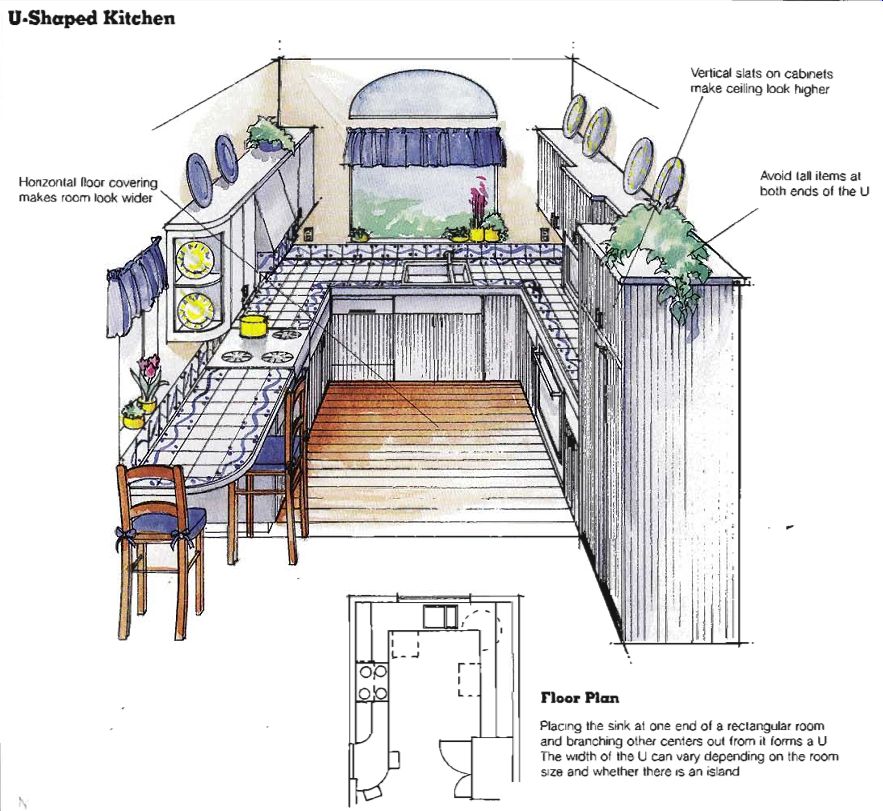
------- U-Shaped
Placing work centers along three sides of a square space creates a U-shaped kitchen. Often the sink is the focal point of the base of the U, with the cooking center on one side and the refrigerator center on the other. One leg may be a peninsula rather than a full wall. If the U is wide enough, consider an island in the center. Minimum U-shaped kitchen width is T2 feet for an island 2 feet wide.
Variations The basic kitchen shapes can be adjusted to your room and activity needs. The basic L and U shapes can be bisected by a door or passageway. The U shape can be augmented with a short fourth wall or peninsula. Adding a short peninsula within the basic square kitchen turns it into a G-shaped room.
Setting any of the basic shapes on an angle or a curve may it your space allotment better and may solve any traffic-pattern problems.
Peninsulas
A partition connected to one wall and dividing the space within the kitchen is called a peninsula. It can be created as a new design element or by removing a portion of a wall between the kitchen and an adjoining space. Peninsulas are a popular means of adding counter space for various work centers. Install a cooktop and oven in a peninsula, place a hood above it, and it serves as a cooking center. Put in a sink and dishwasher onto base cabinets, and the peninsula be comes the cleanup center.
A cantilever-counter peninsula can serve as an eating or other work center either at the same height as other kitchen counters, stepped up six or eight inches as a bar that screens the kitchen activities from view, or stepped down six or eight inches to table height.
Its end can be square, angled, or curved, depending on the design line used within your kitchen.
You can install cabinets, shelves, or other features above a peninsula. Wall cabinets hung from the ceiling above a peninsula will be shorter than standard, ending about eye level. They can be accessed from the kitchen side, the back side, or both. Consider open shelves or glass doors to maintain as much light as possible between spaces.

--------- U-Shaped Kitchen
Vertical slats on cabinets make ceiling look higher
Horizontal floor covering makes room look wider
Avoid tall items at both ends of the U
Floor Plan: Placing the sink at one end of a rectangular room and branching other centers out from it forms a U
The width of the U can vary depending on the room size and whether there is an island
-------------------
Islands
A freestanding unit within a kitchen, either portable or in stalled, is called an island. Design the size of the island In balance with the scale of the room. The bigger your kitchen is, the larger the island can be.
The minimum size /or an is land is 2 feet by 3 feet. Allow for a 3-foot-wide aisle on all sides of an island.
Build an island from base cabinets, add a countertop, and use it as a leg for several different work triangles. Islands make excellent secondary work centers and are especially useful as food-preparation areas.
For example, the cabinets can be designed to hold specialty cooking items, such as those needed for baking. If the island primarily supports a baking center, you may want to top it with a stone slab; if used mainly for cutting and chop ping, consider butcher block.
Topping an island with a different material than that used for the other countertops adds texture and visual interest to the room. Islands can be stepped up or down in height depending on their uses.
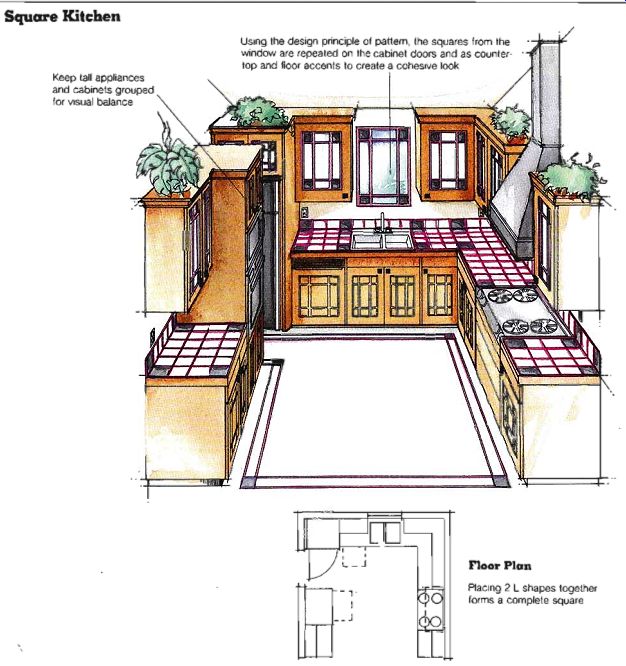
------------- Square Kitchen: Keep tall appliances and cabinets grouped (or
visual balance
Using the design principle o( pattern, the squares from the window are repeated on the cabinet doors and as counter top and floor accents to create a cohesive look
Floor Plan--Racing 2 L shapes together forms a complete square
-------------------
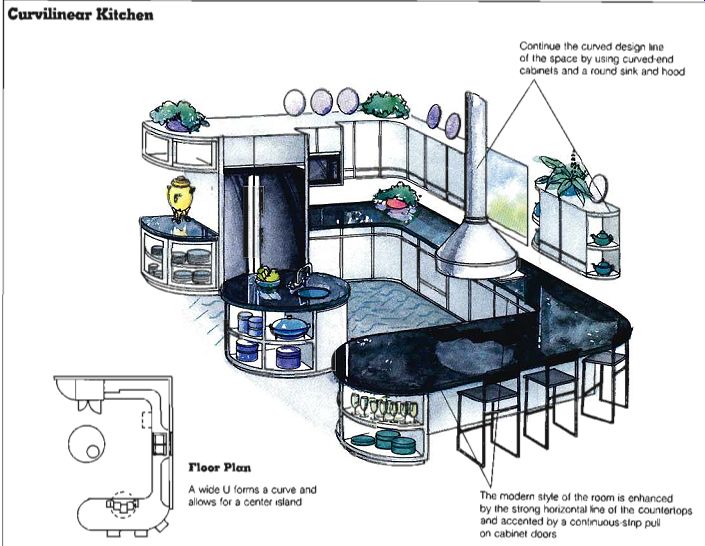
----------- Curvilinear Kitchen: Continue the curved design line of the space
by using curved-end cabinets and a round sink and hood.
The modern style of the room is enhanced by the strong horizontal line ol the countertops and accented by a continuous-strip pull on cabinet doors
Floor Plan---A wide U forms a curve and allows or a center island.
--------------------------
Islands can be plumbed, wired, and used as primary work centers as well. Include a cooktop and oven and use the island as the cooking center; install a sink and dishwasher and make it the primary clean up center; or put in an under counter refrigerator and a small sink and the island becomes a bar for entertaining.
Consider the shape and design lines of the room when determining the island shape.
Match a rectangular island to the rectangular lines of the room, a square island to a square room.
Create a triangle within an L shaped room by customizing cabinet units, thus setting up a diagonal design scheme. Use curved-end cabinets to harmonize with other curved elements within the room.
Developing a Preliminary Plan
One bubble drawing will eventually emerge as the most elegant and practical solution to your needs. With a copy of the base plan as your guide, use your W-inch scale or template to lay out the basic elements of your new kitchen.
The preliminary plan is a guide for choosing finishes, fixtures, and appliances; make it as complete arid detailed as possible. Cast a critical eye on the minute details. Check the views and traffic patterns.
The plans must remain preliminary until you know exactly which construction elements, cabinets, fixtures, and appliances will be installed.
Choosing them wisely is the subject of the next two chapters. Make the final plan only after reading these.
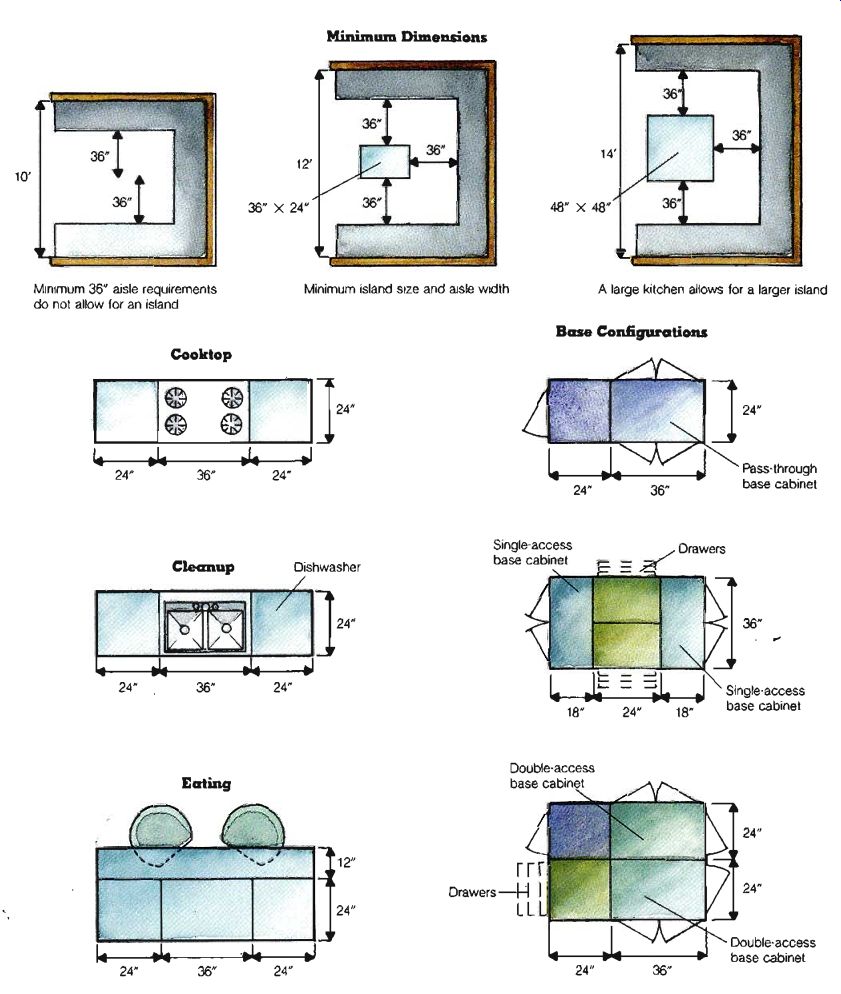
------------ Creating Islands
================