How to select lumber and materials. How to pour footings and piers. How to build ledgers and basic substructures. All about blocking, bracing, connecting posts, beams and joists. How to lay decking, connect decks and build stairs.
There is something almost irresistible about a deck. Those clean lines seem to draw you out side and into refreshingly new surroundings. It's a chance to put aside the day's cares and let yourself relax.
Like people, decks have their own distinct characteristics that stem from their style and how they are built. There are, for instance, decks for privacy and seclusion, decks open to the world and the sun, multilevel decks for free wheeling parties, decks for quiet dining and decks that can accommodate half the kids in the neighborhood. And there are decks divided into different sections that give you different living spaces at the same time.
Fortunately, decks are also fairly easy to construct yourself. One very simple deck is made by laying out lengths of 4 by 4 heartwood redwood or other rot-resistant 4 by 4s about 3 feet apart , leveling them, and then nailing on 2 by 6 decking. As simply as that you can convert that barren, dusty section of your backyard where nothing has ever managed to grow into a little area that is both practical and beautiful . For those more experienced in carpentry, or at least willing to try, we tell in detail here the ways to build sturdy and attractive decks. There are simple and there are complex decks here, and you should find something to meet your needs.
While you are certainly urged to build your own deck, in some cases you may need professional help. It will cost you more money but the job will likely be done faster. Also remember that the professional doesn't have to do the entire deck. You can call one in just to put in the footings for you, or build a tricky part of the substructure or some elaborate railings. Experienced carpenters who advertise their ser vices in your newspaper can often be hired by the hour or the day for such jobs. Once they finish the part that re quires special talent, you can carry on with the rest.
Laying the decking can be a delightful excuse for a party. Make it like an old-fashioned barn raising and invite your neighbors and friends to take part. But try to choose those who will follow your design and building procedures. At the day's end, you will find enormous satisfaction in sitting down to a grand buffet with your friends on the deck that you all just completed.

----- Decks are fairly easy for the average person to build. As co-author
T. Jeff Williams suggests, some can be built by people who Simply want
to have fun at a deck-raising party.
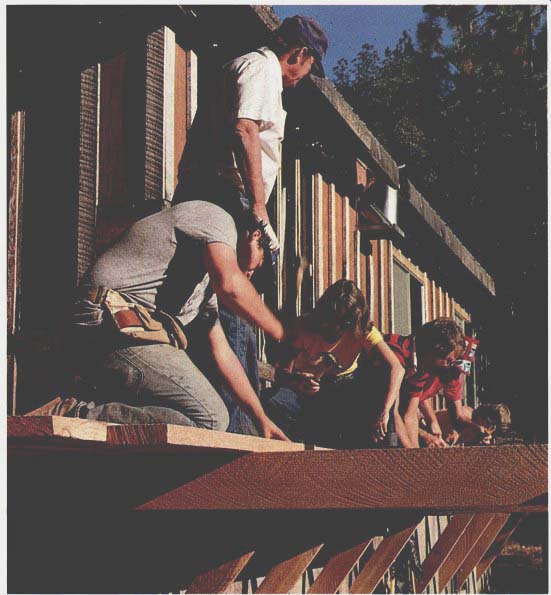
------- Once you have followed the design process and created a
plan, the actual deck or patio construction may be an excuse for a party,
like an old fashioned bam raising.
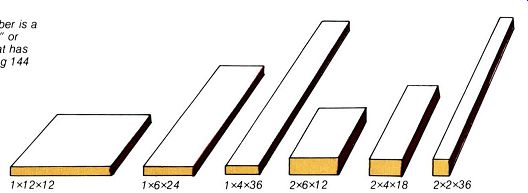
---------- A board foot of lumber is a piece 12" x 12" x
1 " or any other shape that has dimensions equaling 144 cubic inches.
The materials of a deck: The bewildering variety of wood species used for building is further complicated because all lumber is classified into a number of different grades.
Furthermore, the grading differs with different wood species. But the nice thing about building a wood deck is that you really can't go wrong with almost any type or grade; it's just that some are better than others for specific purposes.
Because of their availability in the West, redwood and cedar are the top choices for decking material. These same woods, along with cypress in the East and South, rank high throughout most of the country because of their natural resistance to decay brought on by moisture. However, other woods such as Douglas fir, hemlock, spruce and pine make excellent decks and usually are considerably less expensive than redwood or cedar. Given proper finishing and care, they can last many, many years.
Your final choice of decking will be considerably influenced by your budget.
Don't be concerned if your budget allows only pine instead of redwood for the decking material.
Estimating lumber: After deciding on the species of wood, your next consideration is how much you'll need. In calculating the support structure, there is only one way: draw it all on your working drawing (see Section 6) and then count it up piece by piece.
If you have some beams that are 8 feet long and some 12 feet long, don't hastily decide to order all 12 foot lengths, because you will have a lot of useless 4-foot pieces left over.
Make a detailed list of how many pieces of each length you need. At the same time, count up all the connectors or joist hangers your plan calls for.
In calculating the amount of decking lumber, first figure the square footage of the deck by multiplying length by width. With this information, almost any lumberyard can quickly calculate how much decking lumber you need.
However, you should be aware of how that calculation is done.
Lumber is priced either per linear foot (running foot) or per thousand board feet.
One board foot is a piece of lumber 1 inch thick, 12 inches long and 12 inches wide. In calculating your decking lumber needs, keep this trick in mind: if you cut that piece in half and put one half on top of the other you would have a 2 by 6 that is 12 inches long. That's still 1 board foot . (There fore, a 1 by 12 by 12 is the same in board feet as a 2 by 6 by 12.) For more complex calculations, here's the formula: Thickness times width times length, divided by 12, equals board feet. Thus, a 2 by 4 that is 10 feet long contains 6 3/8 board feet (2 X 4 X 10 = 80 / 12 = 6.6) . If your deck is, say, 20 by 25 feet , that's 500 square feet and you need 500 board feet of 1 by 6s to cover it , or 1 ,000 board feet of 2 by 6s. Allow 5 percent more for breakage and mistakes. And remember that , in fact , the actual size of lumber is less than its nominal size so you need more to make up for this difference.
Count up railings and posts individually.
When you set out to buy the lumber, it will be very much worth your while to shop around. Prices of lumber vary considerably and a little comparative shopping can possibly save you hundreds of dollars.
Wood comes in a variety of grades (see charts on page 44) and the higher the grade, the higher the cost. Don't buy lumber that is a higher grade than you need. For instance, decking of clear heartwood redwood would be magnificent but you may need two oil wells in your backyard to pay for it.
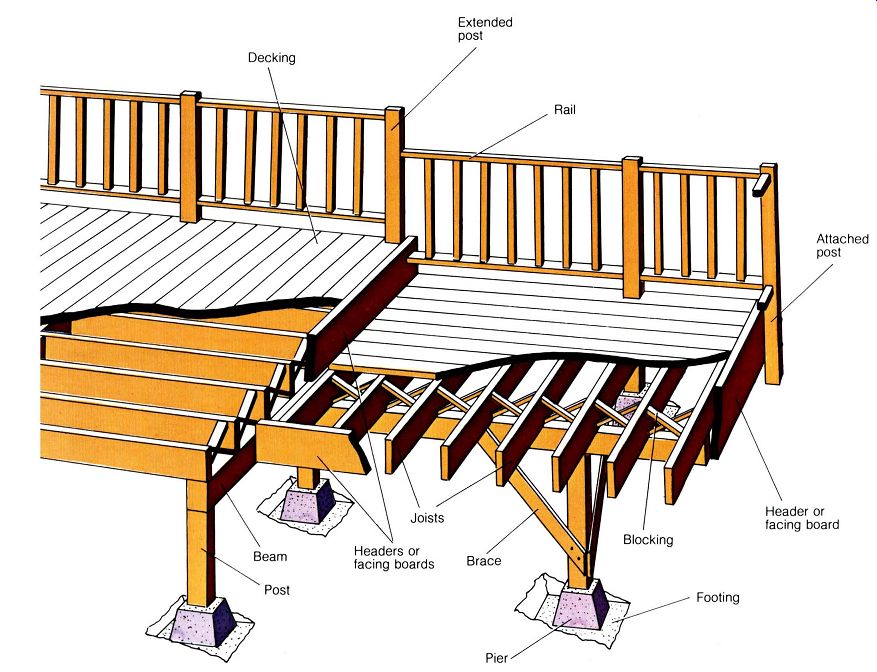
---------- All of the major elements of a deck can be found at
the right: flashing, joists, ledger, decking, extended post, rail ,
beam, post, headers (facing boards), braces, piers, blocking, footings, and
attached posts. Each element, and how to construct It, is explained in the
following pages.
The elements of a deck: Since decks are generally designed to be an extension of the house, they are normally attached to the house. Freestanding decks are built in the same way but of course need that one extra side of substructure.
Although the many variations concerning joist spacings, beam spans and post sizes can be confusing, keep in mind some basic rules about a good deck: it should have no spring in the flooring and no suggestion of sway. You must also be able to lean against a railing with complete confidence.
Decking terms: Decks are built from the ground up with several key elements joined together to make a firm, lasting structure.
Footings support the entire deck and keep it from shifting or sinking into the ground. A footing is usually poured concrete 12 inches square and 6 inches thick. It must sit on firm, undisturbed soil or at least 6 inches below the freezing level of the ground.
Piers rise from the footing several inches above the ground to keep the posts or beams clear of decay causing soil. Like the footing, a pier carries and distributes the' weight of the deck.
Posts are uprights bearing the weight of the deck and transmitting it evenly to the piers and footings. Posts are commonly 4 by 4s but can be larger, depending on the structural needs of the deck. And depending on the design, posts can either support a beam or extend past it to form railing posts or other structures such as benches.
Beams rest on top of the posts or are bolted to them. The heavier the beam, the greater distance it can span - which means fewer posts to put up. Also note that if your plan calls for a 4 by 6 beam, you can make this by nailing or bolting two 2 by 6s together.

--- Flat grain Cross grain End grain Checks Shakes Splits
--- Cupped Twisted Bowed Crooked
Joists are commonly 2 by 6s and are the connection between the beam and the ledger board on the side of the house that supports the decking.
Joists are normally spaced 16, 24, 32, or even 48 inches apart, depending on what type of decking will be laid. When using 2-by decking, try not to exceed 32 inches for joist spacing; 24-inch joist spacing makes a much firmer deck. When using 1 -by decking lumber, don't exceed 16-inch spacing.
Decking is the show piece of your deck. How you plan to lay it out and pattern it will determine how you build the support structure. Decking material should not exceed 6-inches in width because wider boards have a strong tendency to cup and trap water.
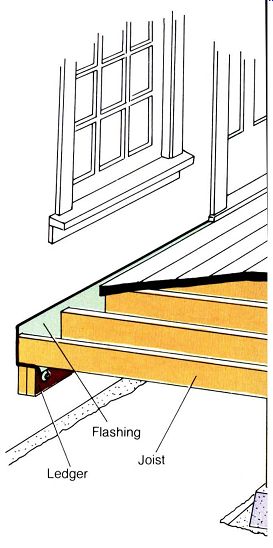
Ledger board. Normally the same width as your joists, it is bolted to the side of the house and supports one end of the joists. Ledgers must be placed so that when the decking is down, there will still be a 1-inch clearance below any existing or planned doorway. This prevents rain from running over the doorsill.
Buying the lumber: In considering your own deck, the best solution is to talk it over with some knowledgeable person at the lumberyard.
He probably sells a great deal of lumber for decks and can tell you the best type of wood for your area, considering the climate and the availability of different lumber.
As a footnote here, don't be shy about asking for a contractor's discount when ordering the lumber; it can mean savings of 5 to 10 percent.
Before going to the lumberyard , keep in mind some of these points: Lumber is sold in 2 foot increments.
These lengths usually range from 6 to 20 feet. Boards longer than 20 feet often have to be specially ordered, and you would probably find them too unwieldy for easy handling. If for some reason your deck comes out 15 feet long, you will have to buy 16-foot lengths and trim off that extra foot.
So consider changing the design to a 14 or 16-foot deck.
Technically, you should also be able to buy lumber that is surfaced only on one side (SIS) which would be cheaper. In actuality, wood is generally avail able in either S4S (surfaced four sides) or rough. Rough wood is cheaper and fine for the support structure unless it is highly visible. Sometimes, of course, it is desirable even for highly visible uses, such as retaining walls.
There are a great many different dimensions of lumber. One combination for a deck would be 4 by 4 posts, 2 by 6 joists and 1 by 6 or 2 by 6 decking. Remember, these are nominal sizes. The actual size of a 2 by 6 is about 1 1/2 by 5 1/2 inches. These actual sizes are important to keep in mind when measuring and cutting during construction.
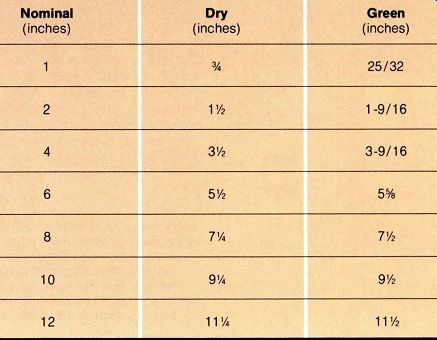
--------- Lumber shrinkage---The following lumber sizes are those
established by the American Lumber Standards Committee.
Selecting the lumber: At the lumberyard you can normally choose all your own wood, particularly if you are hauling it yourself.
Here are some useful things to know about lumber:
Sawmills cut every log in a manner designed to get the maximum amount of lumber out of it. Some cuts are better than others because they have fewer knots or are less likely to warp.
Boards for construction and decking are generally flat grain cuts, where the grain is parallel to the face of the board, or cross grain, with a grain angle up to 45 degrees across the face. End grain lumber is cut with the grain perpendicular to the width of the wood. This is a higher grade of wood than the others and usually reserved for finishing work.
Note that there is a bark side and pith side to all lumber. In putting down your decking, try to keep the bark side up; otherwise the board tends to "cup" and hold rainwater, speeding its deterioration.
Wood also comes green or dried.
Air or kiln-dried wood is considerably more expensive and normally not worth specifying. Your own deck, once nailed in place, will season itself.
In selecting your lumber, keep an eye out for checks, cracks across the grain, and shakes, cracks that run with the grain. These not only weaken the board but make it unsightly. They can also cause dangerous splinters.
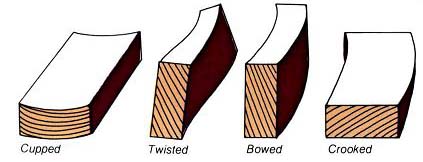
Also try to avoid lumber that is bowed, cupped, twisted, or crooked at one end.
===== TABLE Wood characteristics
1. A - among the woods relatively high in the particular respect listed; B - among woods intermediate in that respect ; C - among woods relatively low in that respect. Letters do not refer to lumber grades.
2. Includes West Coast and easter hemlocks.
3. Includes the western and northeastern pines.
============
Ash (Fraxinus excelsior)
From the earliest times ash has been respected as a hard wood which has served well as tool handles and as weapons of war. These same proper ties of strength and resistance make it an exceedingly fine wood for construction.
Cedar, Western red (Thuja plicata)
Noted for its light weight, strength, straight grain and freedom from knots, the Western red cedar is renowned for its durability and smooth working properties.
Cypress (Cupressus)
A fast-growing tree with reddish hue and straight grain, cypress is popular for its ability to resist decay.
Douglas fir (Pseudotsuga menziesii)
One of the most magnificent trees in the world, it is also among the best for dependability in heavy construction work. The natural coloring is so strong that staining is not needed. Fir's good physical properties as well as its avail ability in large quantities make it a highly desirable wood for home con struction purposes.
Gum (Eucalyptus)
Although the gum superficially resembles the common oak and the ash, its properties are quite different: it is softer, and tends more toward warping. But like the oak and ash, it is extremely strong.
Hemlock (Tsuga)
A fine textured wood, but the hemlock is weak in many properties that one would wish for in deck construction, from decay resistance to hardness.
Pines, soft (Pinus)
Grown mostly in the west and north east, pine is easy to work with, yet strong enough for a wide range of uses.
It is not naturally durable, so must be treated for outdoor use.
Southern pine (Pinus)
Almost opposite of the other pines in strength (the southern pines are as strong as ash or Douglas fir), these timbers are more difficult to work with and are more easi ly decayed or warped.
Poplar (Populus)
A softwood with surprising strength capabilities, the poplars are also noted for their ability to last and are fairly resistant to decay and warping.
Redwood (Sequoia)
One of the most majestic of trees, the redwood is highly favored as decking material for both its classic grain and color, as well as its outstanding ability to resist decay.
Spruce (Picea)
A softwood whose negative qualities include an inability to resist decay, spruce is valued mainly because it is readily available.

--------- Post anchors, Post cap or anchor , Beam saddle, Post cap,
Joist hangers of various styles
Footings: Not all decks, it should be noted here, have to have footings - provided that the ground where you want to build is flat , well drained and never freezes, You can build a deck right on 4 by 4s laid on the ground, if the wood has been pressure treated with a preservative.
Or simply put some piers a few inches into the ground and then place your posts or beams. Check your local codes before you make a move.
Still, a more lasting deck has footings and for a really permanent structure, they are a must.
Footings must be set on undisturbed soil or as far below the surface as required by local codes in frost heave localities, If the area where you want to put the footings is fill dirt (loosely packed soil left after dirt was excavated to build the house), then it must be compacted first. This is best done by renting a power compactor.
The next consideration is whether to mix your own concrete for the footings or buy ready-mix concrete. First estimate how much concrete you will need for the footings. A footing 12 inches square and 6 inches thick requires half a cubic foot . One 90 pound bag of ready-mix concrete contains 3/8 cubic foot. Ready-mix is relatively expensive if you are doing many footings. However, you only have to add water, mix and pour.
In many areas, suppliers will sell you ready-mix concrete and lend you a trailer to haul it yourself. That's also fairly expensive and you must do a lot of hauling and driving.
You can order a ready-mix truck to deliver the concrete but then you may have to order at least 1 cubic yard (27 cubic feet) . In addition, the delivery truck must be able to back up near the site. Many suppliers allow only about five minutes to unload a cubic yard, after which you are charged overtime and that can cost upwards of 50 cents a minute.
Probably you will want to mix the concrete for the footings right in your own yard, either with a rented cement mixer or in a wheelbarrow.
To estimate how much cement, sand and gravel you need to order, use this formula: Details on how to mix and pour concrete footings are on page 55.
==========
Mixing concrete in small batches Small batches can be mixed in a sturdy wheelbarrow .
1. Put dry ingredients into your wheelbarrow or trough. Mix thoroughly by pulling from bottom over the top with a hoe. Pull from one end and then the other.
2. Form a depression and pour in some of the measured water. Pull the dry mix into the depression until the water has been absorbed . ,
3. Add water and continue to mix until a series of hacks with the hoe leave clear-cut ridges.
Crumbly ridges are too dry; flowing ridges too wet.
===========
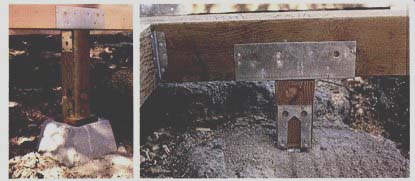
-------- Saddle fittings or pre-cast piers provide alternate supports
for decks.
Piers: You can either make your own piers or buy them precast. The cost will be about the same so it's generally easier to buy them unless you are pouring a lot of concrete, in which case you can make up some forms and pour your own.
Precast piers come with a redwood block already set into the top, which allows you either to toenail the post to it , as is commonly done, or bolt a metal post connector to the top, which is a preferred practice because the connection is stronger.
Piers can also be made from hollow-core concrete building blocks.
They can be set in place while the footing is still pliable, filled with concrete and topped with a metal post or connector. For strength, be sure to use standard aggregate blocks and not cinder blocks.
Pouring your own piers allows you to use a drift pin, which provides a secure fitting for the post. The drift pin - either a foundation bolt or length of re-bar - extends about 6 inches above the top of the pier.
The post is drilled in the center of its base and then set in place over the pin.
A type of pier form useful where greater height is needed is the fiber tube. Tubes come in various lengths and diameters, and can be cut with a handsaw. If footings are sunk several feet in the ground, use the tubes to form piers that rise above ground level. Set the tube on the newly poured footing and square with a level before filling with concrete. Top with either a redwood nailing block or a metal connector. For piers higher than 3 feet , use a length of reinforcing rod up the center . Joining post and beams: In most decks, particularly those just a foot or two off the ground, posts are toenailed to the piers and the beams toenailed to the posts. This is an easier construction method because the weight of the deck will keep everything firmly in place, but you have to worry more about the possibility of wood rot.
However, stronger and more rot resistant joints can be made with metal connectors. They come in a great variety of sizes and styles.
One type of post support is particularly noteworthy. It has a removable steel saddle fitting inset that keeps the base of the post clear of the pier where it could sit in water and eventually decay.
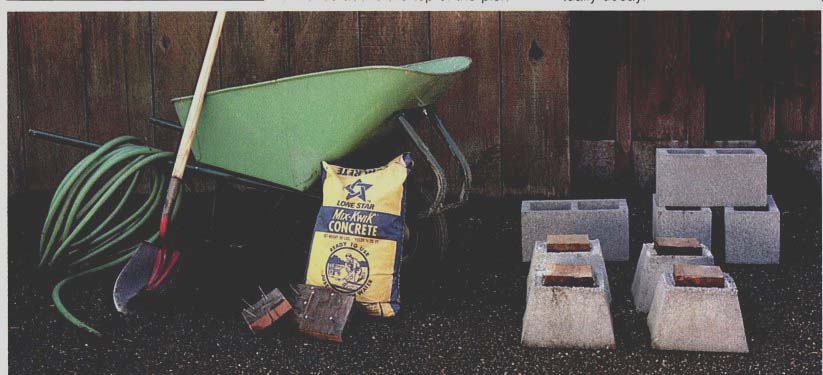
--------- Tools and supplies for the do-It-yourself cement mixer
Include: wheelbarrow, shovel, hose and water, bucket, redwood nailing
blocks, pre-cast piers and hollow-core concrete blocks.

---------- Skewed hanger Double hanger Framing anchor Hurricane anchor
L-tie Strap T-tie strap.
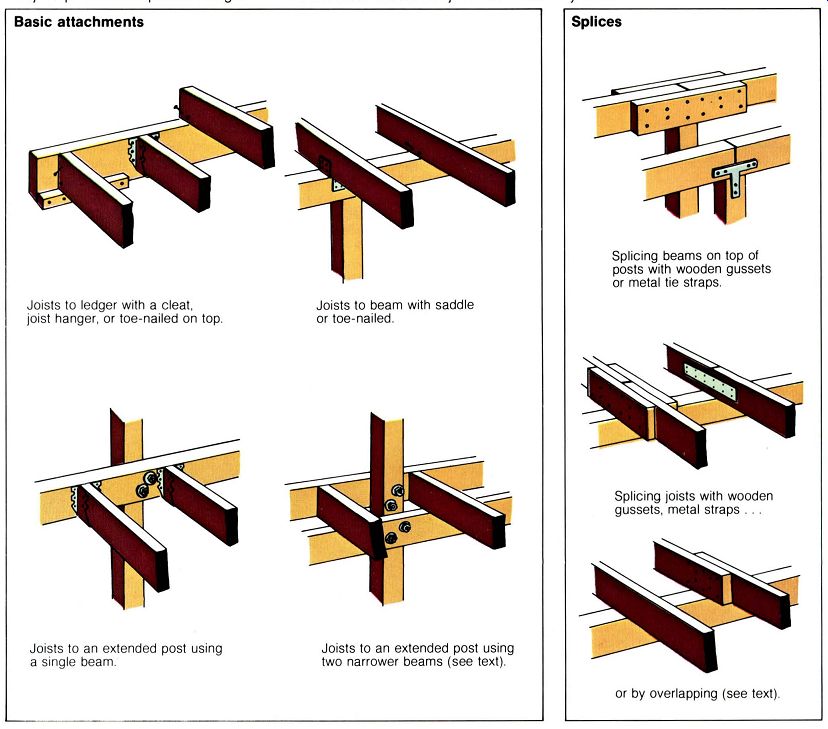
Basic substructures: In the framework of a deck, joists are normally attached to the beams in one of the three ways illustrated.
The best method with joist hangers gives by far the sturdiest structure.
Bolts or nails are driven through predrilled holes in the joist hanger into the joist to hold it firmly in place.
A joist placed on top of the ledger provides firm support and has the advantage of saving you the price of a joist hanger. One risk here is that if the deck shifts outward with unanticipated heavy weight -- such as a heavy snow pack that is rained upon -- it could pull the joist free of the ledger, and down goes the whole deck.
The least desirable method is using a cleat. as illustrated. There is the risk of the joist separating from the ledger.
However. this method allows you to mount joists flush with the ledger without using joist hangers. and it is satisfactory for low decks.
If the other end of the joists rests on top of the beam. toenail each one in place with 16-penny nails on both sides. More rigidity is gained by placing a facing board across the joist ends.
You may wish to extend some joists to hold rail posts (see page 64 for de tails on posts and rails). In designing your deck. decide whether you want a post and beam style or extended posts. The advantage of the extended post system is that it provides a ready-made and firm railing post. If extended far enough. it can support a shade cover for the deck.
There are two basic extended post systems.
==========
Basic attachments
Joists to ledger with a cleat.
joist hanger. or toe-nailed on top.
Joists to an extended post using a single beam.
Joists to beam with saddle or toe-nailed.
Joists to an extended post using two narrower beams (see text).
Splices
Splicing beams on top of posts with wooden gussets or metal tie straps.
Splicing joists with wooden gussets. metal straps . or by overlapping (see text).
=====================

------------ "X" bracing "w" bracing "K" bracing "Y" bracing
In the first example, the beam is bolted to the inside of the posts and joists are placed or hung on it. Generally, if you have a 6 foot span for the beam, use a 4 by 6; if you have an 8 foot span, use a 4 by 8. In the second example shown, a narrower beam is placed on the out side of the post and joists are then attached. This beam can be a 2 by 6, the same as the joists, for a 6 foot span. Additional support is gained by nailing a second 2 by 6 along the inside of the posts directly under the joists. The end result is the same as a 4 by 6. The advantage here is that two 2 by 6s are easier to handle than a 4 by 6, and they can be nailed in place.
This is a proven but unorthodox method and should be first approved by local codes.
Splices: Since it is impractical to buy all the deck elements in one piece, two or more pieces must often be joined in a splice.
Beams meeting on top of posts should be toenailed in place with 16 penny nails and then spliced with gussets. The gussets should be 2-by wood the same width as the beam and overlap each side by 12 inches.
Hold in place with 16-penny nails or 1/2 by 4-inch lag-screws.
Joists meeting on top of beams should be spliced in the same manner.
This prevents unexpected weight from separating them and possibly pulling them free of the beam. (See bracing and blocking, this page.) Joists can also be overlapped as illustrated. Toenail each in place with 16-penny nails.
If many splices are required in joists, stagger them so they don't all land on the same beam. Otherwise that beam would be a weak joint in the whole deck structure.
Beams ca n also be built up by splicing boards together, a common practice in deck construction. A 4 by 6 is quickly formed for a beam by nailing together two 2 by 6s with 16-penny nails.
Joist bracing: Joists that span 8 feet or less do not normally need cross-bracing, although it will add strength. Usually, a facing board on the outer end of the joists is more than sufficient.
Joists spanning more than 8 feet , however, should be crossed-braced to help minimize any tendency to wobble.
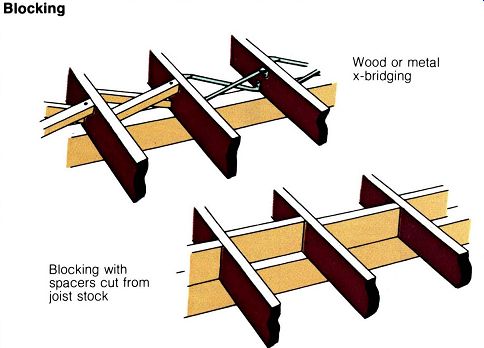
Cross-bracing is most easily done by nailing in spacers cut from the same stock as the joists. Snap a chalk line down the center of the joist span and then, for ease of nailing, stagger each spacer.
An alternate method is to use X bridging. It requires considerably more cutting, fitting and nailing. However, there are metal X-bridges available if you want this style of support , but they have an esthetic drawback if the deck is to be seen from below.
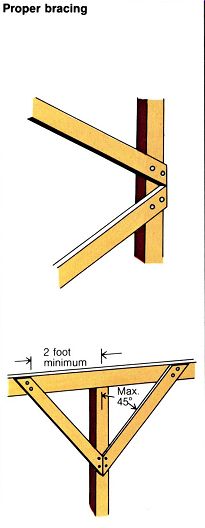
Proper bracing and bolting: A deck more than 6 feet above the ground should have some form of bracing to minimize any sway which could loosen and ultimately bring down the entire deck. Any deck that will carry heavy snow loads or face high winds should also be braced.
Braces that will reach 8 feet or less can be cut from 2 by 4s; for longer spans use 2 by 6s.
All of the illustrated bracing methods are acceptable. Which one you choose will depend in part on how much bracing you need and whether you want easy access under the deck. As an example, the Y-brace can be used where some headroom is needed for walking under the deck, but this is not as strong as the K-brace.
To put up braces, hold or temporarily nail one in place and mark it.
After cutting it, make sure it fits, then use it as a pattern to cut the others.
As shown on page 50, cut the brace ends flush with the side of the post rather than in a V angle in order to get more wood on the post. Braces should be attached with lag-screws or bolts rather than nails.
Using bolts: Deck loads are carried in two different ways: on the cross grain as in ledgers, beams and joists, or on the vertical grain as in posts.
Bolts on bearers of cross-grain load should normally be spaced no closer to the top of the board than four times the bolt's diameter. They should be equally spaced along the board.
When bolting in vertical grain, do not place a bolt nearer the end than four times its diameter. This prevents a compression fracture in the end of the board. You can go as close as one and a half diameters to the side of the board or post.
=========
Blocking
Blocking with spacers cut from joist stock
Wood or metal x-bridging
=================
The best size of bolt to use depends on the load and on the frequency of bolting. As a rule of thumb, use one 0.25-inch bolt for 2-inch boards, two v0.25 inch bolts for 3 and 4-inch boards, and three to eight bolts for 6-inch and larger boards. Bolts 3/8-inch in diameter should be used with timbers 6 inches thick, and 1/2 -inch diameter bolts with timbers more than 8 inches thick.
Except for carriage bolts, always use washers on the head and nut ends of the bolts. Drill the hole just large enough to accommodate the bolt , so you have to tap it through with a hammer.
------ Proper bracing
Carriage bolts are usually the best for decks because of their smooth heads and self-clinching traits. With these, washers are needed only on the nut end.
Attaching ledger boards: The first step in building an attached deck is to put up the ledger board.
That 's a rather simple process but it must be done right because your entire deck will grow from here.
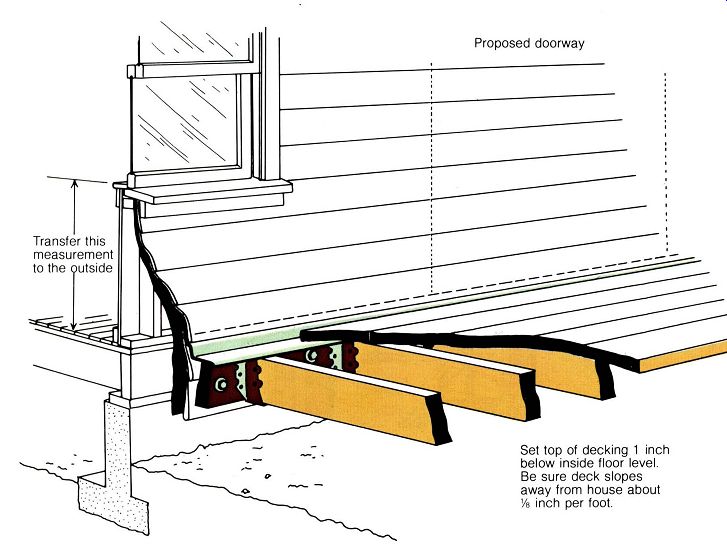
The ledger must be placed so that the decking, when installed, will be about 1 inch below the floor level and any existing or planned door to pre vent rainwater from running into the house.
You can find the floor level on the outside of a house where there is no door opening by measuring from a window sill to the floor inside and transferring the measurement outside.
The ledger must be level and should be bolted to the floor joist header with 3/8 -inch bolts or 3/8 by 4-inch lag screws spaced every 2 feet. Alternate them, one up and one down, as you work across the board.
It's advisable to use flashing-aluminum or galvanized tin - over the ledger to keep water from soaking in between the house and ledger, which could lead to decay.
Length of ledger: The ledger will be cut either a little longer or shorter than the actual deck dimensions.
Here's why:
If you use joist hangers, the ledger must be longer than the deck by about 2 inches on each end to provide nailing space for the outer sides of the hanger on each end.
Alternatively, cut the ledger shorter by the width of the joists on each end and then butt the first and last joist against the end of the ledger and bolt in place. Joists in between can be placed in hangers.

------ Attaching ledger board to wood Siding ; Attaching to masonry
; Attaching to stucco Lag screw
Ledgers on brick houses: These must be held in place with expansion bolts. For added security, place 2 by 6 supports against the house under the ledger every 4 feet , particularly if you live in snow country.
Hold the ledger in place and mark drilling points every 16 inches, or 24 inches at most. Drill the holes in the ledger, while holding it in place on the house and mark where the bricks must be drilled. Use a nail punch to make a guide hole in each spot. The drilled holes should be large enough to accommodate 3/8 by 4 1/2 -inch expansion bolts.
Ledgers on stucco houses: These are put up essentially as on a frame house: tack in place with 16-penny nails and then bolt or lag-screw in place.
Flashing can be installed by snap ping a chalk line a few inches above the ledger and then using a power saw with a carborundum blade to cut a groove :VB inches deep in the stucco.
Bend the top of the flashing to fit into the groove and seal it with butyl rubber caulking - the best type for joining metal to masonry.
-------- Measuring ledger height
Proposed doorway
Transfer this measurement to the
Set top of decking 1 inch below inside floor level.
Be sure deck slopes away from house about 1/8 inch per foot.
Locating the footings: With the ledger in place, the next step is the most critical part of building a deck: locating the footings. After studying the basic load factors (page 102) and the required post spacing (page 104), you know how far each footing is to be spaced and how far out from the house they must be.
Transferring these measurements from plan to reality requires patience and careful work to ensure that the deck goes up square. There are two primary ways to do this: with a stake and simple triangulation, or with batter boards.
Stakes: If you are building a low deck over fairly level ground, this method is faster and simpler.
Start by attaching a length of twine to the end of the ledger board right in the center of where the first joist will fit.
Measure from the house out to where the first footing will go and drive a stake temporarily in place there.
Now, using a framing square as a guide, with the tongue against the house and the blade extending toward the stake, pull the string tight and shift the stake until the string is at right angles to the house. Drive a nail in the top of the stake and tie the string off . To check whether you are square or not, measure out 4 feet from the house and mark that with a felt tip pen or paper clip on the string. Measure off 3 feet along the ledger board from the string. The distance between this mark and that on the string must be 5 feet if your angle is square. Adjust the stake and string until it is.
Do the same at the other end of the future deck, then draw a string between the two stakes and measure off your other footings in between.
==========
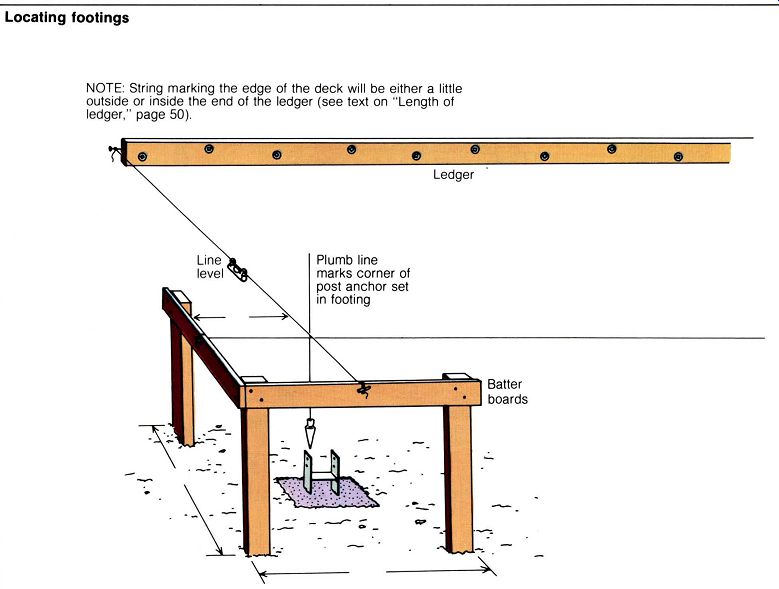
Locating footings
NOTE: String marking the edge of the deck will be either a little outside or inside the end of the ledger (see text on "Length of ledger, " page 50). Plumb line marks corner of post anchor set in footing
==========================
Batter boards: These provide very accurate locations and are essential when working on sloped or irregular ground, or building a free standing deck.
Place the string on the end of the ledger as previously described, mea sure out the required distance and use a square to approximately locate the first footing.
Build batter boards with 2 by 4 stakes and 4-foot long cross-pieces of 1 by 4. Locate them 2 feet back from the stake. Each cross-piece should be level , and the string running out from the house to the boards should also be as level as possible.
Mark the string 4 feet out from the house and 3 feet along the ledger board, then move the string back and forth along the board until the long side of the triangle is exactly 5 feet.
Repeat the process at the other end of the deck, or at all four corners for a freestanding deck. Pull a string between the batter boards directly over the intervening footings and mark them with stakes.
If your batter boards are all on the same level , you can double-check your work by measuring the two diagonals. If they are the same length, your deck will be square.
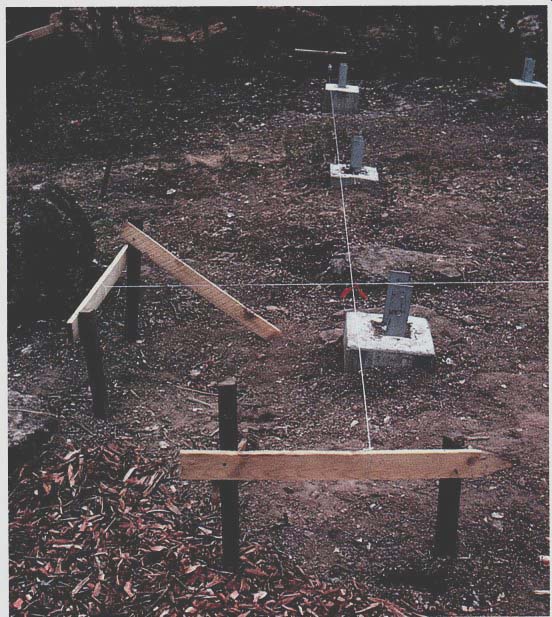
---------- String lines run between batter boards allow for exact
footing location, even on rough or sloping ground.
==============
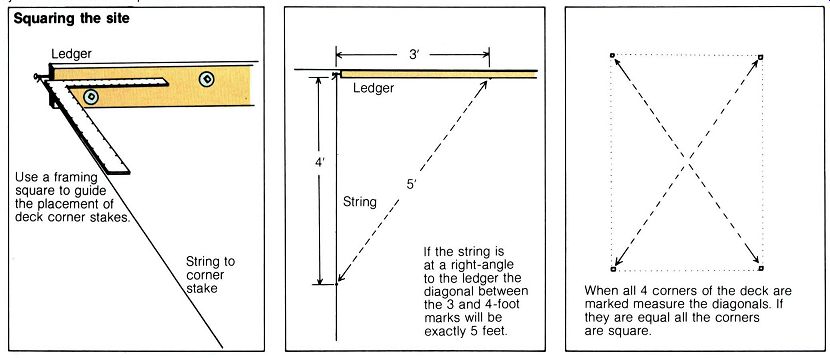
Squaring the site
Ledger
Use a framing square to guide the placement of deck corner stakes.
String to corner stake.
If the string is at a right -angle to the ledger the diagonal between the 3 and 4-loot marks will be exactly 5 feet.
When all 4 corners of the deck are marked measure the diagonals. If they are equal all the corners are square.
============
Installing footings and piers: Before digging the holes for your concrete footings, check your local codes for the exact size and depth required.
Generally, footings should be 12 inches square and 6 inches thick.
They must also be placed in undisturbed soil.
If your house is newly built and on a slope, the dirt around it may be loose fill, pushed in there when the house site was leveled. In that case, you will have to dig through the fill to reach undisturbed soil. A footing placed on fill dirt will slowly settle in the loose earth and cause the deck to shift.
If the fill dirt is too deep to get through, rent a power compactor and compact the earth around the footing locations to 90 percent of the original soil volume.
If you live in an area of severe winters, be sure to sink the footings at least 6 inches below the frost line.
Otherwise, freezing soil will heave and shift your deck. Again, check local code requirements by calling your local building permit office.
With a post hole digger or shovel, dig the footing holes, keeping the sides as straight as possible.
Pouring footings: Footings are made with a 1 :2:3 mix, that is, one part portland cement , two parts sand and three parts gravel that is 3/8 to 1 1/2 inches in diameter. Your measure can be a shovel.
When mixing concrete in a wheel-barrow, first shovel in the sand and cement and mix until a uniform gray.
Next add the gravel and then about half the estimated amount of water.
Keep mixing by turning with your shovel until everything is damp, then slowly add more water while you keep mixing. The amount of water is important to make the final strength of the concrete. The mix should not be so dry that it appears flaky or so wet it is soupy; it should appear almost plastic.
If you have only a few piers, consider buying ready-mix concrete in a bag.
You just add water and mix with a shovel. One bag will make two footings that are 12 inches square and 6 inches deep.
After the concrete is placed in the hole, tamp it a few times to remove any air pockets. But do not overdo the tamping since agitation makes the gravel settle.
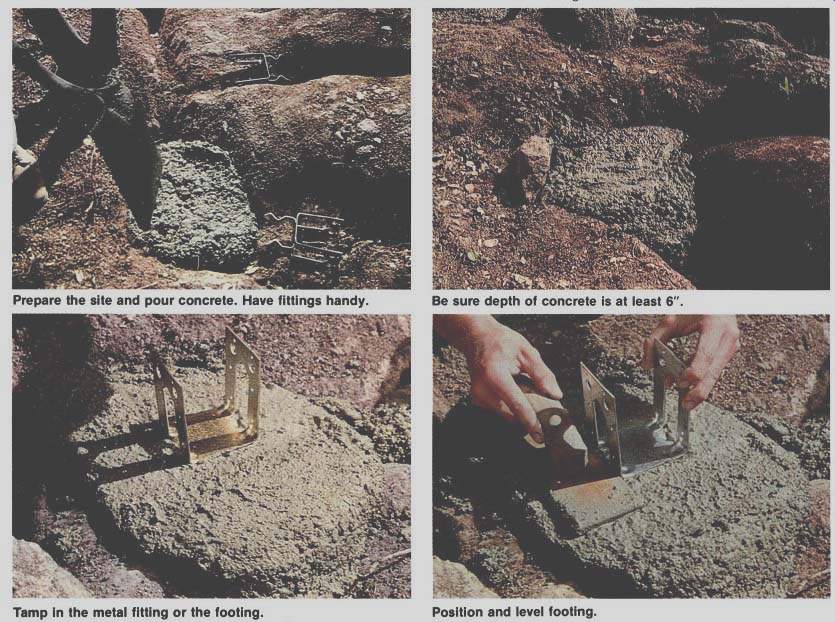
-------------- Prepare the site and pour concrete. Have fittings
handy. Be sure depth of concrete is at least 6". Tamp In the metal
fitting or the footing. Position and level footing.
Piers: In making your footings, keep in mind that the pier must rise about 6 inches above them to keep posts and joists clear of the soil. If you are using precast piers, the footing should rise about 6 inches above the ground surface.
However, if you had to dig deep footing holes, they will require a great amount of concrete. A good alternative is to pour a standard footing and then make long cylindrical piers by using fiber tubes. Cut the tube to length, place on the footing and plumb with a carpenter 's level, then fill with concrete. For a tube longer than 3 feet, cut a length of reinforcing rod to ex tend from inside the footing to about 6 inches below the top of the tube.
After filling the tube, place the type of post support you want on top. If metal , just set it into the concrete. For a wood nailing block, use a rot-resistant wood and drive three 16 penny nails into one side. Bend the tops of the nails over to hold in the concrete and then push into the tube until nearly flush.
The advantage of a nailing board over a metal fitting is that it allows you to adjust your post an inch or two for precise alignment. With metal connectors already in place, a post can only go exactly where the connector is.
But they provide an air gap at the bottom of the post , which is therefore less likely to rot.
If you are using precast piers, put them in place while the concrete is still moist. Work the pier into the footing about 1/2 -inch and then check that it is level.
Double-check that the piers are laid out square and in line. Stretch a string between the two end piers as a guide for the middle ones. Make sure that this is done before you start pouring.
If a footing has hardened before you can lay the pier, wet the top and then coat it with a rich paste of one part cement and two parts sand. (The pier has to be wetted to prevent it from drawing out moisture from the mix.) Press the pier into place.
Making piers: If you plan to be mixing a great deal of concrete yourself or are having it delivered by truck, it might be worth your while to make your own piers.
Forms can be made from wood, 5 gallon cans with both ends cut out , or two No. 10 cans soldered together.
In all cases, coat the insides with car oil before pouring to prevent the concrete from clinging to the form.
Place nailing blocks or metal connectors immediately after pouring the piers. Then cure the piers for 24 hours under a sheet of plastic before placing them on the footings.
--
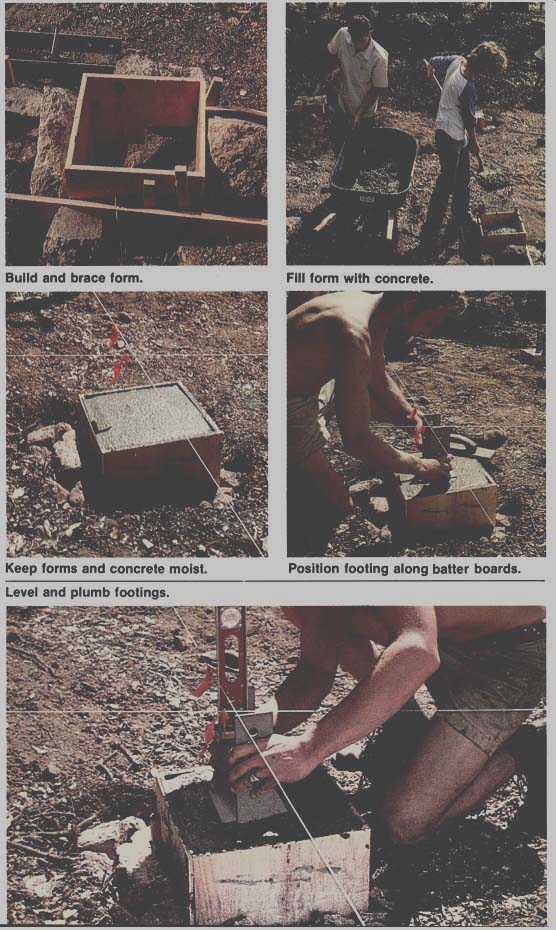
Build and brace form.
Keep forms and concrete moist.
Fill form with concrete.
Position footing along batter boards.

------- Level and plumb footings.
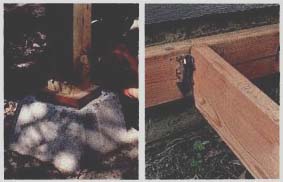
--- Toenailing a post on all four sides may be the weakest
connection, but it is certainly The easiest, since measurements are
not required to be exactly precise. Joist hangers, however, are strong
easy methods for constructing a decking substructure.
Connectors: There are many ways of connecting beams to joists and posts. Toe-nailing, or spiking at an angle on all four sides, is perhaps the easiest , but it is also the weakest shear connection: that is, it is least able to resist side forces that might exert pressure on the joint. There are numerous metal connectors that have great application in building decks, particularly where they won't show. In . visible situations, however, some of these connectors might detract from the esthetic character, and this should be considered in their selection. For instance, a joist hanger on a lower level hanging from a beam might be visible from the side of the deck. It can be covered with a trim board, or some other form of joining can be used for this outermost joist. A wood cleat or simple metal strap can be a good joist holder. AT-plate or an angle iron are also easily used connectors. Specially fitted metal flanges are also available. To attach joists to beams or ledgers, joist and beam hangers are fabricated in many different forms and angles, and for irregular angles. Your supplier can order special custom angled hangers if you need them. Hangers are most useful when joists butt end into beams or ledgers. When they run along the top of beams, metal framing anchors are useful , or the joists can be toenailed in or attached with simple metal straps twisted to nail into beam and joist faces.
==============

How to plumb a post
Attach each post to a pier and make it plumb with a level.
Hold it in place with scrap lumber and stakes.
Mark posts at
Line string; add level thickness of beam and cut off . House wall Ledger
=================
--------- You can also snap a chalk line horizontally. In this case,
the chalk line was leveled with a line level, then snapped so the builder
could saw off both posts at an equal height.
As earlier noted, ledgers are like beams, only attached directly to house.
This connection is usually made by bolting the ledger to the house joist system with lag-screws or bolts. Leave the external finish of the building intact whenever possible. Where you must remove it, however - shingles, stucco or siding - the ledger can be bolted directly to the structure itself. On brick or concrete walls, connections can be made by drilling and placing expand able lead masonry connectors that give purchase for lag bolts.
Whenever you connect a deck directly to the house, you must flash the exterior wall. This is the sheet metal or other water-tight membrane used to protect joints from wind-driven rain water. A stucco surface of a ledger wall undisturbed except for the bolt holes need not be flashed. Merely calk the holes. If, however, you have a wood or shingle sided house, flash from above the finished deck level to below the bottom of the ledger, that is behind the ledger, or from above the future deck level, over the top of the ledger and down its face. The purpose of flashing is to prevent rain water from making its way into the house structure where it could cause decay.
As we stated above, ledgers are bolted to the house. Once they have been nailed in place with 16 or 20 penny nails, drill and place four 0.25 or 3/8-inch lag-bolts every six or eight feet.
Generally, loads carried by bolts across the grain - that is, perpendicular to the grain - will be best sup ported if the bolts are spaced at least four times their diameter from the top of the member and an equal distance apart. When the load is parallel to the grain, as in a vertical post , you should drill bolt holes four bolt diameters apart and at least one and a half bolt dia meters from the post's sides. This spacing will prevent splitting and compression failure. The size of bolt you should use will depend on load and frequency of bolting, but generally, you should use one 1/4-inch bolt for 2 inch thick boards, two V. -inch bolts for 3-inch and 4-inch boards, and three to eight bolts for 6-inch thick and larger boards. As noted earlier, the size of the bolt should increase to 3/ 8 or 1/2-inch diameter with 6-inch or thicker boards.
Where you use bolts, be sure to use washers on the head and nut sides.
When pre-drilling, use a bit just large enough to accommodate the bolt.
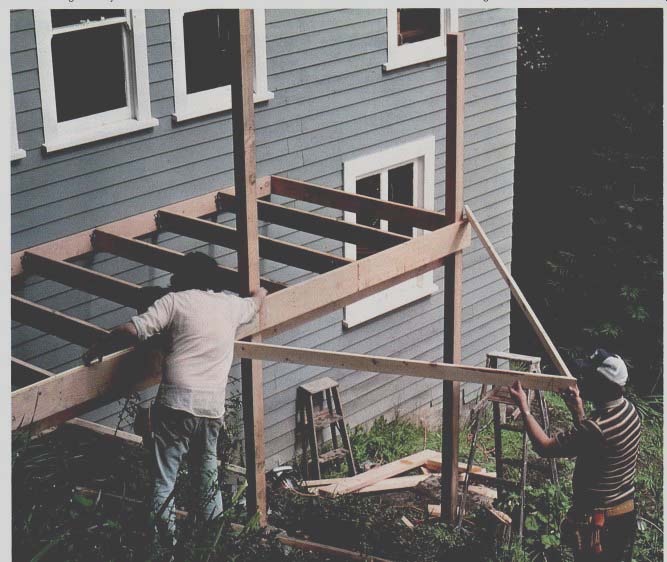
------------ The ledger board, bolted to the house, creates a base
elevation for the rest of the deck. Be sure to allow a 1/8 per foot
slope away from the house for drainage.
Blocking: You can stiffen your deck structure and distribute its live load by blocking between the joists every six to eight feet. Cut out of the joist material or smaller lumber, blocks should have their top elevation level with the top of the joists. You can precut blocks to their exact size and as you assemble the joists, if you have long spans, they will help keep the joists upright and plumb. Blocking can also be used to connect different sections of decking patterns, carrying loads to the normal joist system. When blocks function as load bearing members, they should be · fitted with joist hangers and not just toe nailed in. Draw in blocking lines every 8 feet along joist lines on large decks.
Bracing: Bracing is used to strengthen against lateral or side ways movement like earthquakes, strong winds, or motion caused by people or objects moving on the deck surface. An example of this is the rocking movement of a chaise swing.
To prevent a wiggle from developing and eventually weakening the deck, brace it with simple cross members in one of a number of patterns. It is generally not necessary to brace all of the posts in a deck. Usually a single line of braces in each direction is sufficient so long as the whole length of the side you choose is braced.
Placement of braces may be dictated by under-deck uses like wood storage, pool pump or play house. Be sure not to put braces across an access point.
If a brace is to be longer than eight feet, use 2 by 6 lumber. If less than eight feet, 2 by 4 lumber will work.
Other forms of bracing are Ks, Ys, parallels, Ws and the tension braces of cable and turnbuckle.
Connecting the posts, beams and joists: With the footings and piers in place, you are now ready to put up the deck itself.
The first task -- and one that can be tricky if your deck is several feet high - is to put up the posts.
Of course, if you are lucky enough to have very level ground and the tops of your piers are all on exactly the same level , you don't necessarily need posts; just lay beams across the tops of the piers. Such perfect piers can be accomplished by pouring them in tubes already cut to the same level.
There are two basic types of deck construct ion considered here: post and beam, and extended post: Post and beam: This style is excellent for low decks where no railing is required, although railing posts can be attached.
You will need a helper to determine where to cut the post. One person holds the end post in position on the pier while another extends the first joist. Place a level on the joist to make sure it is exactly level and then mark the post along the bottom of the joist.
This line represents the top of the beam, so subtract the actual thick-ness of the beam, mark the post with a square, then cut the post.
Repeat this process at the farthest point the beam will reach.
When the two posts are cut , fasten the bases of each post to the piers and then carefully place the beam on top. Toenail the beam down to the posts.
While one person holds this frame work in place - or builds a brace for it - the other person connects joists at each end. Check that the posts are plumb (exactly vertical) and that the beam is level , then nail all parts firmly in place.
You now have the skeleton of the support structure up and supporting itself.
Measure from pier to beam for each post required in between and put the posts in place. If you cut one a little short, shim it up with pieces of shingle between the post and beam. Don't be like the novice builder who complained that he had cut the post four times "and it's still too short." Instead of using a joist to mark the beam location on the post, you can use twine or nylon string and a line level. Fasten the string so it is exactly flush with the top of the ledger and pull it tight against the temporarily upright post. Use a line level to check your accuracy and mark the post.
Subtract the thickness of joist plus beam, double-check the measurement, then cut the post.
Extended post: The advantage of extended post construction is that it provides a particularly secure upright for either a railing or an overhead shade support.
These posts should reach a little further above the decking than the anticipated railing top so that you can cut them as necessary to make a level railing. Remember that where the deck is going to be 36 inches or more above ground level , most local codes (and common sense) require railings at least 36 inches high.
To find where the beam must be attached to the posts, raise the first post on the pier, check that it is plumb by using a level on two sides, then stretch twine from the bottom of the ledger to the post. Use a line level on the twine and then mark the post.
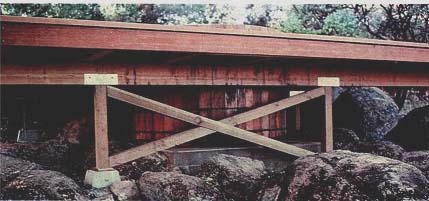
-------- Cross-bracing strengthens a deck against lateral (sideways)
movement.
Repeat this with the second post, then lay both on the ground and fasten the beam on the inside. Check that everything is square and remember to carry the beam across only half the face of the second post so there will be room to attach the next one if necessary.
Now raise the posts and beams back into position on the piers. Hold or brace them in a plumb position while the joists are fastened at each end to stabilize this initial framework.
Save yourself time and effort when using joist hangers: have them all nailed in place on the ledger and beam before raising it.
Install all the joists in this initial framework and then cross-brace it.
You now have a firm framework to support the rest of the deck.
Pre-measuring post heights: Instead of raising posts and using a line level , you can calculate the height for the posts while they remain on the ground.
Measure from the top of the ledger board down to a point a couple of inches above the ground. Make a note of this distance. Now run a line out to the pier, check that is level , and measure the distance between that and the top of the pier. Combine that distance with the measurement marked on the house and you have the distance from the top of the pier to the top of the ledger. Fasten the beams to the posts accordingly.
Cantilevered decks: Cantilevers and the sensation of floating decks ca n result from placing the posts well in from the edge of the joist system. To do this, cantilever the beams one half of the allowed span (see page 103) and do the same with the joists. Along the end of the joists, place a face board with the same vertical dimension as the joists. If you want to strengthen the visual effect of the cantilever, make the face board wider than the joist and face the joists along all edges with the same material. This broad band of joist -facing material (1 by 8s or 1 by 12s) will make the deck seem substantial enough to defy gravity and "float " on its own.
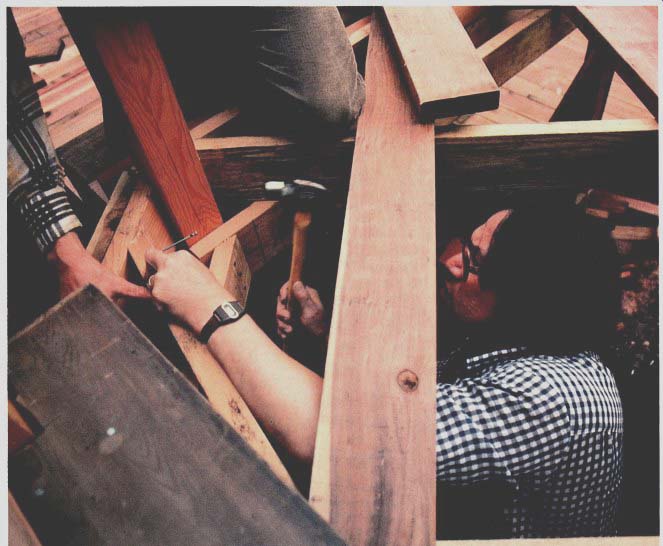
-------- A builder sometimes finds It necessary to work in awkward
spaces, especially when Joining joists to beams . .

-------- Driving nails at opposite angles helps hold the decking
down. Warped boards can be straightened by the use of a wood chisel. See
details in text below.
Laying the decking: If the deck is too high to work on from the ground, start by pushing a dozen or more decking boards over the joists to provide footing . Never step on the end of a plank, since there will probably be no support under it and you could fall.
Begin by laying a straight board alongside the house. Leave a space of at least 3 / 16 inch to allow rain water to drain past the decking.
Position the first board along the house and either flush with the end of the deck or overhanging if you have designed a cantilever. Mark where this first plank crosses the center of the farthest joist it will reach. Use a square to draw the line across the board, cut it and nail in place. Make this first board as true as possible since it is the guide for the rest of the decking. Although you can adjust as you go, it 's best to have the truest start possible.
Nailing: It is preferable to use stain less steel or aluminum nails for the decking, but they are difficult to locate as few stores carry them. They are also very expensive. Galvanized nails will stain woods, showing stains on redwood, cedar or cypress. You may, in the end, have to learn to be happy with galvanized nails.
The diameter of a 16-penny nail is the standard spacer for decking boards.
A nail driven straight down through the decking can soon work its way back out. To counteract this tendency, drive the nails at about a 30 degree angle. Two 16-penny nails driven at opposing angles are sufficient for 2 by 6 deck boards except at the joints, where three nails should be used.
Before starting a nail in at a joint, flat ten its tip slightly by tapping it on the head of a nail already driven in. This will reduce the chance of splitting the end of the board.
Alternating the planks: After the first line of the deck boards has been laid, the second row must be offset so all the joints do not end up on the same joist, which would weaken the deck significantly. If, for instance, you are laying 12-foot boards, cut a number of them in half and start every other row with a 6-foot plank. This keeps the joints alternated.
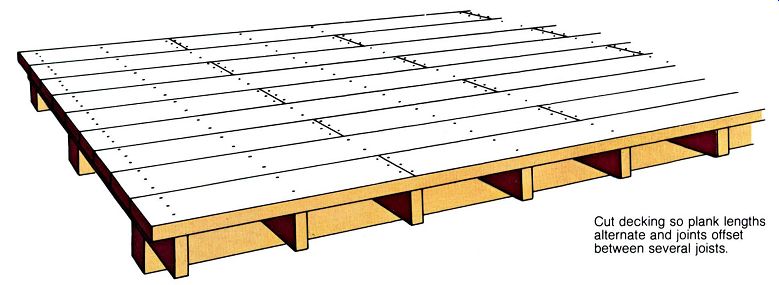
----------
Cutting decking planks Cut decking so plank lengths alternate and joints offset between several joists.
--------------- Straightening boards: It seems in evitable that you will have a number of crooked boards, but you can make them lie straight. Here are two tricks to help you convert those stubborn boards.
If the board is bending out and away from you in the middle, first attach it to the joists with just one nail in each end. (Remember to space each plank with a 16-penny nail) To get the board back into line, pull it as far as you can with one hand then jam a chisel between the board and the joist behind it. Now pull the chisel handle toward you. It will give you a surprising amount of leverage. If you have already started the nails, you can hold the board with one hand while driving the nails with the other.
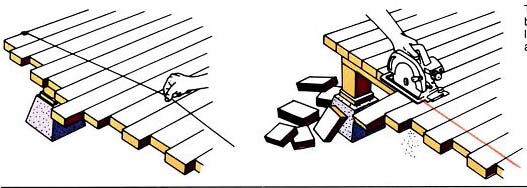
------- Trim irregular decking boards by snapping a chalk line
and cut along it with a portable circular saw.
If the board is curved in too tightly against the plank already in place, nail the ends and then drive the chisel between the two boards until you have forced it out the required amount be fore nailing to the middle joist.
Keeping the decking straight: As you work, stop after every four or five rows and eyeball your progress. Further check it by measuring each end out from the house.
Usually you are going to have to make adjustments as you go. But several small adjustments rather than one large one at the last row will make changes practically invisible. Measuring repeatedly as you go will keep the deck progressing smoothly.
Odds and ends: As you finish each course, don't worry about irregular overhangs at the end of the deck.
When you are all done, snap a chalk line or use a straight board to mark, then use a power saw to trim all the boards at once.
A bigger problem is getting the last piece of decking to fit properly around extended posts. With precise planning and measurements during construction, you might make the last piece fit exactly. If you don't, you will just have to notch the last board to fit around the posts.
To determine how deep your notch should be, lay the board in position alongside the posts. Mark each side of the post and add 3/16-inch for clearance on both sides to allow water runoff . Now measure how much this board overlaps the one underneath already in place. To that distance add 3/16 inch for spacing between the boards plus 3/ 16-inch for clearance around the post. This last measurement is important to remember.
With a square, transfer all these measurements around each post and cut. Most of the inside edge can be cut with a power saw by carefully lowering the blade into the wood.
Finish the cut with a handsaw.
In making these and all other cuts, remember the carpenter's maxim: "Always save the line." Otherwise your measurements will be off by the width of the saw blade.
===========

Filling around posts:
Width of notch equals width of post plus 3/8 inch
Cut sides of notch with a hand saw and split it out with a chisel
Depth of notch equals this measurement plus 3/8 inch
===============
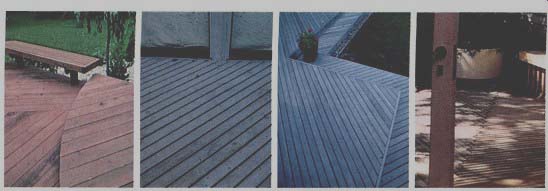
--------- Deck patterns require structural support to fit their complexity.
===============

Various deck patterns and their supports
Decking patterns: The size and shape of the deck and the plank size and pattern of the decking determine the framing plan of the deck.
In diagonal patterns, the decking may be laid at any angle greater than 450 or less than 900 to the joists. Standard framing may be used for diagonal decking as long as you note that the span between joists, must be measured at the same angle as the decking. The joists must be set closer together than for standard decking.
=================
Fitting around a tree: A hand some tree coming through your deck can be both attractive and practical : beauty and summer shade. However, you can never tie part of a deck to a tree since its movement in the wind will destroy the deck. Similarly, in building around a tree remember to leave room for it to sway and grow.
Build a block around a tree as illustrated.
If a tree is directly in line with where a joist should go, first put in the joists on either side and then cross-brace the two as illustrated. Finally, add the two short sections of joists.
Decking on edge: An attractive deck is made by placing 2 by 4s on edge. It requires considerably more wood and time, but you'll have a deck that is both strong and unusually attractive.
Wood spacers are normally required at the ends and over each joist. As each 2 by 4 is put in place, toenail through the side into the joist.
To calculate the number of 2 by 4s needed for an on-edge deck, multiply the deck's width by 6.9. This allows for 3 /4 inch spacing. Round up to the next whole number and add 5 percent for breakage and mistakes.
Parquet decks: These are generally laid out in 3-foot grids so the size of the deck should be a multiple of 3. If this is not possible, you can carry the 3-foot grids as far as possible each way and then finish the outer edges with a contrasting design that will appear as a border or trim.
Use a framing jig as illustrated to speed the process of making the parquets and to ensure uniformity.
In making these decks, the narrow 2 by 4s rather than 2 by 6s lend the appearance of more detailed work.
Parquet decks are often laid directly on the ground. Mark out and square the area, then dig it down deep enough to allow for 2 inches of pea gravel for drainage and 2 inches of sand to firmly seat the deck. The finished deck should be level with the turf surface.
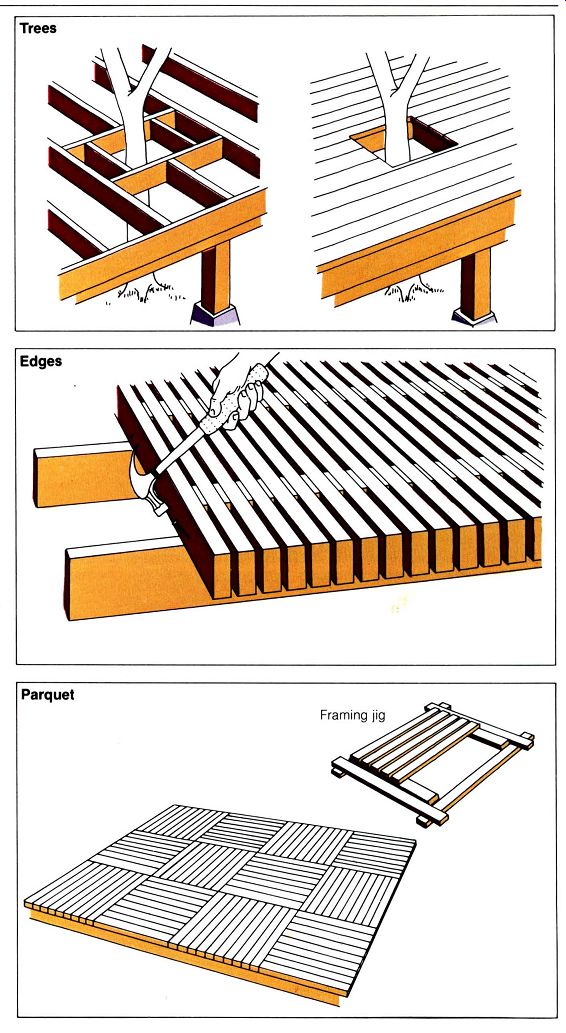
---------- Trees ---- Parquet

------------ Extended post rail supports; Rail posts bolted to facing
board
Constructing railings: There is almost no limit to the variety of attractive railing designs, but there are a few basic rules. First , railings must be sturdy enough to support people leaning or even sitting on them.
If the deck is more than 3 feet off the ground and if small children will ever be on the deck, it should be designed to prevent them from falling through.
Your local codes will usually specify the minimum opening.
Attaching posts to the deck: If you have an extended post deck, this will not be one of your problems.
One of the most common methods of attaching posts is simply to bolt them to the facing board around the deck. Use carriage bolts -- a minimum of 2 per post. You gain additional stability by cutting out a section of the post so it locks into the deck and adds strength.
Posts can also be set on top of a beam and next to a joist before the final decking boards are put in place.
Toenail the post to the beam on three sides and then cinch it tightly against the joist with two 3/8 by 3 1/2-inch lag screws. Put a cleat on the post opposite the joist to provide a nailing base for the decking.
A more secure post is made by clasping a joist between two 2 by 4 or 2 by 6 uprights. In this case, use 2 carriage bolts through the joist and both uprights. This system works well on decks where benches are to be built in. The uprights can be angled out to provide a comfortable backrest.
The railings: For most decks, imagination and money are the only limits on the choice of railing. Here are some of the basic elements: Cap board: Although not necessary and not used on many decks, a cap board lends a finished look and provides a handy place for people to lean comfortably, put drinks and plates, or perch upon. If you have 4 by 4 posts, use a 2 by 6 cap which gives you a 1 1/2 -inch overhang. The cap can be either centered on the post or offset to cover the top railing that fits directly under the offset.
Once in place, the cap can be given a particularly finished appearance by routing the edges, which also minimizes the chances of splinters.
At corners, cut the caps at 45 degree angles for a strong and finished joint.
Rails: These can be attached in any of the illustrated ways. Although some sources suggest you shouldn't have rails inset into posts because that increases the chance for decay, this does not appear to be a common problem. Besides, inset joints are strong and give a handsome and finished appearance. Before setting the railings in this manner, soak the ends of the rails and the notches with a preservative. (See comments on preservatives on page 67.) When they are thoroughly dry, add a thin coat of waterproof glue to both parts and toenail in place with 8-penny finishing nails.
To stir your imagination, here's a sampling of different deck rails.
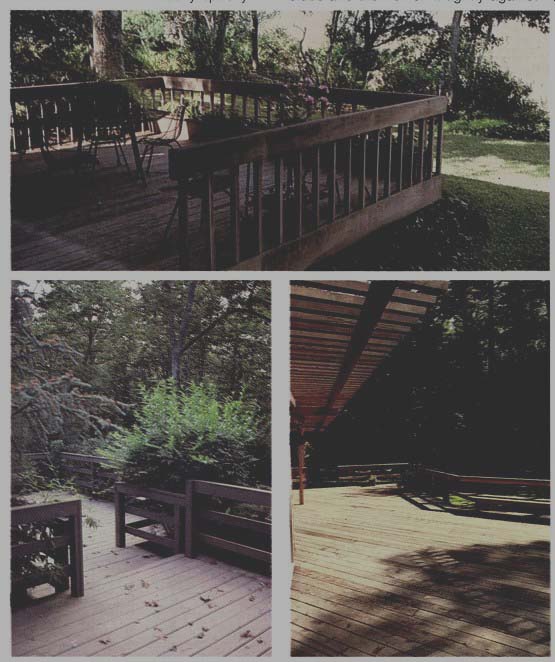
------- Railings for residential decks should be 36" high
and should have no opening greater than 9" in one direction. A small
gap at the base - 3" or 4" - can be useful in sweeping or hosing
leaves off . All railings should be strong enough to support 15 pounds
of horizontal pressure.
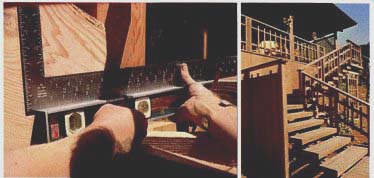
----------- Stair railings are necessary if more than three steps
are used. When possible, the railing should create a visual link between
the levels connected.
Connecting decks: Decks are usually connected to each other or to the ground by stairs. But there are stairs, and then there are stairs.
They can be the practical everyday variety, or a series of descending decks.
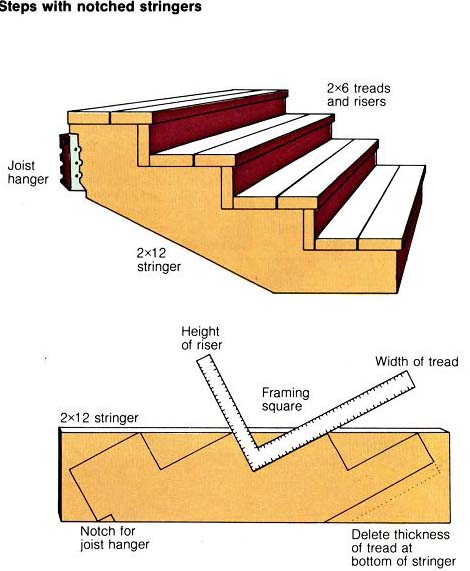
Stairs are comprised of a riser, the vertical part , a tread where you step and stringers to support the steps.
Stairs must always have a constant ratio between riser and tread so there is no guesswork about where to put your foot down.
There are several ways of working out a comfortable riser-to-tread ratio . Household stairs commonly have a 7:11 ratio, that is, a 7-inch riser and an 11-inch tread.
Stairs on decks, however, are usually cut broader for more stability and may have a 6:12 ratio, for example. This type of stair is readily made by using two 2 by 6s as the tread and a 2 by 6 as the riser . As a general rule, the lower the riser the wider the tread.
It is also important that different sets of stairs around decks be laid out in the same fashion . It is confusing if not dangerous to proceed from stairs with a 4-inch riser to stairs with a 6-inch riser.
Stairs are normally supported by stringers made of 2 by 12s. They provide enough depth for the step notches to be cut out and still carry the weight.
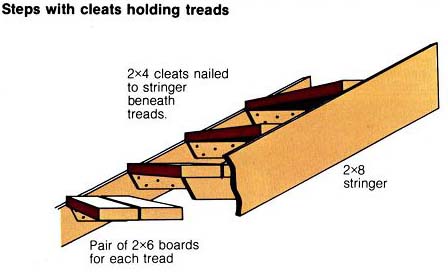
Stairs can also be placed between the stringers by using 2 by 4 cleats or angle irons.
Unless you make a conscious design decision to do otherwise, you should cut the stair treads from the same size lumber used for the decking to provide uniformity.
The riser space can be left open to speed the drainage of water or it can be closed to block the support structure from view and to provide the appearance of more stability.
Cutting stair stringers: The top of the stringers should be bolted to the deck joists and the bottom should rest on a brick or concrete pad -- never on bare ground, where it would soon decay.
Measure the distance from the deck to the landing pad and then, using the height of riser you prefer, estimate how many steps it will require.
Depending on space and height, you may have to compromise your ideal steps.

------------------
Joist hanger 2x1 2 stringer
Notch for joist hanger
Height of riser
Steps with cleats holding treads
2x4 cleats nailed to stringer beneath treads.
Pair of 2x6 boards for each tread
Delete thickness of tread at bottom of stringer
--------------
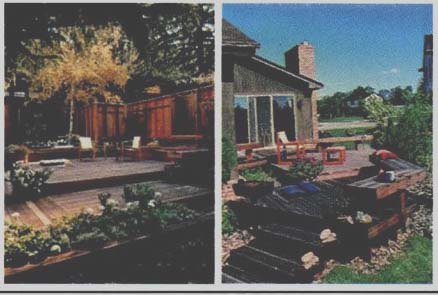
---------- Little stepped decks make easy elevation changes, but
can be dangerous if the steps are not carefully placed. Single risers are
hard to notice, and can become tripping blocks for the unwary.
Mark the stringer with the framing square. In this case, the blade of the square is placed at 12 inches and the tongue at 6 inches for the riser.
The top step should either be the exact riser height below the decking or flush with it. The riser distance between the last step and the landing pad can be a little less than the others to make the other steps come out evenly.
After marking the first stringer, cut it with a power saw and check your work by putting it in place. If it fits, use it as a pattern to cut the second stringer.
For stairs 4 feet or wider, use a third stringer down the center.
If you are building ramps, keep in mind that no ramp should exceed 1:5 slope, that is, a 1 foot rise for every 5 feet horizontally. The stringers for a ramp, of course, will have a smooth slope along the top edge.
Linked decks: Instead of plain stairs, a series of little stepped decks can be useful and attractive.
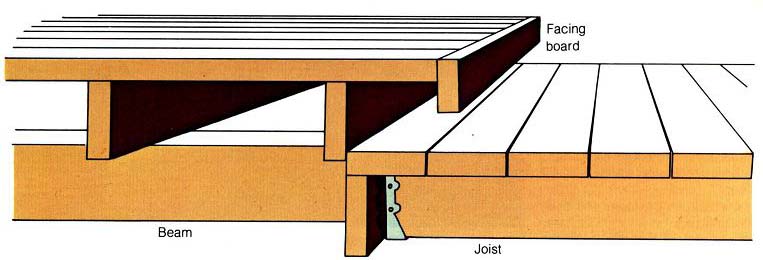
This is done by attaching joists either to the existing beam on the upper deck or by bolting on another beam to support the joists. The choice depends on how much of a step down you want. Two steps can be added between decks for an even greater drop.
A floating effect is achieved by having the decking on the upper level extend out 6 to 12 inches beyond the next level down and covering the extended joists or decking with a facing board.
------- Faced overhang Faced flush
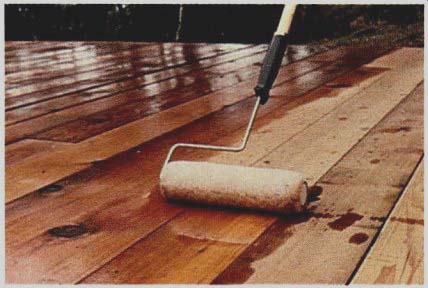
------- Application of Danish oil to decking is costly, but yields
rich wood tones and good protection.
Protective finishes: All decking, regardless of the kind of wood, will benefit from some form of protective finish. What type you use is determined by what effect you want to achieve.
Decks can be bleached for instant weathering; they can be stained for more subtle coloring; or they can be painted to match or contrast with the house.
Whatever the finish you choose, the decking and substructure should be treated with a water repellent as described later. For continuing good results, it should be reapplied every two years.
Paint: Painting a deck requires careful preparation to ensure a smooth and lasting finish. All work should be done on cool and windless days so the paint won't dry too quickly and blowing dirt won 't mar the finish.
Select a high-quality paint specifically designed for heavy use outdoors.
A good choice is an alkyd paint that is quick-drying and self-priming. Oil base paints are slower drying and must be applied over a zinc-free primer.
Although very expensive, certain marine enamels can give a hard wearing, non-slip surface.
For best result, paint the deck and all exposed wood ends with a water repellent and let dry. Apply a primer coat and allow that to dry before finally applying the finish paint. Two coats are recommended for long lasting results.
Stains: You can select a heavy-bodied stain that obscures the texture of the wood but not the grain, or a light bodied penetrating stain that leaves the wood texture visible.
In either case, be sure to specify a sealer type of stain that is "non-chalking," which means it will not rub off on clothes or feet and be tracked into the house.
Before applying a stain, let the newly constructed deck stand in hot dry weather for at least a month. This allows the decking wood to dry enough to absorb the stain.
For best results, mix the stain with an equal amount of water repellent. In applying it, be careful not to leave marks from overlapping brush or roller strokes.
Stain will weather away and usually needs a replacement coat every two or three years.
Bleaching: Unless you use a special wood sealant, decks made from redwood or cedar quickly lose the original distinctive color and turn dark when first subjected to the weather.
Within a year or two, the dark color changes to a soft silvery gray with the natural bleaching brought on by the combination of sun and water.
You can effect this change nearly overnight by applying decking bleach available in many hardware stores.
Check that it contains an anti-mildew substance to protect your deck. If the wood begins to darken again after a few months, one more coat should make the bleach job permanent.
Water repellents: A wood preservative should be applied to all decks, even redwood and cedar. It's a small investment for the added protection.
The best type of preservative for decking is pentachlorophenol , called "penta" for short. It is clear and odorless, and quickly soaks into the wood. It should be applied liberally to all exposed wood, with extra coats being given to the ends of the boards.
Since it is film-free and penetrating, penta should be applied as a primer for all decks to be painted, stained or bleached. It can be mixed directly with the stains or bleaches, or it can be colored by adding pigments available at the paint or hardware store.
A second choice as a preservative is copper napthenate. It is about equally effective but leaves the wood stained lightly green. However, it can be painted over.
One of its chief benefits is that it is non-toxic to plants, while penta is toxic. Copper naphthenate is the best choice for protecting the inside of wood planters.
Creosote should not be used around decks because of its dark coloration, sticky surface and distinctive odor.

---------- A temporary trough made from timbers and plastic sheeting
makes efficient use of wood preservative as posts are soaked.
Preservative treatments: Except for heartwood redwood, any wood that will be placed directly in the ground must be pressure treated.
Heartwood cedar will hold up nearly as well as heartwood redwood. Wood that is just painted or soaked in a preservative will not last.
For substructure wood exposed only to the weather, the best way to treat with a water repellent is to soak it. The whole board or timber can be soaked effectively in a make-shift tub made out of heavy plastic sheeting draped over stacked wood or concrete blocks.
The ends of boards can be soaked by standing several pieces in a partially filled 55-gallon drum.
Allow wood to soak 24 hours.
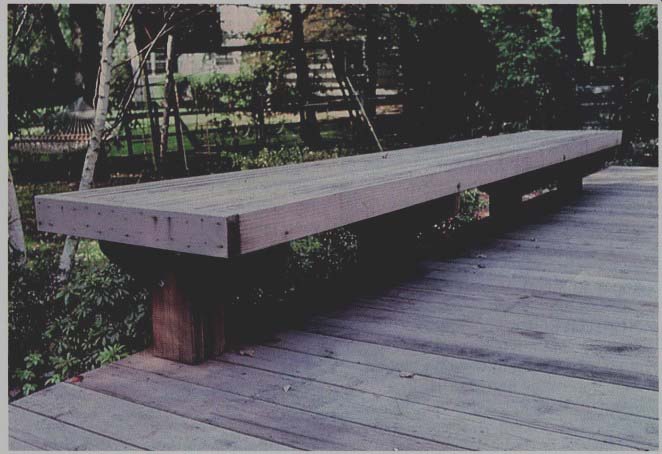
------------ Benches can be an Integral part 0' the structure.
A high bench can double as a table.
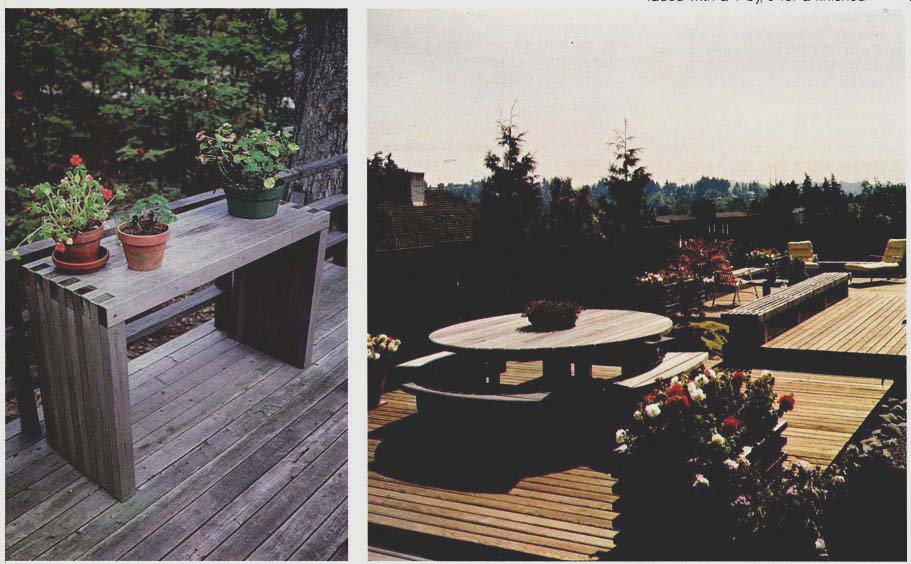
---------- Tables and benches In dining areas can be moved about
to accommodate a variety of uses.
Benches for decks: Benches around a deck, either freestanding or built in, are invitations for people to sit, converse and relax. Benches can have backs that form a railing or - if the deck is near the ground -- they can be low, wide areas that in effect are railings you sit upon.
Benches can be built easily if you have used the extended post style of construction . Bolt two 2 by 4s to each post about 14 inches above the deck and extend them out 15 to 18 inches. A 4 by 4 clasped at the end provides the outer support.
Top these supports with 2 by 4s spaced to allow rain to run off. The ends of the 2 by 4 supports can be faced with a 1 by, 6 for a finished appearance.
If you are installing railing posts on your deck and you want benches around the edges, bolt 2 by 6s to joists every 4 feet and tilt them out at about a 30 degree angle.
This provides a comfortable backrest.
Make the bench supports from 2 by 4s clasping the posts, as described above.
Low benches without backs can be made by bolting 2 by 4s to the joists.
These in turn clasp a support at the top and 2 by 4s are nailed on top. For a more unusual appearance, nail them on edge with spacers over each support . A simple but elegant low bench is made by bolting a 2 by 6 to joists every 4 feet and then bolting a 2 by 6 to the top. Cut the ends back at a 45 degree angle so they won 't interfere with legs. Top with 2 by 4s or 2 by 2s.
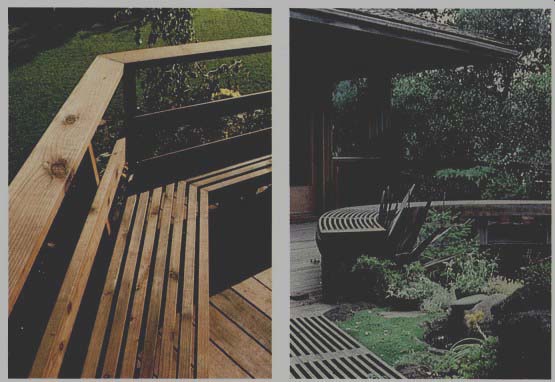
------- A bench can double as railing.
A curved bench produces little comfortable group seating.
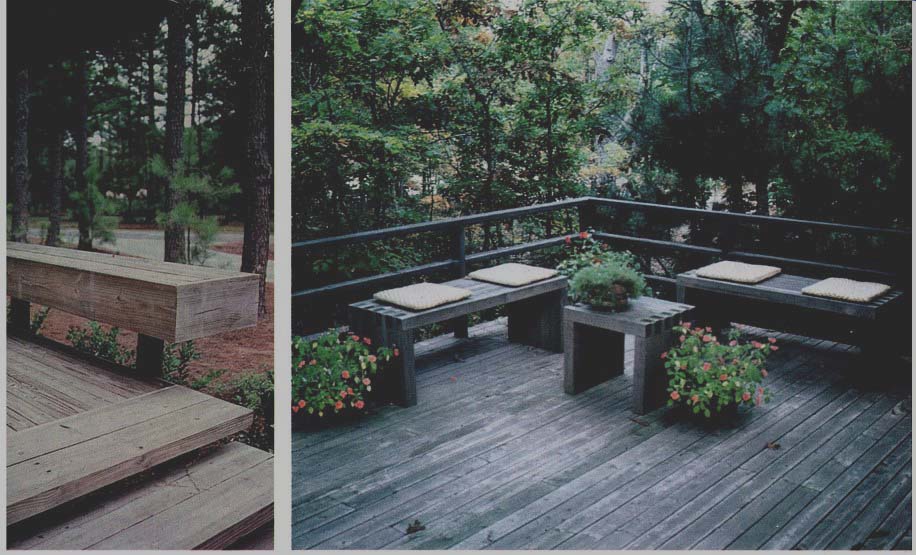
-------- A free standing bench eases maintenance by eliminating
feet to be swept around.
-------- Benches create a cozy comer seating nook.