AMAZON multi-meters discounts AMAZON oscilloscope discounts
Cutting a line across Steel Plate
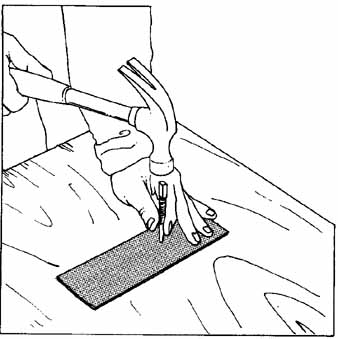
The next exercise involves cutting a straight line across the steel plate. If you did not burn too many holes in the piece of steel you used for the first exercise, you can use it for this exercise as well. Before cutting, you must mark the steel plate so you will have a guide for the cutting. The accepted method of marking metal in the welding trade is to use a special soapstone pencil (ill. 13.19).
AMAZON multi-meters discounts
AMAZON oscilloscope discounts

figr. 13.19 A soapstone pencil is the best toot for marking metal
to be cut.
Soapstone is simply a type of talc that remains visible under heat. It is used by welders for marking straight and curved cut lines. Special pencils are available that can be refilled with lengths of new soap stone, and they work very much the same as a common mechanical lead pencil.
AMAZON multi-meters discounts
AMAZON oscilloscope discounts
One alternative to using a soapstone pencil to mark cuts on metal is to mark the cut line with a series of indentations spaced about ¼-inch apart. These are made with a center punch and a hammer. While this alternative method works well, it will take you quite a bit longer to mark your cuts than if you simply use a soapstone pencil (ill. 13.20).
figr. 13.20 A punch and a hammer can also be used to mark a cut
line on metal, but this will take longer than using a soapstone pencil.
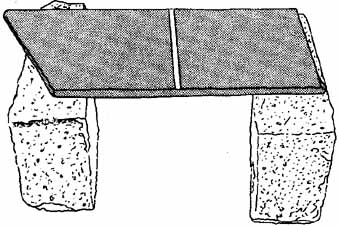
figr. 13.21 The cut line on a piece of steel plate.
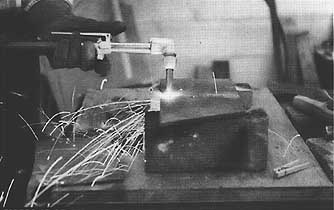
Mark the scrap steel plate with a line running across the piece (ill. 13.21). Next position the steel plate so that the cut line is about mid way between the two firebricks holding up the steel plate. Then light the torch, develop a neutral flame, and begin heating the metal on one edge of the cut line.
Depressing the Oxygen Lever
Once the edge of the steel plate is cherry red in color, the cutting oxygen lever is slowly depressed. This will allow a stream of pure oxygen to blast against the molten metal, resulting in sparks and the beginning of a gouge or cut.
Depressing the oxygen lever slowly prevents the heated spot on the metal from being cooled by the flow of oxygen. This cooling would obviously prevent cutting from taking place (ill. 13.22).
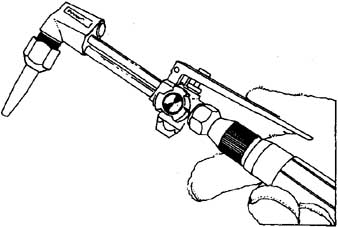
figr. 13.22 The oxygen cutting Lever should always be pressed
slowly and then held when the proper cutting action is reached.
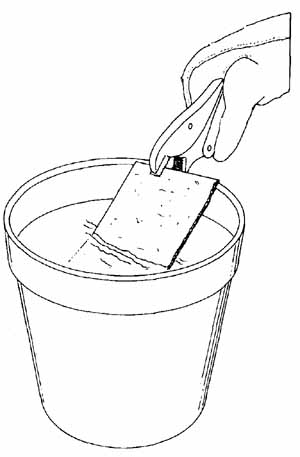
figr. 13.23 Metal can be quickly cooled in a bucket of water.
After the metal has been gouged by a fine stream of oxygen, you will notice that the hole will become deeper. It is at this time that you should press the oxygen lever once again to complete the cut. At about the same time, you should begin to move the cutting torch forward along the cut line about ½-inch. Since this metal is very close to that which has just been severed with oxygen, it will be very hot. You will have to heat it with the preheat flames only momentarily. Then spray a little of the pure oxygen onto the area. This will cut the metal. As this happens, move the torch flames forward once again. Basically, this is how all metal is cut with an oxyacetylene flame and a stream of pure oxygen.
Factors Influencing Speed
The speed at which you progress along the cut line will be determined by a number of factors, the thickness of the metal being the most crucial. A slow even motion is best when cutting metal with oxyacetylene equipment. It will take time to learn just how much heat is needed before pressing the oxygen cutting lever.
Proceed in the manner described until you have made one pass over the steel plate, along the soapstone cut line. Turn off your cutting torch, and let the metal cool until it can be inspected. If you are in a hurry, you can drop the pieces into a bucket of water to cool them rapidly (ill. 13.23). If you do this, it's a good idea to pick the hot metal up with a pair of pliers. I always keep a pair on the welding table for such tasks. When I am working off the table, I often stick a pair of pliers in my back pocket for instant use.
After the metal has cooled, look closely at your first cut. There are basically four possibilities as to how the cut will appear: perfect, too slow, too fast, or too much heat. Since each of these cuts has definite characteristics, it will no doubt be helpful to discuss each of them.
Perfect Cut
A perfect cut will, at first glance, appear as lithe metal has been cut with a hacksaw. There will be no, or very little, buildup of metal on either the top or bottom edge of the cut. The face of the cut will appear to have fairly straight lines running through the metal, and each will be about even with surrounding marks as far as depth. In short, a good cut made with an oxyacetylene cutting torch will look good, almost as if it were made with a machine (ill. 13.24).

figr. 13.24-27: (24) A good-quality cut with oxyacetylene cutting
equipment. (25) The cutting speed was too fast. (26) The cutting speed was
too slow. (27) The preheat was too hot.
Too Fast Cut
A cut through steel plate that has been made too quickly will have a buildup of slag-like metal on the bottom side of the plate. This is a result of not allowing enough time for the pure oxygen to blow the slag out and away from the metal. The cut lines on a piece of metal that has this slag buildup will be curved, almost as if the metal were cut with a circular saw (ill. 13.25).
Too Slow Cut
In all probability, your first cut through steel with oxyacetylene will have a buildup of slag on the top, the bottom, and on the face of the cut. You may find that in some areas the cut lines are straight, while in other areas there are no cut lines. This irregularity is due largely to heating the metal too much. In other words, you could have moved the cutting torch more quickly along the cut line.
Another characteristic of moving the cutting torch too slowly may be burn holes in the top of the cut. If slow movement is combined with an irregular torch movement, you could end up with quite an ugly edge to the cut metal. This will appear as bubble-like mounds and very uneven cut lines on the face of the metal (ill. 13.26).
Too Much Preheat Cut
When more heat than is required is applied to the cut line before depressing the oxygen cutting lever, the top of the metal will indent. This happens because more of the metal along the cut line is ready for the chemical reaction of the oxy gen. In extreme cases of too much preheat, the top edge of the cut will appear to flow down the face of the cut. In effect, this is exactly what has happened (ill. 13.27).
Professional Cutting Tips
As you can see from the description of the various cuts, the speed, height, and intensity of the cutting torch preheat flames are points over which you should have the most possible control. It will be helpful to mention a few professional tips to help you make good clean cuts in metal with an oxyacetylene cutting torch.
Observe the Metal
One of the most important things that can be learned by beginning welders (in this case beginning oxyacetylene cutters) is to keep a very close eye on the metal. As it heats up to about the right temperature, you should be ready to depress the oxygen cutting lever and intro duce excess oxygen to the cut area. The novice is really at a disadvantage here even if he or she has a keen eye. Until you have watched metal heat up with an oxyacetylene flame a few times, you will not really know what to look for. You must be aware that the metal will move up in temperature quite rapidly. It will change from gray to red quickly and then pass through several shades of red until it's practically white in color. If heat is constantly applied, the metal will turn white and become truly molten, just as when you were puddling metal during the welding practice exercises.
When the metal has become molten, without first adding pure oxygen, it will not cut well. When the oxygen is introduced at this point, the metal will deteriorate very rapidly. The time to depress the oxygen cutting lever is just before the white-hot stage (ill. 13.28). Only then can you expect to make clean cuts in metal.
figr. 13.28 You must depress the oxygen cutting lever just before
the metal reaches the white-hot stage.
Adding Oxygen
The manner in which you depress the oxygen cutting lever will have a very real effect on how the metal cuts and even on how the metal will look after being cut. It is a common fault of beginners to add too much oxygen when cutting. This is understandable but not acceptable.
The proper way to add oxygen to cherry red metal is to very slowly press on the oxygen cutting lever until the metal is flowing away at an even stream. This is actually a very soft, subtle touch that can be developed only over time. In time, however, you will learn that only a bit of oxygen is needed and then you will develop the soft touch necessary to make a good, clean cut in any thickness of metal.
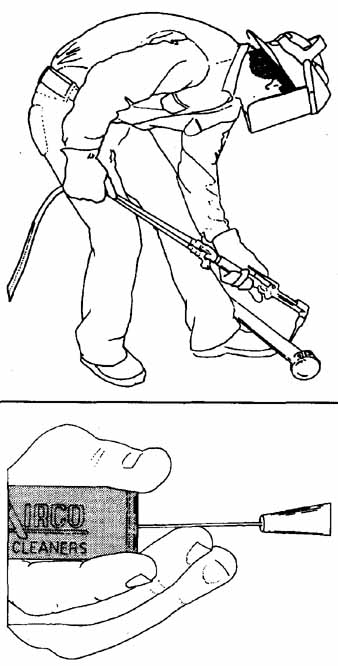
Proper Torch Movement
Keeping the cutting torch moving along a straight line, while at the same time keeping the preheat flames at the same height above the metal, is another requirement for a good cut in metal. As I mentioned earlier, you should use your left hand as a steadying point for the torch while controlling the oxygen cut lever with your right hand and thumb. This is an awkward position when you have to move the torch to cut along a straight line. There will be a natural tendency to put a curve in the cut. One way to overcome this is to move your left forearm and right hand along the line. The task will be easier to accomplish if you also move your whole body at the same time. A good work table will help you to move in front of the work while cutting with oxy acetylene (ill. 13.29).

figr. 13.29 For a straight cut, lock your elbows against your
sides, and move your whole body.
One way to eliminate much of the body movement necessary to make a straight cut is to attach a temporary guide for the cut ting torch. Then you can simply rest the barrel of the cutting torch on the guide. Move the torch along the cut line at both the right height and along a straight path.
A guide for any oxyacetylene cutting torch can be fashioned quite simply from pieces of scrap steel you should have around the welding shop, like a piece of angle iron (ill. 13.30). The only requirements of the metal used for the guide are that it must be straight, at least as long as the width of the cut being made, and , probably most important of all, the right height for the torch being used.
figr. 13.30 A guide for cutting.
Preheat Flame Height
As you are probably aware, the preheat flames should be at a height of about 1/8 to ¼-inch above the surface of the cut line. If the white cones are too high above the work, the metal will not heat properly or will take too long to do so. On the other hand, if the heat cones are too close to the work, you will heat up the surface of the metal too much, along with possibly clogging the holes on the face of the cutting tip.
Setting up a Guide
Obviously some experimentation is called for on your part when setting up a guide for your cutting torch. Once you have found an angle iron that's a suitable height for the torch and tip you are using, you should be able to obtain good results.
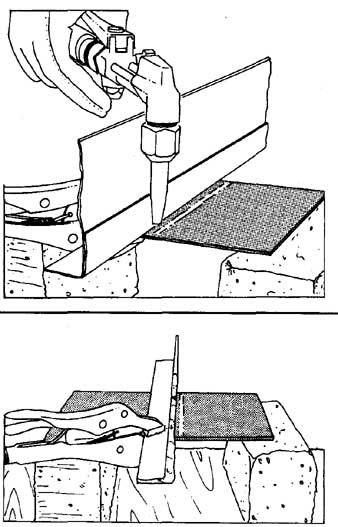
The guide, if it's angle iron, can be quickly fastened in place parallel to the cut line with clamps or locking pliers (ill. 13.31). When positioning the guide, don't place it too close to the area to be cut or the clamp could be damaged or fused to the workpiece. On the other hand, don't place the clamp too far away from the cut line or it will be ineffectual. Most experts agree that a distance of approximately ¾-inch is about the best distance for standard cutting with oxyacetylene.
figr. 13.31 The cutting guide is simply clamped along the cut
line with a pair of Vise-Grips.
A guide for an oxyacetylene cutting torch will enable you to make straight cuts on metal. But you still must keep a close eye on the metal so that you will know when to depress the cutting lever. You must also proceed along the cut line at a speed that's adequate for the thickness of the metal being cut.
You should practice cutting straight lines in ¼” steel plate until you can make perfect cuts every time. In the beginning, use some type of guide for the torch. This will enable you to develop a cutting technique with greater ease. After you have mastered this, try cutting without the aid of a guide for the torch. In time you should become proficient at cutting freehand.
Cutting Thin Metal
Thin metal can also be cut with an oxyacetylene cutting torch. Thin metal is any type that's less than ¼-inch thick and is most commonly referred to as sheet metal. For cutting sheet metal, a different approach is needed as there is always a tendency to burn holes in the metal. Two professional pointers will be of use to you when cutting thin metal.
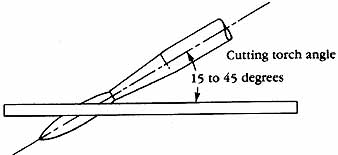
figr. 13.32 Cutting thin sheet metal with an oxyacetylene cutting
torch. The torch angle is slight to moderate.
Hold the torch at an angle to the cut line on the surface. A 45-degree angle, or less, will enable you to make the cut without leaving large holes in the cut line (ill. 13.32). Another point to keep in mind is to work quickly. The more time you spend heating the thin metal, the greater the chances of warping the metal or burning holes rather than cutting a straight line.
When cutting sheet metal, you should use the smallest possible cutting tip. Some experts can make cuts in thin metal with a large welding tip and a slightly oxidizing flame (ill. 13.33). In time, you may want to experiment with cutting with a welding tip also. For now, however, use a small cutting tip.
figr. 13.33 Light sheet steel can be cut with a welding torch.
A very slight angle is used for the torch.
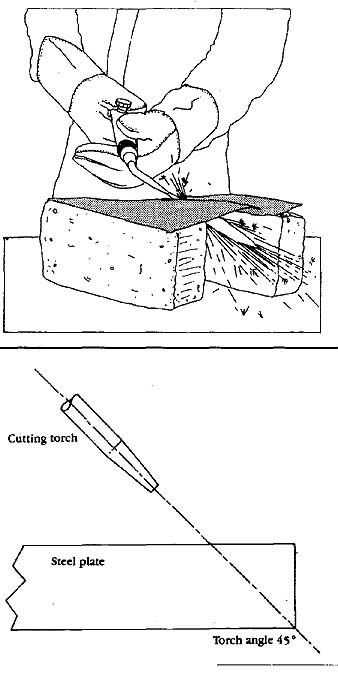
figr. 13.34 Cutting a bevel edge on steel plate with an oxyacetylene cutting torch.
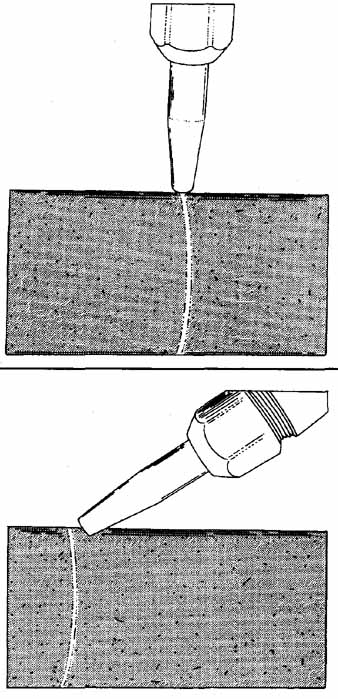
Bevel Cutting
As you may recall, steel that's thicker than ¼-inch must have beveled edges or it will be difficult to weld with the oxyacetylene process. In Section 10 directions were given for grinding the edges of metal to develop a bevel. You may have already tried this and discovered that it takes quite a bit of grinding to bevel the edges of steel plate. Another way to bevel edges of plate steel is, of course, to cut a bevel with a cutting torch (ill. 13.34). While this type of cutting is not difficult, it does require a slightly different approach than that used for straight cutting.
The major difference between straight cutting of steel plate and bevel cutting of the same material is the angle at which the cutting torch is held. To cut a bevel, the torch tip must be held at a 45-degree angle to the cut line rather than perpendicular to it (ill. 13.35). In most cases, some type of guide for the cutting torch will enable you to cut at both a constant bevel and along a straight line.
figr. 13.35 The cutting torch is held at a 45-degree angle to
the cut line to make a bevel cut.
TIP: Use a slightly oxidizing flame when cutting a bevel on steel plate. To refresh your memory, first develop a neutral flame for the preheat holes, and then add a bit more oxygen to the flames.
It is important, when making a bevel cut, to keep the torch moving at a consistent speed. An unsteady cutting speed will often result in an irregular cut and possibly a stop in the cutting action.
Cutting Thick Steel
Cutting thick steel can also be done with an oxyacetylene cutting torch. Generally speaking, the thicker the metal, the longer it will take to make a cut. The cutting operation is basically the same as those previously discussed with a few modifications. One of the first things to keep in mind is that the cutting torch tip must be held closer to the work surface of the metal. In most cases this will mean 1/16 to 1/8 inch above the cut line. It is also important that the torch tip be held at a right angle to the cut line at all times. This will ensure that the heat is being applied evenly as the cut progresses (ill. 13.36).
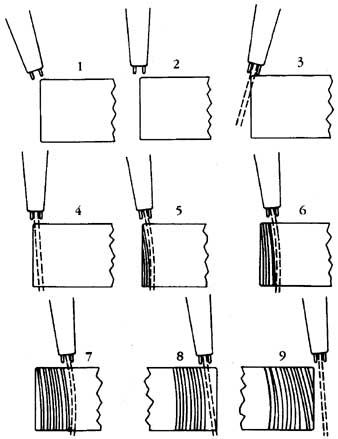
figr. 13.36 Recommended procedure for efficient flame cutting
of steel plate. 1. Start to preheat; point tip at angle on edge of plate.
2. Rotate tip to upright position. 3. Press oxy valve slowly as cut starts,
rotate tip backward slightly. 4. Now rotate to upright position without
moving tip forward. 5. Rotate tip more to point slightly in direction
of cut. 6. Advance as fast as good cutting action will permit. 7. Do not
jerk; maintain slightly leading angle toward direction. 8. Slow down;
let cutting stream sever corner edge at bottom. 9. Continue steady forward
motion until tip has cleared end.
Probably the most difficult part about cutting thick metal with oxy acetylene is starting the cut. There are several different ways of starting a cut that are used by professional welders.
One method of starting, assuming that you are right handed, is to begin at the edge of the metal and move from left to right. This will give you a clear view of the cut and let you look into it to make sure the slag is being blown out by the oxygen. When moving from left to right, you may have some difficulty in following the cut line. You can usually overcome this by using some type of guide for the cutting tip.
Another method used to start a cut in thick metal is to begin at the corner of the metal by slanting the torch in a direction opposite the direction of travel. As the corner heats up to cherry red and is cut, the welder then moves the torch to a vertical position until the steel has been cut. Then proceed along the cut line.
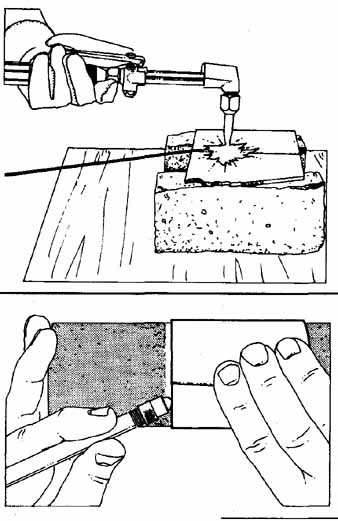
One last method of starting a cut involves using an iron filler rod. The rod is placed along the cut line before starting (ill. 13.38). Then, as the preheat flames are applied, the filler rod will reach the cherry red stage very quickly. As soon as this happens, the cutting oxygen lever is depressed causing the filler rod to oxidize. A chain reaction then takes place, and the parent metal begins to oxidize at about the same time.
Whichever means you use for starting a cut, and you should try them all, it's important to move the cutting torch at a steady rate once you begin the cut. After the edge of the metal has been cut, the oxy gen cutting lever should be kept constantly open by pressing it lightly. As the metal heats up along the cut line, more cutting oxygen is added. At the same time move the torch slowly and steadily along the cut line.
TIP: Some professional welders like to chip the edge of the cut Line with a cold chisel and hammer before starting the cutting operation (ill. 13.37). The sharp edges of the chip will preheat and oxidize more rapidly after doing this.
figr. 13.37 Some professionals like to chip the edge of thick
steel plate before starting the cut.
Pipe Cutting
One last use of the oxyacetylene cutting torch that we will discuss is cutting pipe. Since pipe differs dramatically from plate—it is after all round—a different approach is required.
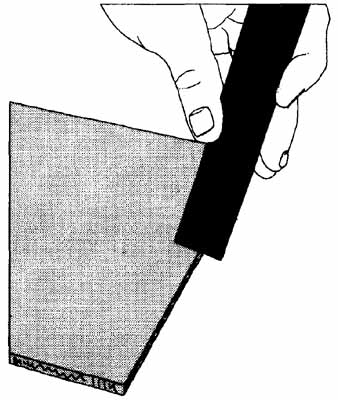
Pipe Marking
Before metal pipe can be cut, it must be marked with a soapstone pencil and a special marking guide. Any welding supply house will sell special pipe marking paper, but you can usually find something around the shop that will do the job just as well and , it won’t cost you anything. What you need is a strip of stiff paper, such as mat-board, about 1 to 2 feet long and about 6 inches wide (ill. 13.39). This paper is then wrapped around the pipe until it overlaps itself. Make sure the edges overlap evenly and then mark the pipe for cutting.
figr. 13.38 A welding rod is used here as a cutting guide and aid. figr. 13.39 A piece of thick paper or cardboard, with a straight
edge, can be used as a marking guide for pipe.
After the pipe has been clearly marked for cutting, place it on your worktable. Prevent the pipe from rolling off the table by placing it between firebricks (ill. 13.40). The area to be cut should extend off the worktable.
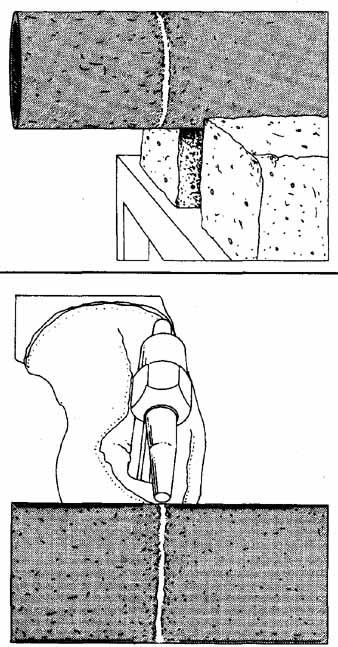
figr. 13.40 Steady a Length of pipe between two bricks before
cutting. figr. 13.41 Cutting small pipe less than 4 inches in
diameter requires only a slight torch angle.
Torch Angle
The size of the pipe will determine for you the angle at which you hold the cutting torch. For pipe that's less than 4 inches in diameter, you should hold the torch so that the preheat flames are almost tangent to the circumference of the pipe (ill. 13.41). For pipe that's thicker than 4 inches, you can usually hold the torch perpendicular to the pipe without burning through the other side of the pipe (ill. 13.42).
The thickness of the walls of the pipe, rather than the diameter of the pipe, will determine the size cutting tip to use in the torch. Consult the guidebook that came with your torch for the proper tip size recommendations for the pipe you are cutting.
Two-Person Operation
Begin cutting anywhere along the cut line on the pipe. As the metal reaches the cherry red stage, press the oxygen cutting lever slowly until you get a good cutting action going. As the actual cutting begins, you must either move the torch along the cut line or have someone else turn the pipe for you. In most instances, cutting pipe will be easier if it's a two- person operation. One person does the actual cuffing, and the other rotates the pipe, as required. Needless to say, both welder and turner should wear suitable protective clothing and goggles.
Beveling Pipe Edges
Beveled edges are also possible when cut ting pipe. You will find the work a bit easier to accomplish if you point the torch toward the short end of the pipe as you proceed with the cutting (ill. 13.43).
If you find that you must work alone when cutting pipe, and the pipe is manageable by one person, you can do the cut ting on the ground and use your foot as a means of holding the pipe (ill. 13.44). Needless to say, you should exercise extreme caution when doing this type of cutting. It is almost as much a balancing act as a cutting operation. Heavy work boots are also required.
Piercing a Hole through Steel Plate
The first exercise in this section involved burning a hole in the center of a piece of steel plate. At some point, you may find that you require a hole in a piece of metal. It will be to your distinct advantage to know how to approach the task. The process is really quite simple and can be mastered in a short time. Begin by choosing a cutting tip that's one size larger than that which is recommended for the standard cutting on the particular thickness of metal you are working on. Next, hold the lighted tip of the cutting torch 1/16 to 1/8 inch above the surface of the metal. It is important that the tip be held at a perpendicular angle.
Heat the spot until it's cherry red, and then very slowly depress the oxygen cut ting lever. At the same time, the nozzle of the cutting torch should be raised slightly off the surface, say, ½-inch. This will reduce the chances of slag being blown up into the nozzle holes and clogging them. As the cutting takes place, you may find it necessary to lower the tip slightly and then raise it once again. In a matter of moments, a hole should be blown through the plate. When this happens, lift the torch up and away from the work.
figr. 13.42 Pipe larger than 4 inches is cut with the torch held
at a right angle to the cut line. figr. 13.43 The torch position
for making a bevel cut on pipe. Point the torch toward the short end of
the pipe.
When piercing a hole in steel plate, there is always a risk of clogging the holes in the cutting tip. You should therefore keep a close eye on the flames. If they appear erratic, chances are very good that bits of molten metal or slag are building up on and around both the pre-heat and oxygen cutting holes. If this happens, you should stop work and clean the tip with a special tip cleaning tool (ill. 13.45).
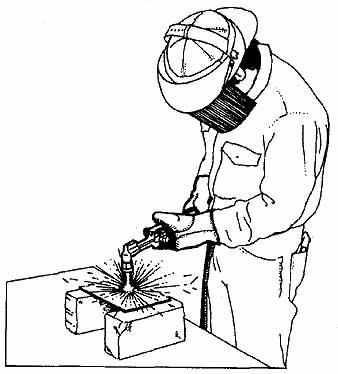
Oxyacetylene cutting is a dramatic experience because of the volume of sparks produced and the speed at which metal can be severed. It will take several hours of practice before you can cut metal well, but it's a skill worth perfecting. There is something almost magical about working with molten metal, even though there are inherent dangers.
In the next section we will discuss how to safely accomplish many welding and cutting tasks. It will be to your distinct advantage to make safe welding and cut ting the only way you know how to work.
figr. 13.44 If you are very careful, you can cut pipe in this
fashion. figr. 13.45 A clean cutting tip works best.
Prev: Cutting
Metal (part 1)
Next: