AMAZON multi-meters discounts AMAZON oscilloscope discounts
An arc is formed in an electric welding circuit when the electrode is brought into contact with the work and then withdrawn slightly. The current jumps this small gap, creating an arc that's hot enough to melt both the work and the electrode.
In order to maintain a steady even heat for the job to be done, and to maintain a constant even transfer of filler metal from the electrode to the weld, there must be a steady flow of current across the arc. The welder, therefore, must have a steady hand and must be able to hold a steady arc at a set distance from the work.
AMAZON multi-meters discounts AMAZON oscilloscope discounts
Holding a Steady Arc
At first you’ll find it a problem just to hold any kind of an arc. If the electrode gets too close to the work- piece it will touch and “short out” the circuit and stick. If the electrode gets too far away, the current won’t carry over the gap and the circuit will be broken. So your first problem is to be able to maintain an arc with out either shorting or breaking the circuit.
This problem can be solved only with practice. A certain amount of patience is required for such practice, but with patience within a few hours you will be able to hold a steady arc.
Be sure to observe all safety precautions. Then proceed as follows:
(1) Set the welding current at about 90 to 100 amperes. Use D.C. reverse polarity (electrode positive), or A.C.
(2) Use any available ordinary mild steel scrap 1/4 in. thick or thicker, placing it on a well-grounded work bench.
(3) Using a 1/8 in. electrode, strike an arc with a sort of scratching motion. Scratch the end of the electrode across the work piece as if striking a match, and end the scratching motion with the tip of the electrode about 1/4 in. away from the work piece, ill. 10.
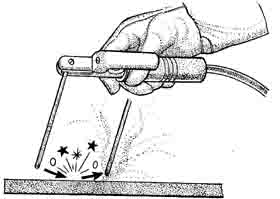
ill. 10
(4) Hold the electrode tip at this point steady for a few seconds (count to ten) then pull it away, breaking the arc.
Repeat this action 25 times or more, watching the arc as it’s established each time, ill. 11. A sense of feel for the arc will come relatively quickly. And striking an arc will soon be easy.
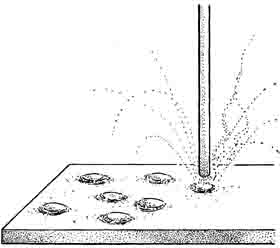
ill. 11—the arc by pulling the electrode away from the work piece.
Moving the Arc
When you are able to strike an arc easily, begin holding the arc for a longer period of time. Then when the weld puddle begins to build up, move the electrode slowly (at a rate of about 2 in. per minute) along the plate, ill. 12.
During this movement, keep the length of the arc—the distance between the end of the electrode and the work—constant. The correct arc length is 1/8 in. long. As the electrode burns off and gets shorter, the arc will get long. To compensate for this burn-off you will have to move your hand gradually toward the work-piece. After a while this movement will become automatic and take place as a reflex action requiring no thought.
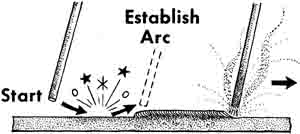
ill. 12—Strike the arc and move the electrode slowly along the plate. Keep
the length of the arc constant.
The beginner usually finds it difficult to judge the length of the arc. You may find it helpful to listen to, as well as see, the correct arc length. A correct arc length will have a sharp, crackling sound similar to bacon frying. Too long an arc will have a pronounced humming sound and is hard to maintain. If the arc length is too short, the arc will have a popping sound, and the electrode will tend to stick to the plate.
Try to keep the movement of the electrode across the work piece in a straight line. It will probably be impossible to do this at the start, but it too will soon become fairly easy with practice, ill. 13.
Don’t be discouraged if while consuming the first few electrodes, you really see nothing except the brightest light you have ever encountered, a lot of sparks and some smoke. You will be accomplishing enough for the first light, are able to strike an arc without sticking the electrode to the work, and can hold a steady arc after it’s struck.
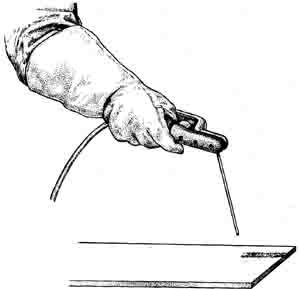
ill. 13 — In practicing running a bead try to move the electrode in a straight
line.
Steadying Your Hand
Here is an exercise you can practice at home for steadying your hand.
Take a steel washer about 1 in. thick, place it on a piece of clean white paper on a desk or table, then move the washer around on the paper by pushing it with the point of a sharpened lead pencil, as shown in ill. 14.
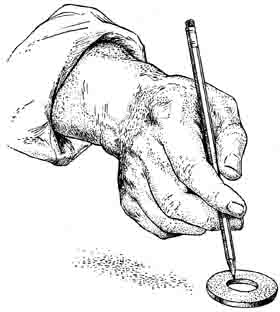
ill. 14
Try not to lose the washer by letting the pencil slip out of the washer or to touch the paper with the pencil point. This exercise will help you learn to hold your hand steady at a fixed distance from the work. It’s a highly recommended exercise that can be practiced out side of the classroom.
Prev: Safe Practices
Next: Running a Bead