AMAZON multi-meters discounts AMAZON oscilloscope discounts
Manual welding is more art and skill than a science. That statement was made in the introduction to this book, but it can stand repeating here as you start to actually run a bead.
In learning to drive a car you must learn to do many things instinctively. You don’t have time to think of each separate motion that has to be made.
In welding, this is even more true than in driving. When a certain condition develops your hand must automatically do what that condition requires—do it promptly and do it properly. That is skill, that's an art.
AMAZON multi-meters discounts AMAZON oscilloscope discounts
If you have to think separately about each movement before you make it, you’re sure to get into trouble. So to develop skill at welding you will need a lot of practice.
Getting Started
Have plenty of scrap plate available, and also plenty of 1/8 in. electrodes. Use these materials to their limit— don’t waste them. Practice with the plate until it’s no longer usable. Use all of each electrode.
Place the plate flat on a grounded work bench. Use D.C. reverse polarity or A.C. current at about 90 to 100 amperes.
Begin at the left end of the plate on the side farthest away by striking an arc. When the arc is established, begin to move the electrode slowly but steadily to the right (opposite direction for left handed students). Watch the arc and try to keep its length constant, ill. 15. Try to move the electrode in a straight line.
As the electrode moves, observe the action of the molten puddle. You should watch the whole puddle— don’t concentrate on only one part of it.
Additional Beads
Try to use the entire electrode without breaking the arc or sticking the electrode. Whenever the electrode is used down to a short (2 in.) stub, start with a new one and take up the weld where it was ended, continuing across the plate to the other end.
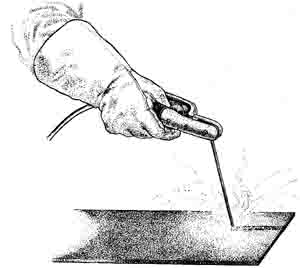
ill. 15—Try to keep the movement of the electrode across the work-piece in
a straight line. It will probably be impossible to do this at the start, but
don’t be discouraged.
Now clean the weld bead with a chipping hammer and a wire brush. Look at it carefully. Then begin another bead next to the first one, and just a fraction of an inch in from the first bead. In this way, with one bead after another, running from left to right, cover the full surface of the plate with weld metal.
The beginner usually finds it difficult to weld in a straight line. Punch marking two guide lines 1/4 in. apart, the approximate width of the finished bead, the entire length of the plate, as illustrated in ill. 16, may prove helpful. After you have one straight bead on the plate, it becomes an easy matter to deposit succeeding beads in a straight line by using the first bead as a guide.
By the time the full surface is covered, there should be some visible improvement in the last few beads, as compared to the first few.
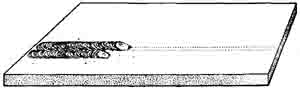
ill. 16
Adjusting for Welding Heat
Turn the plate over, brush or scrape off the scale, and proceed again in the same way as you did on the first side. After using one electrode, go to the welding machine and turn it down approximately five amperes (or the equivalent in markings on the machine dial or steps).
Is the difference in the welding heat caused by the lower amperage now noticeable? After using one electrode turn the machine down five more amperes. By now the difference ought to be obvious. If not, use one more electrode, turning the machine down five more amperes.
Continue these reductions of welding current until the arc is no longer hot enough to melt the base metal. Watch the arc carefully. You’ll notice that it still makes light, but doesn’t generate enough heat to melt the base metal. The amount of electrode that burns off lies as spatter on the practice plate. Scrape this spatter with a file or chisel and note that it’s not welded but only stuck to the plate. Most of it will easily scrape off.
Now reverse the procedure. Raise the amperage by five. Strike an arc and look at it carefully for about half a minute. Decide if the arc is hot enough to melt the metal, so that a good bond takes place between the base and the filler metal. If the arc is not hot enough, continue to raise the amperage by increments of five until it’s hot enough.
What to Look For
During the changes in amperage and the changes in resultant heat, several things should have become more noticeable:
(1) In order to weld, you must melt.
(2) If the base metal is not melted, the filler metal just sticks on, and can easily be scraped off.
(3) As the amperage is raised, the hotter arc not only melts more, but melts faster.
(4) The cooler arc will produce some melting, if it’s kept in one place long enough. Or the cooler arc will melt the base metal, if the mass of the base metal is small enough.
Additional Practice
With an amperage setting that seems best for you— depending upon the plate, the electrode and your skill — go back to the same method of running beads described earlier in this section.
During this additional practice, carefully observe the melting plate, the melting electrode, the transfer of the filler metal to the melted puddle, and the freezing of the puddle as the arc moves away from it.
During your first arc welding experience, you see only the bright light of the arc. But soon you begin to see through the light to a puddle of molten slag. Then you begin to see through and past the slag to the puddle of molten metal.
Watch the weld puddle and see it in relation to the base metal and the filler metal. Watch it melt its way open in the front as the arc moves into the metal, and watch it wink closed in the back as the arc moves on.
Prev: Striking an Arc
Next: Heat Measurement, Whipping and Weaving