AMAZON multi-meters discounts AMAZON oscilloscope discounts
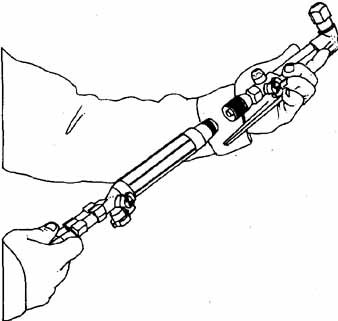
Undoubtedly, the most dramatic use of oxyacetylene equipment is in cutting metal. Sparks shower from the work, and , in most cases, the cutting progresses very quickly. The equipment necessary for cutting metal with the oxyacetylene process is basically the same as for welding. The major difference, of course, is that the blowpipe must be fit ted with a special cutting attachment. In addition, the working pressures are generally greater than for standard welding (ill. 13.1).
AMAZON multi-meters discounts
AMAZON oscilloscope discounts

figr. 13.1 Cutting in progress.
Equipment
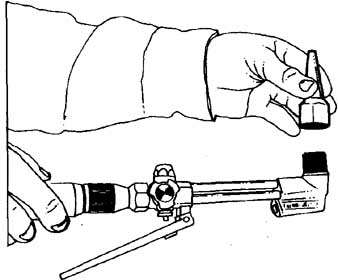
In most cases, a special cutting attachment is fastened onto the end of the standard welding blowpipe handle in place of the welding tip. It will be to your advantage to understand the principles behind its operation (ill. 13.2).
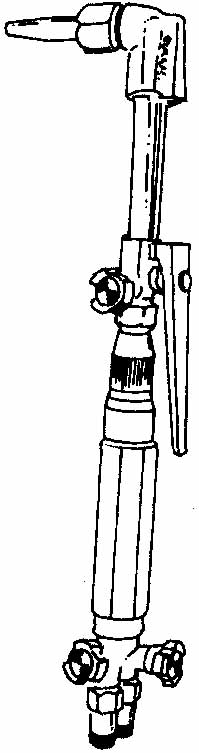
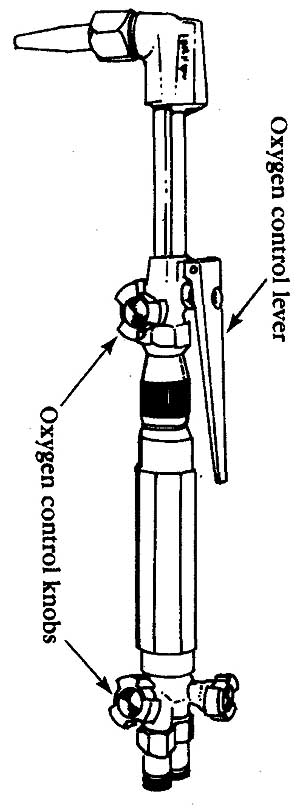
figr. 13.2 A typical welding torch with cutting attachment.
Cutting Attachments
Basically, all cutting attachments are the same, although design features often differ between, manufacturers. A cutting attachment will have a housing through which three tubes run. One tube carries acetylene gas to the tip. Another similar size tube will carry oxygen to the tip. A third, larger tube will also carry oxygen to the tip. The first two tubes carry oxygen or acetylene to a special expansion chamber just behind the cutting tip. There the gases are allowed to expand and mix thoroughly before passing through the small holes in the cutting tip.
In most cases there will be six holes in a cutting tip, surrounding a larger hole in the center. The third tube in the cutting attachment handle carries pure oxygen, and it leads directly to the large center hole. The flow of pure oxygen through the tube to the center hole is controlled and regulated by a lever that sits on top of the cutting attachment handle. No oxygen can flow through this tube—or out of the large center hole—until the lever is depressed (ill. 13.3).
AMAZON multi-meters discounts
AMAZON oscilloscope discounts
Cutting Tip Holes
The six small holes in the cutting tip are called preheat holes, and the larger, center hole is called the cutting hole. Each of the preheat holes produces a flame that resembles a standard welding flame. Since the oxyacetylene mixture flows equally through all of these small preheat holes, each flame will be the same: acetylene, carburizing, neutral, or oxidizing. As you can well imagine, the six preheat holes produce an enormous amount of heat (ill. 13.4).
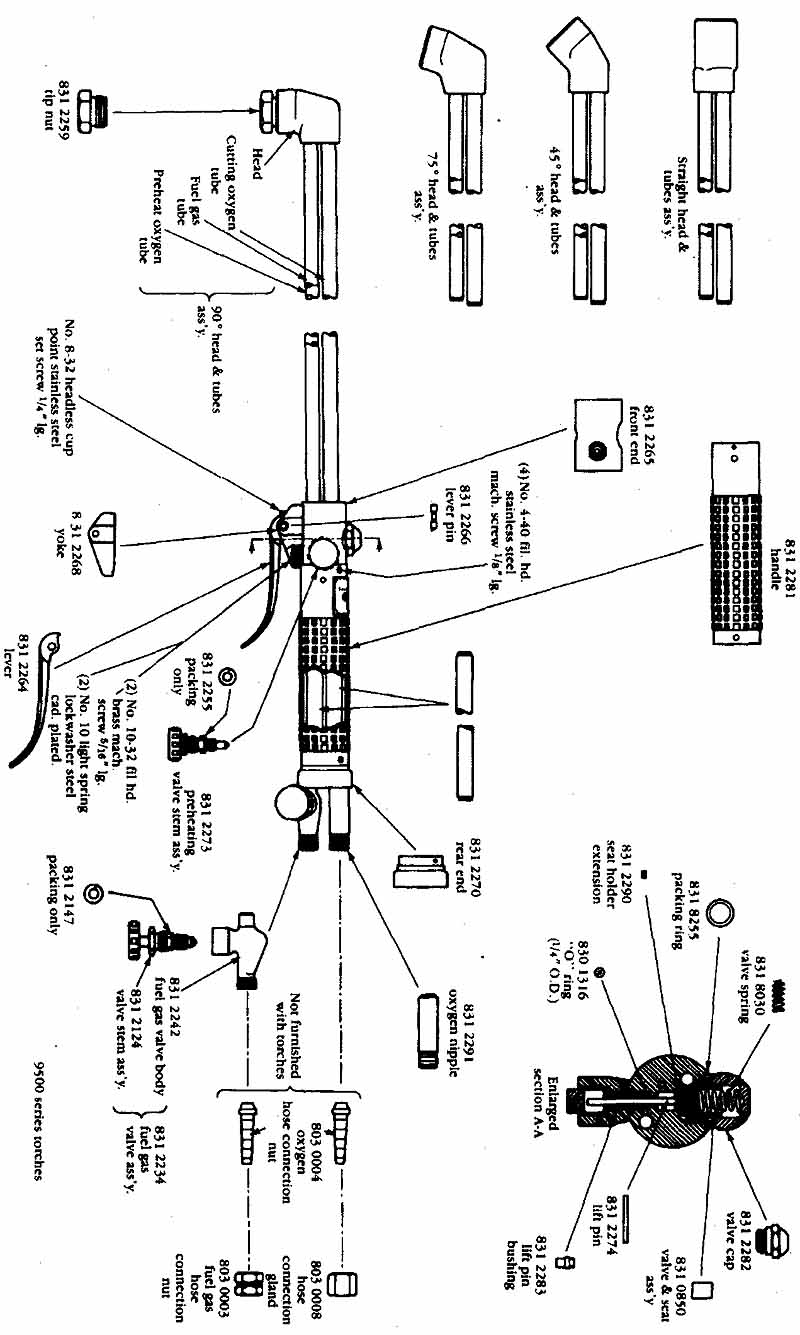
figr. 13.3A A cross-section view and parts for Airco Series 9500
hand cutting.
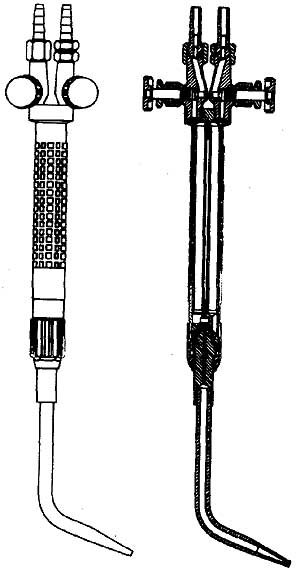
figr. 13.3B A cross-section view and parts for Airco Series 9500
hand cutting torches.
The center hole in the cutting torch tip does not produce any flame. Instead, when the lever is pressed, a stream of pure oxygen is introduced into the heat zone created by the preheat flame. This causes the metal to oxidize away very rapidly. It may be helpful at this time to explain how the oxyacetylene cutting process works.
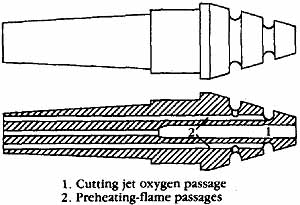
figr. 13.4 A cross-section view of an acetylene cutting tip.
1. Cutting jet oxygen passage 2. reheating-flame passages
Chemical Reaction
Oxyacetylene flame cutting can be used for many common ferrous metals. Oxyacetylene cutting can successfully be used to cut low-carbon steel, low-carbon alloy steel, wrought iron, and other ferrous metals.
This process does not work well for cutting stainless steel, cast iron, or any nonferrous metal such as aluminum.
Actually, the process of flame cutting is a chemical reaction. This reaction takes place because oxygen has a chemical attraction to ferrous metals when they are heated above their melting point. When excess pure oxygen is added to red-hot ferrous metal, the iron will oxidize very rapidly. To say it another way, the metal will burn up. The force of the excess oxy gen, in addition to burning up the metal, will also aid in blowing away the molten metal.
Success Factors
There are several factors that will influence the success of any oxyacetylene cut ting process. It is important to use the proper size cutting tip for the particular cutting project at hand. All makers of oxy acetylene torches and cutting attachments offer a selection of various size cutting tips, each designed for a specific thickness of metal. Obviously, you should use the tip size recommended for any given thickness of metal.
The thickness of the metal being cut, in addition to dictating the cutting tip size, will also determine the speed at which the metal can be cut. It is important to keep in mind that the metal is heated up to the “cherry red” stage before additional oxygen is introduced. Obviously, thin metal will reach this stage much more rapidly than thicker metal. It is important, then, from the standpoint of an acceptable cut, for the welder to keep a sharp eye on the area being preheated and to watch for the metal to reach the proper temperature, based on the color of the metal. The preheat flames are kept operating during the entire cutting operation. The oxygen is introduced only when the metal has reached the proper temperature. If the excess oxy gen is added before the metal has reached the proper temperature, oxidation or cut ting will not take place.
As with welding, the best way to learn how to cut metal with oxyacetylene equipment is to practice often and on various thicknesses of metal until you have mastered some of the basics. It will be helpful, therefore, to run through several exercises in flame cutting and point out the important functions that must be accomplished during the cutting operation. Before we begin, however, it may be helpful to quickly run through how to set up the oxy acetylene cutting equipment.
TIP: Each cutting tip wilt require specific working pressures for both oxygen and acetylene. In all cases the working pressure for oxygen will be considerably more than the working pressure for acetylene, as Table 13-1 illustrates.
Table 13-1: Pressure chart for Sears cutting tips.
Plate Thickness (inches) |
Tip Size (inches) |
Oxygen Pressure (psi) |
Acetylene Pressure (psi) |
3/8—5/8 5/8—1 1—2 2—3 3—6 |
0 1 2 3 4 |
30—40 35—50 40—55 45—60 50—100 |
5—15 5—15 5—15 5—15 5—15 |
Setup
Assuming that your regulators have already been attached to both the oxygen and acetylene cylinders and that the standard welding torch handle is also attached to hoses running from the regulators, begin by removing the welding tip attachment. In most cases this will entail unscrewing the welding tip holder from the end of the handle. At this time, the tanks should be turned off and the lines cleared of both acetylene and oxygen (ill. 13.5).
figr. 13.5 The cutting attachment fits onto the blowpipe handle.
The cutting attachment is then fastened to the end of the blowpipe handle and secured. The next step is to fit the cutting attachment with the proper size cutting tip for the project at hand. For our first exercise, we will be cutting light gauge steel, less than ¼-inch thick. Your welding outfit should have come with a booklet with recommendations for cutting tip sizes for cut ting various thicknesses of met Choose the right size tip, and fit it into the end of the cutting torch handle (ill. 13.6). In all probability, you will be attaching a relatively small cutting tip.
figr. 13.6 The proper size cutting tip is fitted onto the cutting
attachment.
Oxygen Flow
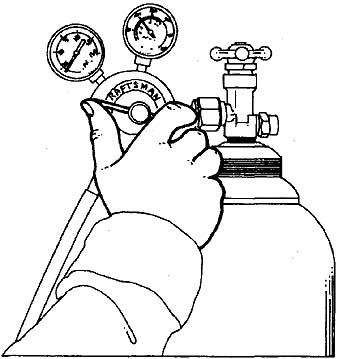
Once the proper size tip has been attached and you have double checked all connections to make certain that they are snug, open the oxygen tank valve slowly and allow some of the oxygen to pass into the regulator housing. At this time the high- pressure gauge of the regulator should register how much pressure is in the oxygen tank. Open the valve slowly so that a sudden surge of pressure will not damage the internal parts of the regulator. The diaphragm of the regulator should be wide open at this time. The low-pressure or working-pressure gauge should read zero. The control valves on the torch and cut ting attachment should also be closed at this time as well. The next step is to set the working pressure for oxygen. This is done by simply turning the oxy gen regulator control lever until the low-pressure gauge registers. Set the working pressure according to the recommendations for the cut ting tip being used. This information can be found in the manual that came with your welding outfit (ill. 13.7).
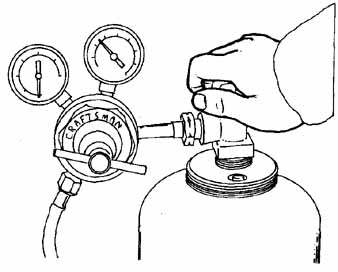
figr. 13.7 Open the valve slowly so that the regulator is not
damaged by a sudden surge of pressure.
The next step is to give a quick check to all oxygen connections to make sure that no oxygen is leaking into the atmosphere. If all is well, open the oxygen control valve on the welding torch handle two full turns. At this time no oxygen should flow. The reason for this is that the oxygen flow is actually controlled by the oxygen control valve on the cutting torch handle rather than the valve on the welding torch itself (Figs. 13.8 and 13.9).
figr. 13.8 The oxygen control knob on the torch handle is opened
alt the way, but the flow of oxygen is con trolled by the oxygen control
knob on the cutting attachment.
figr. 13.9 The oxygen control knob on the cutting attachment.
Open the oxygen valve on the cutting torch handle a quarter turn to make sure oxygen flows. Then turn it off quickly. Next depress the oxygen cutting lever for a second, and then release it quickly. When you depress the oxygen cutting lever, a stream of oxygen should flow from the center hole in the cutting tip.
After the oxygen system has been pressurized and checked for leaks and proper operation, you can turn your attention to the acetylene line. First make sure that the acetylene control knob on the torch handle is in the off position and the regulator control lever is also turned off (fully open). Open the acetylene tank valve slightly to let some of the fuel into the regulator housing. The high-pressure gauge should register how much pressure is in the acetylene tank (ill. 13.10).
figr. 13.10 Set the working pressure for oxygen.
Acetylene Flow
The next step is to turn the acetylene regulator lever until the working-pressure gauge registers the proper pres sure. Once again, this information can be found in the booklet supplied with your welding outfit. After the proper working pressure has been set, open the acetylene control knob on the torch handle to make sure acetylene is flowing (ill. 13.11). Then quickly turn it off. Give a quick check to the acetylene connections to make certain that there are no leaks.
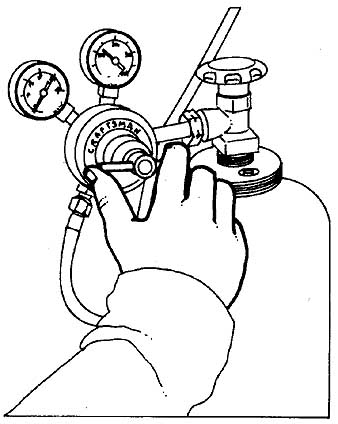
figr. 13.11 Set the working pressure for acetylene.
As you can see, the only difference between setting up the oxygen and acetylene lines is that there are two control knobs for oxygen, one on the torch handle and another on the cutting attachment. There is only one for acetylene, on the welding torch handle. This may cause a bit of confusion initially, but I plan to make it clear as to which oxygen control knob is to be used when cutting.
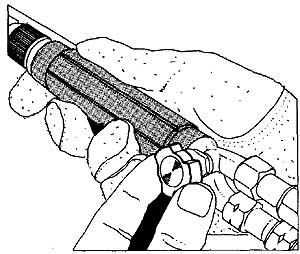
The flow of acetylene is controlled by one knob on the torch handle. The oxygen knob, next to this, is opened all the way when cutting. It is important to remember that no oxygen will flow out of the torch cutting tip, however, until the oxygen flow control knob valve on the cutting attachment is opened. To summarize, the flow of acetylene is controlled by opening the acetylene knob on the torch handle. The oxygen control knob on the torch handle is opened at all times, but the flow of oxygen is regulated by the oxygen control knob on the cutting handle attachment (ill. 13.12).
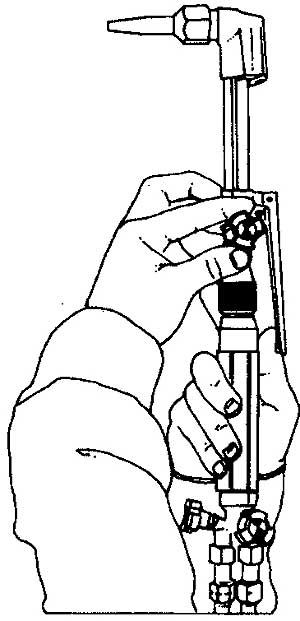
figr. 13.12 The flow of oxygen is controlled by this knob on
the cutting attachment.
Precutting Procedures
The next step in learning some of the basics of oxyacetylene cutting is to lay your hands on a piece of scrap steel plate, about ¼-inch thick, 4 inches wide, and 8 inches long. Lay this scrap lengthwise between two firebricks on your worktable. Now, with protective goggles in place, open the acetylene control valve a quarter turn, and light the torch. Then open the oxygen valve on the cutting attachment. The valve on the torch handle next to the acetylene control knob is, of course, open already. Develop a neutral flame at the preheat holes that results in a cone about 1/8 inch long. You will find this easiest to accomplish by alternately increasing the flow of acetylene and then oxygen until the proper flame is achieved. When you are done adjusting to a neutral flame, each of the preheat holes should have this flame (ill. 13.13).
figr. 13.13 Adjusting to a neutral flame.
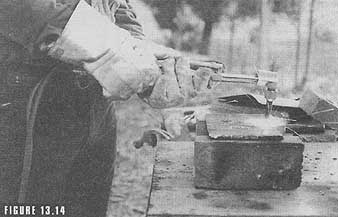
figr. 13.14 Oxygen and acetylene hoses should come from behind
the cutter.
After the neutral flame has been developed, depress the oxygen cutting lever momentarily to make certain that oxygen is, in fact, flowing through this part of the cutting attachment. You may find, when you depress the cutting lever, that the pre heat flame needs to be adjusted. This is often the result of excess oxygen in the center of the preheat flames. Adjust the preheat flames if necessary. Now the torch is ready for the cutting operation.
Positioning of Hoses
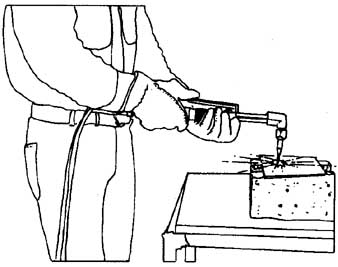
Before actually beginning to cut, you should take a quick look around the work area to make sure the oxygen and acetylene hoses don't run under the work. This would be a dangerous condition especially if a spark or hot slag were to fall onto the hoses. It might cause the hose to rupture, and a fire could result. For the record, it's always best for the hose to run from behind the welder. That way your body will always shield the hoses from hot sparks and molten slag (ill. 13.14).
You should also look to be sure you have a clear path to the oxygen and acetylene tanks. If a fire were to break out, turn off the flow of oxygen and acetylene at the tanks after turning off the control valves on the torch handle and cutting attachment.
Access to Safety Equipment
Safety equipment should also be within easy reach. This includes a fire extinguisher. See Section 14 for solid information on firefighting equipment. A bucket of sand and a bucket of water should also be in the welding shop for a quick response to any type of fire (ill. 13.15).
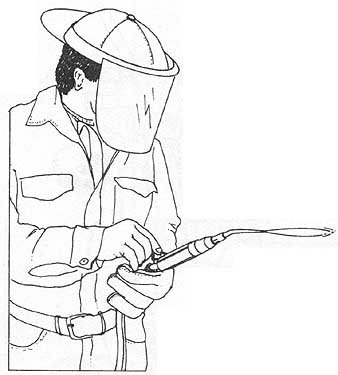
As mentioned earlier in this section, you should have tinted goggles over your eyes. Many experts suggest that the molten metal being cut is brighter than molten metal being welded. Make sure your goggles are dark enough to protect your eyes while at the same time allowing a clear view of the work in progress (ill. 13.16). Heavy leather gloves and other body protection should also be worn as sparks and hot slag are a common occurrence when cutting metal with an oxyacetylene cutting unit. It is important to wear the proper clothing when cutting or welding. Section 14 contains extensive information about the types of clothing that are suitable to wear when working in the welding shop.
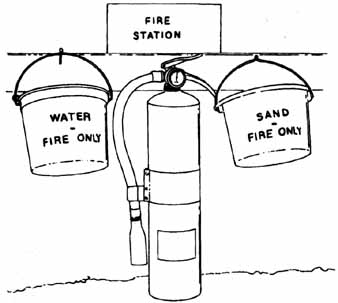
figr. 13.15 Adjusting to a neutral flame. A fire station should
be within easy reach of the cutting area.
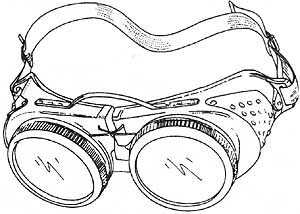
figr. 13.16 Tinted welding goggles should always be worn when
working with a cutting or welding torch.
TIP: One Last reason for holding the cutting torch 1/8 to 1/4 inch off the surface is that at this height the preheat holes and oxygen cutting hole will be protected, somewhat, from reflected heat. At this height, the holes are less likely to become clogged with flying bits of molten metal.
Cutting a Hole in Steel Plate
To get a feel for how a cutting torch can pierce through metal, the first exercise will involve cutting a single hole in the center of the steel plate. Begin by adjusting the torch for a neutral flame, then add a bit more oxygen to develop a slightly oxidizing flame— which is better for cutting than a neutral flame. Hold the tip of the torch about 1/8- to ¼-inch above the center of the steel plate. The idea is to hold the white cones in each of the preheat flames just above the surface of the metal. In a matter of moments, you will notice the change in the color of the metal until finally the color is a cherry red. At this time, depress the oxygen cutting lever on the cutting attachment. It is important to press the lever slowly to blow a stream of pure oxygen onto the molten steel.
As the oxygen hits the molten metal, a shower of sparks will appear at the center of the cut. If you hold the torch steady, the oxygen will remove the surface layers of the metal very quickly, exposing the lower layers. These layers will almost immediately be heated by the preheat flames, and pre-oxygen will blow them away as well. In a very short time, you will blow a hole in the center of the metal. This basically is how all oxyacetylene cutting is done. The difference between blowing a single hole through steel and cutting a straight line across a 2-foot piece of steel is simply a matter of practice and finesse (ill. 13.17).
figr. 13.17 Just before the white-hot stage, press the oxygen
cutting lever.
figr. 13.18 Use two hands to hold the cutting torch and to help
you cut in a straight Line.
Some general comments about cutting are in order at this time. It is important that the cutting torch be held at a constant and steady height above the metal surface. You will find it helpful, especially in the beginning, to use two hands to hold the torch (ill. 13.18). Assuming that you are right handed, your right hand will hold the cut ting torch at the balance point, and your right thumb will be on top of the oxygen cutting lever. Your left hand will be in front of your right and will serve as a steadying point for the cutting torch. Of course, both hands should be encased in heavy leather gloves to protect them from hot sparks and slag.
Prev: The
Weldability of Certain Metals
Next: Cutting Metal (part 2)