AMAZON multi-meters discounts AMAZON oscilloscope discounts
No welding project can be considered finished until the piece has been pressed into service. In some cases this will mean simply cleaning up the weld to remove the ridges of the weld bead. In other cases, however, this may mean grinding the weld flush with surrounding areas and finishing with several coats of paint or clear finish. This section explains protection techniques and examines some common welding problems.
AMAZON multi-meters discounts
AMAZON oscilloscope discounts
Paint Coatings
The actual use of the welded piece will, of course, determine the extent of the finishing. You should keep in mind that ferrous metals (iron, steel, and alloys of these magnetic metals) will rust if subjected to the forces of the elements. Since rust will in time cause the metal to deteriorate, you will want to prevent this whenever possible.
AMAZON multi-meters discounts
AMAZON oscilloscope discounts
There are a number of paint coatings that have been specifically developed for use over metal surfaces. Generally speaking, you can't cover metal with just any paint, such as latex wall paint, and expect this coating to perform in service. You should also keep in mind that the first coat is usually a special primer covering designed to provide a suitable adhesion base for the subsequent finish coats. Probably the best place to find more information about paint coatings is at your local paint store or your welding supply store.
One alternative to a paint coating for welded metals is some type of oil finish. Simply stated, if you coat metals that will be exposed to the elements with oil or some type of silicone spray (such as WD-40), the coating will reduce the chances that the metal will rust. If you do this, keep in mind that the coating must be removed before the metal is ever again heated with a torch flame. Oil or grease burns violently in the presence of pure oxygen, a very dangerous condition, to say the least.
Sandblasting
Before any coating is put on metal, the surface must be cleaned of any existing rust, flux, or scale. Some of the tools that will remove these surface coatings are a wire brush (hand operated or mechanical), sand paper, or a grinding wheel or other suitable machine. Sandblasting is still another way of cleaning up a metal surface preparatory to finishing. Since sandblasting equipment is expensive, it's recommended that the do-it-yourself welder have this cleaning work done by some one who specializes in the field. A good sandblast cleaning will give a truly professional look to your metalworking project.
Common Welding Difficulties
Undoubtedly the most common problem encountered by beginners is popping of the torch during the welding process. In most cases, this is a result of holding the cone of the flame too close to the molten metal. As you develop some skill at keeping the torch tip at a consistent height above the work, you will find popping less of a problem.
Torch Popping
Another cause of popping, and one that often results in the flame going out, results when the welding tip becomes dirty or clogged from bits of molten metal. The first thing you should do when the flame pops out is to turn off the acetylene and oxygen, in that order. Next, check the tip to see that it's not clogged. If it's , clear it by using a special tip cleaning tool. Use a cleaning wire that's just smaller than the opening. Push the wire in and out of the tip hole several times. It is important that the wire be pushed in and pulled out straight so as not to enlarge or distort the hole in the tip (ill. 11.1).
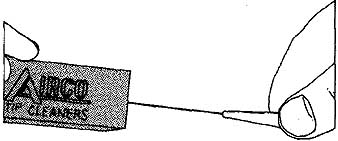
figr. 11.1 Clean your welding tips with a special tip cleaning
tool.
You should also remove any accumulation of metal slag around the orifice at the end of the tip.
If you move too quickly along a joint or if the oxygen-acetylene pressures are too low, the bead that will result will be narrow and uneven. When inspecting your practice welds and subsequent welds as well, keep an eye on the quality of the bead. A good weld will resemble those shown in ill. 11.2.
Range of thickness |
Number of layers |
Method of depositing |
Cross section of weld |
3/8” to 5/8” 5/8” to 7/8” 7/8” to 1-1/8” |
2 3 4 |
Two layers one-pass Three layers two passes 1 and 2 in one pass layer 3 one pass Four layers three passes 1 and 2 in one pass layers 3 and 4 in two passes |
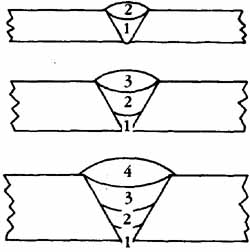
figr. 11.2 |
Above: Table of suggested methods for multilayer welding.
Weld Bead Holes
The importance of constant torch movement can't be overstressed. Holes in a weld bead are caused by holding the cone of the flame in one spot for too long (ill. 11.3). If holes appear while the metal is still in the molten state, they can usually be filled with a bit of welding rod, by simply touching the rod to the area and letting it flow into the hole.
Strive for perfection in your welding exercises. A good weld bead should be a uniform series of circles with no ridges or high and low spots. This uniformity can come only as a result of a total familiarity with your torch, its adjustment, the filler material, and the metal being joined. Needless to say, it will take you many hours of working with a torch and the various types of metals before you can expect to produce good-looking, as well as mechanically sound, welded joints.
Warping of Metal
Metal has a tendency to warp when heat is applied. This is a problem that's more prevalent with light metal; in short, the thinner the metal, the greater the possibility of some type of warpage. Knowing that metal will expand when heated and con tract when cooled can be used to your advantage when working with relatively thin sheet metal. After welding, straightening can be done with your torch. If undesirable warpage presents itself, you can usually correct the problem by hammering and /or heating the opposite side of the warp (ill. 11.4).
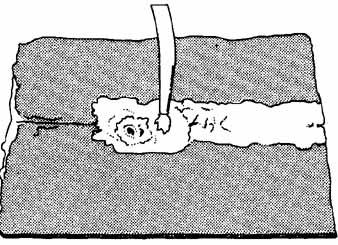
figr. 11.3 Holes in a weld bead are caused by not moving the
blowpipe quickly enough.
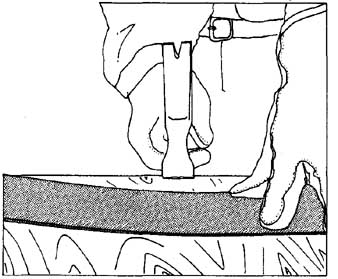
figr. 11.4 Warped metal can often be hammered back into the
desired shape.
Prev: Welding
Thicker Metals
Next: The Weldability of Certain
Metals