We have covered how to weld relatively thin pieces of steel both without and with the addition of a filler material. In just about every instance, thinner
metal does not require any edge preparation other than making sure that the
joint fits together well and it's clean. When working with thicker metals,
however, you will generally not be able to achieve good weld penetration unless
you reduce the thickness of the metal along the joint area. It is generally
accepted that when welding any metal that exceeds ¼-inch in thickness, you
must reduce the thickness of the joint edges by grinding. Then fill in the
area with welding rod. Actually, the point of edge treatment is to ensure that
the heat from the oxyacetylene flame will be even along the joint. The thicker
the metal along the edges, the more heat must be applied to make the edge metal
molten throughout. As it turns out, metal thicker than about ¼-inch can't be heated thoroughly enough to make fusion welding complete and total. This
is the basis for edge treatment.
AMAZON multi-meters discounts
AMAZON oscilloscope discounts
Basically, there are four types of joints in all welding: butt, T joint or fillet, flange, and lap. Since we have covered these previously, the information will not be duplicated here (ill. 10.1).
AMAZON multi-meters discounts
AMAZON oscilloscope discounts
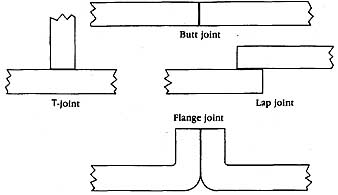
FIGURE 10.1 Common joint designs for metals. Less than ¼-inch thick.
Butt joint, T-joint, Lap joint, Flange joint
Beveling Metal Edges
When working with thick metal, some type of edge treatment must be initiated before welding begins. In many cases this will simply amount to beveling one or more of the edges at about a 45-degree angle. Then, when the two pieces are placed together prior to welding, the beveled edges will form a V, which can then be welded. In some cases the depth of the V groove will be deep, which will require that more than one pass be made with torch and filler rod.
There are really only a few ways in which the edge of a piece of metal can be beveled. These include grinding, cutting, and machining. In most cases only the first two are within the means and capabilities of the average home welder, machining being a commercial production form of edge preparation.
Grinding
Grinding the edges of metal is probably the easiest and most efficient means of edge beveling for the do-it-yourself welder to perform. Since every home workshop should have some type of grinding wheel, chances are good that you will already possess the equipment necessary for this special edge preparation. Begin by marking the angle of the bevel, in most cases 45 degrees, and press the metal into the spin- fling grinding wheel. For larger pieces, you may find the work easier to accomplish if you set up some type of guide or rest on the front of the grinding wheel (ill. 10.2).
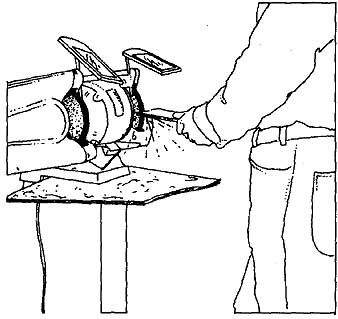
FIGURE 10.2 Use a bench grinder to bevel the edges of metal.
Cutting
Cutting with an oxyacetylene cutting torch is another way the do-it-yourselfer can bevel the edges of metal prior to welding (ill. 10.4). This beveling can often be done while the metal is being cut to size. It is important to keep in mind, however, that the cut must be of a high quality to minimize any additional metal edge preparation and to ensure that the pieces fit together well. It is generally accepted that cutting a beveled or chamfered edge on a piece of steel is not something that can be accomplished by a beginning welder. You will therefore be better off to rely on a grinding wheel for your beveling work until you have become quite proficient at both welding and cutting with oxyacetylene.
QUICK TIP: One alternative to the conventional grinding wheel is a disc sander or side angle grinder with a special metal cutting abrasive wheel or blade. This hand-held machine can be used for a variety of tasks around the shop. For example, it's handy for cleaning up metal before and after welding. A disc sander is also very useful for smoothing metal prior to finishing with primer and paint (ill. 10.3).
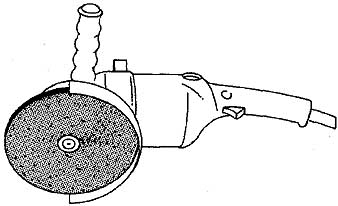
FIGURE 10.3 A hand-held disc sander is very useful for cleaning up metal
before and after welding.
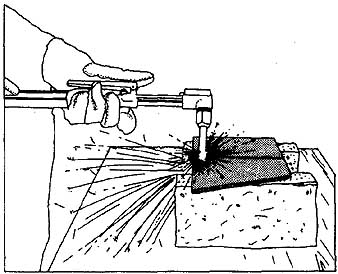
FIGURE 10.4 Beveled edges can also be made with a cutting torch. The
key is to hold the torch at the right angle and steady.
Welding Steel Plate
For your first exercise in welding thick metal, select two pieces of mild-carbon steel plate, 6 to 8 inches long and about 4 inches wide. Steel plate, in case you are wondering, is metal that's at least ¼-inch thick. For this first exercise, you should choose plate that's about ¼-inch thick. Steel of this thickness will be more than adequate for learning how to weld heavy metal.
Before the actual welding can begin, you must first bevel the edges that will butt together to form a joint. As mentioned earlier, the best way to do this is on a bench grinder. Any quality bench grinder will have a guide table in front of each wheel that can be set so that grinding can take place at a predetermined angle. Grind one long edge of both pieces of steel plate to an angle of 45 degrees. It may be helpful at this time to explain how to grind the edge of a piece of steel plate.
Grinding Plate Edges
You should make sure that the bench grinder is securely fastened to a work surface. Good lighting should be over the machine, and you should be wearing some type of clear eye protection. Lightly press one end of the plate into the spinning grinding wheel, and move the piece with a back-and-forth motion. The reason for this is to prevent you from grinding one area more than another. Do not press the metal too hard into the wheel as this will slow down the spinning and reduce the speed at which the metal is removed. During the grinding, it's important that you keep the steel plate fiat on the guide in front of the machine (ill. 10.5). This will ensure that the angle being ground is, in fact, consistent. Stop grinding often, and carefully inspect the edge to make sure it's being ground at both the right angle and uniformly along the edge. Proper grinding takes time, so don't try to rush the work.
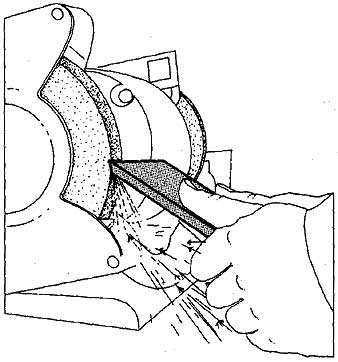
FIGURE 10.5 Use a guide to help you grind a true bevel on steel plate.
Tack Welding Joint Edges
After both edges have been ground, lay the two pieces of steel plate across two firebricks, with the beveled edges aligned. Tack weld both ends of the joint to hold them in alignment while you weld the beveled joint (ill. 10.6). Use a bit of filler material (welding rod) if you find it necessary for the tack weld.
As a side note, you should have already attached the proper size welding tip into the blowpipe handle. When in doubt as to the proper size welding tip, consult the handbook that came with your welding torch outfit. Here you should also find recommended working pressures for both oxygen and acetylene (see Table 10-1).
Table 10-1 Pressure chart for Sears welding tips.
Metal Thickness (inches) |
Tip Size (inches) |
Welding Rod Diameter (inches) |
Oxygen Pressure (psi) |
Acetylene Pressure (psi) |
1/32 3/64 1/16 3/32 1/8 3/16 1/4 5/16 |
1 2 3 4 5 6 7 8 |
1/16 1/16 1/16 3/32 3/32 3/32 1/8 5/32 |
5 5 5 5 5 6 7 8 |
5 5 5 5 5 6 7 8 |
Begin welding the beveled joint at the left end, heating the edges of the joint thoroughly before introducing the welding rod. For ¼” steel plate, a 3/32” or 1/8” all-purpose welding rod should be adequate. It is important when working with thicker metals to keep the torch flame moving to produce consistent penetration. The size of the molten puddle will be the largest you have ever created, so give the metal time to heat up and flow properly.
Once the puddle is formed at the bottom of the V groove, introduce the tip of the preheated welding rod. Flow the rod into the groove and build up the metal until it has filled the groove and risen to about 1/16-inch above the joint. Continue along the joint in this manner until you have both filled the V groove and built up the weld bead.
Basically, as previously stated, welding steel plate is quite similar to welding sheet steel. The major difference, of course, is that you must generally work slower and add more filler material to pro duce a strong weld. By beveling the edges of the joint before welding, you are almost guaranteeing good penetration of the weld. One of the major points to keep in mind is that you must evenly heat up both sides of the joint to the molten stage before adding the filler rod material.
Strength Test
After you have welded your first joint in steel plate, you should check the weld for strength. One very good way to do this is to first let the metal cool. Then clamp the work in a vise, and break the joint with repeated blows from a heavy hammer (ill. 10.7). A sound weld will require a lot of hammering to break while a poor weld will break quite easily. Practice the above welding exercise until you can produce a welded joint that's uniform and strong.
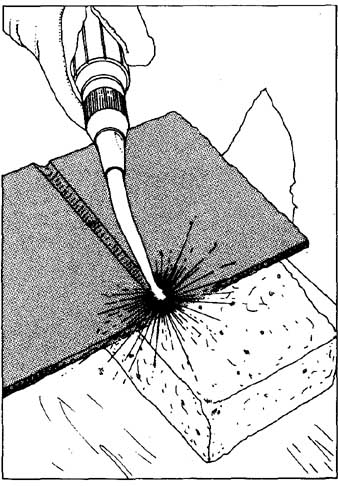
FIGURE 10.6 Tack welding the ends of a beveled edged joint.
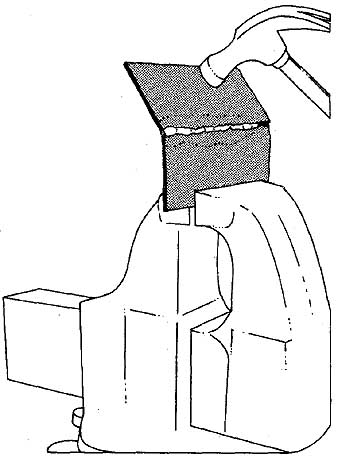
FIGURE 10.7 Test the strength of a joint by breaking it in a vise with
blows from a hammer. A good weld will require a number of hammer blows
white a weak joint will break quite easily.
Characteristics of a Good Weld
It may be helpful at this time to describe what a good weld looks like when working with steel plate. The weld bead should be smooth and form an equal junction between the two pieces of steel plate. The width of the bead should be uniform and about 25 percent wider than the metal is thick. For example, if the steel plate is 1/4 inch thick, the width of the weld bead should be about 3/16 inch. The underside of the weld should be uniform as well with no excess metal formations. In addition, the bead should be covered with a very thin oxide film on both sides of the joint.
Figure 10.8 shows most of the joint possibilities when welding thick metal. Since these are time-proven joint designs, you should use them whenever possible. All of these joints can be fashioned on a conventional home bench grinder, and the do-it yourselfer should have little problem in duplicating them.
Multilayer Welding
On very thick metal, over inch, the home welder may find it almost impossible to fill the beveled joint with one pass of the torch. It is standard practice, in the welding industry for the welder to build up the weld bead in several passes. Technically, this is called multilayer welding.
By approaching heavy metal welding in this manner, the welder will find it much easier to deposit several layers of filler material until the welded joint has been built up to the proper height above the base or parent metal. The point of multilayer welding is to produce smaller puddles of molten metal and enable the welder to have more control over the joint.
When building up a weld bead with multilayer welding, the first layer should provide good penetration at the bottom of the V groove. Additional layers must fuse this first layer with the filler material and the sidewalls of the joint. The final layer seals the joint and should be crowned slightly above the base metal (ill. 10.9).
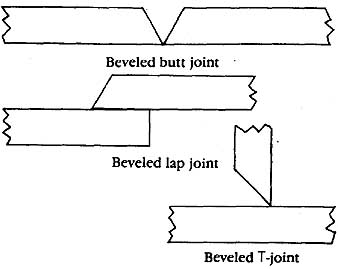
FIGURE 10.8 Common joint designs for metal more than ¼-inch thick. Beveled
butt joint, Beveled lap joint, Beveled T-joint
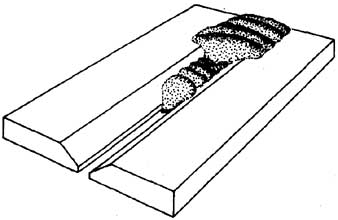
FIGURE 10.9 Multilayer welding.
Anyone knowledgeable in the art of welding will tell you that you should learn welding in gradual stages, mastering each before moving on. For the home welder, it would be best to begin with thin sheet steel. After mastering welding with and without filler rod, move onto steel plate. Do not attempt to weld plate thicker than 1/4 inch until you are able to produce a respectable welded joint. After you have the basics of torch control down, then move on to thicker metal.
Prev:
Next:
Protection and Problems