So far you have been learning a good deal of the theory of welding, especially about the melting and freezing of metals which are necessary in order to join them. You have also been practicing the procedures involved in depositing weld metal. By this time the weld beads you deposit should be fairly even and straight. It is time that you now actually start welding two pieces of metal together.
We will begin with fillet welds. A fillet weld joins two pieces of metal that are butted against each other to form an “L” or a “T”.
Use two pieces of plate at least ½ in. thick. The edges should be fairly straight and square. Then proceed as follows:
(1) Place two long edges together so they form an “L” shape, and hold the plates together with two small spots of weld metal (tack welds) at the ends.
(2) Turn the piece so the corner rests on the bench and the opening is up like a wide “V,” as shown in ill. 23.
(3) Block or support the piece to keep it in this position.
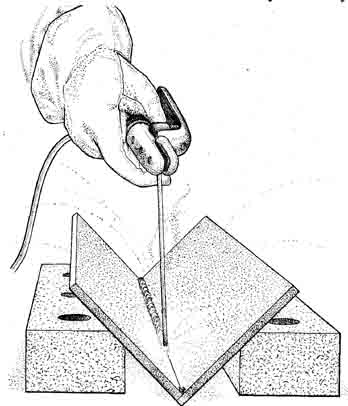
FIGURE 23—In practicing your first fillet weld, support the two plates
in a “V” position, and keep the electrode pointed straight down.
This position is being used to start with because of its convenience for a beginner—the electrode will be pointed down. However, just because you can allow the metal to melt and drop off into the groove is no reason to do so. You won’t always be welding in this convenient position.
Learning to make a good fillet weld is important. Fillet welds are used in all types of steel weldments. A complex piece of machinery called for fillet welds almost exclusively.
The First Pass
Using 1/8 in. electrodes and about 90 to 100 amperes, weld a single pass from front to back the length of the practice piece. Move the electrode slowly and steadily and hold a relatively “short” arc. The end of the electrode should be no more than 1/4 in. from the weld puddle—or better yet, only 1 in. away if you can maintain that short distance without sticking the electrode.
Move steadily along at a rate that's slow enough to melt a puddle ahead of the deposit and produce a smooth even bead. Yet be careful that you aren’t too slow. Bead width should be about twice the width of the electrode. Refer to ill. 24.
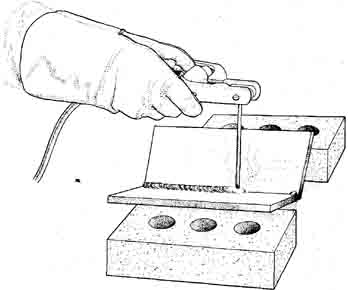
FIGURE 24—Move at a steady rate to produce a uniform.
Note that the position of the joint in the illustration is away from the front edge of the welding table, and the student welds directly away from himself. An alternate practice position for this weld places the joint parallel to the front edge of the welding table. The weld bead is then made from left to right (right to left if left handed) rather than front to back. An experienced welder can make a sound weld in either direction.
Try making the weld in both positions and select the one which seems most comfortable and gives you the best view of the weld puddle. Continue to practice making the fillet weld in this position.
The electrode position in respect to the joint is the same in either case. The electrode should split the angle made by the two plates and lean slightly forward in the direction of travel about 5 - 20 degrees.
Observe
When this first bead is deposited, clean the slag off with a chipping hammer and wire brush. Look at the bead to see if there is any improvement over the work done in previous practice. The bead should have a uniform appearance and should be tied in well to both pieces of plate. ill. 25 is an example.
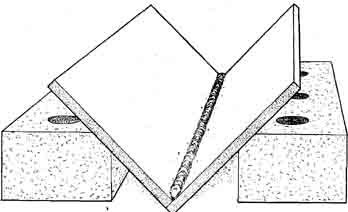
FIGURE 25—The fillet bead should be as fiat as possible and should be
tied in well to both plates.
Make sure that the weld is not “undercut.” An under cut is a groove made in the base metal along the bead
• edges by the heat and force of the arc and left unfilled by deposited weld metal.
After you have mastered this first pass technique, make the same weld using the whipping motion de scribed in Section 6. Compare the welds.
Both techniques should be mastered. Although the steady movement should be used most of the time you will still find occasions when it will be necessary to whip into and out of the weld puddle.
Second Pass
With the plate assembly in the same position as the first pass, (either parallel to or running away from the front edge of the table) use the same size and type electrode and the same machine setting and run the second pass. The second pass should be made with a weaving motion as described in Section 6, illustrated in ill. 26.
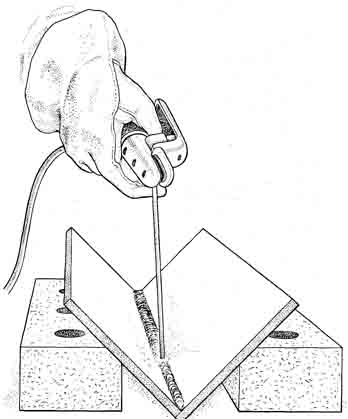
FIGURE 26—The second pass should consist of a weaving motion. Just barely
touch the plate on each side and move fast across the middle of the weld.
When welding with a weaving motion, let the coating of the electrode just barely touch the plate as it moves from side to side. The operation characteristics of the electrode will prevent it from sticking. In this motion, the electrode will seem to gently bounce against the plates which form the sides of the “V”.
When welding with the weaving motion, hesitate slightly (maybe half a second) on each side, and move the electrode smoothly and fast across the weld. Re member that you cross the middle of the weld twice as often as you touch either side. To produce an even deposit across the weld you must have a fast cross-over speed, otherwise you will pile up weld metal in the middle.
When the second pass is completed, clean the weld and look it over carefully, ill. 27. The weld should be fairly flat and even. The ripples of the weld should show that each forward movement has deposited a small layer of metal, like waves lapping at the shore, or like shingles on a roof, one on top of the other. Each one should overlap about the same amount. The sides should be well tied into the weld.

FIGURE 27—Weld ripples should be spaced uniformly.
Third Pass
Using the same welding conditions and the same technique, make a third pass. It will be wider than the second pass because you are now welding farther out in the “V.” You will need to move smoothly from side to side and will have to definitely hesitate on each side.
The movement across the weld will seem like a long way, but don't hurry. Part of the reason for this exercise is to keep you from hurrying and to give you a longer look at the weld puddle.
Continue at this exercise until the welds you make are smooth and even, because much of the welding you will do in the future is based on this kind of manipulation. See ill. 28.
Complete mastery of this exercise will make your future work come easier.
Re-using the Plate
Now cut up your practice piece and re-use the plates. Draw a line on each plate, just above the line of the weld, with a piece of soapstone. Using an oxy-acetylene torch, cut the plate along the lines. You will then have two pieces of plate, each a little smaller than the original size. Line them up and tack them as before. Then start another weld like the first one.
Practice until the welds are smooth, even, well tied into the sides and well penetrated into the base plates. This will require a lot of practice and will use a lot of plate and electrodes. Do not waste any material or any time.
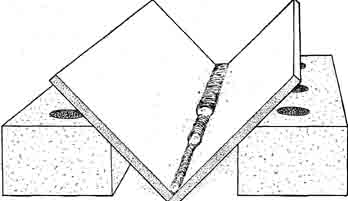
FIGURE 28—The third pass is wider than the second pass. The movement
across the weld may seem like a long way, but don't hurry.
Remember that steady work will pay off quickly in improvement of your skill.
Welding Into a “T” Fillet
For a second exercise on fillet welds proceed as follows:
(1) Take two pieces of plate and place the edge of one on the face of the other to form an inverted “T.”
(2) Tack both ends so they stay in place.
(3) Lay the assembly on the grounded work bench with the top of the “T” flat on the bench and the leg straight up in the air (as shown in ill. 29).
When practicing the fillet weld, position the joint parallel to the front edge of the welding table.
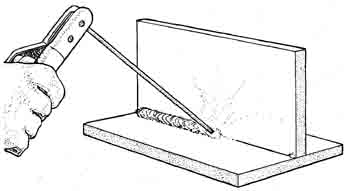
FIGURE 29—In practicing a fillet weld at the base of an inverted “T”,
weld directly into the joint at about a 45 degree angle.
You still want to weld directly into the joint or corner, so now instead of having the electrode above and pointing down it will have to be at an angle into the corner. This will give the electrode an angle of about 45° from the base plate or work table. Slightly lean the electrode in the direction of travel 15 to 20 degrees.
With the same size and type electrode, and with approximately the same machine setting as before, make a first pass into the corner of the two plates moving steadily along at a rate that allows the weld puddle to wash up the side of the vertical plate.
Observe
After completing the first pass, clean off the slag and look carefully at the weld. It will probably be a little wider than it's high. It will also probably be a little better and more smoothly tied into the bottom plate than the vertical plate. But don’t worry about that yet.
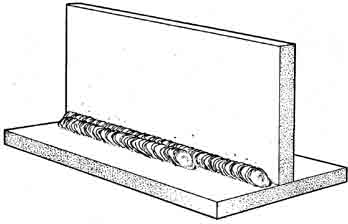
FIGURE 30—The second pass should be half on the flat plate and half
on the first pass.
Building with Weld Beads
For a second pass, lay down another bead which is about half on the flat plate and half on the first bead (as shown in ill. 30). Clean it well. Notice how it has penetrated into the first pass.
For a third pass, lay down another bead which covers the other half of the first pass and also ties into the vertical plate and the second pass (as shown in ill. 31). Clean off the slag and look carefully to see if the edges of the weld are well tied into the second pass and the vertical plate. If they are, you have a good strong fillet weld.
Now cover the fillet with another layer of beads, making three more passes—one at the bottom, one in the middle and one at the top as shown in ill. 32.
After a careful cleaning and inspection of your work, cut the remaining plate away from the weld and repeat this entire exercise.

FIGURE 31—The third pass should cover the exposed part of the first
pass, and tie into the vertical plate and the second pass.
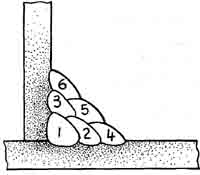
FIGURE 32—Multiple-pass fillet welds beyond three are made in the order
shown.
You will need to make many practice welds of the two types of fillets described in this section before your welding will be as good and as smooth as you want it to be.
Practice diligently—it will be well worthwhile.
Repeat the multiple pass fillet weld substituting the whip motion for the steady forward motion and note the difference.
You have probably observed that the light coated electrode being used performs well with either the steady movement or the whip technique. After you have mastered the basic skills, use the whip motion only when using the light coated electrodes and then only to regain control of a weld puddle that has grown too large. Always use the steady forward motion for the medium and heavy coated electrodes.
The weave motion is suitable for use with all electrodes types. This technique is used, as your present experience has demonstrated, to deposit more weld metal in a single pass.
Circular Weld Motion
Starting with clean plate, tacked as before, try an other way of making a fillet weld using a circular motion on the second pass (as shown in ill. 33).
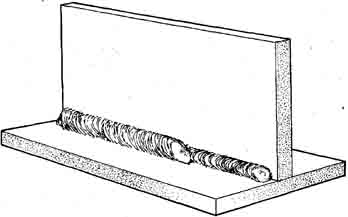
FIGURE 33
Put in a first pass as in the welds you have just completed. But this time on the second pass, deposit enough filler metal to entirely cover the first pass from one side to the other. Do this by manipulating the electrode in a wide circular motion. The circular motion should be counterclockwise.
If the molten filler metal seems to run or fall down from the top of the circle to the bottom, you can correct the fault by hesitating a split-second at the top of the circle.
This may not sound like the thing to do, but it's . Try it and see. By hesitating at the top, more metal is de posited there. Then as the arc speeds up toward the bottom of the weld, the puddle moves away and leaves the deposited metal frozen.
If the puddle is very fluid, the circular motion can be carried out forward like a long oval leaning backward (see ill. 34). This will make a little shelf to help hold the deposit metal in position.
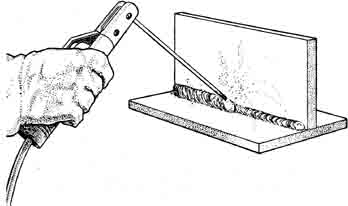
FIGURE 34—If the puddle is very fluid, the circular motion can be carried
out forward like a long oval leaning backward.
Prev: Oxy-Acetylene
Cutting
Next: Corner Welds