In this section you will learn about corner welds. A corner weld is actually
a small fillet weld but looks like and is very similar to a butt weld. It will
help you in the transition from fillet welds to open butt welds.
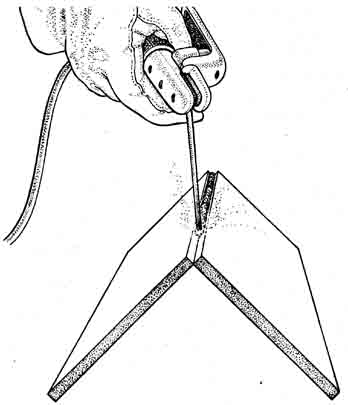
FIGURE 35—The first pass of a corner weld.
Use two pieces of flat plate, no less than 1/4 in. thick. Place the edges together so they just touch and the flat faces of the plates form a 900 “V”, ill. 35.
Tack the plates in this position. Then place the assembly on the grounded
work bench with the small “V” of the edges on the outside facing up.
AMAZON multi-meters discounts
AMAZON oscilloscope discounts
The corner can run either parallel to or away from the front edge of
the bench.
The important thing in this exercise is to learn to move the electrode on the first pass at just the right forward speed without burning through the edges and having the molten metal drop through on the under-side.
The First Pass
Use 1/8 in. electrodes at about 90 to 100 amperes, and proceed as follows:
(1) Point the end of the electrode straight into the bottom of the “V” groove and strike an arc.
(2) Hold the arc so the end of the electrode is just about 1/8 in. from the bottom of the groove and is leaning forward in the direction of travel 5 to 10 degrees.
(3) When the arc is well established begin to move at a slow, steady rate towards the opposite end of the groove, refer to ill. 36.
(4) Move the electrode at a rate so that the touching edges of the plate are just melted and the bottom of the molten puddle falls just a little bit beyond the corner.
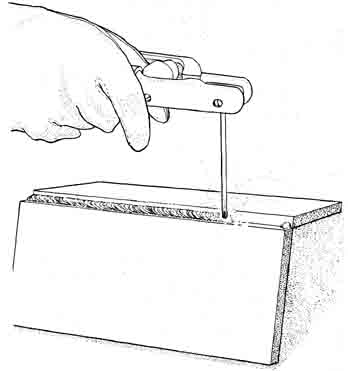
FIGURE 36—The end of the electrode should be about 1/8 inch above the
bottom of the groove. Move the electrode at a steady rate.
At first this weld will be difficult to make, but keep trying. A beginner usually moves too fast and does not let the puddle reach the bottom of the corner where the plates are touching, or else he moves too slow and the puddle falls through completely.
The correct combination of welding current, electrode position and travel speed to produce the desired amount of melt-through will produce a little hole at the leading edge of the crater right under the tip of the electrode.
This hole is sometimes called the “keyhole”. Learn to watch for and keep this keyhole opening without letting it get too large and causing you to loose control and burn through. The existence of the keyhole tells you that you are melting through to the backside of the groove. This is necessary if you want your weld to be as strong as possible. Refer to ill. 37.
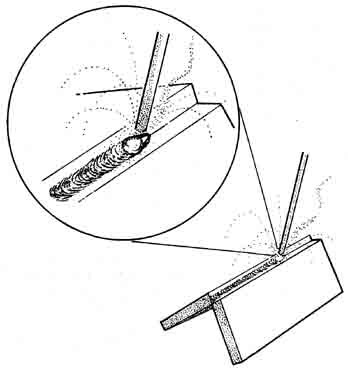
FIGURE 37—Watch for the “keyhole” when making a corner weld.
Practice until you can coordinate the melting and your movement so the puddle freezes behind the arc just before it would otherwise fall through the bottom of the bevel.
Remember that the heat input is a combination of time as well as temperature and BTU’s—also that the mass of the metal has an effect on melting. So if the metal at the bottom of the groove seems to be getting too hot and fluid, either move a little faster or weave the electrode slightly from side to side. This weaving action will direct more of the heat against the sides of the groove where the metal is thicker. If you burn through or a large gap is encountered, a combination whip and weave motion can be used to control the size of the molten puddle and the rate at which weld metal is added.
Whip ahead along one of the plate edges about 1/4 in. and whip back into the puddle to deposit more metal. Weave across the weld puddle to the opposite plate edge and again whip forward. Alternate plate edges for each forward whipping motion.
If the bottom edges of the groove don't seem to be heating and melting enough, keep the electrode directly in the bottom of the “V” and if necessary slow the forward movement.
Complete a good, smooth, well-penetrated first pass. Clean the weld with a chipping hammer and a wire brush, then look at it carefully. See if you can find the places where you went too slow or too fast. Try to decide from looking at the weld where you did well and where you did not do well.
Self-criticism is valuable when learning to weld.
The Second Pass
Now using the same size and type electrode and the same amperage, deposit a second pass over the first one.
ill. 38. The second pass should employ the weaving motion learned in Section 6 and used in Section 8.
Remember as you weave from side to side to hesitate on each side of the weld and to move fast across the center.
This would be a good time to review two important points that have been emphasized several times before:
(1) Get used to looking at the whole puddle, rather than at any part of it.
(2) Keep a slow, steady, even forward motion at a rate that melts both the sides and the bottom of the base metal, deposits the right amount of filler metal, and on freezing will weld the two pieces into one with the joint being as strong as each part.
After you have completed the second pass, clean it well and look it over carefully.
If you have undercut on the sides, it's probably because you did not hesitate long enough on the sides.
FIGURE 38—The second pass, using a weaving motion.
The Third Pass
The “V” groove formed by the edges of the plate will probably not be filled by two passes with 1/8 in. electrode (although it should be almost filled). So put in a third pass (see ill. 39) using the same size and type electrode and at the same amperage.
This third pass will be essentially like the second pass, but a little wider, so you will have to take more care to fill the edges by hesitating on the sides. Also, the forward motion will have to be slower because each movement of the weave from one side to the other will deposit more metal, and that takes more time.
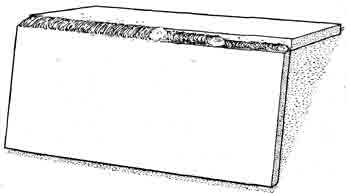
FIGURE 39—The third pass, using a wider weaving motion.
If the weld metal is piled high in the center of the groove it's probably because you moved too slowly across the center.
If the ripples, or beads, are rough and irregular it's because the forward movement of the electrode was not steady and even enough.
At the completion of the third pass, clean the weld and look it over carefully.
Now to test the quality of the weld, put the weldment in a vise (as shown in ill. 40) and press the plates together until they meet. Look at the weld to see if it has separated in the center or has pulled away from either plate. It should not separate or pull away.
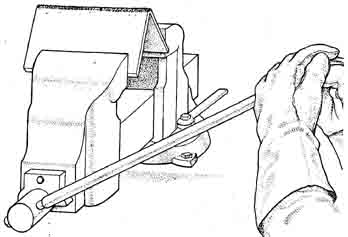
FIGURE 40—The weld should not separate or pull away when tested like
this.
More Practice
The plates you have been using to make your first corner weld can be used again for practicing additional corner welds.
Mark the plates just beyond the weld and cut the weld from both pieces. Set up the pieces of plate as before and make another weld.
Profit by your mistakes and make the second weld better than the first one.
When this second weld is completed, place it in a vise (as shown in ill. 41) and press the two plates apart so as to flatten the assembly. Then look at the under-side to see if there are cracks or unfused areas. The weld metal should be sound and solid, and well fused with both pieces of plate.
Make several more welds of this type, practicing carefully to improve your technique. As you practice you will be able to see and understand more of what goes on in the weld puddle. As you see and understand more, you will be better able to control the puddle.
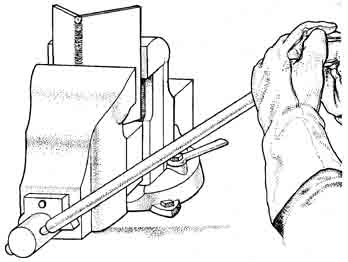
FIGURE 41—The broken weld should have no cracks or unfused areas.
Prev: Fillet
Welds
Next: