While the attic needs insulation more than any other part of the house, exterior walls are next in importance—for comfort and for economy in energy use in most climates. The best time to insulate these walls is during construction, when batts are easily installed between structural members, but the job can be done later. The kind of insulation you use and where you install it depends on how your wall is constructed and whether you prefer to work on the inside or outside of the house.
The walls of a frame house are insulated from the inside, for example, by removing wallboard or other paneling and installing batts of insulation between the studs, but it is generally easier to open part of the wall and stuff it with loose fill. This method works, of course, only on houses constructed in the standard way, with a wood frame and studs that leave air spaces between exterior and interior wall surfaces. If the wall is masonry, put up panels of polystyrene insulation. Even a cavity wall contains obstructions—fire stops of horizontal pieces to block the spread of flames, as well as plumbing pipes, heating ducts and electrical wires. In many case it may be necessary to cut into the wall at several places to fill it completely.
Walls with brick or metal siding o side are best filled by drilling from inside, since the damage done by drilling out side would be difficult to repair. If you have a wood clapboard or shingle siding, however, cut holes from the outside, force in insulation, then replace the removed sections.
loose fill of rock wool or chopped cellulose is ordinarily used, blown into the cavities with a special machine that can be rented from a building-supply firm or insulation contractors. The cavities also can be filled with plastic foam, but this method requires a professional, since mixing the foam and selecting the right installation pressures are critical operations. Even if you do not apply the insulation, you still may save money by drilling the holes yourself; ask the con tractor. Some foam compounds may be fire hazards and should be installed ac cording to local building codes.
If you live in an older frame house, there may be spaces between the studs from the attic down to the basement. Simply close the holes in the basement and drop loose insulation down from the attic to fill the cavities.
If you use loose-fill insulation, make sure there is a vapor barrier between it and the interior of the house to prevent inside moisture from condensing in the insulation and ruining it. Foam insulation makes its own vapor barrier. The easiest way to provide a vapor barrier is to coat the inside walls first with glossy oil-base enamel, which will seal the wall, then with alkyd paint. At the same time, all cracks around windows, doorframes, baseboards and electrical outlets must be caulked.
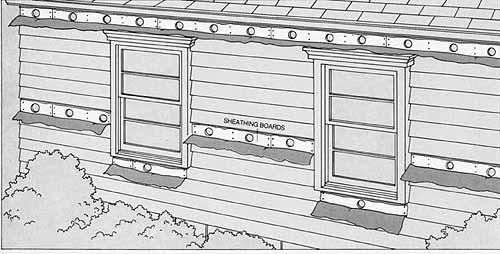
Preparing a wall for insulation. Remove strips of clapboards
or shingles at several points on the house, then cut holes through the sheathing
boards into the wall cavity. Begin by taking off the top row of siding all
around the house. For a two-story house you must also remove a strip of
siding near the ceiling of the first floor. You can identify this strip
by drilling a hole with an extension bit all the way through the wall from
the inside. Patch the holes later. You also must remove siding below windows and be low obstructions within the wall such as fire stops—lengths of 2-by-4s
that are nailed horizon tally between studs. Such obstructions can be located
with the test described overleaf.
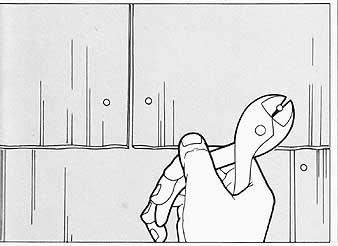
Removing shingles. To dislodge a wood shingle, follow the
instructions for removing a wood roofing shingle. To remove asbestos shingles,
which have exposed nails, cut off nailheads with diagonal cutting pliers, and lift the shingles away from the wall to free them from the remaining
nail stubs, then slip them down and off the wall. Pull the nail stubs out
of the wall with pliers. Remove a row of shingles, then with a utility knife
make one horizontal cut in the building paper at the top of the opening and fold it down to expose the sheathing underneath.
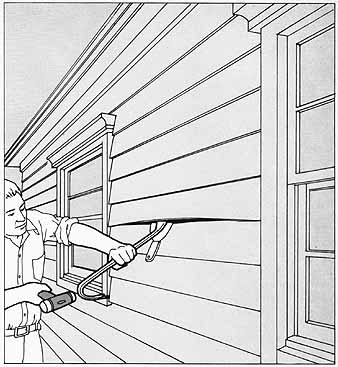
Removing a clapboard. With a mallet, gently tap a wide-blade
putty knife into the joint below the clapboard you wish to remove. The clapboards
will clamp the putty knife in place while you tap a pry bar into the same
joint over the putty knife, which protects the wood beneath. Gently pry
up the clapboard ¼ to ½ inch, then remove the pry bar and knife and tap
the clapboard back against the wall. This will reveal the location of a
clap board nail. If you have pried directly under a nail, you can pull the
nail with the pry bar. If not, re peat the process below the nail and every
16 inches along the wall until you have removed all the nails in a section
of clapboard.
Use the putty knife to break the skin of paint along the upper and lower clapboard joints, then pull downward on the clapboard to remove it.
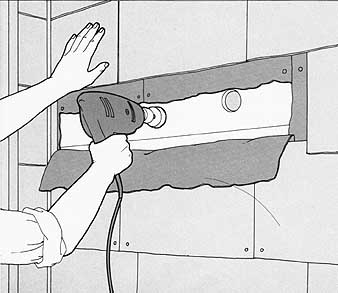
Cutting the holes. Make holes through the sheathing midway
between each pair of studs—the location of the nails in the sheathing reveals
where the studs are. Cut each hole large enough to admit the nozzle of your
blowing equipment—2 or 3 inches in diameter—using a hole saw or a circle
cutter in an electric drill.
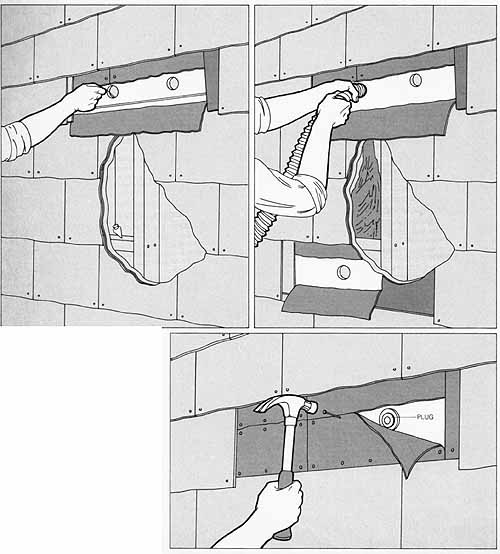
Plumbing the cavities. Before blowing in the insulation. drop
a plumb bob on a line through each hole to check for braces, fire stops
or other obstructions. Drill another hole below each obstruction so the
entire cavity from roof to bottom plate can be filled with insulation.
Blowing in insulation. Insert the nozzle and hose from the blower through the hole and down into the cavity. Gradually fill the cavity with insulation from the bottom up, slowly pulling out the hose as you progress. Tip the nozzle up before with drawing it, to fill space above the hole.
Restoring the wall. Close each hole in the sheathing with a tight-fitting plug. Plastic plugs that snap into place, available in stores that sell insulation to contractors, are the most convenient device to use. Staple the building paper back in place and reposition the siding, making sure that the bottom edges line up. If the siding is asbestos shingle or wood clapboards fasten with galvanized nails hammered through the original holes. Nail wood shingles through the bottoms of the shingles in the course above.
- Intro
- A Guide to the Complexities of Insulation
- Where to Insulate a House
- How Much Insulation Do You Have?
- Getting insulation into Finished Walls
- Some Pros and Cons of Insulated Siding
Next: Some Pros and Cons of Insulated Siding