AMAZON multi-meters discounts AMAZON oscilloscope discounts
Goals:
- Understand the importance of performing various engine maintenance procedures
- Describe procedures for storing a power equipment engine
INTRODUCTION
In this section, you'll learn the importance of scheduled maintenance as well as engine maintenance procedures. What are the benefits to having power equipment engines serviced and maintained on a regular basis? Technicians are frequently asked this question. Peak performance from a power equipment engine requires that each part be correctly adjusted and in good working condition. An experienced technician knows that if a part isn't functioning correctly, it can affect the performance of other related parts and the performance of the machine or implement. For example, a spark plug that doesn't fire when it should affects the power output of the engine. Spark plug failures can be caused by normal wear, an electrical system malfunction, or fuel system problems. Scheduled servicing ensures that marginal and out-of-tolerance parts are routinely corrected.
Many service shops use the word tune-up when referring to particular service procedures in maintenance of power equipment engines.
You'll find that it means different things to different people. Some power equipment engine owners assume that certain items will be serviced during a routine tune-up, when in fact a tune-up may not include that level of service.
A fairly common customer misconception is that a tune-up automatically includes carburetor overhaul service. Some shops may include this in a tune-up, but most don't. Again, some service shops adjust valves in a four-stroke engine during a tune-up, whereas others don't include this in a tune-up. Most shops consider this level of repair to be a separate service. The difference in what shops provide during a tune-up is one of the main reasons that you'll find a wide range of prices for maintenance service.
There's an important point that requires emphasis. You, as a power equipment engine technician, should encourage users to adopt a policy of routine periodic service inspections for their engines. Scheduled maintenance ensures trouble-free operation of the engine and the machine it's powering, as is a complete pre-run inspection each time the engine is used.
----------
Table 1: Maintenance Schedule
(1) For commercial use. log hours of operation to determine proper maintenance intervals.
(2) Service more frequently when used in dusty areas.
(3) Change engine oil every 25 hours when used under heavy load or in higl ambient temperatures.
(4) These items should be serviced by an authorized Honda servicing dealer, unless you have the proper tools and are mechanically proficient. Refer to the Honda shop manual for service procedures.
* See your equipment manual or Honda engine shop manual.
Failure to follow this maintenance schedule could result in non-warrantable failures
-------------

Table 2: Typical Engine-Maintenance Schedule
Daily or before starting engine
Fill fuel tank
Check oil level
Check air cleaner, clean as necessary
Check air intake and cooling areas, clean as necessary
Every 2 months or 25 hours
Service air cleaner element (if not equipped with precleaner)
Change oil and filter
Remove blower housing and clean cooling areas
Check all fasteners are in place and
components are properly secured
Replace fuel filter
Annually or every 100 hours
Replace fuel filter
Every 2 years or 200 hours
Check spark plug condition and gap
Have Bendix starter drive serviced
Every 200 hours
Have valve lash checked/adjusted
Table 3: Typical Engine-Maintenance Schedule
Procedure
Change oil
Check oil level
Clean cooling finns
Change oil
Clean foam pre-filter
Replace paper filter
Check spark plug
Replace spark plug
Interval
After first 2 hours (when engine is warm)
Every 5 hours or before each use
Every 5 hours or before each use
Every 25 hours or 3 months
Every 25 hours or 3 months
Every 100 hours or seasonally
Every 100 hours or seasonally
Every 200 hours or seasonally
MAINTENANCE INTERVALS
All manufacturers recommend that power equipment engines be serviced at specific time intervals. The suggested maintenance intervals are listed in the owner's manual to help remind owners and in the service manual to help technicians set up a realistic and appropriate maintenance schedule. Many power equipment engine owners have a vehicle tune-up every spring, even though it may not be necessary. This is because if a power equipment engine owner had had a full scheduled maintenance completed in spring but used the engine only a couple of times over the year, the engine won't need a full maintenance the following spring.
To ensure maximum performance, a technician should check parts for wear and perform needed adjustments during specific service inspections.
This allows technicians to alert owners if minor or even major repair work is required. If caught in time, this process can potentially eliminate many serious mechanical failures, benefiting both the owner and the technician.
In a service environment, it'll be important for you to convey to engine owners the results and findings of a routine service inspection in a way that generates confidence in your ability.
If, for example, during the inspection, you find a defective part, you should be able to provide the owner with an accurate assessment of the problem and an estimate of what it will cost to correct.
Tables 1 through 3 provide examples of typical engine maintenance intervals as they would appear in an owner's manual. You should note that the maintenance schedules you'll see in many manuals are based on average-use conditions. Machines that are subjected to severe usage would require more frequent servicing than what is listed in the service or owner's manual.
As you can see from these suggested maintenance intervals, different procedures are recommended at different times. Always keep in mind that if a machine is being used under harsh conditions, such as extreme heat or dust, you'll need to perform certain maintenance procedures more frequently.
Maintenance Process Order
The adjustments and repairs related to power equipment engine maintenance can be completed in any order the technician chooses.
However, you'll find that a standard routine, applicable to servicing every type of engine, will help you do the job more efficiently.
All technicians will adopt and practice a routine or system that works best for them. It's best that you adopt a structured approach that fits your unique requirements. The important thing is to get into a fixed routine so that your service technique isn't "hit or miss" but structured and complete.
POWER EQUIPMENT ENGINE MAINTENANCE
As a power equipment engine technician, you'll need to perform engine service and maintenance, including cleaning, adjusting, and replacing parts. This will ensure that parts meet the manufacturer's specifications.
Although it's likely that the engine will be attached to some sort of machine, we are concentrating only on the engine here. In addition, certain tests may need to be performed, such as compression and leak-down tests, to ensure that the engine internals are operating properly. Shown in the following list is maintenance of parts and systems that are subject to dirt, wear, and/or vibration. They should be carefully inspected (and replaced or adjusted as necessary) when you're performing an engine service.
Oil and oil filter replacement
Cooling system inspection
Valve inspection and adjustment (four-stroke engines)
Spark plug inspection and replacement
Battery inspection
Ignition system inspection and adjustment
Idle and fuel screw adjustment
Air filter inspection and cleaning
Good Maintenance Begins with a Clean Machine
The first step in performing quality maintenance on any power equipment engine is to start with a clean vehicle. It's important that dirt and other foreign material don't contaminate the internal working parts of the engine. Use soap and water or a commercially available degreaser to clean the exterior of the engine. Clean power equipment engines are also easier to work on and look better. Always wipe down the external parts of the machine after you have worked on it to remove any fingerprints that may have been left behind. You can be assured that customers will notice and appreciate the fact that they have received their machine back after a service cleaner than when it came into the service shop.
Oil and Oil Filter Inspection and Replacement
In the case of four-stroke engines, engine oil changes are among the most frequent services provided at any power equipment engine repair facility. In the case of two-stroke engines, maintenance is required with the upper-engine lubrication system, although the only requirement here is to be certain that there's a correct ratio of oil to fuel with the premix-type lubrication system. For an oil-injection lubrication system, you must verify if there's an adequate supply of two-stroke oil in the oil reservoir.
Four-Stroke Oils and Oil Filters
Four-stroke power equipment engines use the same oil to lubricate all of the engine's internal components. These engines usually have only one drain plug for removing the oil from the engine's crankcase (FIG. 1). In many small power equipment engines, the oil is drained out the oil fill hole by simply tipping the engine up onto its side.
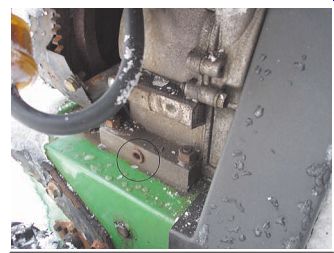
FIG. 1 The drain plug for a four-stroke engine is generally at the bottom
of the engine crankcase.
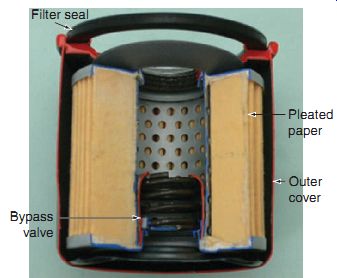
FIG. 2 A cutaway view of a cartridge-type oil filter.
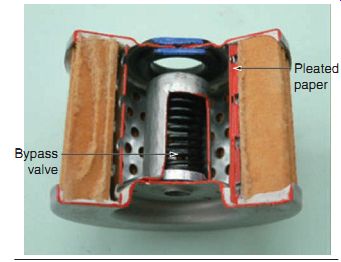
FIG. 3 A cutaway view of an element-type paper oil filter.
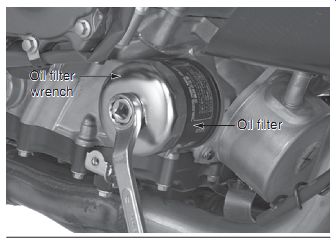
FIG. 4 A typical oil filter wrench being used to remove a cartridge-type
filter. Copyright by
Many larger engines have an oil filter that should also be replaced when the engine oil is changed. Paying close attention to the oil filter is just as important as changing the engine oil.
The oil filter traps and contains most of the dirt and contaminants that the engine has released into the engine oil. If the engine oil is replaced without replacing the oil filter, the engine will filter new oil through a dirty filter, which may contaminate the oil and cause it to lose its effectiveness much sooner than it would have had a new filter been installed.
The most common types of power equipment engine oil filters are the cartridge-type paper filter (FIG. 2) and the element type paper filter (FIG. 3). Both filter types use an oil pressure bypass valve to allow oil to pass through the filter even if the filter itself is so dirty that oil can't pass through it. The idea behind the use of a bypass valve is that dirty oil is better than no oil at all! The cartridge-type filter is removed and installed using an oil-filter wrench. The wrench is designed to grasp the outside of this type of filter, as shown in FIG. 4.
The element-type filter is removed by first removing a filter cover (FIG. 5). Then, the oil filter is removed. Reference the service manual for the specific model you're working on for the proper assembly procedure. It's critically important that you correctly install the new oil filter, springs, washers, and seals. If installed incorrectly, this type of oil filter will not pro vide proper engine oil filtering. In a worst-case scenario, the filter could prevent the oil from reaching the engine components, which would cause major engine damage.
Checking the Oil Level
When you're checking the oil level of a power equipment engine, be sure the unit is in an upright position, on level ground. If the oil is checked incorrectly, the oil may appear to be low or high because of the tilt of the engine.
Generally speaking, the most popular method of checking the oil level uses a dip-stick (FIG. 6). This method is similar to that in an automobile. In most cases, the dip-stick has a screw attachment. Check the manufacturer's recommendations for checking the oil level with a screw-in type of dip-stick. Also note that incorrect use of the screw-in type of dip-stick may yield an incorrect reading (FIG. 7). Another method of checking the level of oil in smaller engines involves checking if the oil level is up to the filler cap on the engine.
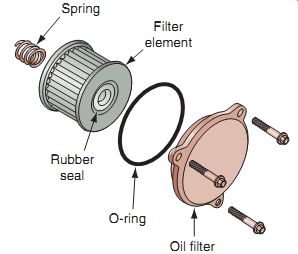
FIG. 5 An element-type paper filter is held in place by a filter cover.
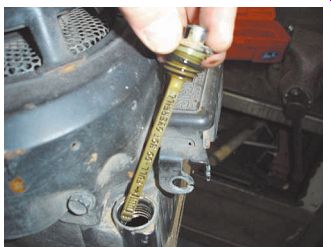
FIG. 6 Generally speaking, the most popular method of checking the oil
level in power equipment engines is by use of a screw- in dip-stick.
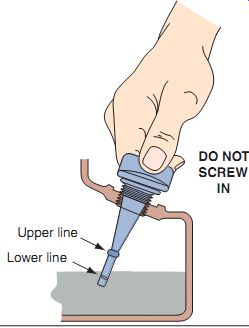
FIG. 7 As you can see in this illustration, if you were to check the
oil level incorrectly with a screw-in dip-stick, the oil level may appear to
be incorrect.
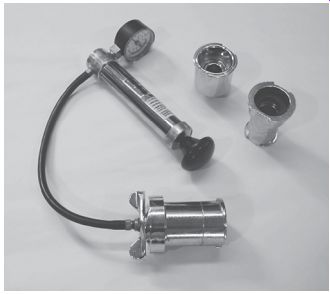
FIG. 8 A typical cooling system pressure tester. This tool checks for
leaks in hoses, pipe connections, radiator, and water pump.
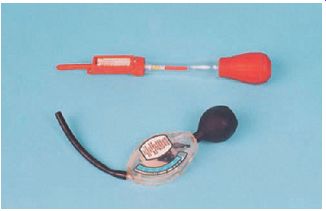
FIG. 9 A hydrometer is used to check if the mixture of coolant and water
is correct.
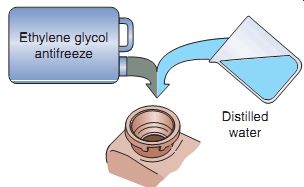
FIG. 10 A 50:50 mixture of the manufacturer's recommended coolant and
distilled water should be used in all power equipment engines that use liquid
cooling.
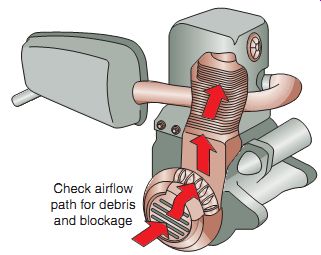
FIG. 11 An air-cooled engine must have its cooling fins open to air.
In most power equipment engines, cooling fins must be checked regularly, especially
when the engine powers implements such as a lawn mower.
Cooling System Inspection
Liquid-cooled power equipment engines can be pressure tested for leaks with a cooling sys tem pressure tester (FIG. 8) to ensure that the system holds the test pressure for a specified length of time.
Each manufacturer provides specifications for cooling-system pressure capabilities. If the system fails the pressure test, you should check hoses, pipe connections, the radiator, and the water pump for leaks. The water pump has a mechanical seal to separate the engine oil and the coolant. This seal is a common cause of failures in a liquid-cooled system. Most water pumps have a "telltale hole" on the bottom of the pump. Coolant will leak out of this hole when the mechanical seal has failed, which will require that the pump be replaced. When checking the cooling system, the coolant should be checked with a hydrometer (FIG. 9) to verify that it has a correct mixture of cool ant and distilled water (FIG. 10). Cooling systems should also be serviced on a periodic basis, which is provided by the manufacturer.
Most agree that liquid-cooling systems should be flushed once every 24 months. Flushing a cooling system consists of draining the coolant, running water through it, and filling it with the correct mixture of coolant and distilled water.
Air-cooled engines need to have clean cooling fins. The forced-air cooling systems used in most power equipment engines should be inspected on a regular basis (and also after any long-term storage) as debris can build up under the engine shrouds (FIG. 11) and cause overheating.
Field mice and other small rodents have been known to build their winter homes inside these types of engine housings!
Compression and Leak-Down Tests
Compression and leak-down tests provide a good indication of the general condition of an engine's piston, rings, and cylinder area.
Compression tests are performed on both two stroke and four-stroke engines.
Compression Test
A compression test ensures that the engine compression is high enough to heat the fuel-air mixture to a combustible level inside the engine's combustion chamber. To perform a compression test, remove the spark plug(s); then, using the compression gauge (FIG. 12), measure the compression of each cylinder while the engine's crankshaft is being rotated rapidly by the starting device (electric starter or the pull starter). The recommended compression reading will be found in the appropriate manufacturer service manual. It should be noted that some engines have compression releases to aid in starting and may give a lower reading than when not activated. Manufacturers will inform you through their service manuals if there are different specifications for compression readings, or if compression releases should be removed when checking for compression.
If the compression is below recommendations, there may be possible worn parts within.
Always remember to hold the throttle control in the wide-open position when checking engine compression, to allow the maximum amount of air to be drawn into the engine. If the throttle isn't held open, the compression reading will almost always read too low.
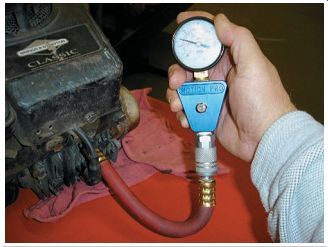
FIG. 12 A typical compression gauge attached to a cylinder.
Unfortunately, the results of a compression test can be deceiving. For example, if you don't turn the engine fast enough, or if the testing procedures aren't correctly followed, the compression test may indicate that the engine should be disassembled and rebuilt, when the engine is actually in good working condition.
When the compression test has been per formed correctly and compression appears to be outside specification, you'll need to consider other factors. If the compression readings are all below the service limit but the readings for all cylinders are relatively close and the engine isn't smoking and is running okay, the compression test by itself is seldom a good reason to disassemble the engine and do an expensive engine rebuild. However, if the compression readings for the cylinders of a multi-cylinder engine vary more than 15%, there's a good possibility that the engine has a problem that will need extensive repair work.
Leak-Down Test
Leak-down tests are performed on four stroke engines. A leak-down tester consists of a calibrated pressure gauge that's connected to a pressure regulator, a pressure source, and a flow restrictor (FIG. 13). As a general rule, a leak-down test provides a better indication of any internal engine problems than a compression test. Leak-down tests are obtained by pressurizing the cylinder with compressed air when the piston is at top-dead center (TDC) on the compression stroke. When this is done, a measurement of the rate at which the air escapes past the rings, piston, and valves is completed.
A range of acceptable percentages of air loss is provided by the leak-down tester's manufacturer. Note that the crankshaft will rotate when performing a leak-down test, and caution should be taken when holding the crankshaft from turning.
A key benefit of using a leak-down tester is that it tells you not only that there is a problem but also where the problem is located. By listening for escaping air at the air filter, the exhaust system, and engine crankcase filler-cap, you can determine if the problem is being caused by the intake valves, exhaust valves, or the piston and rings. Leak-down testers are available at most quality automotive tool suppliers.
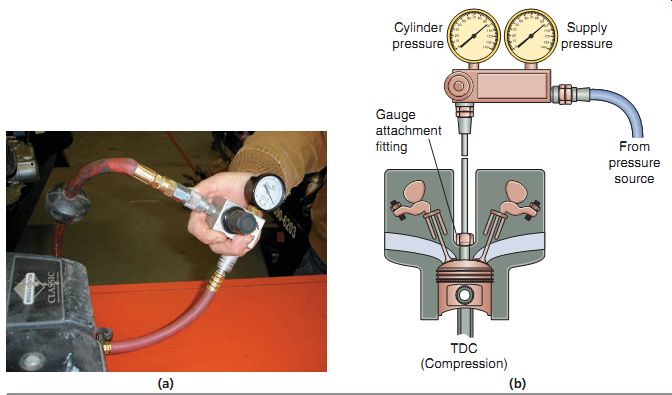
FIG. 13 When used correctly, leak-down testers can give the technician
a good understanding of any internal engine problems.
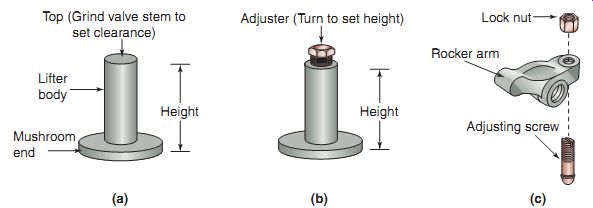
FIG. 14 The most common types of valve adjustment methods.
Valve Adjustment (Four-Stroke Engines)
Nowadays, power equipment engines generally have a four-stroke engine. The valves in four-stroke engines should be inspected for proper adjustment at specific intervals. Valve clearance (lash) is necessary to allow for proper valve sealing. When valves aren't properly adjusted, engine performance may be affected.
In most cases, the manufacturer will require that the valves be inspected for correct clearance when the engine is at room temperature.
Valve Adjustment Methods
There are different ways in which manufacturers adjust valves in a four-stroke power equipment engine (FIG. 14). Note that the piston associated with the valves must be at top-dead center on the compression stroke (TDCC) in order to correctly inspect valves for proper clearance.
The screw and lock nut uses a screw that can be turned in or out to change the clearance.
After the adjustment has been made, a lock nut holds the screw in place. The screw and lock nut may be located on the rocker arm, on a push rod, or on a valve lifter.
Some valves (generally in L-head designs) are adjusted by grinding the tip to allow for more clearance.
Some larger power equipment engines may use hydraulic-valve lash adjusters that automatically adjust for proper valve clearances by using oil pressure to maintain zero lash at all engine temperatures and rpm. Such hydraulic valves require no maintenance.
Valve Adjustment Specifications
The service manual has the manufacturer's recommended specifications for valve adjustments. Do yourself a favor: Don't try to remember these specifications, and refer to the manual each time they're needed. There are too many different engines for you to remember the specifications of each one. You may easily confuse the specifications of one model with those of another.
Spark Plug Inspection and Replacement
In some engines, the spark plug is one of the easiest components to access during maintenance, whereas in others, it may be among the most difficult components to access. The spark plug is generally located in the center of the cylinder head combustion chamber.
Spark Plug Removal
Before you remove the spark plug, be sure to always remove any loose dirt or debris on the cylinder head, near or around the spark plug. It's important to prevent any dirt from getting into the engine through the threaded hole in the cylinder head. If the engine had been in operation just before spark-plug removal, always allow the engine to cool before attempting to remove the spark plug. Engine heat causes the cylinder head and the spark plug shell to expand. If you try to remove the spark plug before the engine has cooled, it may seize, and removing it could dam age the cylinder-head threads. When the engine and spark plug have cooled sufficiently, the plug will be much easier to remove and there's less chance of damaging the cylinder head.
To remove the spark plug, use the correct sized spark-plug socket. We had mentioned in an earlier section that a spark-plug socket is a special socket wrench that's specifically designed for removing and installing spark plugs (FIG. 15). The spark-plug socket has rubber inserts that protect the spark plug's ceramic insulator. The depth of the socket allows it to fit over the top of the spark plug to reach the hexagonal area of the shell. If a spark plug is tightly mounted on the cylinder head, the plug must be carefully removed to prevent it from breaking.
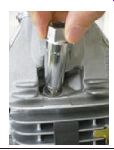
FIG. 15 A spark-plug socket is a special socket wrench that's specifically
designed for removing and installing spark plugs.
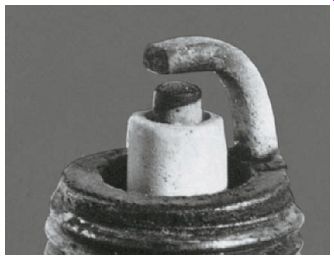
FIG. 16 A spark plug in normal condition.
Note that the bottom surface of the center electrode is flat and the surfaces of the lower electrode are squared. Federal Mogul Corporation.
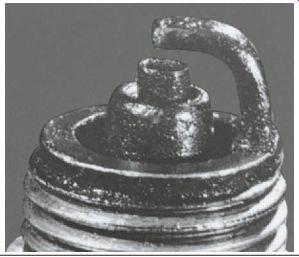
FIG. 17 Oil fouling causes the plug to be saturated with shiny oil deposits.
Federal-Mogul Corporation.
Spark Plug Inspection
After the spark plug has been removed, inspect it to determine its condition. The condition of a spark plug can tell you much about how an engine is operating. Many experienced power equipment engine technicians begin their troubleshooting process by removing and inspecting the spark plug(s).
When inspecting a spark plug, be sure to check the condition of the ceramic insulator.
A damaged insulator can cause a spark plug to fail intermittently. This type of intermittent misfiring problem can be difficult to diagnose.
It's a good idea to start with the spark plugs when you're trying to isolate an intermittent problem. You should also check for the following issues.
You should first verify that the spark plug is the correct type for the engine. You can do this by referring to the service manual for the engine you're working on. After you've determined that the plug is correct, you should check the condition of the electrodes. Let's take a look at some of the most common spark plug conditions.
Normal Spark Plug
FIG. 16 shows a used spark plug in normal condition removed from a properly operating engine. Note that the bottom surface of the center electrode is flat and the surfaces of the lower electrode are squared. The electrodes are an ashy gray or light tan color, from normal fuel combustion.
Note also that there is no buildup of contamination on or around the electrodes.
Oil-Fouled Spark Plug
FIG. 17 shows an oil-fouled spark plug. Oil fouling causes the plug to be saturated with shiny oil deposits. In a four-stroke engine, an oil-fouled plug may indicate that the piston rings are not sealing the cylinder properly, or that the oil may be passing through the intake valve stem. A clogged crankcase breather can also cause oil-fouled plugs. Remember that a breather is a vent in the crankcase. Thus, a clogged breather prevents the crankcase from venting properly. Pressure builds up in the crankcase, which can cause oil to be forced up past the piston rings and into the combustion chamber. Any oil in the combustion chamber can foul the spark plug, especially if the compression in the cylinder is below specifications. Oil-fouled spark plugs are more common in two-stroke engines. Remember that in a two-stroke engine, the fuel and oil are premixed in the crankcase. Thus, oil fouling is a potential problem in any two-stroke engine.
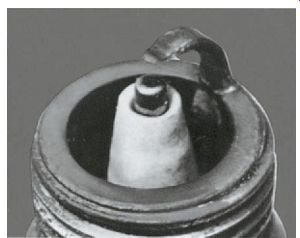
FIG. 20 A spark plug with an eroded electrode from normal long-term wear.
Federal-Mogul Corporation.
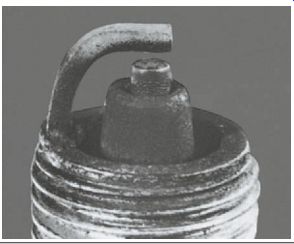
FIG. 18 A fuel-fouled spark plug has dry, black, fluffy carbon deposits
on the plug electrodes. Federal-Mogul Corporation.
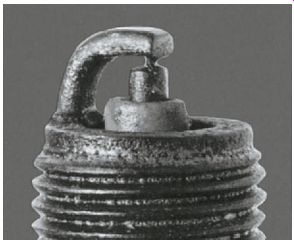
FIG. 19 A bridged gap is caused by carbon or oil deposit buildup in the
spark plug electrode gap until the gap is closed. Federal-Mogul Corporation.
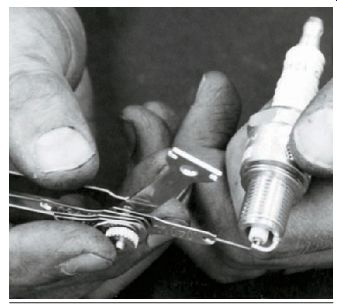
FIG. 21 Measuring spark plug end gap using a wired-end spark plug gap
tool.
Fuel-Fouled Spark Plug
FIG. 18 shows a spark plug fouled by excessive fuel. Fuel fouling is indicated by dry, black, fluffy carbon de posits on the spark plug electrodes. Fuel fouling is most often caused by prolonged operation with a fuel-air mixture that is too rich. This is usually caused by a fuel system problem, such as a dirty air filter. A blocked or faulty exhaust valve can also cause fuel fouling. An engine with the choke that's left on for too long an interval can also cause fuel-fouled spark plugs.
Bridged-Gap Spark Plug
Both oil fouling and fuel fouling can cause a spark plug condition known as a bridged gap (FIG. 19). In this situation, carbon or oil deposits build up in the spark plug electrode gap until the gap ceases to exist. A bridged gap prevents the spark plug from firing, resulting in an engine that won't start. Debris passing through the air filter and into intake port can also cause a bridged-gap.
Electrode-Eroded Spark Plug
After many hours of use, a spark plug electrode begins to erode. This is a normal condition of wear. When erosion occurs, the center electrode appears rounded and the side electrode has a curve on the inside surface (FIG. 20). Because the gap in such a spark plug is too high, the spark plug may not fire. In comparison, a new spark plug has electrodes with flat sharp surfaces.
Spark Plug Gap
The gap between the electrodes of a spark plug must be correct to ensure proper operation. Before you install a spark plug, you should measure the gap between the electrodes. The service or owner's manual for the engine gives the specified spark plug gap. The spark plug gap can be checked by using a wired-end spark plug gap tool (FIG. 21).
Spark Plug Cleaning
Never sand or file a spark plug electrode and then reinstall the spark plug in an engine. Using sandpaper or a file leaves tiny grooves on the electrodes. These grooves will either burn off or will collect deposits when the engine is operated. Sanding and filing also leave tiny particles of sand or metal on the electrodes. These particles can get into the engine's cylinder and cause serious damage.
Some spark plug manufacturers have produced small sandblasting machines designed to clean their spark plugs. However, there are power equipment engine manufacturers who strongly recommend against using these sand blasters, for the reasons we've just discussed. If you're ever in doubt about a spark plug's condition, simply replace it.

FIG. 22 To reinstall a spark plug, don't force it into the hole; hold
the plug with your fingers or with the correct spark plug socket, and gently
screw the plug into the threaded cylinder head opening.
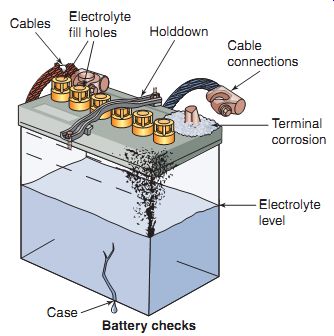
FIG. 23 A conventional battery with filler caps. When inspecting a battery,
look for typical battery conditions, such as ones illustrated here.
Note that maintenance-free batteries don't require electrolyte level inspection.
Spark Plug Installation
To reinstall a spark plug, hold the plug with your fingers and gently screw the plug into the threaded cylinder head opening (FIG. 22). Don't force the spark plug. The plug should turn at least three full turns into the cylinder head before it shows any signs of resistance.
When the resistance point has been reached, use a spark-plug socket to tighten the plug into the cylinder head. Be sure to tighten the spark plug with a torque wrench to the manufacturer's specifications.
Battery Inspection
While you should wear safety glasses anytime you're working on an engine, when it comes to batteries, you must take extra precaution. Battery acid can cause severe burns if it contacts your skin, and it damages clothing. If you accidentally spill any battery acid, the spill should be cleaned up immediately. Use a water-and baking-soda solution to clean the spill area.
This combination helps neutralize the acid.
First, a battery should be inspected for cracks in its casing, broken terminals, or other signs of physical damage (FIG. 23). This includes checking for sulfation or warping on the internal plates if the battery has a transparent outer casing. If any of these conditions is found, the battery should be replaced. You should also ensure that the battery cable connectors make good contact with the battery terminals. If the cable connectors or terminals are corroded or loose, clean and tighten the connections. Application of dielectric grease on the cable connectors and battery terminals helps prevent corrosion.
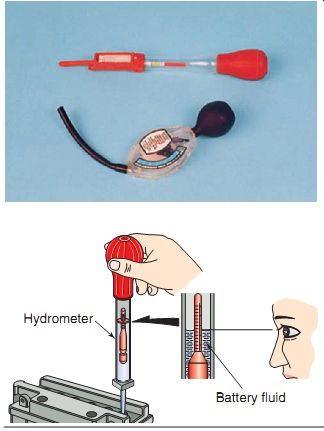
FIG. 24 Two types of hydrometers (top) and the way a hydrometer is used
(bottom).
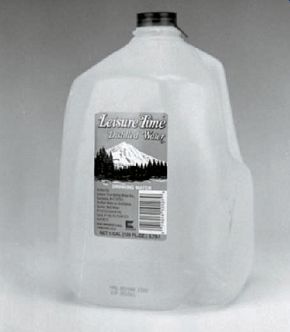
FIG. 25 If water level in a battery is low, replace with distilled water
only, and fill each cell to the upper level. Distilled water has all of impurities
removed and does not contaminate the sulfuric acid or the lead plates in the
battery. Distilled water can be purchased at any grocery store.
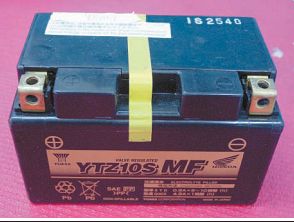
FIG. 26 A maintenance-free battery has no filler caps, and some, like
the one shown here, come from the factory pre-filled with acid.
Conventional Battery Electrolyte Testing
With conventional batteries, the condition of the battery is determined by measuring the specific gravity of the electrolyte. The specific gravity is measured with a hydrometer, as with a cooling system (FIG. 24). The electrolyte should have a specific gravity of 1.280-1.320 (depending on the temperature). As the battery becomes discharged, the specific gravity of its electrolyte decreases.
Conventional Battery Water Level
Remember that conventional batteries are filled with a sulfuric acid electrolyte solution. The acid is absorbed into the battery plates during operation, but the remaining water can evaporate. Look on the outside of the battery for the level in a conventional battery, if it has a transparent casing. If it has been determined that it's necessary to add water to a battery with a low electrolyte level, add only distilled water (FIG. 25). Distilled water should be used to prevent minerals and other impurities from contaminating the sulfuric acid and the lead plates in the battery.
Maintenance-Free Batteries
Many modern power equipment engines have MF batteries (FIG. 26). This type of battery does not require fluid level checks because the battery is sealed. If this type of battery fails to hold a charge, you may replace it. Before replacing a maintenance-free battery, however, the charging and regulating circuits should be thoroughly tested.
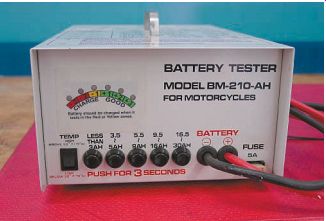
FIG. 27 A battery load tester places a load on a battery to check its
ability to withstand current flow through it.
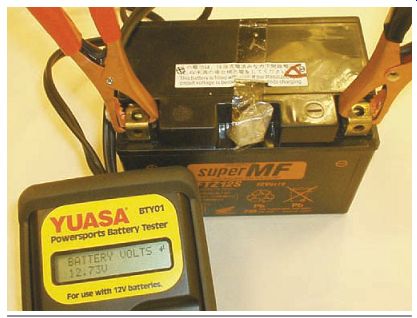
FIG. 28 Battery conductance analyzers are becoming more popular in the
motorcycle industry due to their ability to more accurately tell us the condition
of the battery.
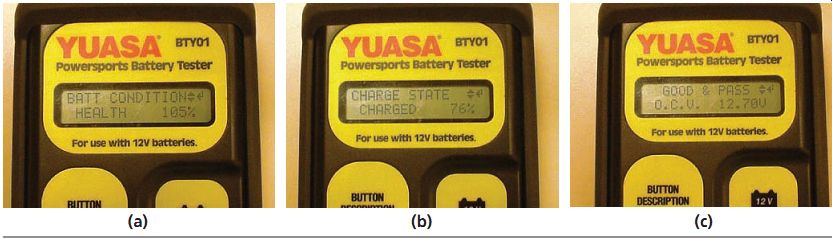
FIG. 29 A conductance battery tester gives information such as (a) the
state of health of the battery, (b) the battery's state of charge, and (c)
if battery condition is good or bad.
Battery Testing
Due to the high quality of today's batteries and the technology that's built into them, in most cases, a battery should not be tested unless a specific request to do so was made or an issue was reported that may be battery related. In the past, and even in some cases today, a battery would be tested for its ability to hold a charge by using a battery load tester (FIG. 27). A load tester tests the battery under a heavy electrical load condition (such as an electric starter) while it's out of the power equipment engine.
As we've discussed earlier, the power equipment engine industry is now beginning to use a tool that has been used in the automotive industry for some time now to measure the health of a battery (FIG. 28). A battery conductive analyzer determines a battery's ability to conduct current. It measures the battery plate surface available in a battery for chemical reaction. Measuring conductance provides a reliable indication of the battery's condition and is correlated to battery capacity. This type of tester can be used to detect cell defects, shorts, nor mal aging, and open circuits in a battery, all of which can cause the battery to fail.
A fully charged battery has a high conductance reading, up to 110% of its internal rating.
As a battery ages, the plate surface sulfates or sheds active material, which lowers its capacity and conductance.
The conductance tester displays the service condition of the battery. It indicates if the battery is good, needs to be recharged and tested again, has failed, or will soon fail. In addition to giving a state of charge, this type of tester shows a state of health as well. (FIG. 29).
Ignition System Inspection and Adjustment
Ignition of fuel must occur at the proper time during the compression cycle for an engine to develop full power. Because the fuel takes some time to start burning, the spark must occur shortly before the piston starts the power stroke.
In virtually every engine, the ignition spark occurs when the piston is still moving upward on the compression stroke. Power equipment engines have an optimum ignition timing set ting that's determined by the manufacturer.
This ignition timing setting is listed in the service manual for the engine. If the ignition timing differs from this optimum setting, the engine potentially loses its rated efficiency and power.
Most modern power equipment engines use non-adjustable electronic ignition systems.
These systems have the correct timing configured into the electronic components, which are fixed in one place on the engine. In some engines, a timing light, though not much used nowadays, may be used to verify proper ignition operation (FIG. 30). When it's attached to a spark plug, the timing light produces a flash of light each time the spark plug fires. The strobe effect of the timing light freezes the rotating timing marks. This allows you to observe and accurately adjust the timing of the ignition sys tem. However, in most cases, either the ignition system timing is correct or the electronic ignition system won't function at all. In these cases, component replacement is required to correct the problem. Because most electronic ignition systems use no moving parts, a timing problem is a rare occurrence with them. Older engines were designed with breaker-point ignition systems (discussed in Section 15), which allowed adjustment of the ignition timing as the points wore over time (FIG. 31). Engines with breaker points are adjusted with a feeler gauge.
Note that some engine manufacturers require the use of a dial indicator to properly locate the piston at a specific point before top-dead center (BTDC), in order to set the points.
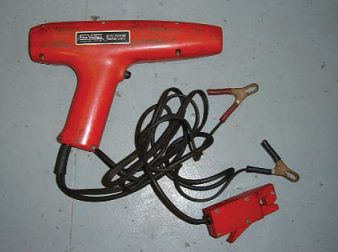
FIG. 30 A tool that isn't often used any longer due to the advent of
electronic ignition systems; the timing light can be used to verify the correct
ignition timing of an engine, by pointing its flashing light at the flywheel
while the engine is running.
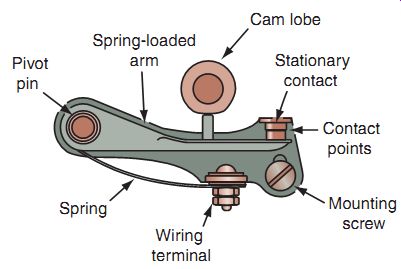
FIG. 31 In older engines, adjustable points are used to signal the spark
of the ignition system. As the crankshaft turns, a cam lobe opens and closes
the point contact.
A slot behind the mounting screw allows for adjustment as the points wear over time.
Idle and Fuel Screw Adjustment
Most power equipment engines have a manual idle speed adjustment (FIG. 32), which uses a lever directly mounted on or attached to (by means of a cable) a control arm that controls the throttle plate (FIG. 33). The latter allows for setting the engine idle speed (engine rpm) on the carburetor. Setting the fuel mixture screw(s) (FIG. 34) is also a critical adjustment to ensure that the engine runs optimally.
The base settings for these screws will be pro vided by the engine manufacturer and will be published in the appropriate service manual.
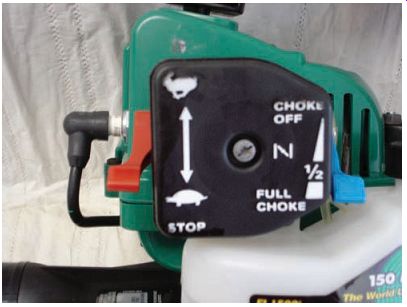
FIG. 32 Engine speed in many power equipment engines is controlled by
a manually adjusted lever.
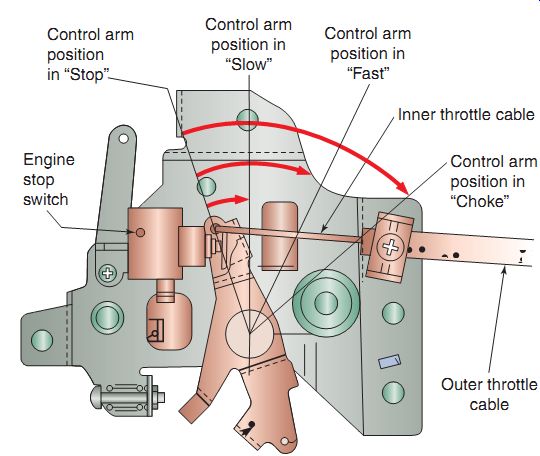
FIG. 33 A cable-operated control arm and its various positions.
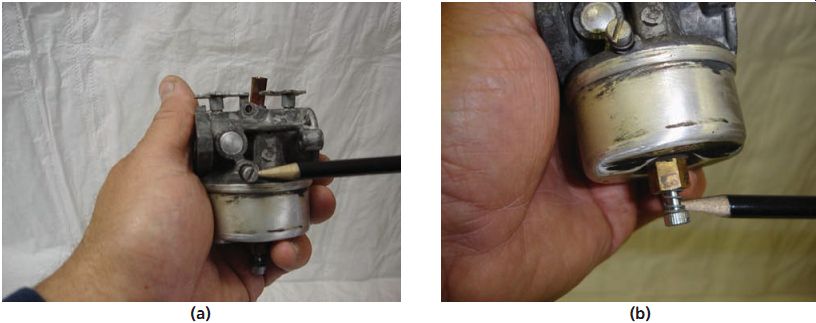
FIG. 34 Fuel mixture setting screws. (a) The low speed adjustment and
(b) the high speed control, which is handled by the screw under the carburetor.
These screws may be located on different parts of a carburetor, depending on
the type being used. Be sure to verify which screw does what by using the appropriate
manufacturer's service manual.
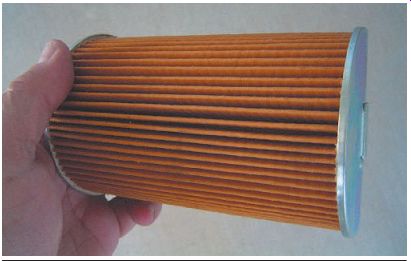
FIG. 35 A typical paper-type air filter with a pleated "W" pattern.
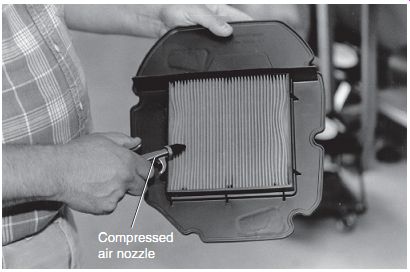
FIG. 36 Cleaning a paper filter with compressed air.

FIG. 37 Foam air filters are commonly found in power equipment engines.
Air Filter Inspection
Proper maintenance of the power equipment engine air filter is important. The air filter extends the life expectancy of the engine.
If dirt and other contaminants are allowed to flow through the intake system, the engine's internal parts will be damaged. Air filters are made of various types of materials.
Paper Air Filters
The paper filter consists of laminated paper fibers that are sealed at the ends or sides of the filter. Some paper air filters include supporting inner or outer metal screen shells. The paper used in these air filters is generally molded into a "W" pattern, as shown in FIG. 35. This molded "W" is designed to increase the surface area and to decrease the restriction of air passing through the filter.
The paper air filter must be kept dry and free of oil. If it becomes excessively dirty or contaminated with oil, it must be replaced. Don't try to clean a paper air filter with soap and water because this will damage the paper fibers and cause the filter to fail. Some manufacturers suggest tapping the paper air filter on a head surface to dislodge any loose debris or using compressed air to clean the filter, provided it's not excessively dirty (FIG. 36).
Foam Air Filters
FIG. 37 shows a foam-type air filter.
It uses a special foam and oil to trap dirt and other contaminants. Clean this filter in a warm, soapy water solution; then rinse and dry it ( FIG. 38). When the filter has dried, apply oil specifically made for foam air filters. The excess oil is then squeezed out of the filter before use. In some cases, foam filters are used in con junction with paper air filters as a pre-filtering device (FIG. 39).
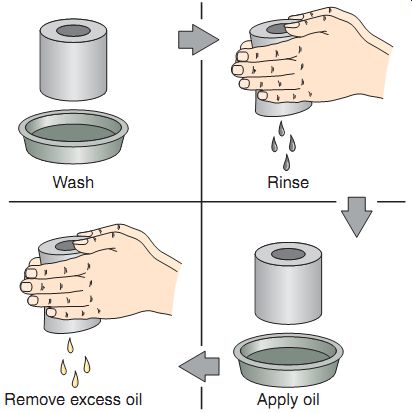
FIG. 38 The process of cleaning a foam air filter.
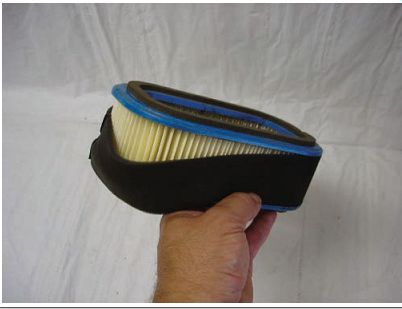
FIG. 39 In some cases, foam filters are used in conjunction with paper
air filters as a pre-filtering device.
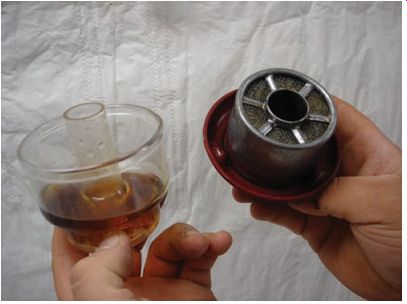
FIG. 40 An oil bath air filter directs incoming engine air over an oil
sump that catches dirt particles. This filter can be seen in older engines.
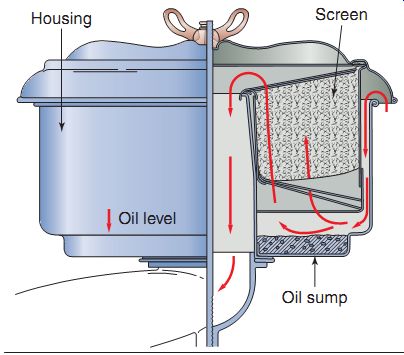
FIG. 41 The path that air takes to get into the engine when an oil bath
filter is used. Oil bath air filters are not used in newer engines as the oil
in the housing requires frequent service and the complicated air routing inside
the housing has very low air flow into the engine, which limits engine power.
Kohler Co. Oil Bath Air Filters
The oil bath air cleaner is a common type of air filter used in very old engines. An oil bath air filter directs incoming engine air over an oil sump that catches dirt particles (FIG. 40). Like other air filters, the oil-bath-type filter is mounted on the carburetor. All the air going into the carburetor must go through the filter first (FIG. 41). The housing is the main part of the oil bath air filter. The housing has air passages that direct the incoming air. Incoming dirty air comes on the top of the housing. It's then directed down the inside of the housing.
The housing passages cause the air to change direction and start back up the housing.
There is a small oil sump in the bottom of the housing. The air entering the housing is made to change direction over the oil. Dirt in the air is too heavy to make the quick turn; so it keeps going straight into the oil. The oil traps the dirt and the filtered air goes through an oiled screen.
Any dirt left in the air sticks to the oiled screen.
Filtered air then goes down the center of the housing and into the carburetor.
The oil bath air filters are not used on newer engines. The oil in the housing requires frequent service. The complicated air routing inside the housing limits the air flow into the engine, which limits engine power.
POWER EQUIPMENT ENGINE STORAGE PROCEDURES
When a power equipment engine is going to be stored for an extended period of time, you should take certain steps to reduce the chances of having storage-related problems. The need for proper engine storage needs to be emphasized to customers because one of the key issues that service shops see is improperly stored engines.
When not properly prepared for storage, the fuel can go bad and prevent combustion. When this occurs, fuel system cleaning is required, which can be expensive.
Preparing an Engine for Storage
To prepare a power equipment engine for storage, you should do the following:
1. Replace the engine oil and filter.
2. If the power equipment engine is liquid cooled, be sure that the cooling system is filled with the correct antifreeze solution. This prevents freezing of the cooling-system components.
3. Fill the fuel tank with fuel and add a fuel stabilizer. The fuel stabilizer prevents the fuel tank from rusting and the fuel from deteriorating during storage. Also, while you're servicing the fuel system, turn off the fuel petcock, if the engine has one. This will prevent fuel seepage into the engine during storage.
4. Drain the carburetor. To verify that all of the fuel is out of the carburetor float bowls, start the engine (choke in the On position) after the bowls have been drained. The engine will run for a brief interval as it consumes any remaining fuel. Fuel-injected power equipment engines don't need draining.
5. To prevent rusting in the cylinder, you need to remove the spark plug from each cylinder, pour a teaspoon of clean engine oil into the cylinder, and cover the spark plug hole with a piece of cloth. Crank the engine several times slowly to disperse the oil in the cylinders. Reinstall the spark plug.
6. Remove the battery and verify that it's fully charged. Store the battery in an area that's protected from freezing and direct sunlight. You should put the battery on a maintenance charger while it's in storage to prevent the battery from discharging.
7. Wash and dry the machine, including the engine, and then wax all of the painted surfaces. This will protect the vehicle while it's in storage, and will provide a clean, polished appearance when the vehicle is brought out of storage.
8. Cover the machine with a suitable cover and store it in an area that's free of excessive dampness, dust, and chemical fumes.
Removing an Engine from Storage
When you bring a machine out of storage, you should do the following:
1. Uncover and clean the machine.
2. Change the engine oil if the machine was stored for more than 4 months. This should be done even if the engine oil was changed prior to storing the engine, as it can break down over time when sitting in an engine.
3. Charge and reinstall the battery as appropriate.
4. Start the engine and run it at a low rpm to verify that everything is operating correctly.
Understanding the importance of scheduled maintenance intervals for an engine is important to be a successful power equipment engine technician. Peak performance from an engine requires that each part be in good working condition and correctly adjusted.
As a technician, you'll perform engine service, including cleaning, adjusting, and replacing parts to ensure that parts meet the manufacturer's specifications.
When a power equipment engine is going to be stored for an extended period of time, proper storage procedures should be followed. This reduces the chances of having any problems when the machine is removed from storage.
QUIZ
1. If you should accidentally spill battery acid, what should you use to neutralize it?
a. A nonflammable household cleaner
b. A water and baking soda solution
c. Water
d. Baking soda
2. What type of test will provide the best indication of any internal engine problems?
a. Compression test
b. Leak-down test
c. Load test
d. Bench test
3. Which type of air filter is least commonly used in modern power equipment engines?
a. The foam air filter
b. The oil-bath-type air filter
c. The gauze-type air filter
d. The paper-type air filter
4. A spark plug with carbon or oil deposits that block the gap between the center and the side electrodes is known as having a ___.
5. Power equipment engine manufacturers recommend that their machines be
a. serviced at specific time intervals.
b. serviced every 4 months.
c. serviced when they no longer run properly.
d. tuned-up at least once a year.
6. What is used to replenish a low conventional battery?
a. Tap water
b. Baking soda
c. Sulfuric acid
d. Distilled water
7. All four-stroke power equipment engines must have at least one yearly tune-up that includes adjusting the valves. (True/False)
8. Which of the following is used to test a cooling system for the correct mixture of coolant and water?
a. Barometer
b. Manometer
c. Hydrometer
d. Thermometer
9. A water pump has a mechanical seal to separate the engine oil and coolant. (True/False)
10. Paper-type air filters can be cleaned. (True/False)