Common Bathroom Repairs -- part 1
| Home | Wiring | Plumbing | Kitchen/Bath |
|
With surprisingly little time and effort, you can apply the methods described in the following pages to end drips, clogs, and other bathroom annoyances—and to re place worn-out fittings with attractive new ones. Keeping up with repairs not only makes your bathroom more comfortable, it also may prevent small problems from turning into big ones, as when an uncorrected leak damages the floor or walls.
Drips and Leaks in Four Kinds of Faucets
New Fittings for Basins and Tubs
Time-Tested Methods for Unclogging Drains
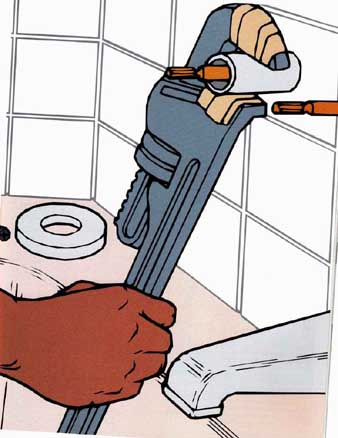
- - - - - - - 
Disassembling a bathroom faucet. - - - - - Replacing a Broken Accessory Towel bars or a soap dish can be a handy addition to a tiled bathroom wall, but an accessory can be an eyesore if it breaks or is damaged. As shown below and at right, you can often replace the damaged item with no harm to the wall. Work carefully to avoid cracking nearby tiles, and keep them from loosening by laying strips of masking tape from one tile to the next. .A Variety of Accessories: Flush- set accessories, such as the soap dish below, are attached directly to the same backing that the tiles are mounted on. To avoid exposing the backing, replace a flush-set accessory with one of the same dimensions or slightly larger. Other accessories, such as the towel bar at right, are mounted to the tile surface. Replace a surface-mounted accessory with another that will at tach to the same tiles; in the case of a towel bar, the new bar should be the same length as the one it re places, so that its brackets rest on the same pair of tiles. Some older bathrooms have recessed accessories, which are sunk into the tiled wall. You can of ten unscrew a recessed toilet-paper holder from its mounting bracket and install a new one, but a recessed soap dish or other sort of shelf cannot be replaced without extensive retiling. SAFETY TIPS---Wear goggles as you free the accessory with hammer and chisel and whenever you drill into tile. SETTING A SOAP DISH INTO A TILE WALL 1. Removing the old soup dish. 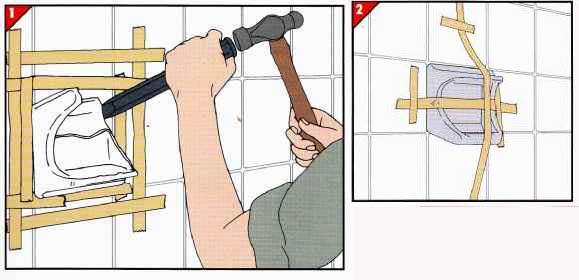
• Protect the tile at the edge of the soap dish with masking tape. Hold down the nearby tiles with more tape. • Remove any caulk or grout around the soap dish, then position a cold chisel at its edge. Tap with a ball-peen hammer (above) until the dish comes free. 2. Positioning the new soup dish. • Remove the tape and clean the exposed area with a putty knife. • Apply silicone tile adhesive to the new soap dish, press it into place, and secure it with masking tape (above). • After 24 hours, take off the tape and grout the joints around the soap dish. TOOLS:
===== A SURFACE-MOUNTED TOWEL BAR 1. Preparing the surface. 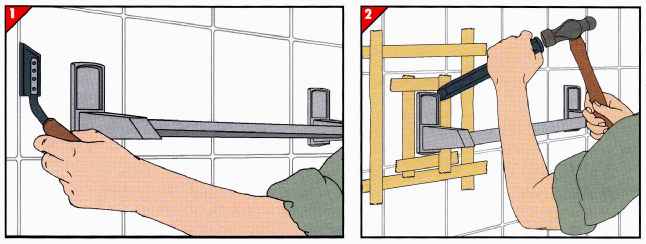
• With a grout saw, cut out the grout around each tile to which the towel bar is attached (above); this will help minimize any movement of the adjacent tiles as you work. • Lay strips of masking tape around the edges of the towel bar’s mounting brackets. For each bracket, add a square of masking tape over the nearby tiles. 2. Removing the old towel bar. If you can, remove the old towel bar from its mounting brackets and unscrew the brackets. For brackets secured not with screws but with adhesive, place a cold chisel against each bracket and tap with a ball-peen hammer (above) to free it. Clean the exposed area and make sure any marred surface will be covered by the mounting brackets of the new towel bar you select. 3. Preparing the wall for drilling. 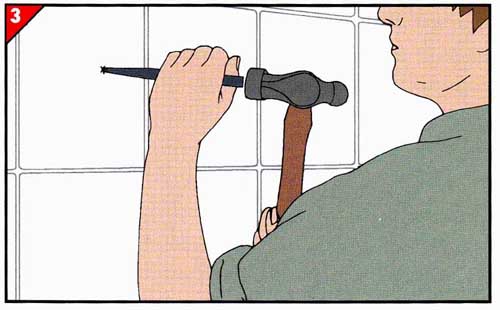
For screw-mounted brackets, check whether you can reuse the old screw holes; otherwise, drill new holes large enough for hollow-wall anchors. • Hold a bracket in place; if it has tapered edges, position them at top and bottom. Mark the screw hole. Position the second bracket with a level and mark that hole as well. With a punch, make an indentation on each mark (left). • Fit an electric drill with a carbide-tipped masonry bit; keeping the drill speed as low as possible, make a hole at each indentation. 4. Installing the towel bar. 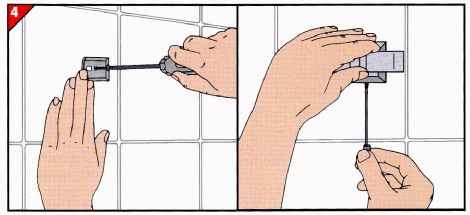
• For brackets without screw holes, apply tile adhesive, press the brackets into place, and allow to dry. For screw-mounted brackets, seat hollow- wall anchors in the drilled holes, then screw the brackets into place (far left). • Slip the towel bar onto the mounting brackets; secure a metal towel bar by tightening setscrews with a hex wrench or screwdriver (near left). • Re-grout the tile joints that you cut out in Step 1, above. ++++++++++++++++++++++ Drips and Leaks in Four kinds of FaucetsOften a bathroom faucet with a dripping spout or leaking handles can be fixed with a small investment of time and some spare parts. Although they come in many sizes and shapes, for repair purposes most faucets are grouped into four types: stem, cartridge, disk, and ball. Stem, or compression, faucets, depicted here, employ hard-rubber seat washers to provide a tight seal. When stem faucets drip, check for worn washers. You may also need to re place the stem and the seat, metal parts that come in contact with the washers. For a leaking handle, tight en the packing nut (below) or re place the packing washer. Cartridge, disk, and ball faucets, all of which usually have single handles, develop drips and leaks less often. When they do, repair methods differ from one type to another, as shown. In each case, the trick is to know how to disassemble the faucet. Before You Begin: As with any plumbing job, locate the main shut-off valve in your house ahead of time in case of emergency. Turn off the shutoff valves below the basin and drain the faucet. If the valves won’t close, turn off the main valve; drain the system by opening the faucets at the highest point in the house and working down to the lowest point. This pre vents a vacuum from forming. Plug the drain so parts cannot fall in, and protect the sink with a towel. As you work, set parts aside in the exact order you remove them to allow for easier reassembly. TOOLS
The inner anatomy of a stem faucet. 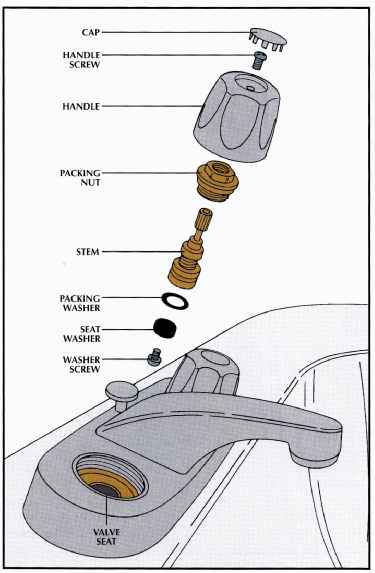
Although they vary in de sign, most stem faucets include the basic components shown at left. Each of the two handles is secured by a screw, often concealed under a decorative cap. The screw attaches the handle to the packing nut located at the top of the stem. Under the stem and packing washer, the seat washer closes against the valve seat to cut off the flow of water to the spout. Tricks of the Trade: Freeing a Handle -- A stubborn handle can be freed with a faucet-handle puller (shown below) without marring the finish. Insert the center shaft into the hole on the handle, and fit the puller arms under it. Turn the puller handle clockwise to lift the faucet handle off . 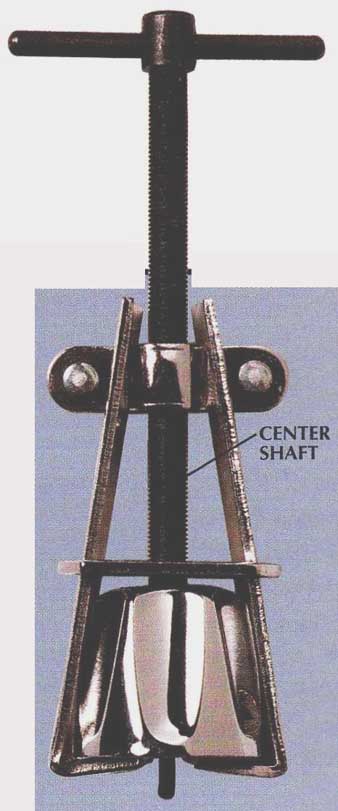
STEM FAUCETS 1. Removing a stem-faucet handle. When a stem faucet drips, repair both hot and cold faucet assemblies. Do one at a time. • Pry out the cap on one handle with a utility knife. • Remove the screw and pull the handle straight up. If it’s wedged on tight, protect the basin or base plate underneath with a towel and pry the handle off with a screwdriver. If it’s very resistant, use a faucet-handle puller. 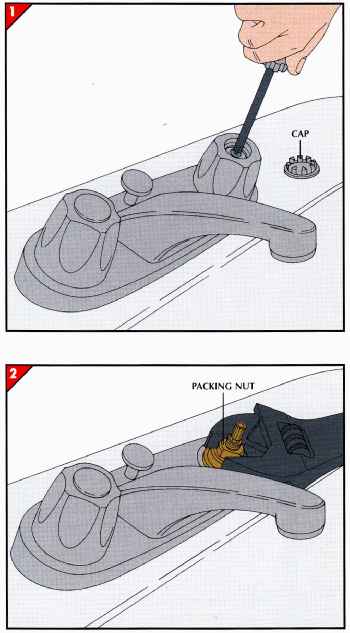
2. Removing the packing nut. Unscrew the packing nut with an adjustable wrench. The stem below may come out with the nut; to separate them, protect the stem with electrician’s tape, clamp it in a vise, and remove the nut with the wrench. 3. Taking out the stem. 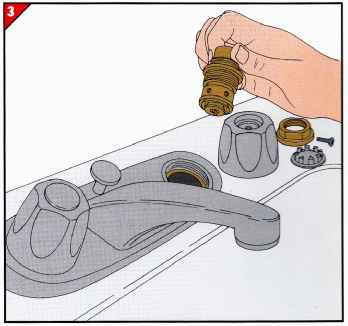
• Try to unscrew the stem by hand. • Should that fail, set the handle on the stem and turn it in the same direction that you would to turn on the water; this will remove most stems. • If the stem does not unscrew, the faucet may be a diaphragm or a cartridge type; remove the stem as described. REPLACING WASHERS A variety of seat washers. 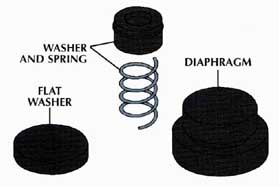
Different stem faucets require their own type of seat washer. Standard stem faucets use flat washers with holes for washer screws; cartridge-type stem faucets may have washers and springs. In a diaphragm stem faucet, caps called diaphragms do the work of washers, covering the bottom end of each stem. If you are not certain which washers fit your faucet, remove a valve seat (opposite, below) and take it to a plumbing-supply store. Making repairs to a diaphragm stem faucet. 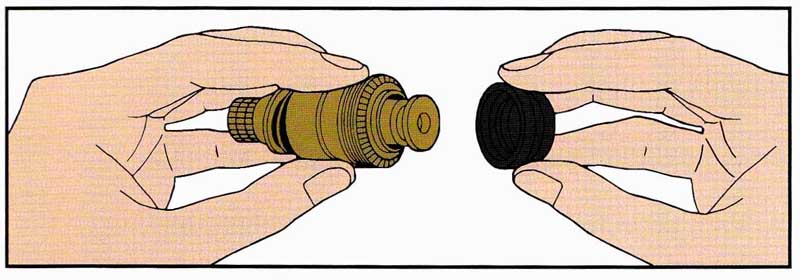
Suction between the diaphragm and the valve seat may make the stem difficult to remove. • Wrap the top of the stem with cloth and pull out the stem with pliers. • If the old diaphragm sticks, pry it out with the tip of a screwdriver. • Using a flashlight, make sure that there are no pieces of the old diaphragm remaining inside; otherwise, the new one won’t seat properly. • Fit the new diaphragm over the bottom of the stem, making sure the diaphragm is snug all around. • Replace the stem, the packing nut, and the handle. Servicing a cartridge-type stem faucet. 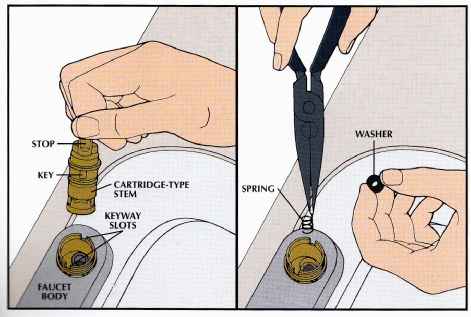
• Lift the cartridge out of the faucet, making sure as you do so to observe the alignment of the stop on the top of the cartridge and the keys on its side. The latter fit into two key-way slots on the faucet body. • With long-nose pliers, pull the washer and spring out of the faucet body. • Push the new spring and washer firmly into place with a finger. Insert the cartridge in the same orientation as before and attach the handle. If the spout still drips, replace the cartridge. SERVICING A VALVE SEAT 1. Inspecting the valve seat. 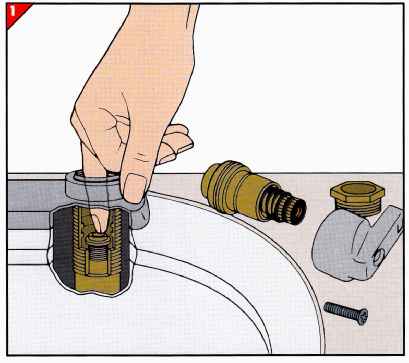
If the spout of a stem faucet continues to drip after you have replaced the washers, check the valve seats for signs of wear—scratches, pits, or an uneven surface. Use a flashlight to look inside the faucet body, then run a fingertip around the edge of the valve seat. If necessary, install a new seat as shown below. 2. Installing a new seat. 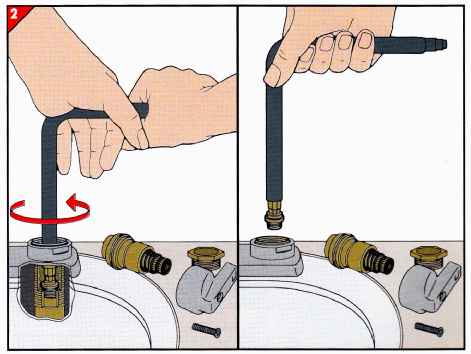
• With a seat wrench, turn the valve seat counterclockwise and lift it out. Take it to a plumbing supply store to get an exact duplicate. • Lubricate the outside of the replacement with a pipe-joint compound, push it onto the wrench, and screw it into the faucet body. SINGLE-LEVER CARTRIDGE FAUCETS 1. Repairing a single-lever cartridge faucet. 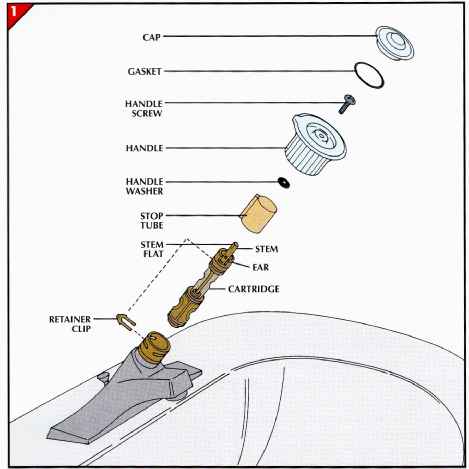
Fixing a cartridge faucet usually re quires replacing the cartridge. When taking the faucet apart, carefully note the orientation of the cartridge ears and the stem flats, flat areas at the top of the stem (diagram, left); position the replacement the same way. • Remove the cap with a utility knife or a very small screwdriver. • Unscrew the handle and remove it. • Remove the stop tube, if there is one present. • Complete the disassembly by re moving the retainer clip and cartridge, as shown below. 2. Removing the retainer clip. • With long-nose pliers, pull out the retainer clip that holds the cartridge in the faucet body. • Lift out the cartridge, using pliers to grip the top of the stem if necessary. 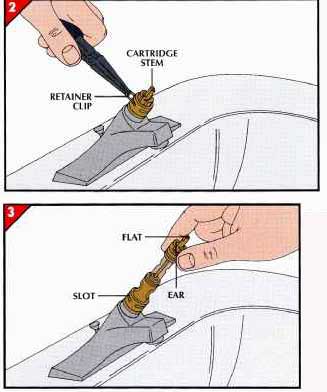
3. Replacing the cartridge. • Position the new cartridge to match the orientation of the old one. With the stem at its highest position, push the cartridge by its ears down into the faucet body. • Align the cartridge ears with the faucet body slots; slide the retainer clip through the slots. • Turn the stem to place the stem flats in the same position as in the old cartridge, then reassemble the faucet and turn on the water. If hot water comes out when you try to turn on the cold, and vice versa, remove the handle and stop tube and rotate the stem 180 degrees. SINGLE-LEVER CERAMIC DISK FAUCETS 1. Getting access to a disk cartridge. 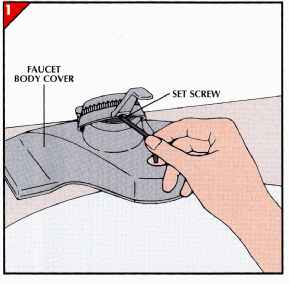
In ceramic disk faucets, leaks show up around the body of the faucet or as a puddle under the basin. • Turn the faucet on full and move the handle side to side to dislodge dirt that may be lodged between the disks. If the leak persists, replace the disk cartridge. • After turning off the water and draining the faucet, raise the lever as high as it can go. Unscrew the setscrew under the lever and remove the handle. • With older models, remove the pop-up lift rod, remove the screws on the underside of the faucet, and take off the body cover. Newer ceramic disk faucets have a screw in the handle and a metal ring that twists off. 2. Removing the disk cartridge. 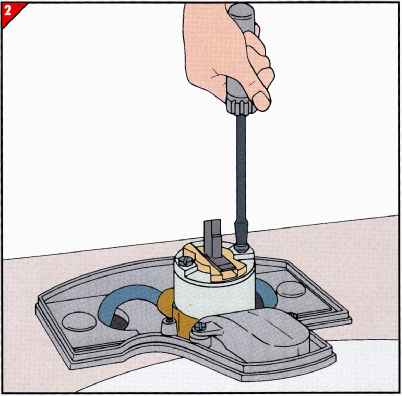
• Unscrew the bolts that hold the disk cartridge in place. • Remove the cartridge and purchase an identical replacement. 3. Installing a new cartridge. 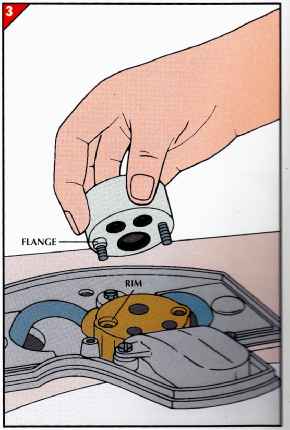
• Align the three ports on the bottom of the disk cartridge with the three holes in the base of the faucet body. One of the bolt holes on the cartridge will have a flange; make sure it fits into the rim around the corresponding bolt hole in the faucet body. SINGLE-LEVER BALL FAUCETS 1. Loosening the setscrew. 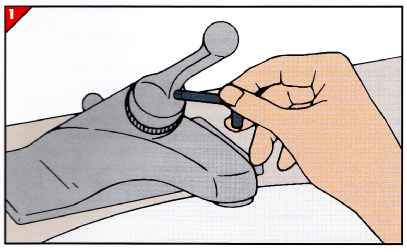
If the spout of a ball faucet drips when the water is off, replace the two rubber valve seats and metal springs in the bottom of the faucet body. • With a hex wrench, loosen the setscrew under the shank of the handle. Don’t take the screw all the way out; it’s easily lost. • Remove the handle. 2. Removing the cap and ball. 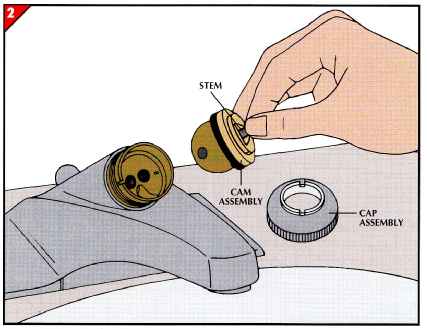
• Unscrew the cap assembly and lift out the ball by its stem; the plastic-and-rubber cam assembly will come with it. • Inspect the ball; if it’s rough or corroded, replace it. 3. Installing new valve seats and springs. 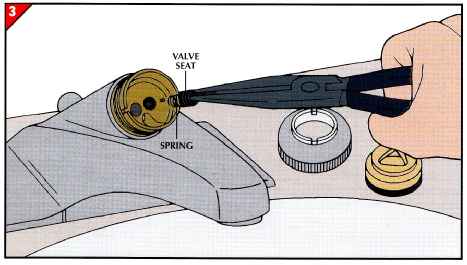
With long-nose pliers, remove the valve seats and springs. Use a fingertip to push replacements firmly into place. 4. Replacing the ball. 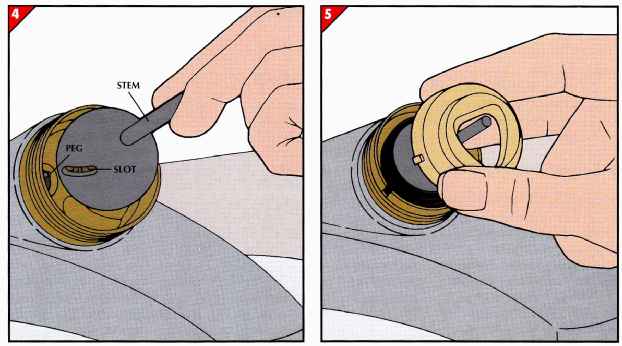
A tiny metal peg projects from one side of the cavity into which the ball fits. As you replace the ball, make sure that the peg fits into an oblong slot on it. 5. Replacing the cam assembly. • Replace the cam assembly so that its tab fits into the slot on the faucet body. • Screw on the cap assembly. 6. Setting the adjusting ring. 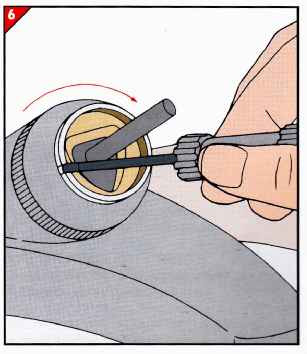
• Turn on the water to the faucet. • Move the ball’s stem to the on position. If water leaks out around the stem, tighten the adjusting ring with a tool provided by the manufacturer or with the tip of a small screwdriver. • If you must tighten the ring so much that the handle is difficult to work, turn off the water, drain the faucet, and replace the entire cam assembly, including the rubber ring. • Now put the cap assembly back in place. Position the handle so that the setscrew is over the flat on the stem and tighten the setscrew. |
| HOME | Prev: Face-Lifts for Timeworn Kitchens -- part 2 | Next: | Article Index |