Common Bathroom Repairs -- part 3
| Home | Wiring | Plumbing | Kitchen/Bath |
.
Updating Drains and TrapsOver time, corrosion in the trap and drain under your bathroom wash basin can cause leaks, which are best remedied by the replacement of all or part of the drain assembly. You may also want to replace a worn pop up plug and drain body when installing a new faucet. For best results, spray the threaded connections in the drain assembly with a penetrating lubricant several hours before disconnecting the old fittings. Drain con figurations vary, but most include slip-nut connections that can easily be dismantled with a wrench. If you intend to reuse a trap, be sure to put new washers under the slip nuts before putting the trap back in. Selecting the Right Parts: If the sink is mounted in a vanity top or on a pedestal, and you are replacing all of the drain assembly, use polyvinyl chloride (PVC) fittings like those depicted here. Such pipes are durable, rustproof, and easy to work with. To replace the entire drain assembly under a wall-hung basin, chrome-plated parts are an elegant alternative. If you are replacing only some of the drain fittings, match the material of those that remain. Pop-up drain plugs. 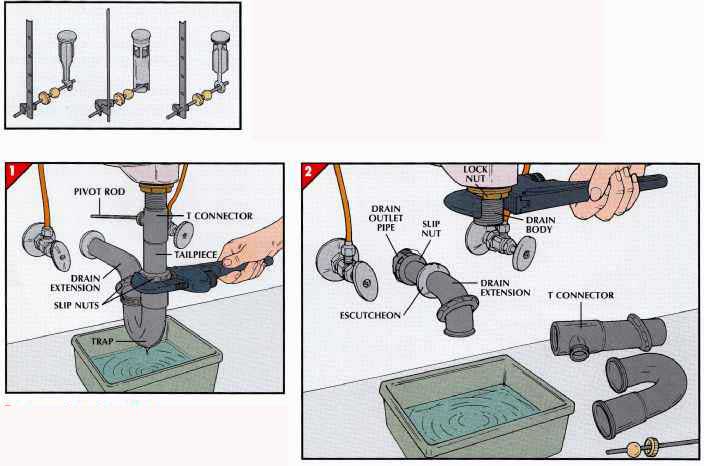
The method for removing a pop-up drain plug depends on its type. Some plugs sit atop the pivot rod and just lift out . Others require a quarter-turn to free them from the rod (left, center). To remove the type of plug at near left, you must disengage the pivot rod from the T connector under the basin and then lift out the plug. 1. Removing the trap. • Place a shallow container underneath the trap to catch any water remaining inside. • With a pipe wrench or a monkey wrench, unscrew the slip nuts on either end of the trap, disconnecting it from the tailpiece and the drain extension (above). • Remove the pop-up plug as outlined above, as well as the lift rod and clevis. With pliers, unscrew the retaining nut at the back of the T connector and remove the pivot rod. 2. Removing the fittings. • With a pipe wrench, unscrew the T connector from the drain body, remove the lock nut and washer holding the drain body to the basin (above), and push the drain body up and out through the hole in the basin. • If replacing all of the drain assembly, pry the escutcheon from the wall. Unscrew the slip nut be hind it, then gently remove the drain extension, being careful not to move or break pipes inside the wall. Clean the threads of the drain outlet pipe. 3. Sealing the new drain flange. 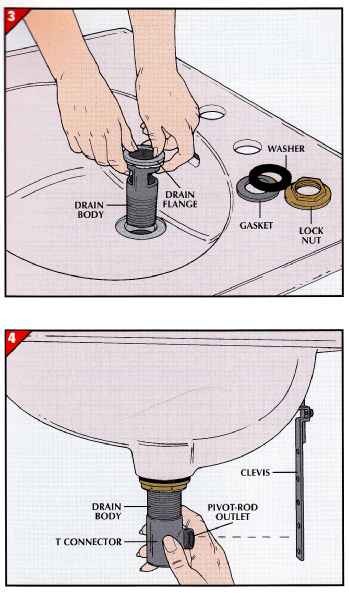
• Inside the washbasin, scrape off any old putty from around the drain opening and clean and dry the surface. • Roll a short rope of plumber’s putty and press it under the edge of the flange at the top of the drain body. Lower the drain body through the opening in the sink (left) and press down on the flange. .• Underneath the basin, push the gasket, washer, and lock nut onto the drain body. Hand tighten the lock nut against the bottom of the basin, then tighten one more turn with a pipe wrench. Wipe away any excess putty with a finger. • If you are replacing the faucet, install the new one now, as well as the new lift rod and clevis. 4. Aligning the T connector. • Wrap plumbing-sealant tape around the threads on the lower part of the drain body. • Screw the new T connector onto the drain body so that the pivot-rod outlet faces toward the clevis (dotted line, left). • Insert one end of the pivot rod into the T connector and attach the other end to the clevis with a spring clip, following the procedure shown. • Tighten the pivot rod’s retaining nut on the T connector and adjust the position of the pivot rod on the clevis as necessary. 5. Installing a new plastic trap. 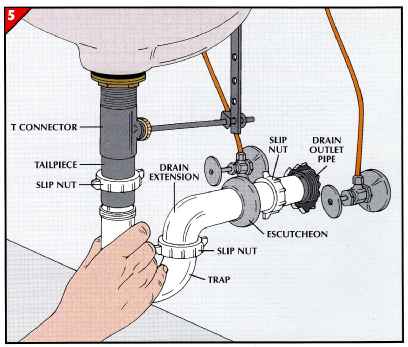
• Wrap plumbing-sealant tape around the threads of the tailpiece and hand tighten it into the T connector. Slide a plastic slip nut and washer (not visible) onto the tailpiece. • If replacing the entire drain assembly, loosely connect the replacement trap and the new drain extension with a plastic slip nut. Slide the escutcheon, a nut, and a washer onto the extension and insert it into the drain outlet pipe. The washer fits between the extension and the outlet pipe, but the nut slips over the pipe’s outside. • Align the top of the trap with the tailpiece . Loosely connect the pipes with the nut. • When the drain assembly is properly aligned, hand tighten the nuts at each connection. Turn each nut once more with a wrench. Push the escutcheon against the wall. • Close the pop-up plug, fill the sink with water, then open the drain and check for leaks. Tighten any leaking joints slightly. ++++++++++++++++++++++++++++++++++++++++ Time-Tested Methods for Unclogging DrainsWhen a bathroom drain stops or slows, see if other drains are affected. If so, the problem may lie else where in the house’s plumbing. A Hierarchy of Solutions: If only one drain is blocked, try a plunger. Prepare the drain by re moving the strainer, pop-up plug, and overflow plate, if present; take apart a tub’s drain hardware as shown in Step 1. Stuff any overflow opening with rags. If the plunger fails, you can sometimes clear a tub or shower drain with water. A third method is to use an auger—a trap- and-drain auger for a tub, sink, or shower, and a closet auger for a toilet Avoid compressed-air de vices, which often compact the blockage and may cause old pipe joints to break apart. Chemical Drain Cleaners: Don’t pour chemical cleaning agents into a blocked drain. Many contain lye, and you could be exposed to the caustic as you continue work on the stoppage. Cleaners can be helpful once a tub, sink, or shower drain is open; applied regularly, they prevent buildup of debris. Never put such cleaners in a toilet, however. They do no good and can stain the porcelain. TOOLS:
SAFETY TIPS---If human waste is present when you are unclogging a toilet, wear goggles and rubber gloves. CLEARING A STOPPAGE WITH WATER Flushing a drain with a hose. 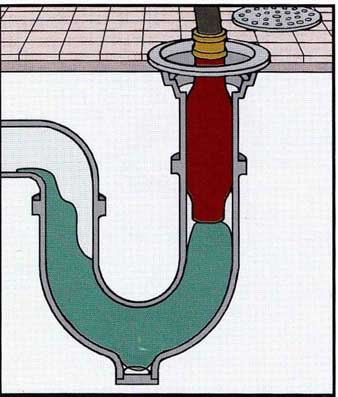
A hose-mounted drain flusher, avail able at most hardware stores, will work in a shower or tub drain. • Attach the drain flusher to a garden hose and push it into a shower drain; in a tub, insert it through the overflow opening past the level of the drain. Connect the other end of the hose to a faucet; for an indoor faucet, you will need a threaded adapter. • Have a helper slowly turn on the hose water. The flusher will expand to fill the pipe so that the full force of water is directed at the clog. CAUTION----Don’t flush a clogged drain that contains caustic cleaners, and never leave a hose in any drain. The cleaner could splash into your face, and the hose could draw waste water into the supply system if the pressure should drop. == A Multi-Role Plunger 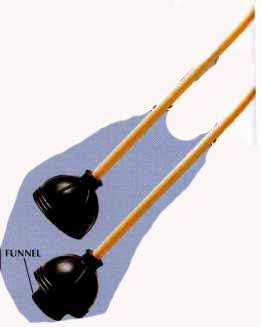
An ordinary force-cup plunger is suited to many drains, but it won’t fit a toilet. For the bathroom, purchase a foldout plunger instead. As shown above, its cup can take on two different shapes. With a tub, sink, or shower drain, keep the funnel portion tucked in side. Coat the rim of the cup with petroleum jelly and center it over the drain. Make sure that standing water covers the cup completely; if it does not, add more water. Without breaking the seal between drain and cup, pump the plunger down and up several times, then jerk it away. When the drain opens, run hot water through it to flush it clean. For a toilet, extend the plunger’s funnel lip. If a clogged toilet is too full, bail out some of the contents. If the bowl is empty, add water by hand, not by flushing. Fit the plunger over the opening near the bottom of the bowl and pump vigorously, then jerk it away. If the bowl empties, pour in water to confirm that the drain is fully opened. == BREAKING UP A CLOG WITH A TRAP-AND AUGER 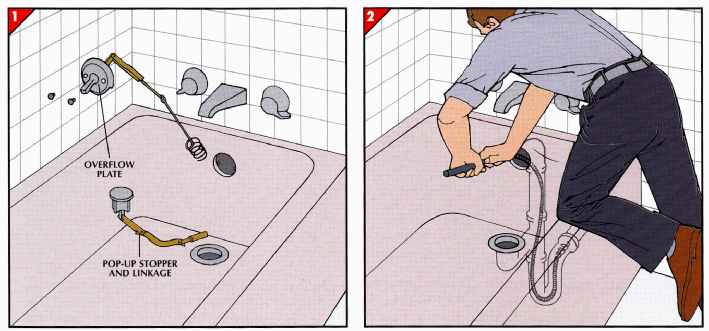
1. Gaining access to the drain. To unclog a bathtub, unscrew the overflow plate and lift it up and out. Draw out the pop-up stopper and its linkage. Note how the parts line up so that you can put them back in the same way. 2. Inserting the auger. • Cranking the auger handle clockwise, feed the auger tip through the tub overflow opening. • When the auger wire reaches the blockage, move the auger slowly backward and forward while cranking. Continue to crank clockwise as you withdraw the auger wire; doing so helps to prevent you from dropping the material that caused the blockage. • After clearing the drain, run hot water through it for 2 to 3 minutes. OPENING A TOILET DRAIN WITH A CLOSET AUGER An auger meant for toilets. 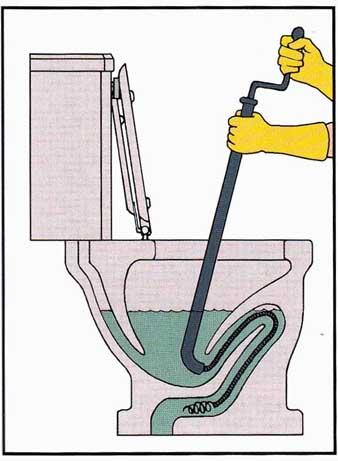
The cranking handle of a closet auger attaches to a long sleeve shaped to help guide the tip of the auger into the trap. Closet augers work equally well in toilets with a front drain opening, as shown here, or with the opening at the back. • Hold the sleeve near the top and position the other end against the drain opening. Crank the auger tip slowly clockwise into the trap until you hook the obstruction or break through it. • Withdraw the auger while cranking the handle clockwise. If the drain re mains clogged, repeat the process. • When the drain seems clear, test it with a pail of water before attempting to flush the toilet. ++++++++++++++++++++++++++ Simple Toilet RepairsUnderstanding how the mechanisms inside a toilet tank work can make their repair fairly simple. Certain parts vary, but most operate ac cording to the same scheme. When you press the handle, a lift wire or a chain pulls a stopper off the opening to the bowl. Water rushes into the bowl. The falling water level in the tank causes a float to drop. This, in turn, opens the ball-cock—the device that starts and stops the refill cycle. When the tank is nearly empty, the stopper drops into place. Rising water then lifts the float high enough to shut off the ball cock. Diagnosing the Problem: One way to spot a mechanical breakdown is to lift the tank lid and watch a flush cycle. Also be alert to noises and leaks. The sound of water running constantly may indicate that the tank ball is not properly seated. A high whine or whistle during flushing means that the ball cock needs attention. Visible leaks near the tank may be caused by loose bolts, worn washers, or condensation. Working Near Porcelain: Most toilets are made of vitreous china, which is easily cracked or broken. Set the lid on padding in an out-of- the-way place while working in the tank, and use gentle pressure when removing or tightening bolts. As shown, it may be safer to cut corroded seat-cover bolts than to strain to remove them with a wrench near fragile porcelain. TOOLS:
- - - - - - - 
Tightening the handle. (above left) If a toilet handle must be held down until the flush cycle is complete, the linkage between the handle and the trip lever needs to be secured. • For a toilet with a bracket arrangement like the one above, tighten the retaining nut with an adjustable wrench so the bracket does not wobble but still moves freely when the handle is turned. Turn the nut counterclockwise—the opposite direction from that used to tighten most nuts. With a wrench or pliers, turn the trip-lever setscrew against the handle shaft. • In models that have a one-piece handle and trip lever, tighten the nut that holds the handle on its shaft. This nut also must be tightened counterclockwise. Adjusting the water level. (above right) If water is cascading through the overflow pipe into the bowl, lower the water level by replacing the float ball or adjusting the float rod. • Unscrew the float ball and examine it; if it’s worn or there is water in it, replace it. • If the ball is sound, bend the float rod 0.5 inch downward with both hands (above). Alternatively, unscrew the rod with pliers and bend it over a rounded surface, then put it back. The rod may break when bent; if that happens, re place it with a new one. Reattach the ball. • Flush the toilet. The water should stop rising about 0.5 inch below the top of the overflow pipe. If it does not, the rod must be readjusted. REMEDIES FOR A LEAKING FLUSH ASSEMBLY Adjusting the tank ball. 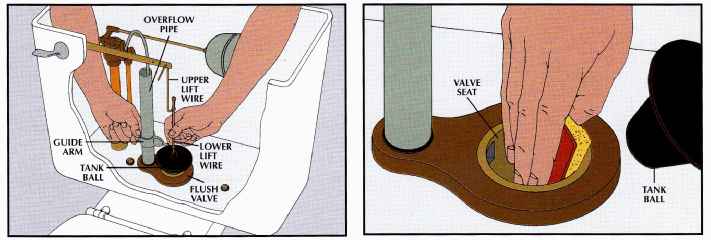
If water runs constantly into the bowl from the tank, some times making the toilet flush, first try reseating the tank ball. • Turn off the water at the shutoff valve and remove the lid. • Flush the toilet. If the tank ball does not fall straight into the flush valve opening, loosen the thumbscrew fastening the guide arm to the overflow pipe (above). • Reposition the arm and the lower lift wire so the tank ball is centered over the flush valve. If necessary, straighten the lift wires. • Turn the water on. If the leak persists, clean mineral de posits off the ball and valve seat. Cleaning the tank ball and valve seat. (above right) • Turn off the water and empty the tank. • Unscrew the tank ball and wash it with warm water and detergent. If the ball is worn, replace it with a modern flap per ball hinged to prevent misalignment. • Gently scour the seat of the flush valve with fine steel wool or a plastic cleansing pad. • Replace the ball and turn on the water. If the valve still leaks, a special replacement flush valve seat can be placed over the old one. To replace the old valve seat completely, remove the tank as shown. Installing a hinged flapper ball. 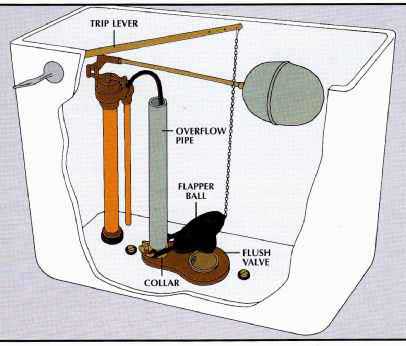
• Turn off the water, drain the tank, and remove the old guide arm, lift wires, and tank ball. • Slide the collar of the flapper ball to the bottom of the overflow pipe and align the ball over the flush valve. If there is a thumbscrew on the collar, tighten it. • Hook the chain from the ball through a hole in the trip lever directly above, leaving about 0.5 inch of slack. • Turn the water on, flush the toilet, and check whether the tank drains completely. If it does not, lessen the slack or move the chain one or two holes toward the rear of the lift arm. REPAIRS FOR THE TANK’S FILL MECHANISM Servicing a ball cock. 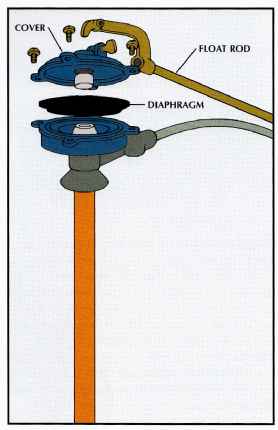
When a diaphragm ball cock or a float-cup ball cock develops a minor leak, repair it with parts available at plumbing- supply stores. Replace other, older types of ball cocks rather than attempting repairs. • Shut off the water and flush the toilet. • Remove the top screws and lift off the cover and float rod assembly. • In a diaphragm ball cock, take out and replace the diaphragm, rubber gaskets, and washers. For a float-cup ball cock like the one shown at far right, replace the rubber valve seal and washers. • Attach the ball cock cover and turn the water on. If the ball cock still leaks, or appears worn-out, replace it. A DEVICE FOR REPLENISHING THE TANK 1. Disconnecting the supply tube. 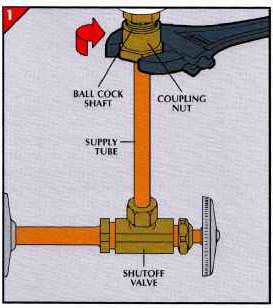
• Turn off the water at the shutoff valve, flush the toilet, and sponge out the remaining water from the tank. • With an adjustable wrench, unscrew the coupling nut on the underside of the tank that attaches the supply tube to the ball cock shaft. 2. Removing the ball cock. 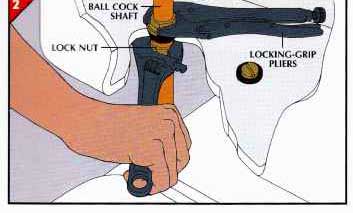
• Inside the tank, attach locking-grip pliers to the base of the ball cock shaft. The pliers will wedge against the side of the tank and free your hands. • With an adjustable wrench, unscrew the lock nut that se cures the ball cock shaft on the underside of the tank. Use firm but gentle pressure to avoid cracking the tank. • If the nut resists, soak it with penetrating oil for 10 or 15 minutes and try again. Once the nut is removed, lift the ball cock out of the tank. 3. Installing a modern ball cock. 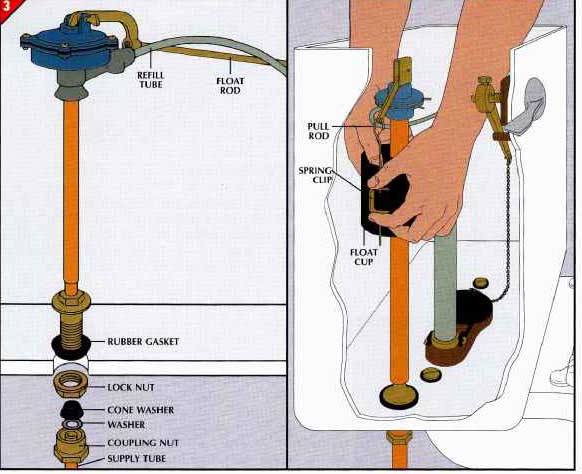
Diaphragm ball cocks and float-cup ball cocks are secured in place in the same way. Float-cup ball cocks require a simple adjustment as well. Float-cup ball cocks come in several heights; measure your tank depth before buying one. • Put the new ball cock shank through the rubber gasket supplied with it and through the hole in the tank. Then screw a lock nut onto the ball cock shaft underneath the tank. • Inside the tank, hold the base of the ball cock with locking-grip pliers. Tighten the lock nut. • Insert a new washer in the coupling nut on the supply tube; some supply tubes come with built in washers. If the tube extends through the nut and washer, place a cone washer over the tube (above, left). Screw the coupling nut to the bottom of the ball cock shaft. • Attach the float rod assembly and refill tube, and turn the water back on at the shutoff valve. For a float-cup ball cock, adjust the ball cock to change the water level in the tank. To raise the level, pinch the spring clip on the ball cock’s pull rod and slide the float cup higher. To lower the water, move the cup down. SEALING LEAKS AT BOLTS AND GASKETS Tightening the tank bolts. 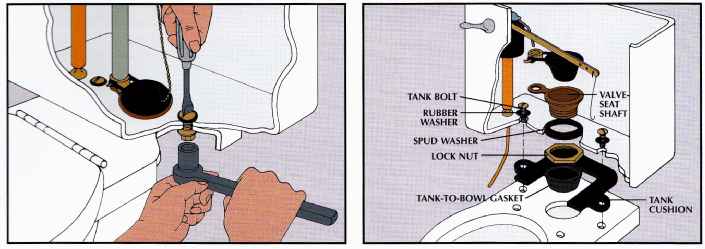
Drips at the tank bolts may be caused by condensation on the tank’s exterior, or by seepage from the inside. To check, pour a few drops of food coloring into the tank and hold white tissue over the bolts. If the tissue turns that color, tighten the bolts to stop the leaks. • Turn off the water and drain the tank. Hold the slotted head of the bolt with a screwdriver or have a helper do it. • Tighten the nut below the tank with a socket wrench and a deep socket, or use an adjustable wrench. • Turn the water back on. • If the leak persists, drain the tank, remove the bolts, and replace their washers. Replacing flush-valve washers. If water leaks outside the toilet at the connection between tank and bowl, you must remove the tank. • Turn off the water, drain the tank, disconnect the supply tube, and unscrew the tank bolts. • Lift the tank off the bowl and set it on its back on a padded work surface. • The components that connect the tank and bowl appear above in diagrammatic form. Remove the lock nut on the valve-seat shaft protruding from the tank bottom, then pull the shaft into the tank and replace the spud washer and tank-to-bowl gasket. Reattach the lock nut. • Place the tank on the tank cushion, reconnect the tank bolts, and attach the supply tube. Turn on the water. DETERRING TOILET TANK CONDENSATION Installing insulation pads. 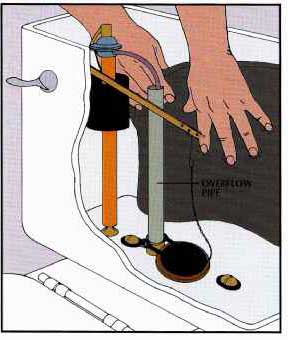
Condensation on the outside of a toilet tank may signal other problems, such as a constant leak from tank to bowl. If temperature or humidity is the cause, line the tank with a waterproof insulating material such as foam rubber. • Turn off the water, drain the tank, and sponge it dry. • Measure the inside width and depth of the tank and the height from the bottom of the tank to a point 1 inch above the overflow pipe. • Cut four pieces of 0.5-inch-thick foam rubber to fit the front, the back, and each side. • Trim 1 inch from the width of the front and back pieces so they will abut the side pieces. • Make a cutout for the toilet handle, and be sure the pads don’t interfere with other moving parts. • Apply a liberal coating of silicone glue or rubber cement to the inside tank surfaces; press the pads in place. • Let the glue dry 24 hours before refilling the tank. REPLACING A TOILET SEAT Removing the seat bolts. 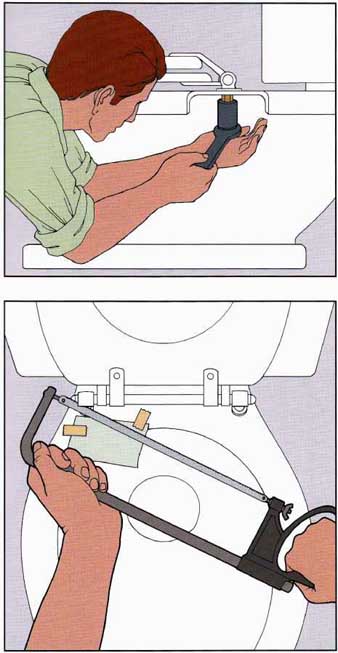
To take off an old toilet seat, unscrew the nuts underneath the bowl. First try to turn the nuts with long-nose pliers. Should that fail, twist gently using a socket wrench with a deep socket. If the seat bolts are too corroded to loosen, apply the methods below. Freeing corroded bolts. • Soak the bolts with penetrating oil for at least 30 minutes—overnight is better still. Then try loosening the nuts once more. • If penetrating oil does not free the nuts, tape thin cardboard on top of the bowl next to the heads of the bolts to protect the china. Then, with a hack saw, cut off the boltheads, sawing through the attached washers. |
| HOME | Prev: part 2 | Next: | Article Index |