.
New Fittings for Basins and Tubs
Sometimes the best and easiest pair for a worn-out bathroom faucet is
to throw it out and install a new one. Replacing the washbasin faucet—or
any tub and shower fittings— also helps give an old bathroom a new look
with relatively little effort.
Buying the Right Fitting: If you plan to keep your washbasin, you must
buy a faucet that fits the spacing of the sink’s side holes. Deter mine
the spacing by measuring between the centers of the faucet handles, or
remove a faucet with a single handle to check the holes directly. Most
center-set faucets are designed for a washbasin in which the side holes
are 4 inches apart. You can replace a center-set faucet with a single-hole
faucet if its base plate covers the side holes. A wide-spread faucet
can accommodate side holes that are situated from 6 to 20 inches apart
and must be re placed by a wide-spread set.
If your washbasin has a pop-up drain plug, you may want to replace the
plug and the drain body to match the new faucet, as shown. You can also
follow the steps on the same pages to add a pop-up plug to a basin that
does not have one; you will need to in stall a new drain body, T connector,
and pop-up plug mechanism and purchase a faucet with a lift rod.
. Tub and shower fittings are not as standardized as a sink’s. Depending
on the part, it’s always best and sometimes essential to use replacements
from the same manufacturer.
Preparation Steps: Several hours before disconnecting an old faucet
or other fittings, spray all the threaded connections with penetrating
lubricant. Cover the drain so that screws and small parts won’t be lost.
For work in a tub or shower, lay down padding or towels to avoid scarring
the finish. After removing the old fittings, clean the surface beneath,
removing crusty mineral deposits with a solution of equal parts of white
vinegar and water.
TOOLS
- Pliers
- Basin wrench
- Adjustable wrench
- Pipe wrench
- Tubing bender
- Faucet-handle puller
- Small screwdriver
- Drill with a 0.25-inch carbide bit
- Hacksaw
MATERIALS
- Penetrating lubricant
- Plumber’s putty
- Plumbing-sealant tape
- Washers, lock nuts, and other hardware
- Braided flexible supply tubes
----------
REMOVING AN OLD WASHBASIN FAUCET
1. Freeing the pop-up plug mechanism.
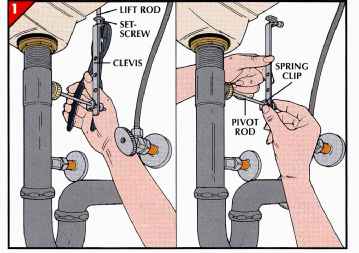
Detach the pop-up plug mechanism, if any, before re moving the faucet;
leave the plug and pivot rod in place.
• With pliers, loosen the setscrew securing the pop-up lift rod to the
clevis, or adapter bar, underneath the basin.
• Above the basin, pull the lift rod up and out of the clevis.
• Pinch the spring clip holding the pivot rod in place, and pull the
clevis and spring clip free; set aside for reuse with the new faucet.
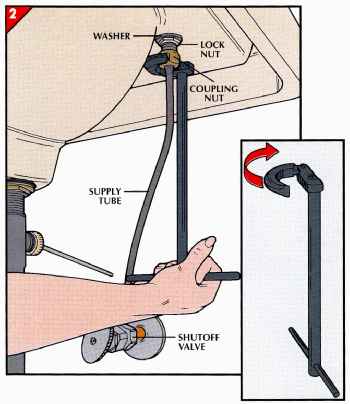
2. Disconnecting the supply tubes.
• Turn off the shutoff valves and drain the faucet; if you find that
the valves won’t turn, drain the house system as described.
• With a basin wrench, unscrew the coupling nut at the top of one of
the supply tubes and disconnect the tube.
• At the bottom of the supply tube, unscrew the nut attaching it to
the shutoff valve.
• Disconnect the second supply tube in the same way.
• With the basin wrench, unscrew the lock nuts under the basin that
secure the faucet; remove each nut and washer.
• Lift out the faucet, and clean the sink surface.
HOOKING UP A CENTER-SET FAUCET
1. Attaching the faucet.
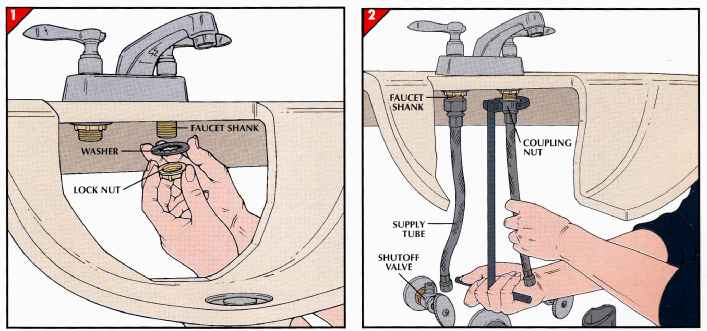
• Before positioning the faucet, slip a gasket and bottom plate over
the faucet shanks; if these were not supplied, apply a bead of plumber’s
putty under the assembly.
• Insert the shanks into the side holes of the basin.
• Working underneath the washbasin, slip a washer onto one of the faucet
shanks. Then thread on a lock nut and tighten by hand. Do the same with
the other faucet shank.
• Tighten both lock nuts with a basin wrench. If you used plumber’s
putty, wipe off any excess with a finger.
2. Attaching flexible supply tubes.
• Wrap plumbing-sealant tape around the threads of the faucet shanks
and shutoff valves.
• Insert a washer into the large coupling nut at one end of a braided
flexible supply tube and hand tighten the nut to a faucet shank; attach
the second supply tube the same way.
• Connect each tube to its corresponding shutoff valve with the smaller
coupling nut at the other end of the tube.
• Make a final half-turn on each nut with a wrench.
3. Installing the lift rod.
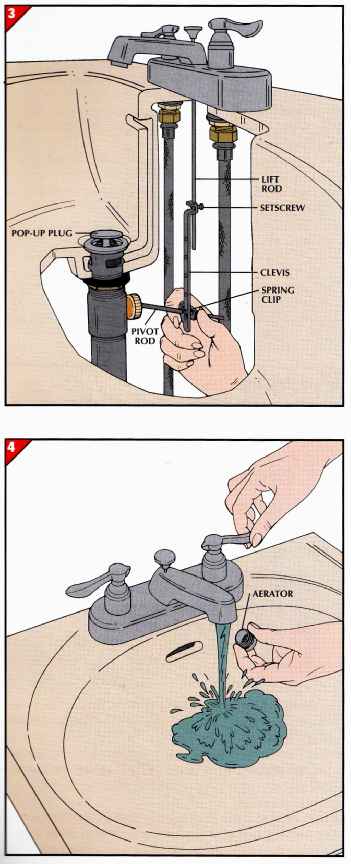
Attach the faucet’s lift rod to the pop-up plug mechanism.
• Drop the lift rod through the hole at the back of the spout. From
underneath the sink, slip the lift rod through holes in the top of the
clevis.
• With a spring clip, secure the pivot rod to the clevis, passing the
rod through one of the clevis holes. Holding the pivot rod and clevis
at this connection (left), pull downward to raise the pop-up plug in
the drain. Adjust if necessary by moving the pivot rod to a different
hole.
• Lock the lift rod in place by tightening the setscrew at the top of
the clevis.
4. Flushing out the faucet. (see fig. above)
• Turn on the water supply.
• Unscrew the aerator, an attachment in the underside of the spout that
ensures an even flow of water and prevents splashing.
• Turn on the faucet slowly and check under the sink for leaks. Fix
leaking connections by tightening slightly with a wrench. Then turn the
water on full force to flush out sediment.
• Turn off the faucet and replace the aerator.
MOUNTING A SINGLE.LEVER FAUCET
Setting the faucet in place.
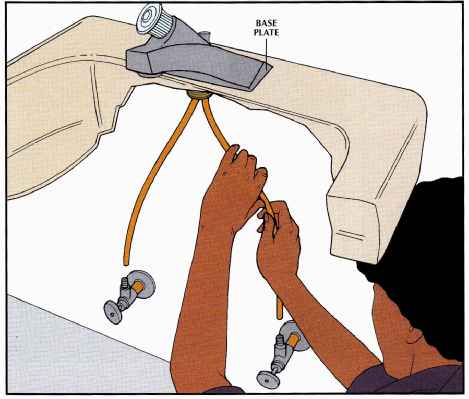
• Place the gasket supplied with the faucet on the base plate; if there
is no gasket, substitute a bead of plumber’s putty.
• Insert the faucet’s pre-attached sup ply tubes—usually flexible copper
tubing—through the center hole. Position the faucet on the sink.
• Under the basin, push a washer up over the tubing, followed by a lock
nut. Thread the nut onto the faucet shank and tighten.
• With your hands, gently separate the supply tubes. Don’t bend them
sharply, or the faucet assembly will be useless. Put your thumbs together
and shape each piece of tubing to line up with its corresponding shutoff
valve. Or use a tubing bender.
• If the tubing is too short, extend it with braided tubes.
• Complete the installation as with a center-set faucet.
Extending the supply lines.
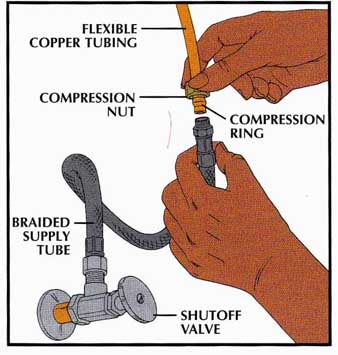
If the flexible copper tubing does not reach to the shutoff valves,
extend each piece with a braided supply tube equipped with compression
fittings.
• Find the end of the braided tube that has a compression nut that turns
in place but stays on the tube; attach that end to the shutoff valve.
• At the other end of the tube, detach the compression nut and compression
ring and slip them onto the corresponding piece of faucet tubing. Connect
the faucet tubing and the supply tube with the compression nut.
• Repeat the process for the second supply line.
=== TRICKS OF THE TRADE ===
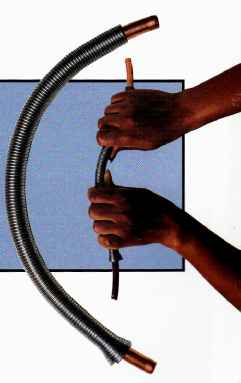
To Gently Shape Tubing (shown above)
A tubing bender makes
it easier to shape flexible copper tubing without crimping. Slip the
coiled metal over the tubing and bend to the desired shape.
INSTALLING A WIDESPREAD FAUCET
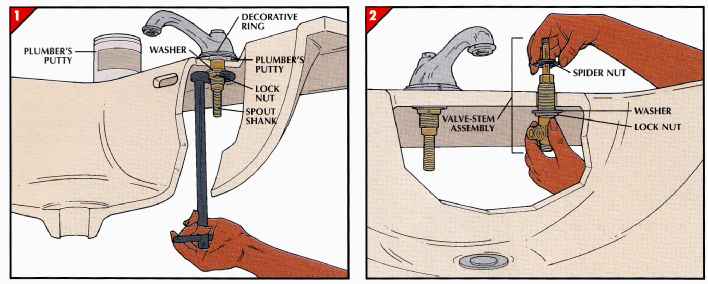
1. Mounting the faucet spout.
• Press a pencil-thick bead of plumber’s putty around the edge of the
underside of the spout.
• Insert the shank through the decorative ring and into the center hole
of the sink. Be sure to position the spout at right angles to the back
of the washbasin.
• Under the basin, secure the spout with a washer and lock nut; use
a basin wrench to tighten the nut.
• With a finger, wipe away excess plumber’s putty from around the spout.
2. Installing the valve-stem assemblies.
• Place a washer and lock nut on one of the faucet’s valve-stem assemblies.
From underneath the washbasin, push the upper part of the assembly through
a side hole.
• By hand, screw a spider nut onto the top of the assembly.
• Adjust the upper and lower nuts until the stem portion of the assembly
protrudes above the sink by the distance recommended by the manufacturer.
• Install the second valve-stem assembly in the same way.
3. Connecting the spout.
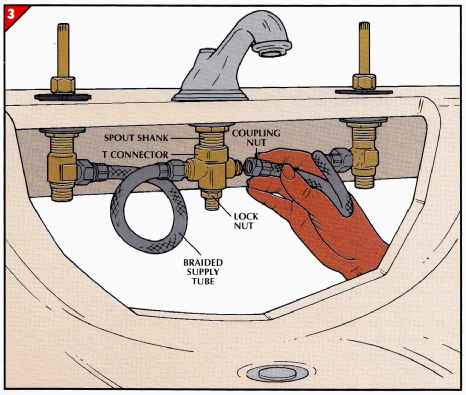
• Place an o-ring and washer on the upper side of the faucet’s I connector
and sup the connector onto the spout shank; secure the connector from
be low with a packing nut and a lock nut.
• Wrap plumbing-sealant tape on the threads at each side of the T connector
and around the supply connectors on each valve-stem assembly.
• Connect each valve-stem assembly to the T connector with a braided
sup ply tube. Hand tighten the larger coupling nut on the tube to the
valve- stem assembly and the smaller one to the T connector. Make a final
turn on each nut with an adjustable wrench.
• Follow the same procedures as for a center-set faucet to connect the
pop-up plug mechanism, at tach supply tubes from the faucet shanks to
the shutoff valves, check for leaks, and flush out the faucet.
A NEW LOOK FOR A THREE-HANDLE TUB FAUCET
1. Removing the handles.
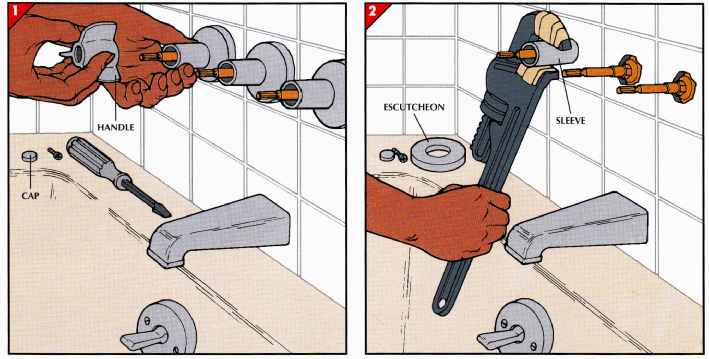
• Before starting, obtain replacement handles from the same manufacturer
for best results; others can be adapted to fit (Step 5) but won’t last
as long.
• Turn off the water supply to the tub.
• Pry off the cap in the center of each faucet handle, or unscrew the
cap with pliers if it has raised edges.
• Remove the screw holding the handle on the faucet stem, and pull off
the handle. If necessary, use a faucet-handle puller.
2. Removing escutcheons and sleeves.
• Take off the faucet’s escutcheons, or cover plates; they may be held
in place by face screws or by a setscrew at the base of each escutcheon,
or they may have been se cured by the handles.
• If the sleeves are separate pieces, as here, remove them next; they
may lift off, or you may need to unscrew each with a tape-wrapped pipe
wrench.
3. Installing new escutcheons.
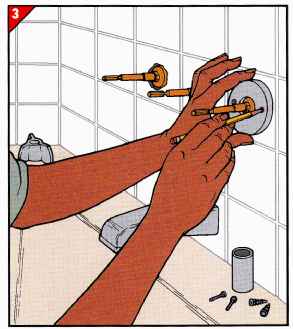
• Slide each new escutcheon over a faucet stem. If the escutcheons have
holes for setscrews, position the holes at the bottom.
• For escutcheons that are secured with face screws, center each escutcheon
over a stem and line up the face-screw holes to either side of it. Mark
the location of the screw holes on the wall and make 1 -inch- deep holes
at the marks using a drill with a k-inch carbide bit. Insert the plastic
screw anchors supplied with the handles into the holes, then attach the
escutcheon with the face screws.
4. Inserting the sleeves.
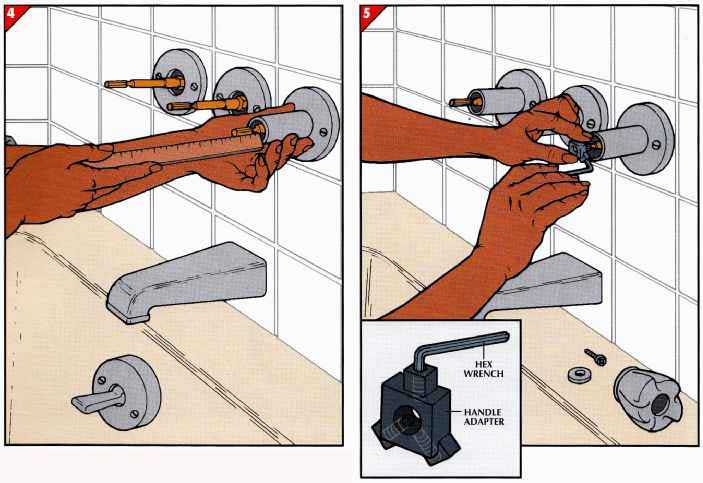
• Attach separate sleeves by placing each one over a faucet stem and
inserting it into the center of that escutcheon.
• Measure how much of the stem protrudes beyond the sleeve (above);
if less than inch of the stem is exposed, remove the sleeve and shorten
it with a hacksaw.
• Attach the sleeve, usually by tightening a setscrew at the bottom
edge of the escutcheon.
5. Attaching the handles.
• If the new handles are from the same manufacturer as the original
handles, set them in place, attach with screws, and cover the screws
with caps.
• For replacements from a different company, use handle adapters. Fit
an adapter onto the ridged end of each faucet stem, then tighten the
three setscrews with the hex wrench supplied with the adapter. Put on
each handle and secure it with a screw. Snap the handle caps in place.
REPLACING OTHER BATH AND SHOWER FITTINGS
Revamping a single-handle faucet.
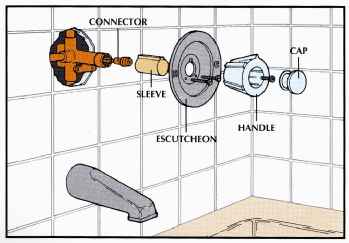
Always replace a single-handle tub or shower faucet with one from the
same manufacturer.
• Pry off the faucet cap, which conceals a screw attached to the connector.
Loosen the screw and pull off the handle.
• Unfasten the escutcheon. Remove it, the sleeve, and the connector.
• Install new trim by reversing the disassembly process, substituting
a new sleeve, escutcheon, and handle.
Changing a showerhead and shower arm.
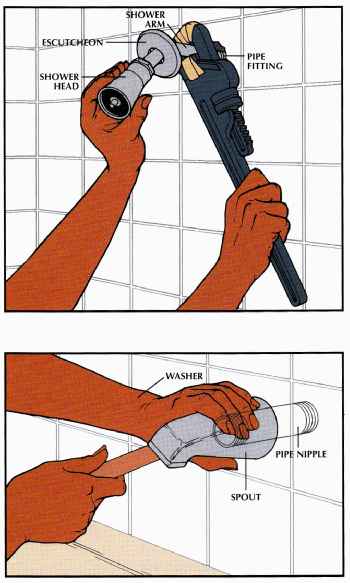
• Pull the shower-arm escutcheon away from the wall.
• With a pipe wrench, carefully unscrew the shower arm from the pipe
fitting inside the wall. Discard the old showerhead and shower arm.
• Wrap the threads on both ends of the new shower arm with plumbing-sealant
tape. Screw the new head onto the arm and slide the escutcheon over the
other end.
• Hand screw the free end of the arm into the pipe fitting. Steadying
the assembly with one hand, tighten the arm with a tape-wrapped wrench
until the shower head points down.
• Press the escutcheon against the wall.
CAUTION---Never allow the pipe fitting to turn or move inside the wall.
This could break it and require extensive repairs.
Changing a tub spout.
• If your spout has a setscrew at the base, loosen it and slide the
spout off; replace it with any other spout using the same system.
• If your spout does not have a setscrew, turn the spout with a pipe
wrench to remove it from the pipe nipple underneath. Take the spout to
a plumbing-supply store to find a replacement with the same threading.
• Wrap the threads on the nipple with plumbing-sealant tape and tighten
the new spout onto the nipple by hand. To finish tightening, trim a piece
of wood to fit in the spout opening; use it to position the spout with
its opening straight down.
Changing an overflow plate.
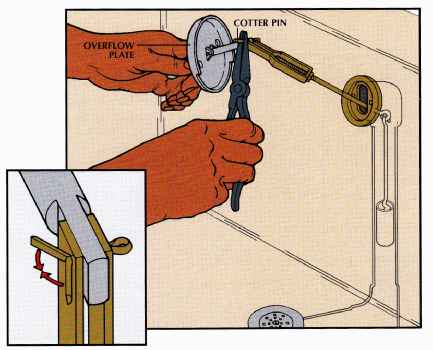
• Remove the two screws holding the overflow plate to the tub.
• Pull the plate and attached mechanism out of the overflow hole far
enough to reach the cotter pin (inset) that secures the mechanism to
the back of the plate.
• With pliers, squeeze the ends of the cotter pin together and pull
the pin out to free the plate.
• Attach the new plate to the old mechanism with a new cotter pin.
• Ease the mechanism back into the overflow hole and secure the plate
with the two screws provided.
SERVICING AND REPLACING SHOWER DIVERTERS
Replacing a screw-on spout diverter.
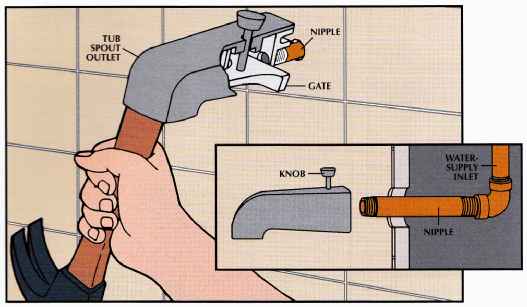
The knob of this diverter raises an internal gate that closes the pathway
to the tub spout, forcing the water up to the shower head. If the mechanism
malfunctions, the entire spout must be replaced.
• To remove the old spout, insert a piece of wood, such as a hammer
handle, in the spout and turn it counterclockwise. Buy a replacement
spout of the same length as the old one.
• If you cannot match the spout, buy an appropriately sized threaded
adapter or replace the nipple (inset).
• Apply plumbing-sealant tape to the threads and silicone sealant to
the spout base.
• Hand tighten the spout. If you can not complete the alignment by hand,
use the makeshift wood tool or—provided the spout comes with a pad to
protect the finish—use a wrench.
Replacing a slip-fit spout diverter.
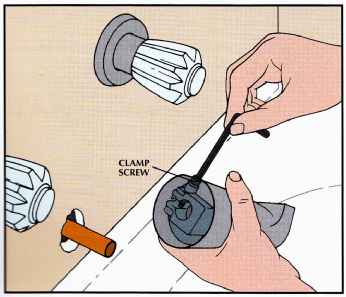
• To remove this type of spout, loosen the clamp screw on the underside
with a hex wrench. Grasp the spout firmly and twist it off the pipe.
• With the hex wrench, loosen the clamp screw on the new spout, and
twist the spout onto the pipe.
• Turn the spout so that the clamp screw faces up, and partially tighten
the screw.
• Twist the spout into position and finish tightening.
Servicing and replacing other diverter types.
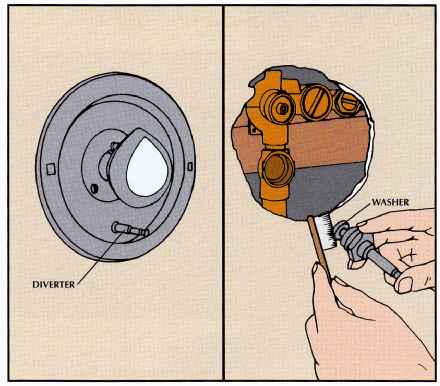
For a diverter in a single-lever faucet unit (above, left), remove the
faucet handle and escutcheon, then unscrew the diverter.
• If water is not being diverted from the tub spout to the shower head
properly, clean any sediment that may be adhering to the washer with
white vinegar and an old toothbrush (above, right).
• If water leaks from around the diverter or if its parts are worn,
replace the entire mechanism with one of the same make.
• For a diverter in the center of a three-handle faucet, replace the
en tire cartridge if it leaks or malfunctions. Proceed just as you would
for a faucet cartridge.
UNCLOGGING A SHOWER HEAD
1. Removing a shower head.
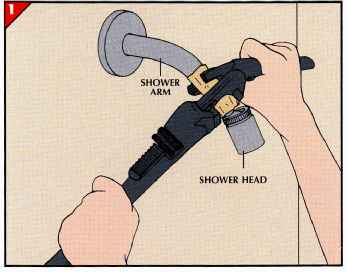
When the water flow from a shower head is uneven or insufficient, disassemble
and clean the fitting:
• Wrap the shower head collar in masking tape and turn it counterclockwise
with a pipe wrench. For greater leverage, grip the shower arm with one
wrench and turn the collar with a second wrench.
• Twist off the loosened shower head by hand.
2. Disassembling the shower head.
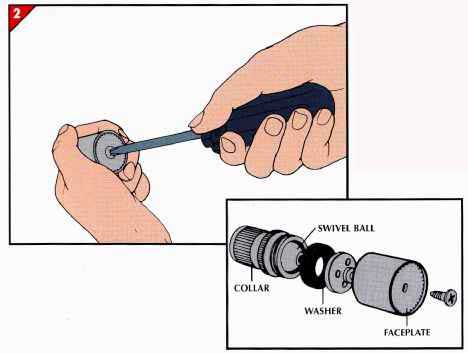
• Remove the screw (left) or the knob that secures the faceplate to
the shower head.
• Unscrew the collar from the shower head to reveal the swivel ball,
and pry out the washer.
3. Cleaning the shower head.
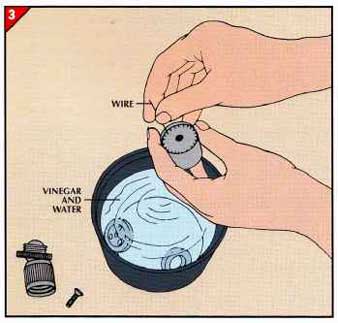
• Soak the entire shower head or its disassembled parts overnight in
a bowl of white vinegar and water.
• Scrub with steel wool or an old toothbrush, and clear the spray holes
with a small wire (left).
• Rinse thoroughly.
• Replace any worn parts of the shower head.
• Lubricate the swivel ball with silicone lubricant, and reassemble
the head.
ADJUSTING BATHTUB DRAINS
A trip drain.
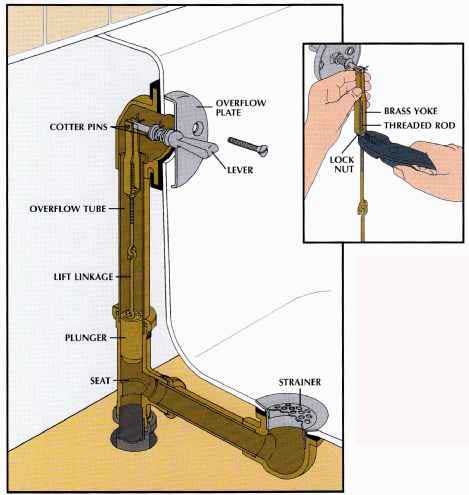
The key element of this type of drain is a brass plunger suspended from
a lift linkage. The lever lowers the plunger onto a slight ridge below
the juncture of the overflow tube and the drain, blocking outflow of
water via the main tube outlet; however, any water that spills into the
overflow tube can pass freely down the drain because the plunger is hollow.
A leak in the drain may be due to wear on the plunger caused by repeated
impact against its ridge seat. To restore a proper fit, lengthen the
linkage:
• Unscrew the overflow plate and lift out the whole mechanism, removing
any accumulated hair or debris. The upper segment of the lift linkage
consists of a brass yoke from which a threaded rod is suspended; a lock
nut secures the threaded rod in place.
• Loosen the lock nut with pliers, turn the threaded rod the desired
amount—usually just a turn or two—then tighten the lock nut again (inset).
• Replace the cotter pins if they are corroded.
A RANGE OF VERRATILE SHOWER HEADS:
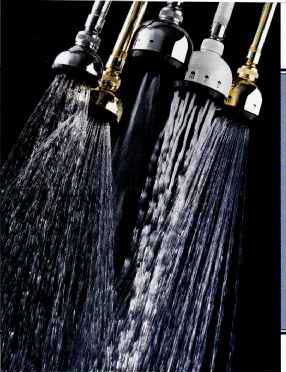
The traditional shower head, designed simply to deliver a steady stream
of water from above, is only one of many shower fittings now available.
Today’s alternatives include hardware with internal mechanisms that conserve
water by lowering the pressure, reduce or shut off water when the temperature
gets too high, or regulate the pulse of the spray to simulate a massage.
Hand-held showers, attached either to the tub spout or the: shower arm,
allow you to maneuver the spray freely—and you can also hang the head
from a bar and use it in the conventional manner.
A pop-up drain.
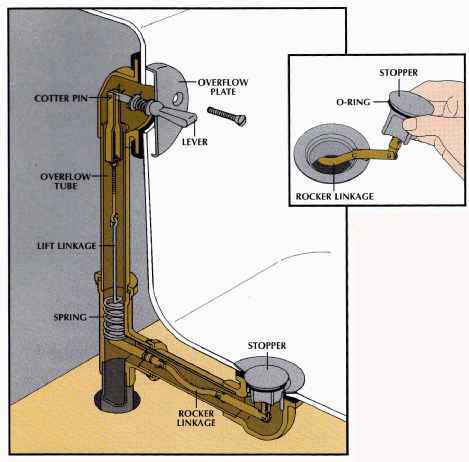
The lift linkage of a pop-up drain resembles that of a trip- lever drain,
except that the lower end of the linkage is shaped to form a stiff spiral
spring. This spring rests on the end of a separate, horizontal rocker
linkage leading to the metal stopper. When the spring presses downward,
the stopper rises. The stopper has a cross-shaped base that pre vents
small objects from passing down the drain.
• If the drain begins to clog, open it with the control lever, then
pull out the stopper and the rocker linkage.
• Clean these parts of accumulated hair.
• Replacing the stopper can be tricky. Make sure that the bottom of
the curve in the linkage faces down. Work it sideways or back and forth
until the bend in the pipe is cleared.
A toe-operated drain.
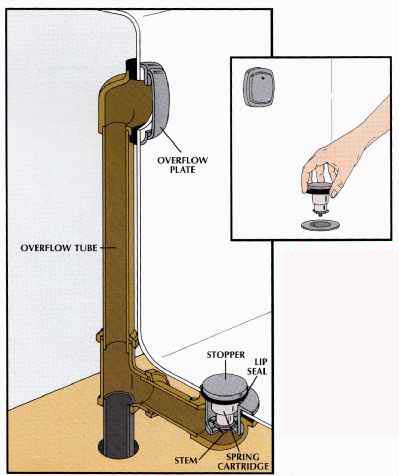
The only moving part of this type of drain is the stopper. Beneath its
rubber lip seal is a spring cartridge attached to a stem. Pressing on
the stopper when it’s open will seal it shut; pressing again will open
it.
• If the rubber lip seal wears out, simply un screw the stopper and
replace it with a matching one.
REPLACING A THREE-HANDLE FIXTURE
1. Cutting the pipes.
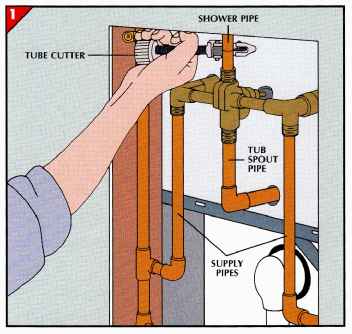
• Detach all handles, escutcheons, and the tub spout from the old faucet
body.
• Look for an access panel on the other side of the wall. If there is
no panel, cut through the wall, as explained below.
• For copper or CPVC supply pipes, cut the pipes leading into the faucet
body at points where they can easily be reconnected with fittings to
the new faucet. If the supply lines are threaded steel, cut them and
unthread the cut sections.
• Take the faucet body, with its cut pipe ends still in place, to a
plumbing-supply store. Buy a replacement, fittings, and spacer pipes.
===INSTALLING AN ACCESS PANEL===
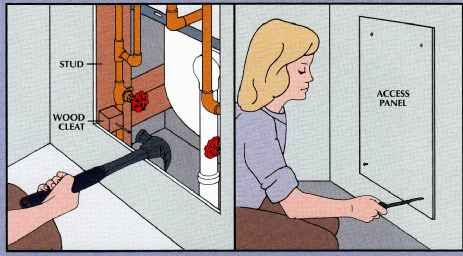
If a faucet body is walled in, create an access panel as part of the
replacement job To determine where to cut, measure from the floor and
nearest corner to the fitting on the tub side of the wall transfer these
measurements to the other side of the wall, and punch a hole with a hammer
and chisel at the indicated point With a dry-wall saw, cut from the hole
out to the studs Draw a rectangular box, stud to stud and about 2 feet
high, and cut the wall along the outline Cut a plywood panel slightly
larger than the opening At the corners of the opening nail wood cleats
to the studs (above, left) The panel attaches to the cleats with screws
(above, right)
2. Connecting the shower pipe.
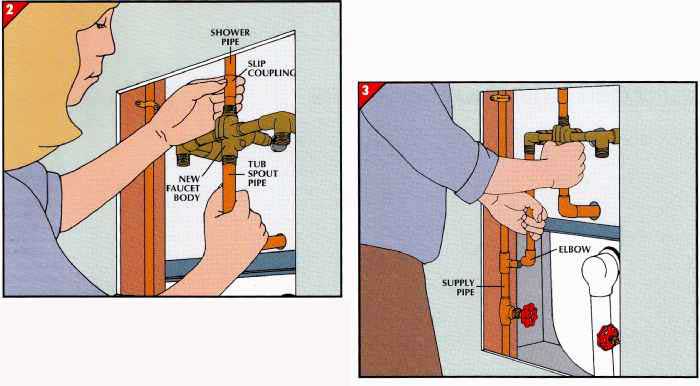
• Cut the pipes to connect the new faucet body to the shower pipe, the
spout, and the supply lines. For CPVC or steel supply lines, use CPVC
and add threaded adapters to the faucet body.
• Temporarily place the pipes in the faucet body, and put the assembly
in position to check the pipes’ lengths. Remove it and shorten them as
needed.
• Secure the tub spout pipe and the shower pipe spacer to the faucet
body, placing a slip coupling on the spacer.
• Set the faucet body assembly in place.
• Add an elbow and horizontal pipe to the tub spout pipe. Use a slip
coupling to attach the shower pipe to the spacer (above).
3. Connecting the supply pipes.
• Slip a supply pipe into one of the two openings in the faucet body.
• At the other end of the pipe, attach a coupling or elbow and connect
it to the supply line (above). Connect the other pipe in the same way.
• Solder or cement the pipes at both ends.
• Leave the access panel open for a few days in order to check for leaks.
===ANTI-SCALD PROTECTION===
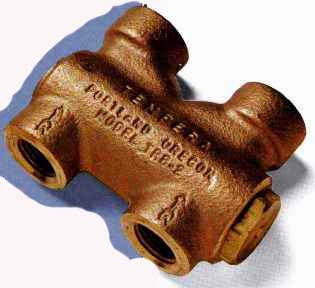
Many state codes require so-called pressure balancing faucets in new
installations to protect against dangerous changes in the mix of cold
and hot water—as when a toilet is flushed while someone is showering.
These faucets, available only in single-lever style have a mechanism
that regulates the relative pressure of the hot- and cold-water supplies—hence
the maximum temperature. With two- or three faucets you can in stall
a device such as the one at right—a separate pressure balancing valve
This may require rerouting the existing supply pipes; since the valve’s
internal mechanism is sandwiched between two parallel intakes and outflows.
INSTALLING A NEW SINGLE-LEVER FAUCET
1. Gaining access to the faucet body.
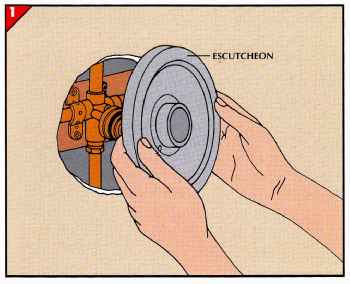
• Remove the handle and unscrew and lift off the escutcheon (left).
• If you have access to the faucet from the other side of the wall,
follow the procedure for removing the faucet body described for a three-handle
faucet. If you cannot gain access from the back, you may be able to re
place the faucet body from the tub side (next step); don’t attempt this,
however, in a house with steel supply lines.
2. Removing the faucet from the tub side.
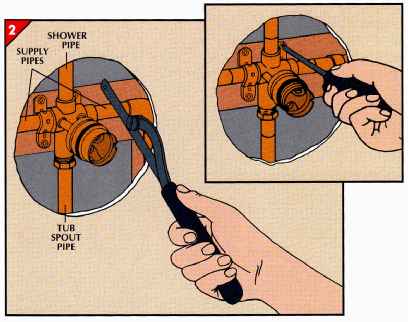
• Cut the shower pipe, tub spout pipe, and supply pipes with a mini-hacksaw
(left). It may be necessary for you to chip away tiles or wallboard for
easier access.
• Remove the screws that secure the faucet body to the wooden crosspiece
behind it (inset).
• Lift the faucet body out of the wall.
• Buy a replacement faucet of the same make and model as the old one
(or at least the same size), along with replacement pipe and slip couplings
that will be used to reconnect the pipes. To calculate the total amount
of new pipe needed, add the lengths of the four pipes in the old faucet
plus at least half an inch for each length.
3. Reconnecting the pipes.
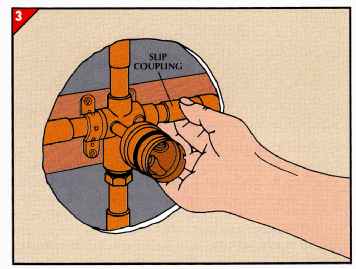
• Cut the new pipe into segments that will join the faucet body to the
shower pipe, tub spout pipe, and supply lines; insert them in the faucet
body, using threaded adapters for plastic pipe.
• Position the faucet and connect the pipes with slip couplings (left).
• Secure the faucet body by screwing it to the crosspiece with pipe
clamps.
• If you have copper pipe, remove all plastic and rubber parts from
the faucet body before soldering the joints. Mount a flameproof pad between
the crosspiece and the pipes for protection. ( You may need to unfasten
the clamps to slip the cloth through.)
• Screw on the escutcheon and reconnect the handle.
|