.
...
New Faces for Old Cabinets
One economical alternative to installing new kitchen cabinets is to
reface the old ones. The job consists of replacing old doors and drawer
fronts with new ones and veneering the cabinet frames to match.
Acquiring Materials: Supplies for the job are available through millworks,
cabinetmakers, or firms that specialize in cabinet re-facing. After choosing
a style and finish for the new doors and drawer fronts, order veneer
in a matching finish to cover the ends and faces of the cabinets.
Two kinds of veneer are required. Thin peel-and-stick veneer for the
cabinet faces comes in sections that are 2 by 8 feet and are pre-coated
with a pressure-sensitive adhesive. Veneer for cabinet ends is mounted
on 1/8-inch plywood and is available only in 4- by 8-foot sheets. Ask
your supplier to cut the veneer for you slightly larger than the ends
of your cabinets.
Things Not to Overlook: Besides the veneer, you’ll want prefinished
molding to trim the tops of eye-level cabinets and the ends where they
meet the kitchen ceiling and walls. To fill joints and nail holes, ask
for a touch-up kit containing a wood crayon—a stick of filler that matches
the finish on the veneer.
The face of many a cabinet extends 0.25 inch beyond the ends, creating
a void that must be filled before the ends can be veneered. For this
purpose, purchase 0.25-inch luan plywood, which is named for the tree
whose wood gives the material a smooth surface ideally suited to adhering
veneer.
TOOLS
- Utility knife
- Hand roller
- Fine-toothed hand saw
- Combination square
- Nail set
- Level
- Circular saw with plywood blade
- Backsaw
- Miter box
- 0.25-inch drill
MATERIALS:
- Doors
- Plywood-backed veneer
- Peel-and-stick veneer
- Trim molding
- Hinges
- Door handles
- Drawer pulls
- Drawer fronts
- Contact cement
- 0.25-inch luan plywood
- Medium sandpaper
- Clear lacquer spray
- 1.25-inch finishing nails
- Wood filler
- Wood crayon
- Felt or plastic bumpers
- - - - - - -
VENEERING CABINET ENDS
1. Preparing the cabinet frames.
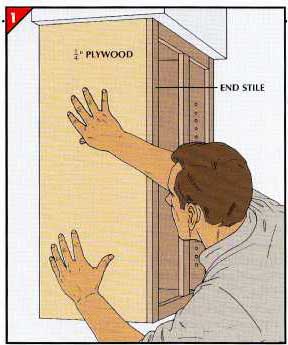
• Remove drawers, doors, and hinges from the cabinet frames. Pry off
any trim and save the pieces as guides for cutting new molding.
• Strip painted surfaces and fill nail and screw holes with wood filler.
Sand the cabinets smooth, then wipe them clean with a damp cloth.
• If necessary, measure and cut pieces of 0.25-inch luan plywood to
fit between the stiles and the wall. With a small paint roller, coat
the plywood and cabinet ends with contact cement. Press the plywood to
the cabinet and secure it with 0.5-inch nails.
• Spray the cabinet exterior and plywood with three coats of clear lacquer.
2. Securing the veneer.
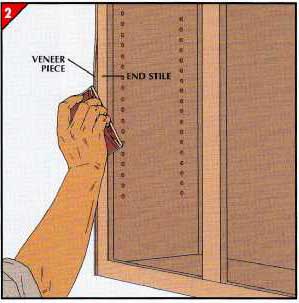
• Hold a piece of veneer against the end of the cabinet. Run a pencil
along front and bottom edges of the cabinet to mark guidelines on the
back of the veneer.
• With a circular saw, trim the piece about inch shorter and 1/16-inch
wider than marked.
• Coat the cabinet and the back of the veneer with contact cement. Press
the plywood in place, with one edge against the wall and another even
with the bottom of the cabinet.
• Sand the protruding edge of the veneer piece flush with the end stile,
then spray clear lacquer on the sanded edge. Recoat any sanded areas
of the stile.
PEEL-AND-STICK VENEER AROUND OPENINGS
The best sequence.
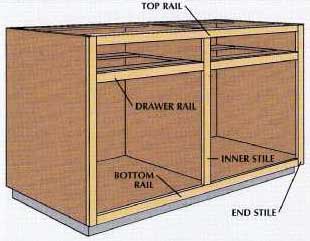
The cabinet face is composed of vertical pieces, called stiles, and
horizontal ones, called rails. Using the technique shown below, veneer
each piece individually, beginning with the end stiles. Cover top and
bottom rails next, followed by inner stiles. Veneer drawer rails last.
1. Veneering end stiles.
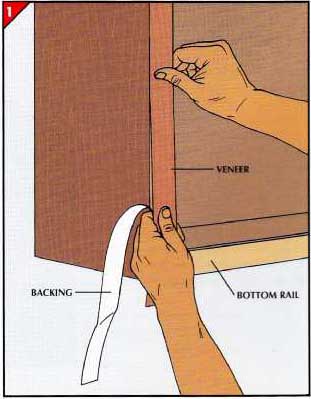
• With a straightedge and utility knife, cut two strips of veneer that
are 0.5 inch wider and 1 inch longer than the end stiles.
• Peel a few inches of backing from one strip and, with the grain running
vertically, lightly press it against the stile, flush with the top. Working
down the stile, continue peeling off the backing and pressing the veneer
against the cabinet. Cover the other end stile in the same way.
TOP RAIL
2. Trimming the veneer.
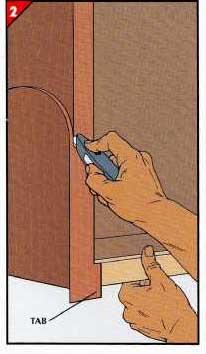
• Run a utility knife down the inner edge of each stile, then cut along
the top of the bottom rail, leaving a small tab of veneer on the bottom
rail.
• Next trim along the outer edge of the stile (above) and the bottom
edge of the rail.
3. Covering the rails.
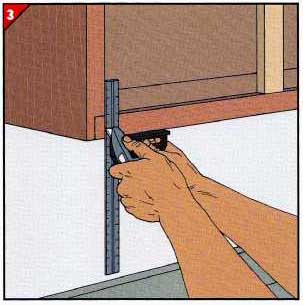
• Cut two strips of veneer 0.5 inch wider than the top and bottom rails
and long enough to overlap both end stiles.
• Press the veneer against the rails as described in Step 1, then trim
the veneer along the top and bottom edges of both rails.
• Using a combination square as shown above, cut through the rail veneer
and the tab of stile veneer at each end of the two rails. Remove the
scraps thus formed, and press the rail veneer into place.
• Follow the same procedure to veneer first the inner stiles and then
the drawer rails.
4. Finishing up.
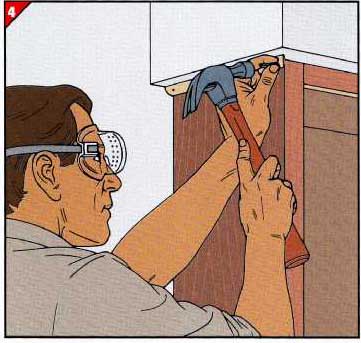
• When all the peel-and-stick veneer is in place, run a hand roller
along the stiles and rails to permanently bond the veneer to the cabinet
face.
• Cut trim molding with a backsaw and a miter box to cover the joints
that the cabinets form with the walls and the ceiling. Nail the molding
to the cabinets with 1.25” finishing nails.
• Sink the nail heads into the trim molding with a nail set.
• Conceal the nail holes—as well as joints between pieces of molding
and veneer—with a wood crayon.
DRAWER FRONTS AND DOORS
1. Putting on new drawer fronts.
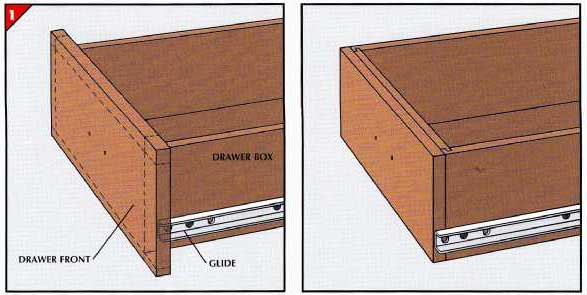
• Remove the old drawer fronts if you can do so without damaging the
drawer box. Other wise, unscrew the drawer glides and trim each front
flush with the drawer box (dotted lines) using a fine-toothed saw. Reposition
the drawer glides so that they are flush with the drawer front as shown
above right, and drill two screw holes through the drawer front and the
drawer box.
• Lay a new drawer front on the floor with the finish side down, and
center the drawer box on it. Through the screw holes in the box, mark
the front for pilot holes and drill them as shown earlier. Then screw
on the new front from inside the drawer.
2. Hanging new doors.
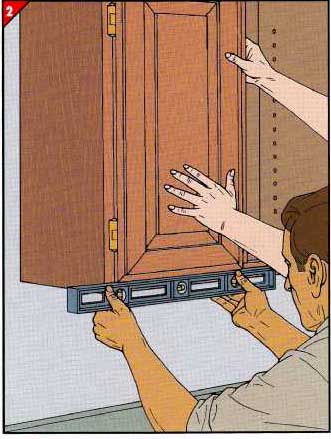
• Attach hinges to each door 2 to 3 inches from the top and bottom edges.
• With a helper holding the door in place, center it on the door opening
and level it. Then reach inside the cabinet and mark the frame for pilot
holes where the hinges will attach to the cabinet frame. Drill pilot
holes, and mount the door.
• Install the adjacent door by aligning it with the level on the one
that is al ready in place.
• Mount the door and drawer handles and put felt or plastic bumpers
on the inside of the doors and the drawers to protect the veneer.
++++++++++++++++++++++++++++++++++++
Installing a Sheet-Vinyl Floor
If your kitchen floor is worn or damaged beyond repair, or if you just
want a new look, you may want to consider using vinyl. Available in square
tiles or in large sheets, vinyl flooring comes in a wide variety of colors
and patterns with a durable, no-wax finish. Vinyl is also easy to install;
doing the project yourself will result in a significant cost savings.
One of the biggest advantages of vinyl is that it can usually be laid
right over the existing floor. A variety of products are available to
smooth and level the old surface in preparation for installation of a
new floor. Talk to a salesperson when purchasing your new flooring, and
read the manufacturer’s instructions to determine what you need.
Measurements and Preparations: To calculate how much flooring you will
have to buy, measure the dimensions of your kitchen floor at the widest
and longest points in the room and add 6 inches at each wall for overlap.
If you find you will need more than one sheet, note the width of the
pattern repetition on the flooring you have chosen; it’s usually printed
on the back of the sheet. For ex ample, if your pattern repeats every
3 feet, allow 3 feet of extra width when you buy the material.
Before beginning the installation, remove the shoe molding or vinyl
wall base as shown earlier and move appliances out of the kitchen so
the new flooring can be laid underneath. Scoot these heavy items on a
piece of hardboard to protect the floor.
The Finishing Touch: When the floor is in place, attach metal edging
at the kitchen doorways to conceal the edge of the vinyl sheet.
TOOLS:
- Utility knife
- Notched spreader
- Rolling pin
- Metal yardstick
- MATERIALS:
- Vinyl-flooring adhesive
- Seam sealer
CUTTING THE MATERIAL TO FIT
1. Rolling out the material.
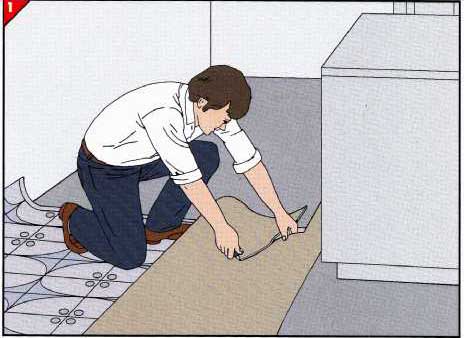
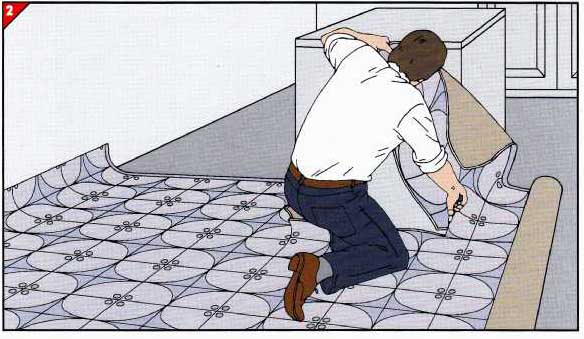
• Let the material adjust to room temperature for an hour or so; then,
if you are using more than one sheet, start in one corner and unroll
the larger sheet from the longest wall of the room. Leave 6 inches of
overlap at each wall.
• When you reach a large immovable object, such as a center island,
you will need to leave 6 inches of overlap as you cut around it. Reach
under the roll and unroll the sheet back toward the starting wall. Push
the unrolled section against the object and, about 6 inches above the
floor, cut from the outside edge toward the center with a utility knife.
When you are about 6 inches short of the vertical side of the object,
cut back toward the starting wall; make this cut at least 6 inches shorter
than the object’s depth.
2. Fitting around a large object.
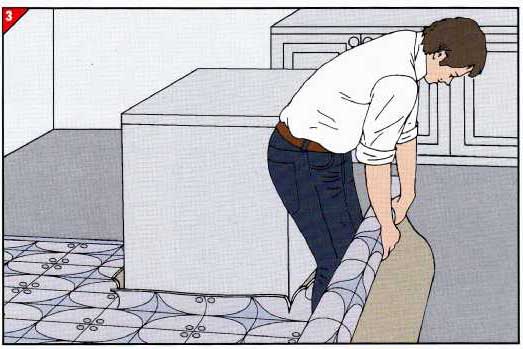
Lift the roll over the object and lower it to the floor on the other
side. Holding the corner of the flap you have made in the sheet, cut
at a right angle toward the outside edge of the sheet. This should give
you a 6-inch overlap along all three sides of the object.
3. Reversing the roll.
• Unroll the sheet completely, then pull it back and reroll the sheet
from the far edge as shown at left. The tightness of the inner part of
the original roll compresses the pattern; unless the roll is reversed
briefly, the pattern will be smaller in one part of the room than the
other.
• Unroll the sheet again and press it into all corners, to the extent
that its natural resiliency will allow.
4. Laying the second sheet.
• Before bringing the second sheet into the kitchen, measure the width
of uncovered floor from the first sheet’s edge to the opposite wall.
Add 6 inches, plus the amount of overlap required to match the pattern.
• Unroll the second sheet completely in an area free of obstructions.
Mark the above measurement on the sheet and cut. Reroll the sheet and
bring it into the kitchen.
• Starting again from the longest wall, roll the second sheet out as
far as the obstruction, then pull it over the first sheet until the patterns
match (above). Cut and fit the second sheet around objects as you did
the first, leaving 6-inch overlaps at the walls.
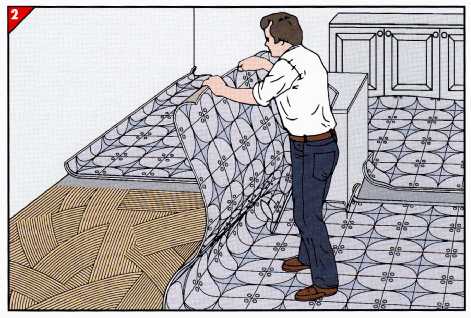
5. Trimming the edges.
Pull the second sheet off the first and out of the way. At each wall
and object, cut the first sheet back to about 3 inches above the floor.
Take care in making this cut— you are now close to the final trim.
BONDING THE VINYL TO THE FLOOR
1. Applying the adhesive.
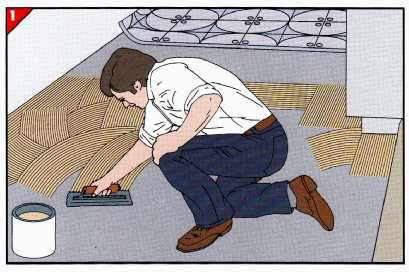
Pull the first sheet halfway back upon itself. With a notched trowel,
spread adhesive over the exposed floor as closely as possible to the
walls and corners, but leaving bare a 6-inch strip along the line where
the first sheet will meet the second.
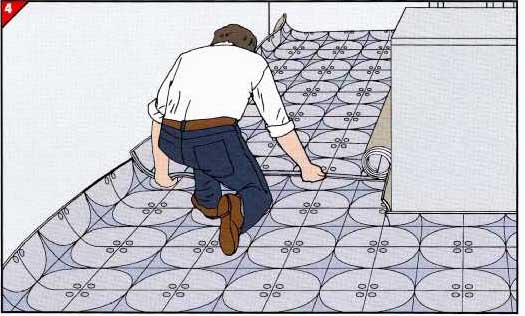
2. Affixing the first sheet.
Lift the edge of the sheet high above the floor and slowly walk it back
into place over the adhesive. Press it against the wall and into the
corners as closely as its resiliency will allow.
3. Rolling out the bumps.
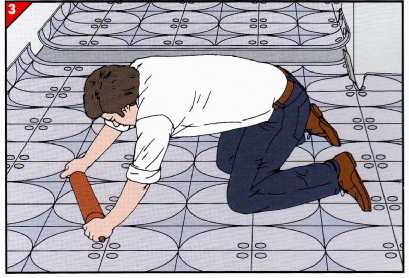
With a rolling pin, start from the center and roll the material toward
each of its edges. Work slowly, and be sure to flatten any bulges or
air bubbles in the vinyl’s surface.
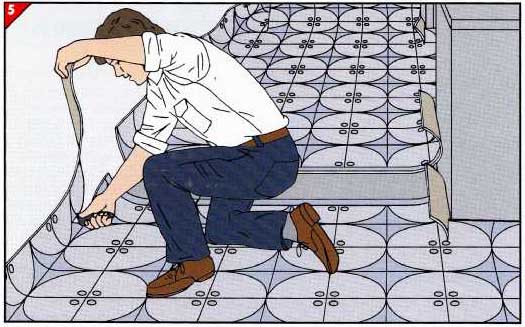
4. Making the final cuts.
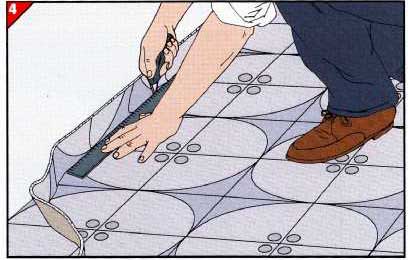
• To crease the material, press a metal yardstick into the angle where
walls or objects meet the floor. Then slice along the edge of the yardstick
with a utility knife. Make the cuts as straight and accurate as possible;
shoe molding or wall base will cover errors up to about inch.
• Repeat Steps 1 through 4 for the other half of the sheet.
MATCHING THE PATTERN AT SEAMS
1. Cutting off the trim.
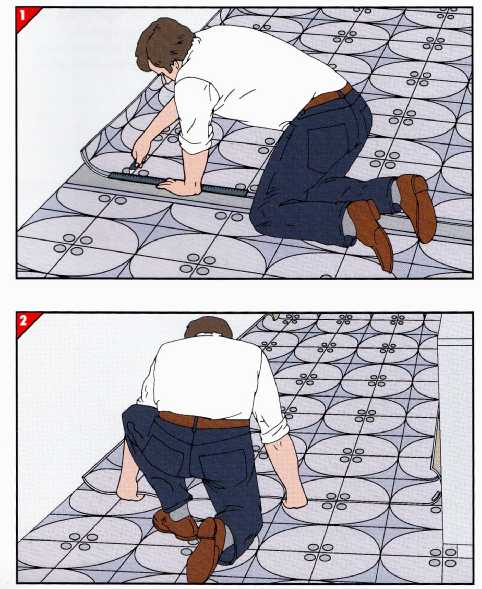
Place a metal yardstick along the over lap edge of the second vinyl
sheet. With a utility knife, cut off the - to 1-inch trim along this
edge. On inlaid vinyl this trim is likely to be an extra- wide grout
line; cut along the line so that its width matches the widths of the
other grout lines in the pattern.
2. Matching the pattern.
Pull the second sheet over the first until the patterns of the two sheets
match perfectly. Note the pattern care fully to be sure the overlap continues
the pattern in the same manner—a mismatched pattern will spoil the appearance
of the finished job.
3. Cutting off the overlap.
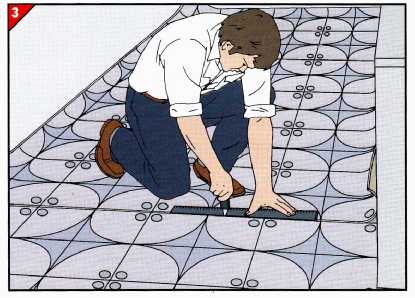
• Place a metal yardstick along a grout line or other inconspicuous
part of the pattern where the seam is less likely to show. Then, cut
straight down through both sheets. Don’t worry if it takes more than
one pass with the knife to cut completely through the material; the important
thing is that the cut be straight and clean. Remove the strips you have
cut; the sheets should now abut tightly and have a perfect pattern match.
• Lay the second sheet as you did the first, trimming overlaps to 3
inches around objects and against walls.
• Spread adhesive to within 6 inches of the edge of the first sheet,
and make a final trim along each wall and object.
4. Applying adhesive under the seam.
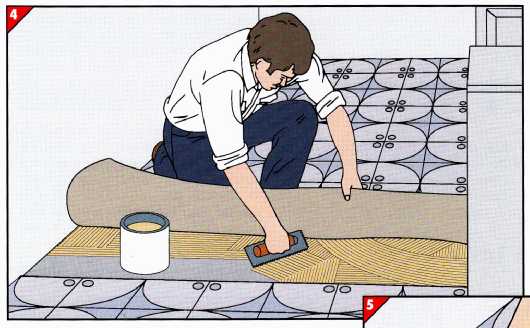
Follow the manufacturer’s directions for sealing the seam between two
sheets. Some vinyl flooring requires a special sealing adhesive below
the sheets; with others you use regular adhesive underneath and seal
the seam from the top.
• Pull back the butted edges on both sheets and spread adhesive over
the bare floor along the en tire length of the seam. Then press the sheets
back in place, pushing the edges together until you get a tight fit.
• If seam sealer is called for by the manufacturer, proceed immediately
to Step 5.
5. Sealing the seam.
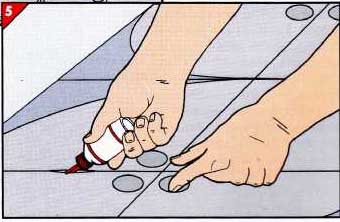
Press the seam together with the thumb and fingers of one hand while
applying seam sealer with the other. Wipe away any excess sealer immediately
and keep off the seam for at least 24 hours.
+++++++++++++++++++++++++++
The Versatility of Vinyl Tiles
Vinyl tiles offer virtually endless design possibilities for a kitchen
floor. More often than not, tiles are laid in rows parallel to the walls
of the room, but there are other options as well. You can, For example,
create a diagonal checkerboard of contrasting colors, a pattern that
can make a small kitchen look larger.
Learning from a Dry Run: Begin by snapping chalk lines to divide the
room into roughly equal quadrants, then lay tiles along the lines. For
a simple parallel layout, begin the dry run at the intersection, and
set tiles along each line to the walls. The dry run for a diagonal checkerboard,
explained on these pages, is somewhat more complex. In either case, if
the dry run would result in cutting very small pieces of tile in order
to fill in along walls and elsewhere, start over with chalk lines in
slightly different locations.
Laying the Tiles: When the dry run is satisfactory, prepare the old
surface as described, then begin laying the tiles. Fill in a parallel
pattern one quadrant at a time, working from the center to the walls.
A checkerboard pattern proceeds as shown beginning below. Cut tiles to
fit in spaces against walls and cabinets, taking care that the edges
you cut form the outer edge of the floor, where they can be covered by
baseboard.
When all the tiles are down, wipe up any excess adhesive, then press
the tiles against the floor with a rolling pin or with a tile roller,
which lets you do the work standing up. Keep traffic to a minimum for
48 hours to let the adhesive cure.
TOOLS
- Tape measure
- Contour gauge
- Framing square
- Scissors
- Masking tape
- Chalk line
- Rolling pin
MATERIALS
- Vinyl tiles
- Notched trowel
- Premixed adhesive
- Utility knife
- Paper
- - - - - - - -
ESTABLISHING THE LAYOUT
1. Determining the starting point.
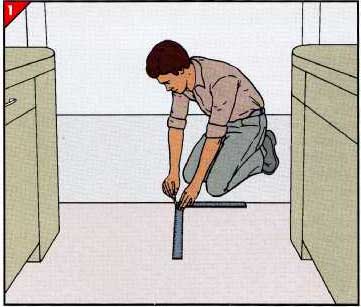
• Mark the center of the main kitchen doorway on the threshold. If there
is no threshold to serve as a baseline, establish the center point on
a line drawn between the corners of the doorframe.
• Position a framing square at the midpoint of the doorway, and draw
a pencil line about 2 feet into the kitchen.
2. Marking the primary axis.
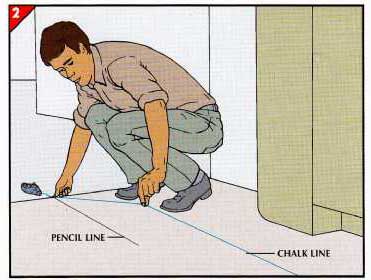
• With a helper, stretch a chalk line from the doorway to the opposite
wall. Hold your end on the center point of the doorway, and have your
helper move the other end to position the string directly over the pencil
line on the floor.
• Holding the chalk line taut, with both ends pressed against the floor,
lift the line directly up ward a few inches and let go. It will snap
to the floor, leaving a straight line of powdered chalk.
3. Starting the dry run.

• Place a tile diagonally along the chalked line with one corner at
the point marking the center of the doorway. Tape it to the floor with
masking tape.
• Set tiles of a single color along the chalked line until you come
within 1 tile width of the wall.
4. Establishing secondary axes.
• At about the midpoint of the dry run—and wherever the room widens
into an alcove or into a T or L shape— snap a chalk line the width of
the room and perpendicular to the primary axis.
• Lay tiles of a single color along each of these secondary axes.
STICKING DOWN THE TILES
1. Laying the first tile.
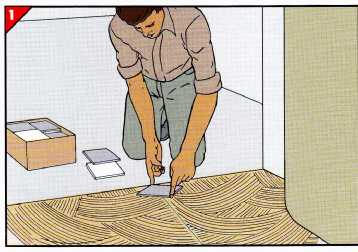
• Note the working time of the adhesive, and make a conservative estimate
of the area you can cover with tile in that time. Pick up all the tiles
from the dry run, then pour equal amounts of adhesive on both sides of
the chalk line near the doorway. Spread the adhesive evenly with a notched
trowel to the chalk line but not across it.
• Holding a tile as shown at left, set one corner on the adhesive on
the baseline at the midpoint of the doorway. Align the other corner with
the chalk line and let it fall onto the adhesive. This tile must be absolutely
straight, since it will determine the alignment of all the rest. Adjust
the tile if necessary by nudging it gently.
2. Working across the floor.
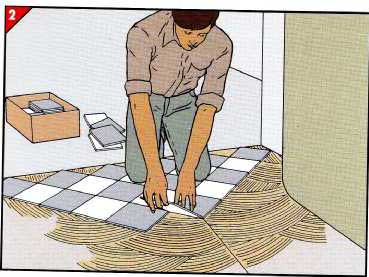
• Begin by laying tiles of one color, corner to corner, along the baseline.
Next lay a row of tiles of contrasting colors, creating the pointed array
at left. Fill in the half-tile spaces at the baseline.
• Continue laying rows of tiles along the sides of the point to extend
it to the far end of the room, alternating colors and aligning tile edges
carefully.
• Where the room widens, use the zigzag edge of the tiled area as a
baseline from which to extend the tiles to the left or right.
CUTTING TILES TO FILL GAPS
Making a triangular piece.
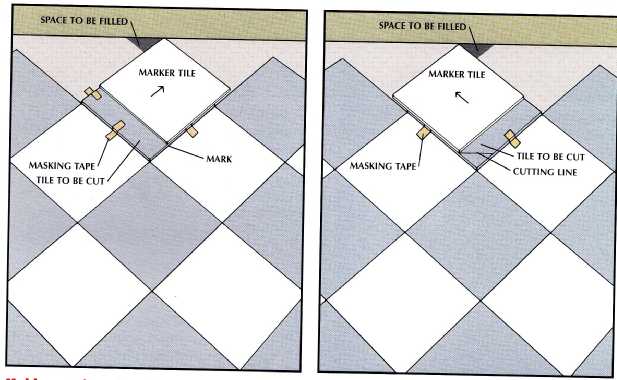
• Cut corners from tiles to fill small triangular spaces (shaded area)
along walls. To do so, tape the tile to be cut—here a dark one—on a tile
of the same color. Set a third tile on top to act as a marker.
• Slide the marker tile diagonally to the wall (left). At the corner
farthest from the wall, pencil a mark on the tile to be cut. Slide the
marker tile diagonally in the other direction, and make another mark
.
• With a utility knife, cut along a straight line joining the marks,
and set the triangular piece in place.
Filling a five-sided space.
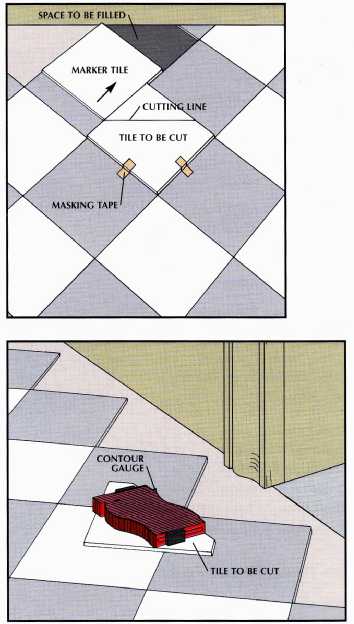
• Tape the tile to be cut—in this case a light one—on top of a tile
of the same color, then set a marker tile alongside it.
• Slide the marker tile diagonally to the wall, and mark where the corner
farthest from the wall touches the tile to be cut. Set the marker tile
on the other side of the tile to be cut and repeat.
• Use a utility knife to cut the tile along a straight line drawn between
the two marks, and fit the five-sided piece in place.
Cutting irregular shapes.
• To fit a tile against an irregularly shaped object, such as door molding,
first cut a tile to fit the space to be filled as if the obstacle were
not there.
• Then press a contour gauge against the irregular shape and part of
the adjoining wall on either side, of it and lock the sliding fingers.
Transfer the contour to the tile .
• Warm the tile in a 200° oven for a few minutes, then cut it to shape
with heavy-duty scissors.
Fitting tiles under a low overhung.
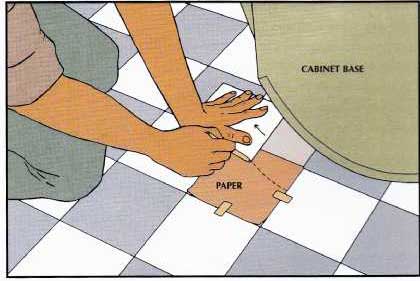
• To fit a tile against the base of an overhanging cabinet or appliance,
tape a tile-size piece of paper to a nearby tile and place a marker tile
atop the paper.
• Slide a corner of the marker tile under the overhang and against the
base. Hold a pencil against the corner as shown at right, and slide the
marker tile along the base, keeping the edges parallel to the tile seams.
• Transfer the pencil line on the paper to a tile of the right color,
and cut the tile to shape. If there is not enough room below the overhang
to trowel the adhesive onto the floor, spread a thin coat on the underside
of the cut tile before fitting it in place.
|