An A-frame is one of the simplest and sturdiest of all structures. Its skeleton is a row of triangles—the bases of the triangles are the joists that support the floor and the sides of the triangles are the rafters that hold the combined walls and roof. With sheathing in place on top of the skeleton, this elementary structure is one of the strongest known.
The A-frame’s simplicity of construction and comparatively low cost make it a popular choice for vacation cabins. The slope and strength of its roof are particularly well suited to snow country, but an A-frame can make a comfortable vacation home anywhere, from the mountains to the beach. Its high, peaked ceiling gives a spacious feeling to the smallest cabin. The inward-sloping walls create low, awkward areas on both sides of the house, but these spaces can be turned into convenient storage places.
An A-frame can be built to almost any size simply by varying the dimensions and number of the triangles in its skeleton, but a cabin with a sleeping loft must be built of triangles measuring at least 17’ on a side, to allow adequate head room above both floors. Keep in mind also that at board lengths greater than 20’, lumber costs increase radically and availability may be limited, and that tri angles more than 24’ on a side may be too unwieldy for a crew of amateurs.
The shape of the triangles can vary from gently to steeply sloped, but the most common shape is equilateral, with joists and rafters of equal lengths and angles of 60°. This shape simplifies ordering and cutting the lumber for the skeleton and gives adequate headroom for a minimum amount of lumber. If you choose to build an A-frame that's not equilateral, you must use a scale drawing or trigonometry to determine the lengths of the rafters and the angles of the cuts.
An A-frame’s triangles are bolted and nailed together on the ground, then lifted into place atop continuous masonry- block foundation walls or a foundation of poles (or piers) and girders like the one shown below. For a small A-frame (up to 24’), the lifting can be done by three people with no special equipment. When the triangles are up and sheathed, the floor is laid and interior partitions can be erected in any arrangement.
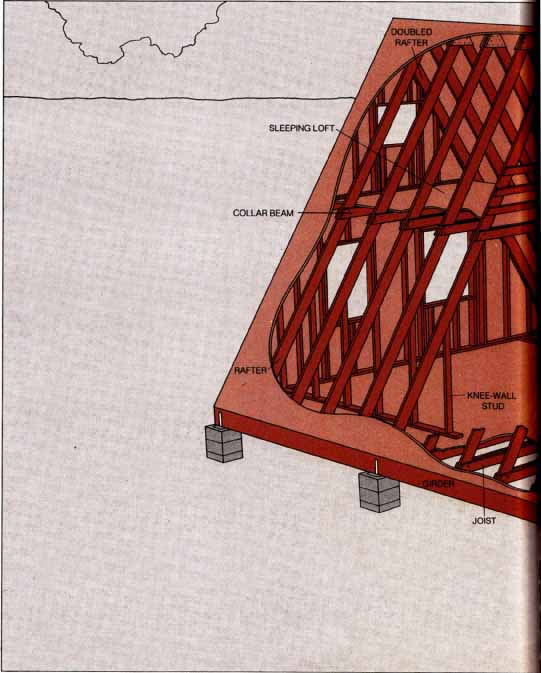
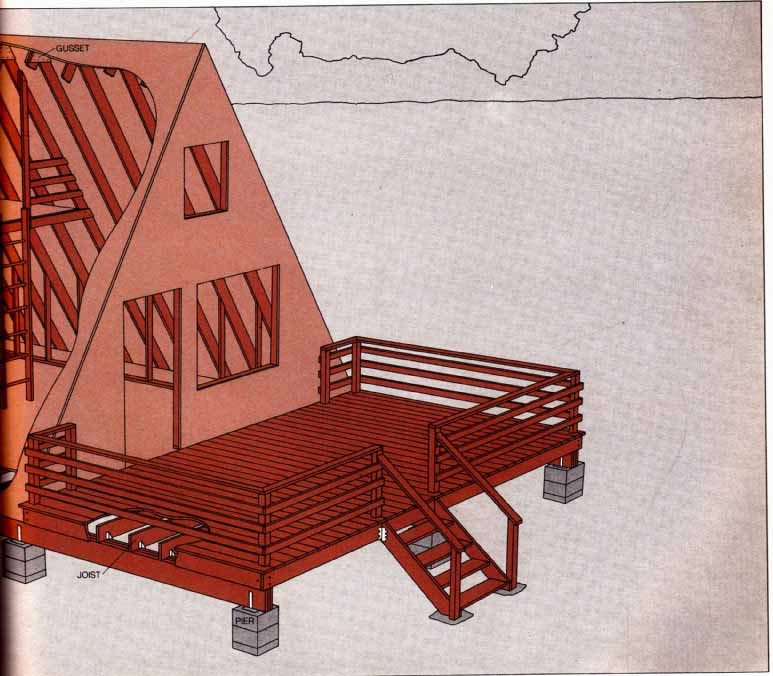
A sleeping loft must be provided with stairs or a ladder (the choice depending on the amount of available space on the first floor) and a sturdy railing. Doors and windows are framed in the end walls with 2-by-4 studs—large A-frames require a lot of window space if they are not to be dark in the middle. A deck, if you build one, should be surrounded by a sturdy railing and should rest on the same foundation as the main structure. Stairs to the deck can be ordered from a stair-builder or constructed on the job with 2-by-b stringers and 2-by-10 treads.
above: A basic A-frame cabin. This small equilateral A-frame rests on a foundation of tripled 2-by-10 girders supported by concrete-block piers. The triangles of the skeleton spaced 24 inches apart on center, are formed of 2-by-8 rafters joined at the apexes with plywood gussets and sandwiched at the bottom corners by pairs of 2-by-6 joists. (Triangles spaced wider apart would require heavier rafters and joists.) At the end walls and under the sleeping loft, horizontal 2-by-6 collar beams sandwich the rafters like extra joists. The rafters of the end walls are doubled in order to provide a flush nailing surface for the exterior sheathing.
The sleeping loft, reached by a ladder, sits over the rear of the cabin. Knee walls along the sides of the cabin square off the low corners where the rafters meet the floor, and conceal a convenient storage space. The deck rests on 2-by-6 joists set 16 inches apart on center. Posts for the railing are secured to the deck joists; the stairs are set on concrete footings and are attached to the deck with metal fasteners.
Putting Up the Frame
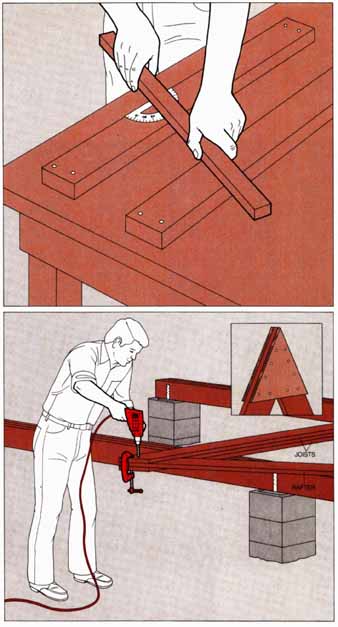
1. Cutting joists and rafters. After building a foundation and installing girders, make a jig to cut the joists by nailing to a work surface two 2-by-4s 5½” apart and nailing across them a 1-by-2 at the angle of the joist ends—for the equilateral A-frame illustrated, 60-degrees. Run a circular saw along the guide, cutting a kerf into both 2-by-4s.
Mark each 2-by-6 joist for length—the width of the cabin—slip it into the jig so that the end mark is at the kerf in the jig and cut the joist.
Cut both ends to angle toward the middle. Make a similar jig to fit rafters, spacing the 2-by-4s 7½”, and add an adjustable guide. Cut the rafters with one end at the same angle as the joists and the other at the angle of the peak cut (for an equilateral A-frame, 60° and 30° respectively). Determine the rafter length from the width of the cabin and the slope of its roof, using an accurate scale drawing or trigonometry (for the equilateral A-frame, the rafters are the same length as the joists).
2. Assembling the triangles. Clamp the ends of two joists around the base of a rafter, align the edges so that the boards meet at the correct angle, and drill through the three boards. Fasten them with a 5/8” carriage bolt. Bolt the other ends of the joists to the base of another rafter and complete the triangle by joining the rafter peaks with two gussets of ¾” exterior-grade plywood nailed to the rafters. Then add a second carriage bolt to the joint at the base of each rafter. Assemble all the triangles in the same manner, but on each of the end triangles nail a gusset to just one face of the rafters.
On one of the assembled triangles, mark the top edge of each rafter at the height at which you wish to attach collar beams, allowing for sufficient headroom—at least 7’. In the jig you used for the joists (Step 1), cut collar beams to the distance between the two rafter marks and bolt them on as you did the joists. Slip short 2- by-4 spacer blocks between all the pairs of joists and collar beams at 2-foot intervals and nail the blocks in place.
Using the rafter jig, cut 2-by-8 boards to fit flush against the outside faces of the end rafters, one set of boards between the joists and the collar beams and another from the collar beams to the peaks; nail the boards in place.
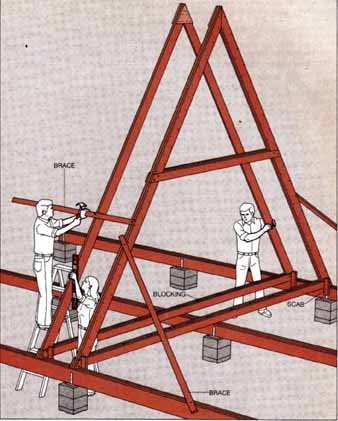
3. Erecting the triangles. You will need two helpers to lift the triangles into position and to steady and plumb them as you attach braces to the rafters. Mark the girders for the triangles on 2-foot centers, then nail scabs—1- to 2-foot 2-by-4s—-to the insides of the outer girders next to the marks for the front end triangle. Set the base of the end triangle against the scabs, raise the triangle plumb and brace it with 2-by-4s run diagonally from the rafters to the girders.
Raise and plumb the remaining triangles as you did the first, bracing each with a pair of horizontal braces nailed across the rafters on both sides of the erect triangles. Set the braces at least 4½’ from the base of the rafters.
As each triangle is erected and secured with horizontal braces, anchor its bottom corners to the girders with metal anchor plates on both sides of the joist nail through the corners of the rafters and joists into the girders. Sheathe the skeleton with 4-by-8 panels of 3 exterior- grade plywood, removing the temporary braces after the bottom course of panels is in place. Cover the main floor and the floor of the sleeping loft, if you have one, with similar 4-by-5 panels.
Filling In the Walls
1. Marking the plates. Cut top and sole plates to fit from rafter to rafter along the floor and the underside of the collar beam; nail down the sole plate along the outer edge of the floor and center the top plate next to it. Mark the plates for studs spaced 16” on center, leaving space between two stud marks for a door.
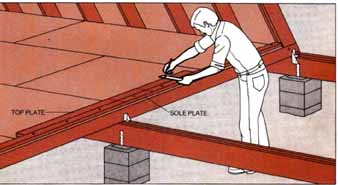
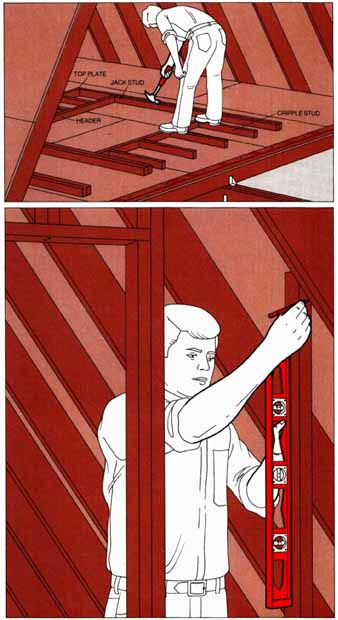
2. Assembling the end wall. Cut studs to fit between the top and sole plates; cut headers and jack and cripple studs to frame a door and window. Butt-nail the studs to the top plate at the marked locations and complete the door and window framing. With a helper, lift the stud assembly into place and align the top plate flush with the outer edge of the outer collar beam. Nail the top plate to the underside of the collar beam, then plumb the studs and toenail them to the sole plate at the marks made in Step 1.
3. Marking beveled studs. Stand a 2-by-4 on a piece of 2-by-4 next to each remaining marked location on the sole plate; plumb the 2-by-4 and mark a line along its edge where it meets the bottom edge of the rafter. Cut the 2-by-4 along the line and toenail it to the doubled end rafters and to the sole plate.
Frame the rest of the wall below and above the collar beams and frame the other end wall in the same manner. Sheathe both walls with 3 exterior plywood, staggering joints.
Putting In a Knee Wall
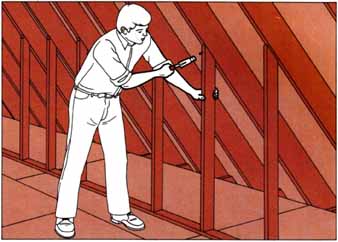
Framing the knee wall. To close off the low corners
where the sloping roof meets the floor at the sides of the house, build
knee walls from the floor to the rafters. To make a knee wall, cut a 2-by-4
sole plate the length of the wall and mark its ends on the floor directly
under two rafters. Mark the plate for studs to extend to each rafter above
it. Stand a 2-by-4 on the plate next to one of the marks and mark the 2-by-4
as you did the stud in Step 3. Cut the 2-by-4 at the mark and use it as
a template to mark and cut the remaining studs.
Butt-nail the cut studs to the sole plate, tilt the assembly into position, and nail the plate to the floor and the studs to the rafters. If the knee wall does not extend to the end of the house, run a second sole plate from the first across to the rafter, and cover the open end with wallboard.
Partition walls that fit between the floor and the collar beams are framed like end walls.
Finishing the Loft
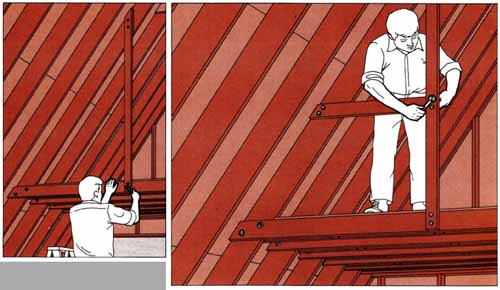
1. Securing posts for a rail. After installing a loft floor, mark locations a ladder-width apart for two 2-by-4 posts on the front collar beam; with a helper, cut the 2-by-4s to fit from the bottom of the beam to the top of the rafters; attach the bottom of each to the collar beam with a lag bolt. Plumb the posts and bolt them to the rafters with two ½” carriage bolts, using 2-by-4 blocking between posts and rafters. Add a second lag bolt to the bottom of each post.
2. Attaching the rails. Cut 2-by-4 top rails to overlap the posts and the rafters 3’ above the floor of the loft. Bolt each rail to the rear face of the post and to the front face of the rafter with two ½” carriage bolts. Add lower rails spaced no more than 6” apart. Build your own ladder or buy a simple wooden one at a hardware store and attach it to the collar beam with metal anchor plates.
If you want stairs rather than a ladder, you can conserve space by installing fold-up attic stairs, available in kits, in a trap-door-covered hole in the floor. Set the stairs parallel to the rafters.
Building a Deck
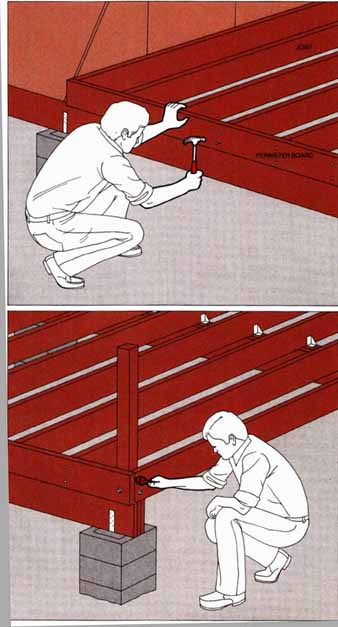
1. Laying the understructure. Fasten 20-foot 2- by-6 deck joists as long as the cabin width to the cabin girders with metal anchors 16” apart, placing one end joist flush against the outer joist of the first triangle (notch the deck joist to fit over projecting nuts or bolt heads). Butt-nail 2-by-6 perimeter boards to the deck-joist ends at each side.
2. Installing posts for railings. At each corner of the deck, set a 4-by-4 post 4’ long on the girder, and bolt the post to the end joist with two carriage bolts and to the perimeter board with a third. Bolt a similar post inside the outer joist at either side of the stairway opening with three carriage bolts, resting one post on the center girder if possible, and bracing both by bolting them to pieces of 2-by-6 blocking nailed between joists.
For decking, nail 2-by-6s across the joists, spacing the boards ¼” apart.
3. Completing the rail. Screw 2-by-4 rails to the outside faces of the posts, working up from the lower rails and spacing them no more than 6” apart. To enclose the small triangular space next to the end wall of the house, run rails from the nearby corner post on each side to a stud in the end wall. Screw the rails to the corner post, nail them to the stud, and on each side toenail an additional 4-by-4 post to the ends of the rails and the top of the deck.
Set 2-by-4 top rails on top of the posts; miter them at the corners for a neat fit.
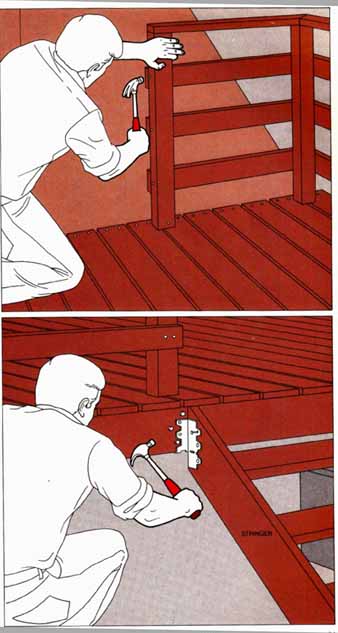
4. Mounting the stairway. Pour concrete footings for the stairway stringers and fasten the tops of the stringers to the outer deck joist with metal anchors. Bolt 4-by-4 bottom posts for the handrails to the outside faces of the stringers and nail 2-by-4 handrails to the bottom posts and to the stairway posts on the deck, keeping the rails parallel with the stairway stringers.