The elaborate framing and sheathing techniques required in most types of construction are not needed to build a log cabin. Instead, logs are notched to fit over each other to form interlocking walls, out of which openings for doors and windows are later cut. The techniques used today are almost identical to those, employed by the pioneer settlers 200 years ago, the major modernization being the substitution of a chain saw for an ax as chief tool.
Dozens of precut log-home kits are sold in a variety of designs, but if you can procure and prepare your own logs, you can build a log cabin at far less cost. The trees best suited to log construction are softwoods—cedar, pine, fir and larch— that measure 8 to 12” in diameter and taper very little from butt to tip. To calculate the number of logs you will need, add the heights in” of all the walls in your plan—including gables at the end walls—and divide by the average diameter in” of the logs you will use. To this basic count, add a few extra logs to allow for mistakes. For your rafters, get straight, smooth logs 5 to 6” thick.
Using the techniques shown, you can fell logs on your own land; in some areas, you can log land of the National Forests or of a local lumber company by paying a “stume.” Occasionally you can buy logs seasoned, peeled and ready for use from a local utility company or logging company.
Whenever possible, cut logs in late fall or early winter, while the sap is down. To prevent excessive cracking, use a spud to peel a 2” strip from the two roughest opposite faces of each log before you stack them. These will be the top and bottom faces, and any cracking that occurs will be localized in these strips, which you will conceal as you build. Stack the partially peeled logs in one or two layers, spacing them about 3” apart to allow air to circulate between them, cover them with pine boughs and turn them every month or so to prevent uneven bleaching and drying. When the logs have cured for at least six months, peel them and soak or paint them with a commercial preservative to repel insects and prevent decay.
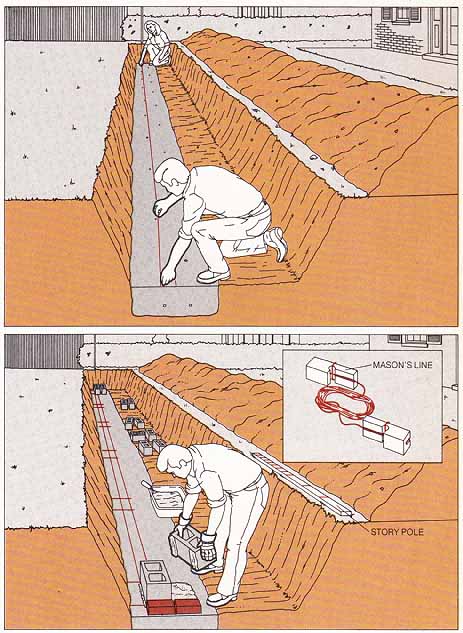
The considerable weight of log walls requires a continuous foundation of stone or masonry block. You can build a log cabin on the foundation described, modifying it to accommodate the offset levels of the logs by building up the end walls with an additional course of half blocks. Long anchor bolts, projecting 7½” above the foundation wall, are needed in the side walls, but bolts are not used in the end walls; the end logs are notched over bolted sill logs in the side walls. The sill logs are the keystone of the structure and must be squared off to fit snugly against the foundation and to accommodate joist hangers. Though you can square off your own sill logs with a chain saw, many builders use pressure-treated 8-by-8 timbers.
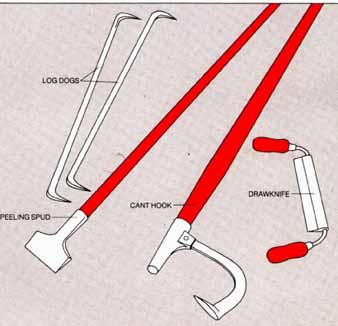
Time-honored Tools
The chain saw has replaced many of the unique tools once used in log construction but a few old devices, available from specialized tool or antique dealers, remain essential:
- THE CAN’T HOOK, a pole with a spiked hook at one end, makes it easy to move heavy logs short distances.
- THE PEELING SPUD, or SLICK, with its shovel-like blade, strips bark off logs.
- LOG DOGS are 3-foot iron bars with turned points at each end. The points are driven into a log and a nearby sup port to secure a log while you work on it. Get at least four of them for the job of building a log cabin.
- THE DRAWKNIFE is a long double-handled blade pulled toward the user to shave and smooth log surfaces.
If you can't find log dogs, you can substitute 2-by-4s with a spike at each end; you can shorten and sharpen the blade of a shovel for a peeling spud.
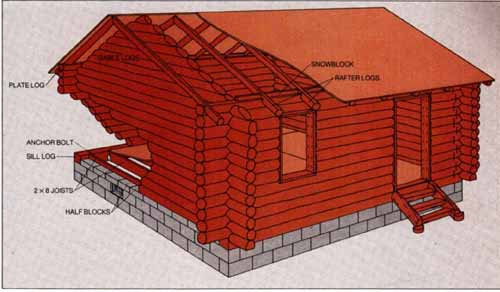
Anatomy of a log cabin. The masonry foundation for
this cabin is identical to the one described, except that the gable walls
have an extra half course extending to within 8” of the corners. Joists,
supported by joist hangers, run between 8-by-8 sills bolted to the side
foundation walls. The bottom end logs are flattened to rest on the end
foundation walls and notched at each end to fit over the sills.
Notched logs, laid alternately butt to tip, serve to build up the walls. Spikes, driven 2’ from every corner and on both sides of door and window openings, secure each log to the one be low it. (In this drawing only the spikes at the right corner are shown.)
At the tops of the front and back walls, plate logs with squared top and outside faces simplify the notching of rafter logs, which are spiked together at the roof ridge. Snow-blocks cut from 2-by-4s fit between rafters to plug the air spaces above the plate logs and below the roof. Gable logs are spiked directly to one another.
For a log cabin with a shed roof, simply stack the end-wall logs with all the butts at the front or back of the cabin to build up a higher wall.
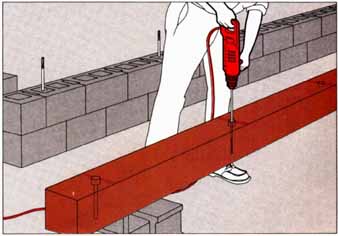
1 Drilling the sill logs. After building a foundation and setting in anchor bolts, transfer bolt locations from the foundation to the sill log. Using a ½” drill fitted with a 1½” bit, drill a 2” hole at each bolt location; then, using a ¾” electrician’s bit, extend each hole through the sill log.
Set the sills over the bolts and , starting 8” from the end of each sill, mark joist positions on 16” centers. Install joist hangers at the marks, nail joists to the hangers and lay a subfloor.
Fitting the First Courses
2 Flattening the first two end logs. Rest the first two end logs on a pair of timbers, butt their bottom faces—one of the sides peeled before drying to localize cracking—and secure them with log dogs. Then, starting at one end, run a chain saw between the logs, reposition them to close the gap you have created and repeat the process until you have made a flat surface—3 to 4” wide—on each log.
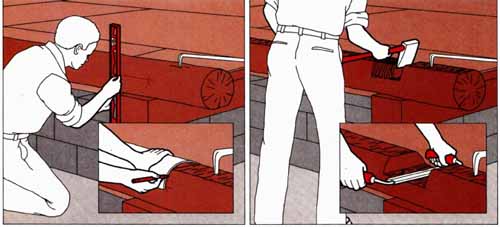
3 Marking notches on the first end logs. Position both gable-end logs over the sill logs, with equal lengths overhanging each corner, and check diagonals to square them. Secure them with log dogs and , holding a carpenter’s level against the outside face of an end log, mark the position of the sill log at two points 4” above the top of the sill. Connect the marks with a straightedge. Similarly mark the inside face of the end log. Repeat the process to mark the other corner and the other end log.
Remove the log dogs, roll each end log toward the interior of the cabin and secure it flat side up. Connect the marks at each log end, using an open section of stovepipe as a template.
4 Cutting the notches. With the logs still se cured, make vertical cuts to the marked depth with a chain saw and chop out waste wood with an ax. Finish the corners of the notch with a chisel and mallet, and smooth the bottom with a drawknife.
After you have finished the notches, remove the log dogs and roll the logs into position over the sill logs. Mark any bumps that prevent the logs from sitting properly, secure the logs notch side up and trim them with a drawknife.
Spread oakum or caulking compound where the end logs will rest on the
foundation and sill logs; roll the end logs into place.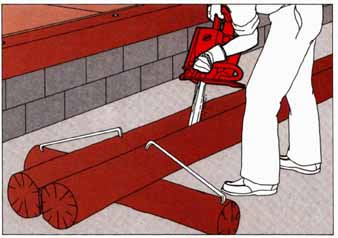
How to Raise a Log Wall
Raising a log wall is largely a process of approximation and compensation, unlike the precise measuring and planning procedure involved in building with milled lumber. The logs go up building-block fashion, one at a time, and they are trued in the same piecemeal way. As each log is placed, it's checked with a level and plumb bob; if the wall begins to stray from level or plumb, the next logs are worried into positions that compensate for the drift.
Choosing like-sized logs for corresponding positions in opposite walls is the first way to keep the walls level. Use matched pairs of thick logs at the bottoms of opposite walls; pair off thinner logs near the tops. A second trick for keeping courses level is alternating the thick ends, or butts, of the logs in each wall to compensate for their taper.
Even the most careful log selection will not always produce a level, plumb wall; in some cases you must make adjustments by changing the size of the corner notch—the crucial cut in the bottom of each log that locks walls together at the corners. A notch that's shallower than others will make a log ride higher to lift the end of a wall that's beginning to dip; a deeper notch will lower the end. Be careful when making these adjustments: a log notched too deeply rests along its length on the log below, and a structurally unsound gap, called a mousehole, appears at the top of the notch. R you see that you have opened a mousehole, trim wood from the bottom of the notched log until the entire weight of the log hangs from the notches.
The depth of the corner notches also controls the size of the gaps between logs, and the depth of these notches is controlled in turn by the dividers used to mark them. Setting the dividers as shown at right will leave the smallest practical gap; if you want wider gaps, set the divider points in the same way, then slightly decrease the distance between them before marking the notch. Walls built with wide gaps require fewer logs and take less time to build, but they are poor insulators and the job of filling in the gaps, called chinking, is especially difficult. You must, in any case, ob serve certain limits in setting gaps and notches: never make a gap wider than 2” or a notch deeper than half the diameter of a log.
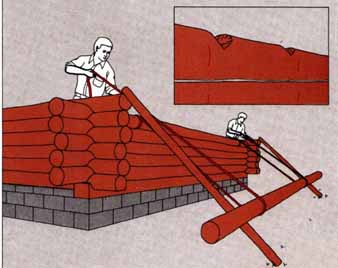
As a wall rises, a lifting aid is needed to wrestle the logs into place. The simplest consists of two leaning poles that form a ramp for rolling the logs up to the top of the wall. To avoid the hazards of cutting notches while standing on high scaffolding, some builders raise the wall to a low height, then move the highest logs to masonry blocks resting on the ground and build the top courses there. When these courses have been properly fitted, the builder numbers the logs, reassembles them in their correct positions on the top of the wall, and spikes them in place.
Doors and windows for a log wall can be made from scratch or bought pre hung. Their finish frames of jambs and sills or thresholds are placed in the standard way but a rough frame especially suited to log structures must be built for them. These rough frames, made with an air space at the top and nailed in place through predrilled slots, allow the walls to settle gradually without racking the doors and windows.
Notching and Fitting Logs
1 Scribing the notch. Use log dogs to secure the first wall log across the end logs and directly over the sill, then lock the points of a pair of wing dividers to the distance between the wall log and the sill. Rest one point on the bottom of the wall log and the other against the side of the end log; then, keeping the points in a vertical line and in contact with both logs, move the dividers up and over the end log to scratch the end log’s contours into the under side of the wall log. Repeat the operation on the opposite side of the wall log to complete the markings for the notch, then scribe the other end of the wall log in the same way.
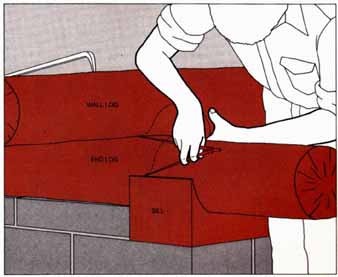
2 Cutting a notch. Secure the scribed log up side down, make several vertical Cuts down each notch almost to the scribed lines with a chain saw and cut out most of the waste wood with an ax or with a chisel and mallet. To trim the wood precisely to the scribed lines, use the chisel called a gouge; use a 2- inch gouge with an outside bevel. Cut the center of the notch about 1” deeper than the edges. Roll the log into place and mark any high spots that keep the notches from settling snugly onto the logs below. Roll the log upside down again and trim the high spots with a drawknife or a gouge.
As each pair of logs is fitted into place, measure to their tops from the subfloor at the corners of the cabin. If the measurements vary by more than an inch, level the next course by using logs with especially thick or thin ends, or by adjusting the depth of the notches. To be sure the walls are square, make regular checks of the diagonal measurements between corners—they should be identical.
3 Spiking the logs. Drive spikes to secure each course to the course below it. To prepare a course for spiking, drill ¾” holes halfway through the logs about 2’ from each corner and about 1 foot from each side of a planned door or window opening. Extend the holes to the bottom of the course with a 7/16” bit, then into each hole drive a spike ½” thick and long enough to reach the middle of the log below. Using a long machine bolt as a punch, drive the spikes well into the log beneath. Mark the spike locations and stagger the spikes in each new course.
4 Rolling logs up a wall. When the wall gets too high for logs to be lifted into place easily, lean two sturdy poles against the wall at about a 45° angle and spike their ends to the projecting ends of the top logs of the adjacent walls. Tie ropes to the top log of the wall you are raising, loop the ropes down under the log to be hoisted and back to the top of the wall and , with a helper, pull the free ends of the ropes to roll the log up the poles.
When you have placed the highest log that will have lo be cut out for a door or window opening, cut two V-shaped notches into its top just inside the edges of the planned opening ; make the notches deep enough to serve as starter holes for a chain saw.
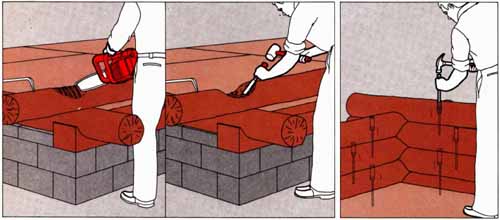
5 Squaring the plate logs. To make square plate logs for the tops of the side walls, choose two logs with little or no taper and flatten their top faces; then secure the logs alongside each other with the flat faces up ward and flatten the facing sides in the same way. Continue removing wood until the side and top faces form a true right angle. Finally, trim and smooth this corner with a drawknife.
Cutting and Framing for Doors and Windows
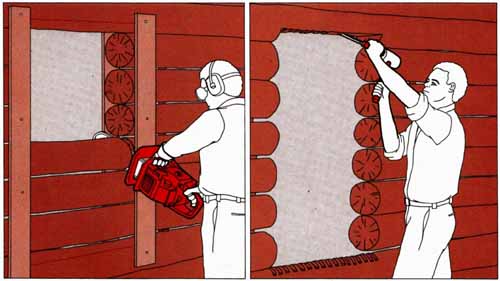
1 Nailing up guide strips. Nail vertical guide strips to the interior walls as far apart as the width of the door or window unit (including jambs) plus 4”; run the strips from the floor or be low the window sill to points above the planned opening, and use a level to make sure that the boards are vertical. Fasten matching strips to the outsides of the walls, aligning them to the inner strips with a straightedge pushed through the gaps between logs. Inside the cabin, measure up from the subfloor a distance 5” greater than the height of the door unit and mark the top of the opening with a level. You can put a window at any convenient height as long as the bottom of the opening is not between logs. Mark the top and bottom of a window opening with horizontal lines as far apart as the height of the window unit plus 6”.
Drive shims between the logs on both sides of the planned opening to keep the sawed ends of the logs from sagging as you cut the opening.
2 Cutting out the openings. Starting at the tri angular starter notches, use a chain saw to cut along both guide strips to the top and bottom lines for each opening. Run the chain-saw blade flush with the interior and exterior strips to ensure a square cut; remove log sections one by one as you cut through them.
3 Squaring the top and bottom. Saw several vertical cuts to the marked top and bottom lines for the opening, then chisel away the waste wood and smooth the bottom surface with a drawknife. Make this surface flat for a window or a prehung door; slant it slightly down and out ward for a homemade door.
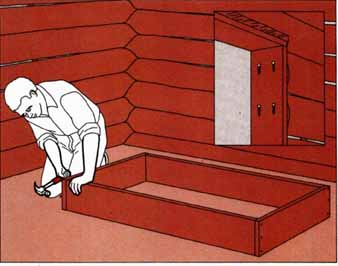
4 Framing the openings. Nail together rough frames of 2-by-8s, making them as wide as the opening and high enough to leave about 3” of air space above a doorframe and about 2” above a window frame. Rest the frames in the openings, inner edges flush with the inner wall, plumb the frames, and nail them temporarily in place.
Drill several linked holes through the side jambs with a 7 bit to form vertical slots about 2” long, making two slots for each log end next to the jambs. Drive an 8” spike through the top of each slot to secure the frames, and remove the temporary nails.
Fitting Logs for Gable and Roof
The techniques of building with logs change drastically at the gable and the roof. Walls can be built level, plumb and square in a piecemeal way, course by course; gables and roofs must be laid out as a whole to exact pitches. And because the work above the eaves is done high above the ground, where sharp, heavy tools are hard to manage, tinkering for a proper fit becomes impractical or down right dangerous. To avoid as much roof top work as possible, all the rafters and gables are planned in advance, cut on the ground and assembled in place.
The first step in topping out a cabin is deciding the pitch of the roof. While roofs with little slope are lighter and faster to build, roofs in areas subject to heavy snowfall may need a steep pitch and roofs sheathed with wood en shingles or shakes must be steep enough for good drainage.
Having decided upon the pitch of your roof, you must cut rafters to match it. A jig fashioned from 1-by-8 boards will serve as a saw guide for two essential rafter cuts: the ridge cut, which joins the tops of rafters at the peak of a roof; and the bird’s-mouth notch, which fits the underside of a rafter to the plate log at the top of a wall.
Choose the rafter logs carefully—from 5 to 6” thick and as smooth and straight as possible—and flatten their top faces with a chain saw (Step 2). If a log is at all curved, install it with the convex arc of the curve facing upward; the log will straighten under the load of the roofing material above it.
1 Plotting the roof line. Tack an upright to the center of the gable wall, setting the top of the up right at least as high as the planned roof peak, and string lines from the upright to the plate logs to outline the angle of the roof. Using the line as a rough guide, scribe and notch the first log for the gable, and spike it in place.
2 Building the gables. Drill spike holes through the gable logs every 2’ and lift the logs into place one at a time, checking each log with a plumb bob and spiking it to the log below. Use short logs on the upper part of a wall, but be sure that the ends of every log extend beyond the guide strings. When the logs reach the level of the roof peak, remove the upright and strings.
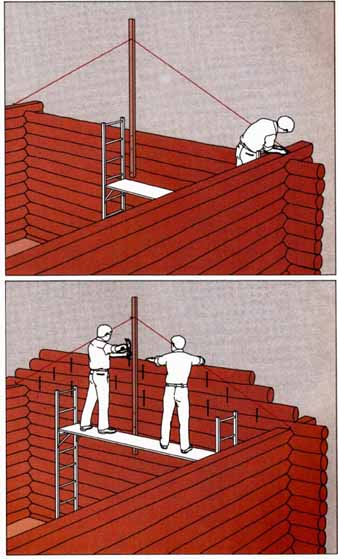
3 Planning the rafters. Tack a 1-by-8 to the in side of the gable wall, with the lower edge of the board resting on the plate log and running up to the center of the wall at the planned angle of the roof. Snap a chalk line along the board 3” above its lower edge.
4 Making a pattern for rafters. Hold a level vertically against the outside face of the plate log and the 1-by-8, and draw a line along the level from the outer edge of the plate up to the chalk line on the 1-by-8. From the top of this vertical line draw a horizontal line all the way to the lower edge of the 1-by-8, completing the marks for a bird’s-mouth notch.
Mark a ridge cut at the upper end of the 1-by-8 by snapping a vertical chalk line up the exact center of the gable wall, then extending the line across the 1-by-8. Take the 1-by-8 down, cut it along the marked lines and use it as a template to mark and cut a second 1-by-8.
5 Assembling the jig. Nail the 1-by-8s, birds- mouth notches up, to opposite edges of a long 2-by-6, aligning the ridge cuts and bird’s-mouth notches of the 1-by-8s directly opposite each other. Secure the 2-by-6 to two scrap logs.
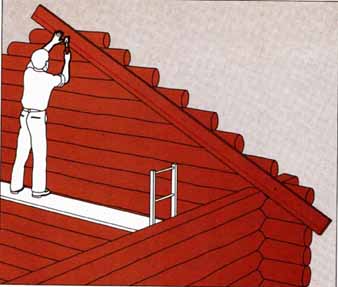
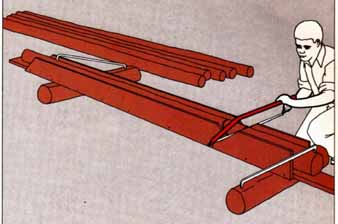
6 Cutting the rafters. After flattening the top face of a rafter pole with a chain saw, following the procedure Step 2, secure the pole, flattened face down, in the jig with log dogs. Cut the bird’s-mouth notch and bevel the ridge end of the pole with a bucksaw—a chain saw is not used because it might damage the jig— using the end and notch of the jig as saw guides. Saw off the lower end of the rafter or, if you prefer, trim it with an ax for a more rustic look, leaving at least 18” beyond the bird’s- mouth for an overhang.
After cutting two rafters, raise them to opposite walls and rest them on the plate logs and a sturdy board laid across the top of the walls.
7 Assembling a rafter pair. Butt the ridge bevels of the rafters and nail a temporary horizontal brace across the rafter pair to hold the assembly tight for nailing, then drive four 8” spikes through the ridge at several angles.
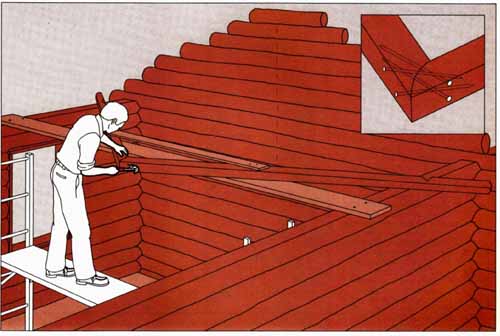
8 Trimming the gable logs. Hold the ratter pair against a gable wall, aligning the rafter peak with the center line you have chalked on the wall and fitting the bird’s-mouth notches over the plate logs. (You may need to chisel some wood from a bird’s-mouth or a plate log to bring the peak into line.) While a helper steadies the rafters, run a grease pencil along the top of each rafter to mark the gable wall for trimming. Remove the rafters, nail 2-by-4 guide strips just below the marked lines and run a saw along the guides to trim the ends of the logs.
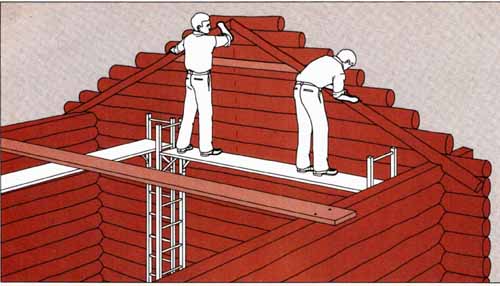
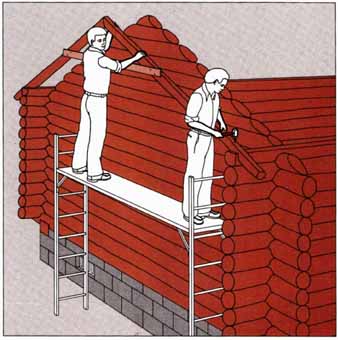
9 Installing the rafters. Set the rafter pair on the ends of the plate logs, outside the gable wall, and drive spikes through the rafter and into the plate log at each bird’s-mouth notch. Hang a plumb bob from the underside of the peak, push the rafters into plumb and nail a temporary brace between each rafter and the top of the gable wall. Assemble a second pair of rafters, use it to trim the opposite gable logs, then spike and brace it to the opposite ends of the plate logs.
String a line between the end peaks to serve as a guide for the peaks of the remaining rafters. Assemble these rafters, then spike, plumb and brace them roughly 24” apart for a roof of shakes nailed to spaced boards; for a roof sheathed with plywood, place the rafters on precise 16- or 24” centers. When you have in stalled all the rafters, lay a long, straight edged board across them to detect high spots; trim these spots with a drawknife.
Making the Cabin Snug
After the roof for the cabin is finished, you must fill, or chink, all the gaps between the logs of the walls. Wherever logs fit tightly, caulking with lengths of tarred hemp, called oakum, is sufficient. Larger gaps must be closed with wood scraps covered by metal lath and mortar.
You must also install doors and windows. It is a simple job to install factory- made units, but most commercial doors look out of place against log walls. Many craftsmen prefer to build their own doors, facing them with log slabs— round-faced, flat-backed slices cut from the outsides of logs.
Sealing the Walls
Chinking with wood and mortar. Pack wood scraps into wide gaps between logs and nail metal lath over the scraps on both the inside and outside of the cabin, bowing the lath slightly in ward. Cover the lath with a layer of mortar, sloping the mortar slightly outward on the outside of the walls to shed water.
Making a Log Door
1. Making the base. Cut lengths of ¾” tongue-and-groove stock ¼” shorter than the width of the door frame and fit them together until they reach a length at least 1½” greater than the height of the door- frame. Screw a 1-by-6 Z-brace to the back of the door, centering the horizontal legs of the brace over the seams between the last tongue- and -groove boards at top and bottom. Turn the door over and trim it 1/4” shorter than the frame, removing the unused tongue and groove from the top and bottom boards, then staple building paper to the face of the door.
2. Finishing the door. Cut log slabs ¾” shorter than the height of the door, and trial-fit them vertically on the face of the door (far left), so they project slightly over the sides. Use a drawknife to trim the edges of the slabs (near left) until the entire slab assembly lies ¾” or less within the sides of the door. Nail the slabs to the face—use cut nails for a rustic appearance—with the slab ends flush with the bottom of the door. Hang the door in the rough frame (no finish frame is needed) with strap hinges, using 1-by-2s for doorstops.
